OpenGL 实验二 纹理映射
OpenGL 实验二 纹理映射
一、创建工程
(同实验一)
1.1 用VS2015创建exp_2
1.2 建立OpenGL开发环境:复制头文件,静态库文件,动态库文件
1.3 配置VS,指定OpenGL头文件路径,连接OpenGL库文件
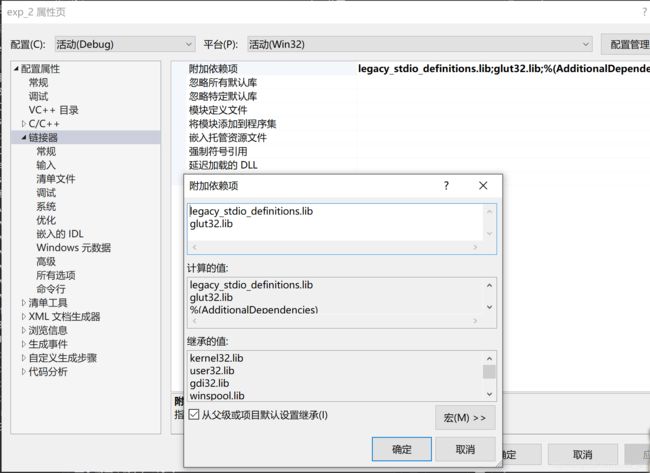
1.4 为避免在连接glaux.lib时出现无法解析的外部符号_sscanf,配置属性->链接器->输入->附加依赖项中添加依赖项legacy_stdio_definitions.lib
二、创建资源文件
在exp_2目录下创建文件夹/Data,复制图片Create.bmp

(我截图后用画图软件保存为bmp文件)
三、源文件
// exp_2.cpp : 定义控制台应用程序的入口点。
//

#include "stdafx.h"
#include
#include       //Header File For The OpenGL32 Library
#include      //Header File For The GLu32 Library
#include    //Header File For the Glaux Library
#define GLUT_DISABLE_ATEXIT_HACK
#include "GL\GLUT.H"

#pragma warning (disable:4996);
GLfloat rtri;
GLfloat rquad;

GLfloat LightAmbient[] = { 0.5f,0.5f,0.5f,1.0f };  //外界环绕
GLfloat LightDiffuse[] = { 1.0f,1.0f,1.0f,1.0f };
GLfloat LightPosition[] = { 0.0f,0.0f,2.0f,1.0f };

GLuint filter;      //Which Filter to Use
GLuint texture[3];  //Storage For 3 Textures

int InitGL(int width, int height);
void DrawGLScene(void);
void myReshape(int w, int h);
void myKeyboard(int key, int x, int y);
void myMovedMouse(int x, int y);
AUX_RGBImageRec *LoadBMP(char *Filename);
int LoadGLTextures();

int main(int argc,char **argv)
{
	glutInit(&argc, argv); //Initialize GLUT function callings

	glutInitWindowSize(800, 600);//Set window size(width,height) in number of pixels

	//Set window position, from the left and top of the screen, in numbers of pixels
	glutInitWindowPosition(200, 100);

	//Specify a window creation event
	glutCreateWindow("3D Graph");

	//Specify the drawing function that is called when the window is created or redrew
	glutDisplayFunc(DrawGLScene);
	glutReshapeFunc(myReshape);
	glutSpecialFunc(myKeyboard);
	glutMotionFunc(myMovedMouse);

	InitGL(800, 600);   //Invoke this function for initialization

	glutMainLoop();     //Enter the event processing loop

	return 0;           //Indicate normal termination
}

int InitGL(int width, int height) {
	myReshape(width, height);

	if (!LoadGLTextures())      //Jump To Texture Loading Routine
	{
		return FALSE;
		//If Textrure Didn't Load Return False
	}

	glEnable(GL_TEXTURE_2D);   //Enable Texture Mapping
	glShadeModel(GL_SMOOTH);   //Enable Smooth Shading
	glClearColor(0.0f, 0.0f, 0.0f, 0.5f);  //Black Background
	glClearDepth(1.0f);
	//Depth Buffer Setup
	glEnable(GL_DEPTH_TEST);    //Enables Depth Testing
	glDepthFunc(GL_LEQUAL);
	//The Type of Depth Testing To Do

	glHint(GL_PERSPECTIVE_CORRECTION_HINT, GL_NICEST);  //Really Nice Perspective Calculations

	glLightfv(GL_LIGHT1, GL_AMBIENT, LightAmbient);     //Setup The Ambient Light
	glLightfv(GL_LIGHT1, GL_DIFFUSE, LightDiffuse);     //Setup The Diffuse Light
	glLightfv(GL_LIGHT1, GL_POSITION, LightPosition);   //Position The Light
	glEnable(GL_LIGHT1);
	return TRUE;
}
void myReshape(int width, int height) {
	if (height == 0)
	//Prevent A Divide By Zero By
	{
		height = 1;
		//Making Height Equal One
	}
	glViewport(0, 0, width, height); //Reset The Current Viewport

	glMatrixMode(GL_PROJECTION);
	glLoadIdentity();
	//Reset the Projection Matrix

}
void DrawGLScene(GLvoid)
	//Here's Where We Do All The Drawing
{
	glClear(GL_COLOR_BUFFER_BIT | GL_DEPTH_BUFFER_BIT);  //Clear the Screen and The Depth Buffer
	glLoadIdentity();
	//Reset The View
	glTranslatef(0.0f, 0.0f, -5.0f);

	glRotatef(rquad, 1.0f, 1.0f, 1.0f); //Rotate The Quad On the X axis (NEW)

	glBindTexture(GL_TEXTURE_2D, texture[filter]);

	glBegin(GL_QUADS);
	//Front Face
	glNormal3f(0.0f, 0.0f, 1.0f);
	glTexCoord2f(0.0f, 0.0f); glVertex3f(-1.0f, -1.0f, 1.0f);
	glTexCoord2f(1.0f, 0.0f); glVertex3f(1.0f, -1.0f, 1.0f);
	glTexCoord2f(1.0f, 1.0f); glVertex3f(1.0f, 1.0f, 1.0f);
	glTexCoord2f(0.0f, 1.0f); glVertex3f(-1.0f, 1.0f, 1.0f);
	//Back Face
	glNormal3f(0.0f, 0.0f, -1.0f);
	glTexCoord2f(1.0f, 0.0f); glVertex3f(-1.0f, -1.0f, -1.0f);
	glTexCoord2f(1.0f, 1.0f); glVertex3f(-1.0f, 1.0f, -1.0f);
	glTexCoord2f(0.0f, 1.0f); glVertex3f(1.0f, 1.0f, -1.0f);
	glTexCoord2f(0.0f, 0.0f); glVertex3f(1.0f, -1.0f, -1.0f);
	//Top Face
	glNormal3f(0.0f, 1.0f, 0.0f);
	glTexCoord2f(0.0f, 1.0f); glVertex3f(-1.0f, 1.0f, -1.0f);
	glTexCoord2f(0.0f, 0.0f); glVertex3f(-1.0f, 1.0f, 1.0f);
	glTexCoord2f(1.0f, 0.0f); glVertex3f(1.0f, 1.0f, 1.0f);
	glTexCoord2f(1.0f, 1.0f); glVertex3f(1.0f, 1.0f, -1.0f);
	//Bottom Face
	glNormal3f(0.0f, -1.0f, 0.0f);
	glTexCoord2f(1.0f, 1.0f); glVertex3f(-1.0f, -1.0f, -1.0f);
	glTexCoord2f(0.0f, 1.0f); glVertex3f(1.0f, -1.0f, -1.0f);
	glTexCoord2f(0.0f, 1.0f); glVertex3f(1.0f, -1.0f, 1.0f);
	glTexCoord2f(1.0f, 0.0f); glVertex3f(-1.0f, -1.0f, 1.0f);
	//Right face
	glNormal3f(1.0f, 0.0f, 0.0f);
	glTexCoord2f(1.0f, 0.0f); glVertex3f(1.0f, -1.0f, -1.0f);
	glTexCoord2f(1.0f, 0.0f); glVertex3f(1.0f, 1.0f, -1.0f);
	glTexCoord2f(1.0f, 1.0f); glVertex3f(-1.0f, 1.0f, 1.0f);
	glTexCoord2f(0.0f, 1.0f); glVertex3f(-1.0f, 1.0f, -1.0f);
	glEnd();

	glFlush();   //Force to display the new drawings immediately
}
void myKeyboard(int key, int x, int y) {
	switch (key) {
	case GLUT_KEY_LEFT:
	case GLUT_KEY_UP:
		rtri -= 0.5f;   //Increase the Rotation Variable For the Triangle(NEW)
		rquad += 0.85f;
		DrawGLScene();
		break;
	case GLUT_KEY_RIGHT:
	case GLUT_KEY_DOWN:
		rtri += 0.5f;
		rquad -= 0.85f;
		DrawGLScene();
		break;
	}
}
void myMovedMouse(int x, int y) {

}

AUX_RGBImageRec *LoadBMP(char *Filename)   //Loads A Bitmap Image
{
	FILE *file = NULL;
	//File Handle

	if (!Filename)
	//Make sure a filename was given
	{
		return NULL;
	//If not return NULL
	}

	file = fopen(Filename, "r");   //Check To See If the File Exists

	if (file)
		//Does the file Exists?
	{
		fclose(file);
		//Close Handle
		return auxDIBImageLoadA(Filename);  //Load The Bitmap and RETURN A Pointer
	}
	return NULL;
	//if Load Failed Return NULL
}
int LoadGLTextures()        //Load Bitmaps and convert textures
{
	int Status = FALSE;
	//Status Indicator
	AUX_RGBImageRec *TextureImage[1];  //Create Storage Space for the Texture
	memset(TextureImage, 0, sizeof(void*) * 1); //Set the pointer to NULL

	//Load The Bitmap,Check For Errors,If Bitmap's not Found Quit
	if (TextureImage[0] = LoadBMP("Data/Create.bmp"))
		Status = TRUE;   //Set The Status To TRUE
	glGenTextures(3, &texture[0]);  //Create Three Textures

	//Create Nearest Filtered Texture
	glBindTexture(GL_TEXTURE_2D, texture[0]);
	glTexParameteri(GL_TEXTURE_2D, GL_TEXTURE_MAG_FILTER, GL_NEAREST);
	glTexParameteri(GL_TEXTURE_2D, GL_TEXTURE_MIN_FILTER, GL_NEAREST);
	glTexImage2D(GL_TEXTURE_2D, 0, 3, TextureImage[0]->sizeX,
		TextureImage[0]->sizeY, 0, GL_RGB, GL_UNSIGNED_BYTE, TextureImage[0]->data);

	//Create Linear Filtered Texture
	glBindTexture(GL_TEXTURE_2D, texture[1]);
	glTexParameteri(GL_TEXTURE_2D, GL_TEXTURE_MAG_FILTER, GL_LINEAR);
	glTexParameteri(GL_TEXTURE_2D, GL_TEXTURE_MAG_FILTER, GL_LINEAR);
	glTexImage2D(GL_TEXTURE_2D, 0, 3, TextureImage[0]->sizeX, TextureImage[0]->sizeY, 0, GL_RGB, GL_UNSIGNED_BYTE, TextureImage[0]->data);

	//Create MipMapped Texture
	glBindTexture(GL_TEXTURE_2D, texture[2]);
	glTexParameteri(GL_TEXTURE_2D, GL_TEXTURE_MAG_FILTER, GL_LINEAR);
	glTexParameteri(GL_TEXTURE_2D, GL_TEXTURE_MIN_FILTER, GL_LINEAR_MIPMAP_NEAREST);
	gluBuild2DMipmaps(GL_TEXTURE_2D, 3, TextureImage[0]->sizeX, TextureImage[0]->sizeY, GL_RGB, GL_UNSIGNED_BYTE, TextureImage[0]->data);

	if (TextureImage[0])   //If Texture Exists
	{
		if (TextureImage[0]->data)    //If texture Image Exists
		{
			free(TextureImage[0]->data);   //Free the Texture Image Memory
		}
		free(TextureImage[0]);  //Free the Image Structure
	}
	return Status;

}
四、运行结果
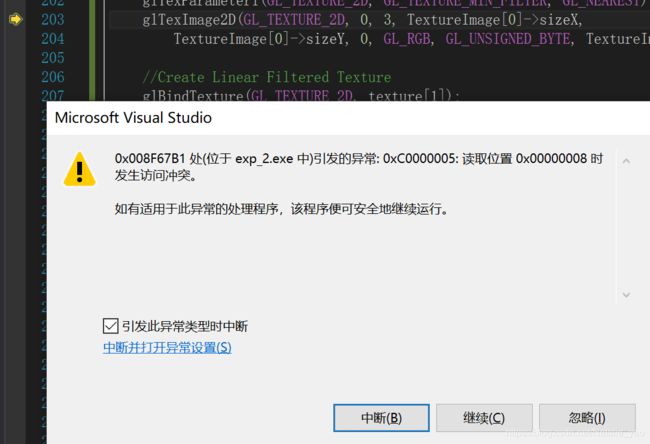
4.1 起初报错:

解决方法:把glut32.dll复制到C:\Windows\SysWOW64目录下
参考:https://blog.csdn.net/u012130706/article/details/73695406
后来报了第二个错误,是找不到openGL.dll,查找网上信息可知:
错误原因:附加依赖项同时引用了glut.lib和glut32.lib,更改内容如下:
4.2 程序运行检验
glTexImage2D该句有误,载入图像出错
解决: if (TextureImage[0] = LoadBMP(“C:/Users/Natalie/Documents/Visual Studio 2015/Projects/openGL_SUES/exp_2/Data/Create.bmp”))
*注意文件路径
#pragma warning (disable:4996) 这句表示解决掉fopen等函数安全性问题。
4.3 运行截图

要注意位图的边框、大小否则要出错
按方向键可以实现图像旋转功能
有一些小问题还没有解决,比如不知道为什么该立方体上有一部分色差。(好心人路过的话麻烦看看是怎么回事…我看矩阵没有问题鸭)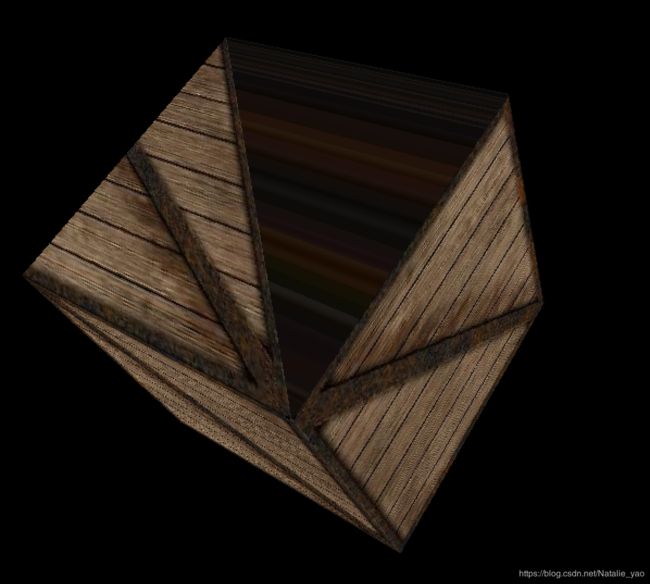
4.4 绘制圆柱体
glu中提供了一个绘制圆柱体的函数:
void gluCylinder( GLUquadric* quad,
GLdouble base,
GLdouble top,
GLdouble height,
GLint slices,
GLint stacks )
使用方法是:
GLUquadric *pObj;
pObj = gluNewQuadric();
注意之后使用到sin,cos 函数,需要导入cmath头文件。
4.5 所用函数解释
- LoadGLTextures() 载入图像并转换成
纹理贴图 - glLightfv() 创建指定的光源,light可以是GL_LIGHT0(第0号光源的位置)、GL_LIGHT1,pname定义的是光源的属性,它指定了一个命名参数。params表示表示pname属性将要被设置的值
GL_AMBIENT 设置光的环境强度
GL_DIFFUSE 漫射光强
GL_POSITON 光源位置(x,y,z,w)
如程序所述:
GLfloat LightAmbient[] = { 0.5f,0.5f,0.5f,1.0f }; //外界环绕
glLightfv(GL_LIGHT1, GL_AMBIENT, LightAmbient) - **glBindTexture()**将一个命名的纹理绑定到一个纹理目标上
- glPopMatrix() 就是“返回自己原来所在地”。 第二个函数表示弹出堆栈顶部的矩阵,令原第二个矩阵成为顶部矩阵,接受当前操作,故原顶部矩阵被破坏;当堆栈中仅存一个矩阵时,不能进行弹出操作,否则出错。由此看出,矩阵堆栈操作与压入矩阵的顺序刚好相反,编程时要特别注意矩阵操作的顺序。glPushMatrix和glPopMatrix之间的变换效果被消除。
- memset() Memset 用来对一段内存空间全部设置为某个字符,一般用在对定义的字符串进行初始化为‘ ’或‘/0’;
- *glGenTexture(GLsizei n, GLuint textures) n:用来生成纹理的数量, textures:存储纹理索引的,glGenTextures函数根据纹理参数返回n个纹理索引。纹理名称集合不必是一个连续的整数集合。(glGenTextures就是用来产生你要操作的纹理对象的索引的,比如你告诉OpenGL,我需要5个纹理对象,它会从没有用到的整数里返回5个给你)
- glTexParameteri() 其中的参数GL_LINEAR对应线性滤波,GL_NEAREST对应最近邻滤波方式。
- glTexImage2D() (GL_TEXTURE_2D, //此纹理是一个2D纹理
0, //代表图像的详细程度, 默认为0即可
3, //颜色成分R(红色分量)、G(绿色分量)、B(蓝色分量)三部分,若为4则是R(红色分量)、G(绿色分量)、B(蓝色分量)、Alpha
TextureImage[0]->sizeX, //纹理的宽度
TextureImage[0]->sizeY, //纹理的高度
0, //边框的值
GL_RGB, //告诉OpenGL图像数据由红、绿、蓝三色数据组成
GL_UNSIGNED_BYTE, //组成图像的数据是无符号字节类型
TextureImage[0]->data); //告诉OpenGL纹理数据的来源,此例中指向存放在TextureImage[0]记录中的数据 - gluBuild2DMipmaps() gluBuild2DMipmaps(GL_TEXTURE_2D,//此纹理是一个2D纹理
3, //颜色成分
TextureImage[0]->sizeX, //纹理的宽度
TextureImage[0]->sizeY, //纹理的高度
GL_RGB, //告诉OpenGL图像数据由红、绿、蓝三色数据组成
GL_UNSIGNED_BYTE, //组成图像的数据是无符号字节类型
TextureImage[0]->data); //告诉OpenGL纹理数据的来源,此例中指向存放在TextureImage[0]记录中的数据 - glTexCoord2f() 该函数主要与glVertex3f()配合使用,glTexCoord2f()是配置纹理坐标,glVertex3f()是配置图形坐标。
- glFlush() 清空缓冲区,将指令送往缓硬件立即执行,但是它是将命令传送完毕之后立即返回,不会等待指令执行完毕。这些指令会在有限时间内执行完毕
- gluCylinder() 画圆柱体