【python网络爬虫与NLP系列】一、利用scrapy+redis实现新闻网站增量爬取
写在前头:为了督促自己完成2018上半年的个人小任务,决定在平台上记录和分享完成的过程和心得。时间有限,但尽量详细具体吧。
简述一下整个系列的任务:(1)精选几个自己感兴趣的外文网站;(2)利用scrapy+redis框架实现几个网站的定时增量爬取;(3)定时基于自定义规则的新闻筛选;(4)文本预处理,并利用机器翻译模型对新闻进行翻译(5)定时对筛选后的新闻进行拼装整合(自然语言),加上固定格式和一些人性化的信息如当日当地天气、重大政策、重大预警等,并推动到微信或其他接口。
本文主要是完成整个任务中很基础且重要的一部分,即基于scrapy+redis框架的新闻数据爬取。本文以BusinessInsider网站为例,实现了基本的几个功能:获取新闻、解析内容、定时增量爬取
1. scrapy和redis安装
不管是Python2 还是python3,只要有pip,就能很轻松的安装Scrapy框架,直接在shell运行命令就自动化安装:
pip intsall Scrapyredis安装稍微复杂些,可以参考redis安装 - 菜鸟教程 我是在mac下homebrew安装的,同样,首先在shell安装homebrew:
ruby -e "$(curl -fsSL https://raw.githubusercontent.com/Homebrew/install/master/install)"
安装完成后利用brew获取redis
brew install redis安装后可以自测一下是否安装成功,能否使用如下命令启动redis-server
redis-server /usr/local/etc/redis.conf之后,另启一个shell,输入redis-cli,进入redis客户端则安装成功,可通过简单的set, get进行测试。

同时,可以通过config set requirepass 「password」命令配置redis数据库的密码。到此处,scrapy和redis环境就安装成功了。最后,别忘了安装redis的python接口:
pip install redis(如果没有数据自行下载安装mysql,mongodb等,本文例子中用文件形式替代数据库以便简化流程)
2. scrapy-redis项目
scrapy-redis项目是github上关注度较高的项目,它是非常优秀的解决多任务、分布式爬虫的框架,在多网站的增量爬取和部署方面非常优秀。需要注意的它的依赖:Python 2.7, 3.4 or 3.5 + Redis >= 2.8 + Scrapy >= 1.1 + redis-py >= 2.10。安装同样很简单。
pip install scrapy-redis【写在coding之前】
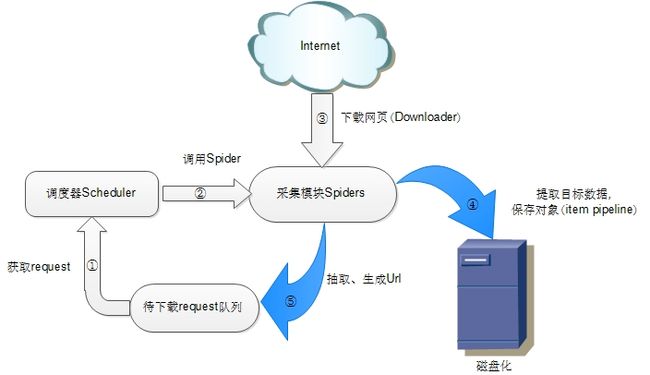
为了更好地发挥scrapy_redis架构的优势,我们有必要先来熟悉一下整个项目的架构,详细介绍请自行完整阅读Scrapy-Redis架构分析
– Scrapy原生架构:

– Scrapy-redis架构

该架构即在原本Scrapy基础上引入了redis组件,即增加了快速的键值存储访问模式。更好地支持了多爬虫、分布式、网页增量与去重。
3. 创建scrapy-redis项目爬取新闻
具体流程与详解参考丁香园防封禁Scrapy-Redis实战
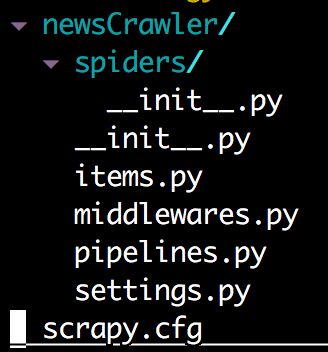
– 创建Spider
scrapy startproject newsCrawler– 更新你的items
items.py就是你实际要爬取对象的实体类。在这里你可以定义你需要爬取的字段格式。当然你也可以继承NewscrawlerItem类并定义更多的实体类,比如增加图片、视频信息的item.这里我们以自动生成的NewcrawlerItem为例。
# -*- coding: utf-8 -*-
import scrapy

class NewscrawlerItem(scrapy.Item):
    # define the fields for your item here like:
    news_id = scrapy.Field()
    news_url = scrapy.Field()
    news_source = scrapy.Field()
    news_author = scrapy.Field()
    news_title = scrapy.Field()
    news_create_time = scrapy.Field()
    news_content = scrapy.Field()
    news_image_lst = scrapy.Field()
    pass
– 如果你需要爬取若干不同实体/网站,创建你需要的spider,命令如下:
scrapy genspider [options] <name> <domain>
# 以BusinessInsider为例
scrapy genspider -t basic BusinessInsider businessinsider.com
– 为了形成新闻爬取的框架,我有生成了一个NewsBasicSpider
scrapy genspider -t basic NewsBasic basic.com然后在NewsBasic类中创建一些必要的新函数,如:
# -*- coding: utf-8 -*-
import scrapy
import logging
from newsCrawler.items import NewscrawlerItem
from newsCrawler.templates.BasicTmpl import BasicTmpl

class NewsBasicSpider(scrapy.Spider):

    tmpl = BasicTmpl
    def parse(self, response):
        links = response.xpath(BasicTmpl['link'])
        for link in links:
            link = self.parse_link(link, tmpl)
            yield scrapy.Request(url=link, callback=self.parse_item)

    def parse_item(self, response):
        news = NewscrawlerItem()
        try:
            news.news_url = response.url
            print news.news_url
            news.news_id = hash(news.news_url)
            news.news_source = self.name
            news.news_author = response.xpath(self.tmpl["author"]) or ""
            news.news_title = response.xpath(self.tmpl["title"]) or ""
            news.news_content = self.parse_content(response.xpath(self.tmpl["content"]) or "")
            news.news_image = self.parse_image(response.xpath(self.tmpl["image"]) or "")
            news.news_create_time = self.parse_time(response.xpath(self.tmpl["create_time"]) or "", tmpl)
            self.convert(news, self.tmpl)
            yield news
        except Exception as ex:
            logging.error("Parse Error: %s" % response.url)
            yield news

    def parse_image(self, image):
        return image

    def parse_link(self, link):
        return link

    def parse_time(self, create_time):
        return create_time

    def parse_content(self, content):
        return ""

    def convert(self, news):
        return news
需要注意的是,其中涉及到一个import进来的xpath模版BasicTmpl,是我根据新闻Item创建的一个dict。可以根据具体爬取的网站重新配置模版。模版在与spider平行的templates文件夹下创建。
BasicTmpl = {
    "link": "//a/@href",
    "author": '//meta[@property="author"]/@content/text()',
    "title": '//meta[@name="title"]/@content/text()',
    "create_time": '//meta[@name="date"]/@content/text()',
    "image": '//meta[@property="og:image"]/@content/text()',
    "content": '//article',
}
– 根据实际情况修改BusinessinsiderSpider.py
下面我们就来根据BusinessInsider网站的实际情况,继承NewsBasic类并实现必要的函数吧。例如我们在从网站通过xpath提取到content所在的container后,需要对container中的文字进行拆分和重组,并将文字中的配图以一定的格式替换掉。这个步骤可以通过overwrite NewsBasic中的parse_content()和parse_image()来实现~
我们此处创建一个最简的版本。
首先我们需要查看BusinessInsider网站创建相应的xpath模版。模版相当于只是对BasicTmpl个别字段进行了一定的更新。比如首页link的xpath。
from BasicTmpl import BasicTmpl
import copy
BusinessinsiderTmpl = copy.deepcopy(BasicTmpl)

update_xpath = {
    "link": '//a[@class="title"]/@href/text()',
}
BusinessinsiderTmpl.update(update_xpath)
接下来就可以来继承NewsBasicSpider创建BusinessinsiderSpider了~由于basic类中已经实现了一部分解析每个item的工作,我们这里只需要
# -*- coding: utf-8 -*-
import scrapy
from newsCrawler.items import NewscrawlerItem
from newsCrawler.templates.BusinessInsiderTmpl import BusinessinsiderTmpl
from newsCrawler.spiders.NewsBasic import NewsBasicSpider


class BusinessinsiderSpider(NewsBasicSpider):
    name = 'BusinessInsider'
    allowed_domains = ['businessinsider.com']
    start_urls = ['http://www.businessinsider.com/']
    tmpl = BusinessinsiderTmpl

    def parse(self, response):
        print self.tmpl['link']
        links = response.xpath(self.tmpl['link'])
        for link in links:
            yield scrapy.Request(url=link, callback=self.parse_item)
至此,基本的代码工作可以先停一停,下周会来更新如何利用lxml和xpath完美爬取新闻正文并保存标记必要的图片。也就是检验新闻爬虫优劣的正文解析部分。
不过要想运行以上的代码,还需要在setting里进行些配置,来使爬虫的redis。需要的参数settings.py文件里有提示,我们先来介绍几个常用的参数配置。
DOWNLOAD_DELAY = 3
# The download delay setting will honor only one of:
CONCURRENT_REQUESTS_PER_DOMAIN = 4
CONCURRENT_REQUESTS_PER_IP = 10

# Enables scheduling storing requests queue in redis.
SCHEDULER = "scrapy_redis.scheduler.Scheduler"

# Ensure all spiders share same duplicates filter through redis.
DUPEFILTER_CLASS = "scrapy_redis.dupefilter.RFPDupeFilter"

# Configure item pipelines
# See http://scrapy.readthedocs.org/en/latest/topics/item-pipeline.html
ITEM_PIPELINES = {
    'scrapy_redis.pipelines.RedisPipeline': 300
}

# Specify the host and port to use when connecting to Redis (optional).
REDIS_HOST = '127.0.0.1'
REDIS_PORT = 6379
# Custom redis client parameters (i.e.: socket timeout, etc.)
REDIS_PARAMS  = {}
#REDIS_URL = 'redis://user:pass@hostname:9001'
REDIS_PARAMS['password'] = '***'
看了前文提到的scrapy-redis架构文档的童鞋一定对ITEM_PIPELINES和Dupefilter有了比较深入的理解。Dupefilter依赖redis键值存储,对每个request查询是否已被处理过,实现新闻的增量去重爬取。pipeline即处理item的若干管道,管道与管道间存在先后关系。Redispipeline只是其中我们比较常见的item数据队列存储形式,当然你也可以实现你需要的pipeline对item进行更新和存储。
– 运行spider前还需要在shell中打开redis-server.
redis-server /usr/local/etc/redis.conf– 测试BasicSpider
首先运行scrapy list查看现有的spiders,你会看到news和BusinessInsider
scrapy crawl BusinessInsider不出意外的话,应该会看到log里显示
 [scrapy.extensions.logstats] INFO: Crawled 0 pages (at 0 pages/min), scraped 0 items (at 0 items/min)
 [scrapy.extensions.telnet] DEBUG: Telnet console listening on 127.0.0.1:6023
 [scrapy.core.engine] DEBUG: Crawled (200) .businessinsider.com/robots.txt> (referer: None)
 [scrapy.core.engine] DEBUG: Crawled (200) .businessinsider.com/> (referer: None)
不要慌,不要怕,这是因为网站针对咱们小蜘蛛们设置了防护门。下周有空我来讲讲如何通过random delay + user agent list + proxy list来解决反爬机制。
==还不知到穷学生党能不能买得起现在的代理==
先写到这些,最后整理一下必备的环境清单自己检查一下哦!
- redis数据库
- Anaconda2.x/3.x
  - requests
  - lxml
  - redis
  - Scrapy
- scrapy-redis当然这些平常用不到的话也可以conda create -n spider创建一个conda环境再来一个个安装,干净清爽些。把环境配好了剩下的下周继续~
