EasyPlayerPro:安卓视频播放器Android H.265硬解码方案(内含代码)
背景介绍
H.265是ITU-TVCEG继H.264之后所制定的新的视频编码标准。H.265标准围绕着现有的视频编码标准H.264,保留原来的某些技术,同时对一些相关的技术加以改进。H.265使用先进的技术用以改善码流、编码质量、延时和算法复杂度之间的关系,达到最优化设置。关于H.265对比H.264的优越性,网上有更专业的文章来作分析,因此我们在这里不做过多陈述。
基于其更高的压缩比,H.265适用于安防行业再合适不过了!因为安防行业每天都有海量的视频数据,同时需要实时传输、分析、存储…在带宽和存储成本依然昂贵的今天,我们极度需要更低的码率!更低的码率就等同于更低的成本。因此,各个安防厂商已经逐渐将视频设备由H.264转移到H.265了,这对于H.265编码也有着积极的推动作用。
然而,带给我们码农的则是痛苦——意味着我们不得不做大量的兼容和适配工作。好在FFmpeg已经支持了H.265的编解码算法了。这方面的文章也不少,其中雷神也专门写了一系列博客,参考:FFmpeg的HEVC解码器源代码简单分析:解码器主干部分
本篇文章将着重介绍在Android平台上H.265的硬解码的接口支持
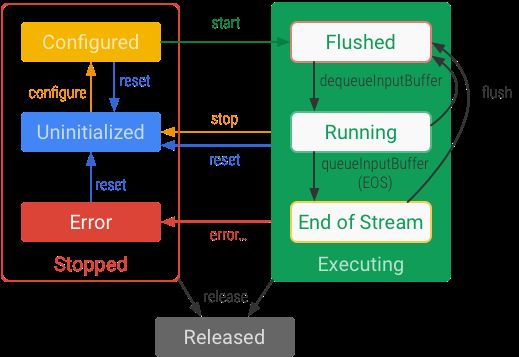
在安卓平台,伟大的Google也给我们带来了H.265(又称HEVC)的硬解码的接口的支持(值得注意的是,也支持H.265软编码。后面我们会有专门文章来做介绍)。大家可以看看MediaCodec的API说明,接口简单基本上就是下面Google画的流程图:
硬解码接口调用
初始化解码器
首先初始化解码器,可以使用解码器类型或者解码器名称进行初始化,一般使用解码器类型即可。
```
// 使用解码器类型初始化
MediaCodec codec = MediaCodec.createDecoderByType("video/hevc");
// 使用解码器名称初始化,名称可通过MediaCodecList遍历所有解码器获取到
MediaCodec codec = MediaCodec.createByCodecName(name);
```
进行参数配置
初始化之后,需要进行配置,这也是最难的地方。配置时针对不同的解码器,需要不同的配置参数。对于HEVC,需要知道宽度、高度和CSD。CSD即:Codec-specific Data,是指跟特定编码算法相关的一些参数,比如AAC的ADTS、H.264的SPS、PPS等。
下面表格是安卓平台支持的编码格式与CSD(code specific data)的说明:
   Format
   CSD buffer #0
   CSD buffer #1
   CSD buffer #2


    AAC
    Decoder-specific information from ESDS*
    Not Used
    Not Used


    VORBIS
    Identification header
    Setup header
    Not Used


    OPUS
    Identification header
    Pre-skip in nanosecs

        (unsigned 64-bit native-order integer.)

        This overrides the pre-skip value in the identification header.
    Seek Pre-roll in nanosecs

        (unsigned 64-bit native-order integer.)


    MPEG-4
    Decoder-specific information from ESDS*
    Not Used
    Not Used


    H.264 AVC
    SPS (Sequence Parameter Sets*)
    PPS (Picture Parameter Sets*)
    Not Used


    H.265 HEVC
    VPS (Video Parameter Sets*) +

     SPS (Sequence Parameter Sets*) +

     PPS (Picture Parameter Sets*)
    Not Used
    Not Used


    VP9
    VP9 CodecPrivate Data
    (optional)
    Not Used
    Not Used
可以看到对于H.265,CSD只需要“csd-0”参数,就是把VPS、SPS、PPS拼接到一起即可。因此整个配置过程可以说就是获取这三个分量的过程。
遍历数据
作者参考了雷神的博客后,大体上明白了这三个分量的提取方式。简单的说,就是遍历数据,获取到00 00 01(或 00 00 00 01),再取出下一个字节,提取到nal_type。
```
byte nal_spec = data[i + 3];
int nal_type = (nal_spec >> 1) & 0x03f;
```
再判断nal_type的值,vps/sps/pps对应的nal_type分别是:
```
private static final int NAL_VPS = 32;
private static final int NAL_SPS = 33;
private static final int NAL_PPS = 34;
```
然后再到下一个00 00 01(或 00 00 00 01)结束
提取过程的代码如下:
```
private static byte[] getvps_sps_pps(byte[] data, int offset, int length) {
int i = 0;
int vps = -1, sps = -1, pps = -1;
do {
    if (vps == -1) {
        for (i = offset; i < length - 4; i++) {
            if ((0x00 == data[i]) && (0x00 == data[i + 1]) && (0x01 == data[i + 2])) {
                byte nal_spec = data[i + 3];
                int nal_type = (nal_spec >> 1) & 0x03f;
                if (nal_type == NAL_VPS) {
                    // vps found.
                    if (data[i - 1] == 0x00) {  // start with 00 00 00 01
                        vps = i - 1;
                    } else {                      // start with 00 00 01
                        vps = i;
                    }
                    break;
                }
            }
        }
    }
    if (sps == -1) {
        for (i = vps; i < length - 4; i++) {
            if ((0x00 == data[i]) && (0x00 == data[i + 1]) && (0x01 == data[i + 2])) {
                byte nal_spec = data[i + 3];
                int nal_type = (nal_spec >> 1) & 0x03f;
                if (nal_type == NAL_SPS) {
                    // vps found.
                    if (data[i - 1] == 0x00) {  // start with 00 00 00 01
                        sps = i - 1;
                    } else {                      // start with 00 00 01
                        sps = i;
                    }
                    break;
                }
            }
        }
    }
    if (pps == -1) {
        for (i = sps; i < length - 4; i++) {
            if ((0x00 == data[i]) && (0x00 == data[i + 1]) && (0x01 == data[i + 2])) {
                byte nal_spec = data[i + 3];
                int nal_type = (nal_spec >> 1) & 0x03f;
                if (nal_type == NAL_PPS) {
                    // vps found.
                    if (data[i - 1] == 0x00) {  // start with 00 00 00 01
                        pps = i - 1;
                    } else {                    // start with 00 00 01
                        pps = i;
                    }
                    break;
                }
            }
        }
    }
} while (vps == -1 || sps == -1 || pps == -1);
if (vps == -1 || sps == -1 || pps == -1) {// 没有获取成功。
    return null;
}
// 计算csd buffer的长度。即从vps的开始到pps的结束的一段数据
int begin = vps;
int end = -1;
for (i = pps; i < length - 4; i++) {
    if ((0x00 == data[i]) && (0x00 == data[i + 1]) && (0x01 == data[i + 2])) {
        if (data[i - 1] == 0x00) {  // start with 00 00 00 01
            end = i - 1;
        } else {                    // start with 00 00 01
            end = i;
        }
        break;
    }
}
if (end == -1 || end < begin) {
    return null;
}
// 拷贝并返回
byte[] buf = new byte[end - begin];
System.arraycopy(data, begin, buf, 0, buf.length);
return buf;
}
```
进行配置
提取成功后,我们再用它进行配置:
```
byte[] csd0 = getvps_sps_pps(data, offset, Math.min(length, 200));
if (csd0== null) {
    throw new IOException("parse vps sps pps error...");
}
ByteBuffer csd0bf = ByteBuffer.allocate(csd0.length);
csd0bf.put(csd0);
csd0bf.clear();
format.setByteBuffer("csd-0", csd0bf);
format.setInteger(MediaFormat.KEY_WIDTH, width);
format.setInteger(MediaFormat.KEY_HEIGHT, height);
format.setString(MediaFormat.KEY_MIME, MIME_TYPE_HEVC);
// config
codec.configure(format, surface, null, 0);
```
我们将提取到的csd0转成ByteBuffer,再通过setByteBuffer设置到format里面,然后用format进行配置。
启动解码器
配置成功后,我们再启动解码器:
```
codec.start();
```
对视频帧进行解码
接下来就是对视频帧进行解码了。MediaCodec内部维护着一系列输入输出buffer,我们需要将265数据帧输入到输入队列,将解码后的视频数据从输出队列显示到界面。
对于输入,需要外部调用者申请(dequeue)buffer,并将视频帧拷贝到buffer,然后再释放(queue)给Codec;
```
    int inputBufferId = codec.dequeueInputBuffer(timeoutUs);
    if (inputBufferId >= 0) {
      ByteBuffer inputBuffer = codec.getInputBuffer(…);
      // fill inputBuffer with valid data
      // 我们需要把我们接收到的视频帧数据copy到inputBuffer里
      …
      // 把buffer归还给codec
      codec.queueInputBuffer(inputBufferId, …);
    }
```
对于输出,外部调用者需要dequeue到outputbuffer,然后再做显示:
```
     int outputBufferId = codec.dequeueOutputBuffer(…);
     if (outputBufferId >= 0) {
       ByteBuffer outputBuffer = codec.getOutputBuffer(outputBufferId);
       // outputBuffer is ready to be processed or rendered.
       …
       // 下面可以直接显示,视频会显示在surface上了。
       codec.releaseOutputBuffer(outputBufferId, …);
     }
```
如果一切顺利,应该可以看到视频了。
退出时释放解码库
记得退出时要释放解码库~
```
    codec.stop();
    codec.release();
```
当然,不是所有的安卓机都支持H.265的硬解码,对于这些不支持硬解码的,使用ffmpeg进行软解即可,这方面资料也不在少数,但是软解码效率就不是很高了。
硬解码已应用于EasyPlayerPro项目
EasyPlayerPro是由TSINGSEE青犀开发和维护的一款精炼、易用、高效、稳定的流媒体播放器,支持RTSP(RTP over TCP/UDP)、RTMP、HTTP、HLS、TCP、UDP等多种流媒体协议,支持各种各样编码格式的流媒体音视频直播流、点播流、文件播放!

