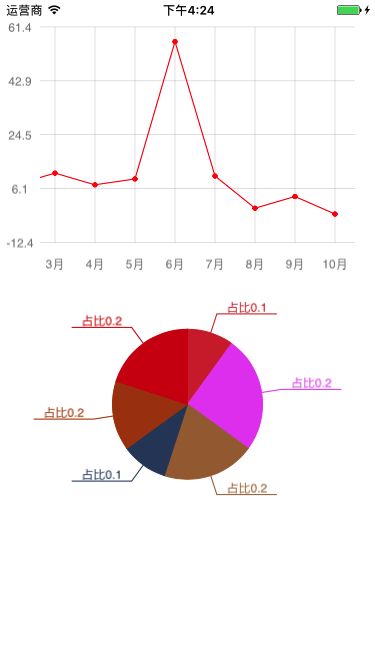
最近项目上线了,有点时间便想着重构一下项目中之前使用的折线图. 先预览下效果图.
理顺思路, 用 CAShapeLayer + UIBeziapath画线 , 用 CATextLayer 显示文本.
一. 饼状图
1. 画扇形
a.移动画笔到圆心
b.画扇形的直边
c.画弧边
d.画另一条直边
- (void)drawChildPieWithPercent:(CGFloat)percent arcPoint:(CGPoint)arcPoint radiu:(CGFloat)radiu startAngle:(CGFloat)startAngle endAngle:(CGFloat)endAngle color:(UIColor *)color isSelect:(BOOL)isSelect
{
    CGPoint startPoint = CGPointMake(arcPoint.x + radiu * cos(startAngle), arcPoint.y + radiu * sin(startAngle));

    UIBezierPath *bezierPath = [UIBezierPath bezierPath];
    [bezierPath moveToPoint:arcPoint];
    [bezierPath addLineToPoint:startPoint];
    [bezierPath addArcWithCenter:arcPoint radius:radiu startAngle:startAngle endAngle:endAngle clockwise:YES];
    [bezierPath addLineToPoint:arcPoint];

    CGFloat padding = isSelect ? 10 : 0;
    CGPoint point = CGPointMake(padding * cos(startAngle + (endAngle-startAngle)/2) ,
                                   padding * sin(startAngle + (endAngle-startAngle)/2));


    CAShapeLayer *layer = [CAShapeLayer layer];
    layer.backgroundColor = [UIColor clearColor].CGColor;

    layer.frame = CGRectMake(point.x, point.y, kWidth, kHeight);
    layer.path = bezierPath.CGPath;
    layer.fillColor = color.CGColor;
    layer.strokeColor = color.CGColor;

    [self.layer addSublayer:layer];

    [_pathArray addObject:bezierPath];
    [_layerArray addObject:layer];

    [self drawTextWithContent:[NSString stringWithFormat:@"占比%.1f", percent] percent:percent arcPoint:arcPoint radiu:radiu startAngle:startAngle endAngle:endAngle color:color];
}
2. 画扇形对应的描述文本
a.找到圆弧的中心点
b.找到圆弧中心延长点
c.找到放置文本的点
d.连线上面三个点
e.绘制文本
- (void)drawTextWithContent:(NSString *)content percent:(CGFloat)percent arcPoint:(CGPoint)arcPoint radiu:(CGFloat)radiu startAngle:(CGFloat)startAngle endAngle:(CGFloat)endAngle color:(UIColor *)color
{
    // 圆弧中心点
    CGPoint point1 = CGPointMake(arcPoint.x + radiu * cos(startAngle + percent * M_PI), arcPoint.y + radiu * sin(startAngle + percent * M_PI));
    // 圆弧中心延长点
    CGPoint point2 = CGPointMake(arcPoint.x + (radiu + 20) * cos(startAngle + percent  * M_PI), arcPoint.y + (radiu + 20) * sin(startAngle + percent * M_PI));

    UIBezierPath *bezierPath = [UIBezierPath bezierPath];
    [bezierPath moveToPoint:point1];
    [bezierPath addLineToPoint:point2];
    // 找到放置文本的点
    CGPoint point3 = CGPointZero;
    point3.y = point2.y;
    if (point2.x > arcPoint.x)
    {
        point3.x = point2.x + 60;
    }else
    {
        point3.x = point2.x - 60;
    }
    [bezierPath addLineToPoint:point3];

    CAShapeLayer *lineLayer = [CAShapeLayer layer];
    lineLayer.backgroundColor = [UIColor clearColor].CGColor;
    lineLayer.path = bezierPath.CGPath;
    lineLayer.fillColor = [UIColor clearColor].CGColor;
    lineLayer.strokeColor = color.CGColor;
    [self.layer addSublayer:lineLayer];

    // 文本
    CATextLayer *textLayer = [CATextLayer layer];
    if (point2.x > arcPoint.x)
    {
        textLayer.frame = CGRectMake(point2.x, point3.y-15, fabs(point3.x-point2.x), 15);
    }else
    {
        textLayer.frame = CGRectMake(point3.x, point3.y-15, fabs(point3.x-point2.x), 15);
    }

    textLayer.foregroundColor = color.CGColor;
    textLayer.fontSize = 12;
    textLayer.alignmentMode = kCAAlignmentCenter;
    textLayer.string = content;
    [self.layer addSublayer:textLayer];

}
3.绘制剩余的扇形
- (void)drawPieViewWithDataArray:(NSArray *)dataArray
{
    CGFloat startAngle = -M_PI_2;
    CGFloat endAngle = 0;
    for (int i = 0; i < dataArray.count; i++)
    {
        CGFloat percent = [[dataArray objectAtIndex:i] floatValue];

        endAngle = startAngle + percent * M_PI * 2;

        CGPoint arcPoint = CGPointMake(self.defaultArcPoint.x, self.defaultArcPoint.y);

        [self drawChildPieWithPercent:percent
                             arcPoint:arcPoint
                                radiu:self.radiu
                           startAngle:startAngle
                             endAngle:endAngle
                                color:self.colorArray[i]
                             isSelect:i == self.selectIndex];

        startAngle = endAngle;
    }
}
这样基本就画出了相要的效果, 下面再加一些额外的功能:
- 动画展现饼图
- 点击某一块扇形加上动态效果
4.动画展现饼图
这里可以考虑用一个和背景色一样的 layer 挡在上面, 然后使用透明色来绘制一个圆.
- (void)drawCoverLayer
{
    CAShapeLayer *backLayer = [CAShapeLayer layer];
    backLayer.fillColor = [UIColor clearColor].CGColor;
    backLayer.strokeColor = self.backgroundColor.CGColor;
    backLayer.lineWidth = self.radiu + 10;

    UIBezierPath *backLayerPath = [UIBezierPath bezierPathWithArcCenter:self.defaultArcPoint
                                                                 radius:backLayer.lineWidth/2
                                                             startAngle:-M_PI_2
                                                               endAngle:3 * M_PI_2
                                                              clockwise:YES];
    backLayer.path = backLayerPath.CGPath;

    CABasicAnimation *animation = [CABasicAnimation animationWithKeyPath:@"strokeStart"];
    animation.duration = 2;
    animation.repeatCount = 1;
    animation.fromValue = @(0);
    animation.toValue = @(1);
    animation.removedOnCompletion = NO;
    animation.fillMode = kCAFillModeForwards;
    [backLayer addAnimation:animation forKey:nil];

    [self.layer addSublayer:backLayer];
}
5.点击某一块扇形加上动态效果
在 view 的 touchBegin 方法中去实现即可,具体如下:
- (void)touchesBegan:(NSSet *)touches withEvent:(UIEvent *)event
{
    UITouch *touch = [touches anyObject];
    CGPoint touchPoint = [touch locationInView:self];

    CGFloat totalPercent = 0;

    for (int i = 0; i<_pathArray.count; i++)
    {
        UIBezierPath *path = _pathArray[i];
        CAShapeLayer *layer = self.layerArray[i];

        CGFloat percent = [self.dataArray[i] floatValue];

        if ([path containsPoint:touchPoint])
        {
            self.selectIndex = i;

            CGFloat padding = 10;

            CGFloat startAngle = totalPercent * M_PI * 2 - M_PI_2;
            CGFloat endAngle = startAngle + M_PI * 2 * percent;

            layer.frame = CGRectMake(padding * cos(startAngle + (endAngle-startAngle)/2),
                                     padding * sin(startAngle + (endAngle-startAngle)/2),
                                     kWidth,
                                     kHeight);
        }
        else
        {
            layer.frame = self.bounds;
        }
        totalPercent += percent;
    }
}
更多的功能还在扩展中, 具体请关注 项目地址
二.折线图
这个没什么好写的, 算好相应的坐标, 再画线即可.
// 初始化 scrollview
[self initScrollView];
// 画横线
[self drawHorizontalLine];
// 画竖线
[self drawVerticalLine];
// 画底部标签
[self drawBottomTitle];
        // 画左侧刻度
[self drawYTextLayer];
        // 画线
[self drawValueLine];
画线的时候可以加上动画效果
- (void)drawValueLine
{
    CGFloat originHeight = self.scrollView.frame.size.height / 5;

    UIBezierPath *bezierPath = [UIBezierPath bezierPath];

    for (int i = 0; i < self.titleArray.count; i++)
    {
        CGFloat value = [self.dataSourceArray[i] floatValue];
        CGFloat scale = (value - _minValue) / (_maxValue - _minValue);
        CGFloat y = (1-scale) * originHeight * 4 + self.originWidth * 0.5;

        CGPoint point = CGPointMake(self.originWidth + self.originWidth * i, y);

        if (i == 0)
        {
            [bezierPath moveToPoint:point];
        }
        else
        {
            [bezierPath addLineToPoint:point];
        }
    }

    CAShapeLayer *shapeLayer = [CAShapeLayer layer];
    shapeLayer.path = bezierPath.CGPath;
    shapeLayer.strokeColor = [[[UIColor redColor] colorWithAlphaComponent:1] CGColor];
    shapeLayer.fillColor = [[UIColor clearColor] CGColor];
    shapeLayer.lineWidth = 1;
    [self.scrollView.layer addSublayer:shapeLayer];


    CABasicAnimation *animation = [CABasicAnimation animationWithKeyPath:@"strokeEnd"];
    animation.duration = 2;
    animation.repeatCount = 1;
    animation.fromValue = @(0);
    animation.toValue = @(1);
    animation.removedOnCompletion = NO;
    animation.fillMode = kCAFillModeForwards;
    [shapeLayer addAnimation:animation forKey:nil];
}
基本上就这些内容了, 我们在平时的时候可以多使用 layer 来进行绘制图形, 这样可以加快渲染速度, 提升体验.
具体的代码请见** 项目地址**
欢迎 star!
