spring-security-oauth2(二十三) 基本令牌配置及JWT扩展解析
令牌前面我们用的都是默认配置,其实令牌的样式及存储我们都可以进行定制,这章我们主要完成
- 基本的Token参数配置
- 使用jwt替换默认的token
- 扩展和解析jwt的信息
基本的Token参数配置
硬编码配置
token是在认证服务器处理的。
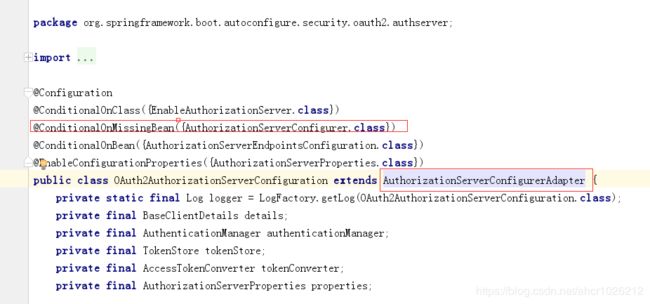
springboot2.x和1.x的配置不太一样,这点我们要注意。分析源码可知
OAuth2AuthorizationServerConfiguration 类是 @EnableAuthorizationServer 的自动配置类;
如果我们 继承了 AuthorizationServerConfigurerAdapter,那么该类将不会被初始化,认证服务器将不能正常工作。

下面我们来进行改造
package com.rui.tiger.auth.app;

import org.springframework.beans.factory.annotation.Autowired;
import org.springframework.context.annotation.Configuration;
import org.springframework.security.authentication.AuthenticationManager;
import org.springframework.security.config.annotation.authentication.configuration.AuthenticationConfiguration;
import org.springframework.security.core.userdetails.UserDetailsService;
import org.springframework.security.crypto.password.NoOpPasswordEncoder;
import org.springframework.security.oauth2.config.annotation.configurers.ClientDetailsServiceConfigurer;
import org.springframework.security.oauth2.config.annotation.web.configuration.AuthorizationServerConfigurerAdapter;
import org.springframework.security.oauth2.config.annotation.web.configuration.EnableAuthorizationServer;
import org.springframework.security.oauth2.config.annotation.web.configurers.AuthorizationServerEndpointsConfigurer;
import org.springframework.security.oauth2.config.annotation.web.configurers.AuthorizationServerSecurityConfigurer;

/**
 * 服务提供商-认证服务器
 * @author CaiRui
 * @date 2019-03-18 09:12
 */
@Configuration
@EnableAuthorizationServer
public class TigerAuthorizationServerConfig extends AuthorizationServerConfigurerAdapter {

    private final AuthenticationManager authenticationManager;

    public TigerAuthorizationServerConfig(AuthenticationConfiguration authenticationConfiguration) throws Exception {
        this.authenticationManager = authenticationConfiguration.getAuthenticationManager();
    }

    @Override
    public void configure(ClientDetailsServiceConfigurer clients) throws Exception {
        clients.inMemory()
                .withClient("tigerauth")
                .secret("123456")
                .redirectUris("http://example.com", "hlocalhost:80")
                .authorizedGrantTypes("refresh_token", "password")
                .accessTokenValiditySeconds(7200)
                .scopes("all")
                .and()
                .withClient("myid2")
                .secret("myid2")
                .redirectUris("http://example.com", "localhost:8080")
                .authorizedGrantTypes("refresh_token", "password")
                .accessTokenValiditySeconds(7200)
                .scopes("all", "read", "write");
    }

    @Override
    public void configure(AuthorizationServerEndpointsConfigurer endpoints) throws Exception {
        endpoints.authenticationManager(this.authenticationManager);
    }
    @Override
    public void configure(AuthorizationServerSecurityConfigurer security) throws Exception {
        // 这里使用什么密码需要 根据上面配置client信息里面的密码类型决定
        // 目前上面配置的是无加密的密码
        security.passwordEncoder(NoOpPasswordEncoder.getInstance());
    }


}
把我们的配置文件中的app信息可以注释了

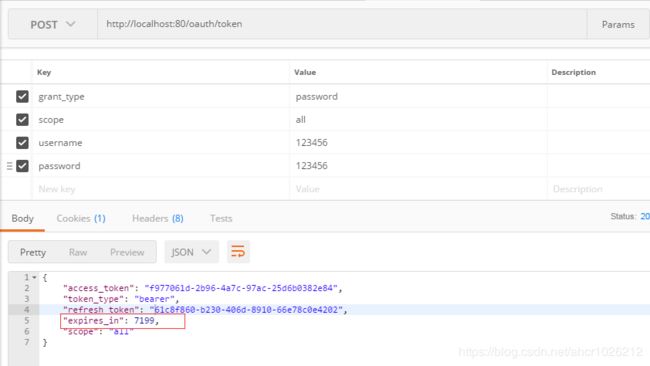
我们来用密码模式来测试下
可以看到token过期时间已经生效,app信息硬编码不够灵活,下面我们来通过配置文件来进行配置
配置文件配置
首先定义配置关系实体类
package com.rui.tiger.auth.core.properties;

/**
 * oauth2客户端配置
 * @author CaiRui
 * @Date 2019-05-01 16:17
 */
public class OAuth2ClientProperties {
    private String clientId;
    private String clientSecret;
    private String[] authorizedGrantTypes = {};//授权类型
    private String[] redirectUris = {}; // 信任的回调域
    private String[] scopes = {};
    private int accessTokenValiditySeconds; // token有效期 默认单位秒

    public String getClientId() {
        return clientId;
    }

    public void setClientId(String clientId) {
        this.clientId = clientId;
    }

    public String getClientSecret() {
        return clientSecret;
    }

    public void setClientSecret(String clientSecret) {
        this.clientSecret = clientSecret;
    }

    public String[] getAuthorizedGrantTypes() {
        return authorizedGrantTypes;
    }

    public void setAuthorizedGrantTypes(String[] authorizedGrantTypes) {
        this.authorizedGrantTypes = authorizedGrantTypes;
    }

    public String[] getRedirectUris() {
        return redirectUris;
    }

    public void setRedirectUris(String[] redirectUris) {
        this.redirectUris = redirectUris;
    }

    public String[] getScopes() {
        return scopes;
    }

    public void setScopes(String[] scopes) {
        this.scopes = scopes;
    }

    public int getAccessTokenValiditySeconds() {
        return accessTokenValiditySeconds;
    }

    public void setAccessTokenValiditySeconds(int accessTokenValiditySeconds) {
        this.accessTokenValiditySeconds = accessTokenValiditySeconds;
    }
}
package com.rui.tiger.auth.core.properties;

/**
 * oauth2配置
 * @author CaiRui
 * @Date 2019-05-01 16:17
 */
public class OAuth2Properties {
    private OAuth2ClientProperties[] clients = {};

    public OAuth2ClientProperties[] getClients() {
        return clients;
    }

    public void setClients(OAuth2ClientProperties[] clients) {
        this.clients = clients;
    }
}
加到权限基本配置SecurityProperties中
同时修改我们的配置文件,注意yaml格式数组的写法
oauth2:
        clients:
          -
             clientId: tigerauth
             clientSecret: 123456
             authorizedGrantTypes: ["refresh_token", "password"]
             scopes: ["all", "read"]
             redirectUris: ["http://example.com","localhost:80"]
             accessTokenValiditySeconds: 7200
          -
             clientId: myid2
             clientSecret: myid2
             authorizedGrantTypes: ["refresh_token", "password"]
             scopes: ["all", "read", "write"]
             redirectUris: ["http://example.com","localhost:80"]
             accessTokenValiditySeconds: 7200
修改我么的认证服务器为配置
package com.rui.tiger.auth.app;

import com.rui.tiger.auth.core.properties.OAuth2ClientProperties;
import com.rui.tiger.auth.core.properties.SecurityProperties;
import lombok.extern.slf4j.Slf4j;
import org.springframework.beans.factory.annotation.Autowired;
import org.springframework.context.annotation.Configuration;
import org.springframework.security.authentication.AuthenticationManager;
import org.springframework.security.config.annotation.authentication.configuration.AuthenticationConfiguration;
import org.springframework.security.core.userdetails.UserDetailsService;
import org.springframework.security.crypto.password.NoOpPasswordEncoder;
import org.springframework.security.oauth2.config.annotation.builders.InMemoryClientDetailsServiceBuilder;
import org.springframework.security.oauth2.config.annotation.configurers.ClientDetailsServiceConfigurer;
import org.springframework.security.oauth2.config.annotation.web.configuration.AuthorizationServerConfigurerAdapter;
import org.springframework.security.oauth2.config.annotation.web.configuration.EnableAuthorizationServer;
import org.springframework.security.oauth2.config.annotation.web.configurers.AuthorizationServerEndpointsConfigurer;
import org.springframework.security.oauth2.config.annotation.web.configurers.AuthorizationServerSecurityConfigurer;

import java.util.Arrays;

/**
 * 服务提供商-认证服务器
 * @author CaiRui
 * @date 2019-03-18 09:12
 */
@Configuration
@EnableAuthorizationServer
@Slf4j
public class TigerAuthorizationServerConfig extends AuthorizationServerConfigurerAdapter {

    @Autowired
    private SecurityProperties securityProperties;

    private final AuthenticationManager authenticationManager;
    public TigerAuthorizationServerConfig(AuthenticationConfiguration authenticationConfiguration) throws Exception {
        this.authenticationManager = authenticationConfiguration.getAuthenticationManager();
    }

    @Override
    public void configure(ClientDetailsServiceConfigurer clients) throws Exception {
       /* clients.inMemory()
                .withClient("tigerauth")
                .secret("123456")
                .redirectUris("http://example.com", "localhost:80")
                .authorizedGrantTypes("refresh_token", "password")
                .accessTokenValiditySeconds(7200)
                .scopes("all")
                .and()
                .withClient("myid2")
                .secret("myid2")
                .redirectUris("http://example.com", "localhost:8080")
                .authorizedGrantTypes("refresh_token", "password")
                .accessTokenValiditySeconds(7200)
                .scopes("all", "read", "write");*/
//配置文件解析token配置
        InMemoryClientDetailsServiceBuilder inMemory = clients.inMemory();
        OAuth2ClientProperties[] clientsInCustom = securityProperties.getOauth2().getClients();
        for (OAuth2ClientProperties p : clientsInCustom) {
            inMemory.withClient(p.getClientId())
                    .secret(p.getClientSecret())
                    .redirectUris(p.getRedirectUris())
                    .authorizedGrantTypes(p.getAuthorizedGrantTypes())
                    .accessTokenValiditySeconds(p.getAccessTokenValiditySeconds())
                    .scopes(p.getScopes());
        }

    }

    @Override
    public void configure(AuthorizationServerEndpointsConfigurer endpoints) throws Exception {
        endpoints.authenticationManager(this.authenticationManager);
    }
    @Override
    public void configure(AuthorizationServerSecurityConfigurer security) throws Exception {
        // 这里使用什么密码需要 根据上面配置client信息里面的密码类型决定
        // 目前上面配置的是无加密的密码
        security.passwordEncoder(NoOpPasswordEncoder.getInstance());
    }


}
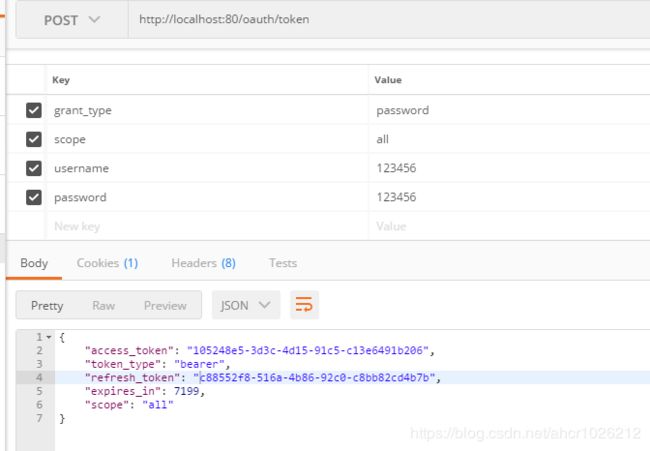
测试下
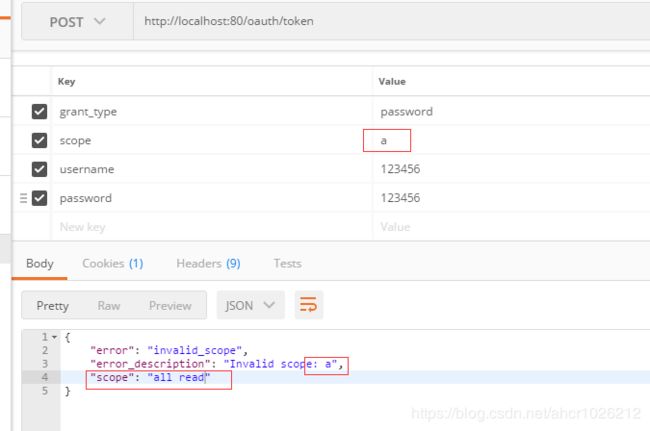
ok 我们换个不在scope中的来试试
redis存储
上面的的配置信息都是基于内存存储令牌信息,我们改用redis来存储
配置我们自定义的tokenStore
package com.rui.tiger.auth.app;

import org.springframework.beans.factory.annotation.Autowired;
import org.springframework.context.annotation.Bean;
import org.springframework.context.annotation.Configuration;
import org.springframework.data.redis.connection.RedisConnectionFactory;
import org.springframework.security.oauth2.provider.token.TokenStore;
import org.springframework.security.oauth2.provider.token.store.redis.RedisTokenStore;

/**
 * redis存储token
 * @author CaiRui
 * @Date 2019-05-01 17:44
 */
@Configuration
public class TokenStoreConfig {
    @Autowired
    private RedisConnectionFactory redisConnectionFactory;

    @Bean
    public TokenStore redisTokenStore() {
        return new MyRedisTokenStore(redisConnectionFactory);
    }

}
spring-data-redis 2.0版本中set(String,String)被弃用了,要使用RedisConnection.stringCommands().set(…),所有我自定义一个RedisTokenStore,代码和RedisTokenStore一样,只是把所有conn.set(…)都换成conn..stringCommands().set(…),详情如下
https://blog.csdn.net/smollsnail/article/details/78954225
package com.rui.tiger.auth.app;
import org.springframework.data.redis.connection.RedisConnection;
import org.springframework.data.redis.connection.RedisConnectionFactory;
import org.springframework.security.oauth2.common.ExpiringOAuth2RefreshToken;
import org.springframework.security.oauth2.common.OAuth2AccessToken;
import org.springframework.security.oauth2.common.OAuth2RefreshToken;
import org.springframework.security.oauth2.provider.OAuth2Authentication;
import org.springframework.security.oauth2.provider.token.AuthenticationKeyGenerator;
import org.springframework.security.oauth2.provider.token.DefaultAuthenticationKeyGenerator;
import org.springframework.security.oauth2.provider.token.TokenStore;
import org.springframework.security.oauth2.provider.token.store.redis.JdkSerializationStrategy;
import org.springframework.security.oauth2.provider.token.store.redis.RedisTokenStoreSerializationStrategy;
import java.util.*;
/**
* org.springframework.data.redis.connection.RedisConnection.set([B[B)V 异常处理
*
* spring-data-redis 2.0版本中set(String,String)被弃用了,要使用RedisConnection.stringCommands().set(…),所有我自定义一个RedisTokenStore,代码和RedisTokenStore一样,只是把所有conn.set(…)都换成conn..stringCommands().set(…),
* 参见: https://blog.csdn.net/smollsnail/article/details/78954225
*
* @author CaiRui
* @Date 2019-05-01 20:36
*/
public class MyRedisTokenStore implements TokenStore {
private static final String ACCESS = "access:";
private static final String AUTH_TO_ACCESS = "auth_to_access:";
private static final String AUTH = "auth:";
private static final String REFRESH_AUTH = "refresh_auth:";
private static final String ACCESS_TO_REFRESH = "access_to_refresh:";
private static final String REFRESH = "refresh:";
private static final String REFRESH_TO_ACCESS = "refresh_to_access:";
private static final String CLIENT_ID_TO_ACCESS = "client_id_to_access:";
private static final String UNAME_TO_ACCESS = "uname_to_access:";
private final RedisConnectionFactory connectionFactory;
private AuthenticationKeyGenerator authenticationKeyGenerator = new DefaultAuthenticationKeyGenerator();
private RedisTokenStoreSerializationStrategy serializationStrategy = new JdkSerializationStrategy();
private String prefix = "";
public MyRedisTokenStore(RedisConnectionFactory connectionFactory) {
this.connectionFactory = connectionFactory;
}
public void setAuthenticationKeyGenerator(AuthenticationKeyGenerator authenticationKeyGenerator) {
this.authenticationKeyGenerator = authenticationKeyGenerator;
}
public void setSerializationStrategy(RedisTokenStoreSerializationStrategy serializationStrategy) {
this.serializationStrategy = serializationStrategy;
}
public void setPrefix(String prefix) {
this.prefix = prefix;
}
private RedisConnection getConnection() {
return this.connectionFactory.getConnection();
}
private byte[] serialize(Object object) {
return this.serializationStrategy.serialize(object);
}
private byte[] serializeKey(String object) {
return this.serialize(this.prefix + object);
}
private OAuth2AccessToken deserializeAccessToken(byte[] bytes) {
return (OAuth2AccessToken)this.serializationStrategy.deserialize(bytes, OAuth2AccessToken.class);
}
private OAuth2Authentication deserializeAuthentication(byte[] bytes) {
return (OAuth2Authentication)this.serializationStrategy.deserialize(bytes, OAuth2Authentication.class);
}
private OAuth2RefreshToken deserializeRefreshToken(byte[] bytes) {
return (OAuth2RefreshToken)this.serializationStrategy.deserialize(bytes, OAuth2RefreshToken.class);
}
private byte[] serialize(String string) {
return this.serializationStrategy.serialize(string);
}
private String deserializeString(byte[] bytes) {
return this.serializationStrategy.deserializeString(bytes);
}
public OAuth2AccessToken getAccessToken(OAuth2Authentication authentication) {
String key = this.authenticationKeyGenerator.extractKey(authentication);
byte[] serializedKey = this.serializeKey("auth_to_access:" + key);
byte[] bytes = null;
RedisConnection conn = this.getConnection();
try {
bytes = conn.get(serializedKey);
} finally {
conn.close();
}
OAuth2AccessToken accessToken = this.deserializeAccessToken(bytes);
if(accessToken != null) {
OAuth2Authentication storedAuthentication = this.readAuthentication(accessToken.getValue());
if(storedAuthentication == null || !key.equals(this.authenticationKeyGenerator.extractKey(storedAuthentication))) {
this.storeAccessToken(accessToken, authentication);
}
}
return accessToken;
}
public OAuth2Authentication readAuthentication(OAuth2AccessToken token) {
return this.readAuthentication(token.getValue());
}
public OAuth2Authentication readAuthentication(String token) {
byte[] bytes = null;
RedisConnection conn = this.getConnection();
try {
bytes = conn.get(this.serializeKey("auth:" + token));
} finally {
conn.close();
}
OAuth2Authentication var4 = this.deserializeAuthentication(bytes);
return var4;
}
public OAuth2Authentication readAuthenticationForRefreshToken(OAuth2RefreshToken token) {
return this.readAuthenticationForRefreshToken(token.getValue());
}
public OAuth2Authentication readAuthenticationForRefreshToken(String token) {
RedisConnection conn = this.getConnection();
OAuth2Authentication var5;
try {
byte[] bytes = conn.get(this.serializeKey("refresh_auth:" + token));
OAuth2Authentication auth = this.deserializeAuthentication(bytes);
var5 = auth;
} finally {
conn.close();
}
return var5;
}
public void storeAccessToken(OAuth2AccessToken token, OAuth2Authentication authentication) {
byte[] serializedAccessToken = this.serialize((Object)token);
byte[] serializedAuth = this.serialize((Object)authentication);
byte[] accessKey = this.serializeKey("access:" + token.getValue());
byte[] authKey = this.serializeKey("auth:" + token.getValue());
byte[] authToAccessKey = this.serializeKey("auth_to_access:" + this.authenticationKeyGenerator.extractKey(authentication));
byte[] approvalKey = this.serializeKey("uname_to_access:" + getApprovalKey(authentication));
byte[] clientId = this.serializeKey("client_id_to_access:" + authentication.getOAuth2Request().getClientId());
RedisConnection conn = this.getConnection();
try {
conn.openPipeline();
conn.stringCommands().set(accessKey, serializedAccessToken);
conn.stringCommands().set(authKey, serializedAuth);
conn.stringCommands().set(authToAccessKey, serializedAccessToken);
if(!authentication.isClientOnly()) {
conn.rPush(approvalKey, new byte[][]{serializedAccessToken});
}
conn.rPush(clientId, new byte[][]{serializedAccessToken});
if(token.getExpiration() != null) {
int seconds = token.getExpiresIn();
conn.expire(accessKey, (long)seconds);
conn.expire(authKey, (long)seconds);
conn.expire(authToAccessKey, (long)seconds);
conn.expire(clientId, (long)seconds);
conn.expire(approvalKey, (long)seconds);
}
OAuth2RefreshToken refreshToken = token.getRefreshToken();
if(refreshToken != null && refreshToken.getValue() != null) {
byte[] refresh = this.serialize(token.getRefreshToken().getValue());
byte[] auth = this.serialize(token.getValue());
byte[] refreshToAccessKey = this.serializeKey("refresh_to_access:" + token.getRefreshToken().getValue());
conn.stringCommands().set(refreshToAccessKey, auth);
byte[] accessToRefreshKey = this.serializeKey("access_to_refresh:" + token.getValue());
conn.stringCommands().set(accessToRefreshKey, refresh);
if(refreshToken instanceof ExpiringOAuth2RefreshToken) {
ExpiringOAuth2RefreshToken expiringRefreshToken = (ExpiringOAuth2RefreshToken)refreshToken;
Date expiration = expiringRefreshToken.getExpiration();
if(expiration != null) {
int seconds = Long.valueOf((expiration.getTime() - System.currentTimeMillis()) / 1000L).intValue();
conn.expire(refreshToAccessKey, (long)seconds);
conn.expire(accessToRefreshKey, (long)seconds);
}
}
}
conn.closePipeline();
} finally {
conn.close();
}
}
private static String getApprovalKey(OAuth2Authentication authentication) {
String userName = authentication.getUserAuthentication() == null?"":authentication.getUserAuthentication().getName();
return getApprovalKey(authentication.getOAuth2Request().getClientId(), userName);
}
private static String getApprovalKey(String clientId, String userName) {
return clientId + (userName == null?"":":" + userName);
}
public void removeAccessToken(OAuth2AccessToken accessToken) {
this.removeAccessToken(accessToken.getValue());
}
public OAuth2AccessToken readAccessToken(String tokenValue) {
byte[] key = this.serializeKey("access:" + tokenValue);
byte[] bytes = null;
RedisConnection conn = this.getConnection();
try {
bytes = conn.get(key);
} finally {
conn.close();
}
OAuth2AccessToken var5 = this.deserializeAccessToken(bytes);
return var5;
}
public void removeAccessToken(String tokenValue) {
byte[] accessKey = this.serializeKey("access:" + tokenValue);
byte[] authKey = this.serializeKey("auth:" + tokenValue);
byte[] accessToRefreshKey = this.serializeKey("access_to_refresh:" + tokenValue);
RedisConnection conn = this.getConnection();
try {
conn.openPipeline();
conn.get(accessKey);
conn.get(authKey);
conn.del(new byte[][]{accessKey});
conn.del(new byte[][]{accessToRefreshKey});
conn.del(new byte[][]{authKey});
Listcom.rui.tiger.auth.app.TigerAuthorizationServerConfig#configure(org.springframework.security.oauth2.config.annotation.web.configurers.AuthorizationServerEndpointsConfigurer) 添加token
    @Override
    public void configure(AuthorizationServerEndpointsConfigurer endpoints) throws Exception {
        endpoints.authenticationManager(this.authenticationManager)
                .tokenStore(redisTokenStore);
    }
测试下看见redis中已经有token信息
使用jwt替换默认的token
什么是jwt?
JSON Web Token(缩写 JWT)是目前最流行的跨域认证解决方案,详情如下
http://www.ruanyifeng.com/blog/2018/07/json_web_token-tutorial.html
配置JWT
@Conditionalxxx根据条件是否实例化
package com.rui.tiger.auth.app;

import com.rui.tiger.auth.core.properties.SecurityProperties;
import org.springframework.beans.factory.annotation.Autowired;
import org.springframework.boot.autoconfigure.condition.ConditionalOnProperty;
import org.springframework.context.annotation.Bean;
import org.springframework.context.annotation.Configuration;
import org.springframework.data.redis.connection.RedisConnectionFactory;
import org.springframework.security.oauth2.provider.token.TokenStore;
import org.springframework.security.oauth2.provider.token.store.JwtAccessTokenConverter;
import org.springframework.security.oauth2.provider.token.store.JwtTokenStore;
import org.springframework.security.oauth2.provider.token.store.redis.RedisTokenStore;

/**
 * redis存储token
 * @author CaiRui
 * @Date 2019-05-01 17:44
 */
@Configuration
public class TokenStoreConfig {
    @Autowired
    private RedisConnectionFactory redisConnectionFactory;

    @Bean
    //这里要完全配合
    @ConditionalOnProperty(prefix = "tiger.auth.oauth2", name = "tokenStore", havingValue = "redis")

    public TokenStore redisTokenStore() {
        return new MyRedisTokenStore(redisConnectionFactory);
    }

    // matchIfMissing = true 如果没有找到配置项也是生效的
    @Configuration
    @ConditionalOnProperty(prefix = "tiger.auth.oauth2", name = "tokenStore", havingValue = "jwt", matchIfMissing = true)
    public  static class JwtConfig{

        @Autowired
        private SecurityProperties securityProperties;

        @Bean
        public TokenStore jwtTokenStore() {
            return new JwtTokenStore(jwtAccessTokenConverter());
        }

        @Bean
        public JwtAccessTokenConverter jwtAccessTokenConverter() {
            JwtAccessTokenConverter converter = new JwtAccessTokenConverter();
            //指定密签
            converter.setSigningKey(securityProperties.getOauth2().getJwtSigningKey());
            return converter;
        }

    }

}
认证服务器配置
@Autowired(required = false)
private JwtAccessTokenConverter jwtAccessTokenConverter;
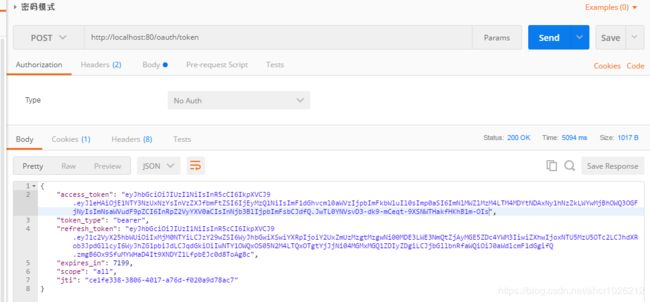
我们来测试下,还是用密码模式获取
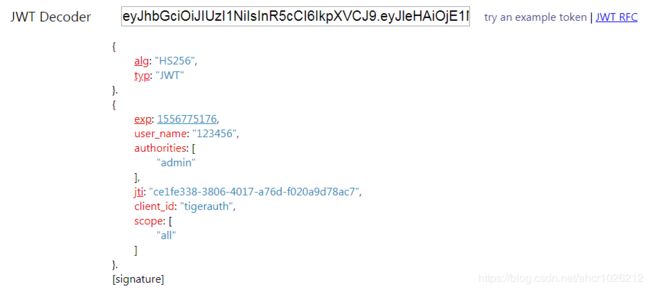
在线解析jwt的网站: http://jwt.calebb.net/
这个就是我们的jwt,解析出来的
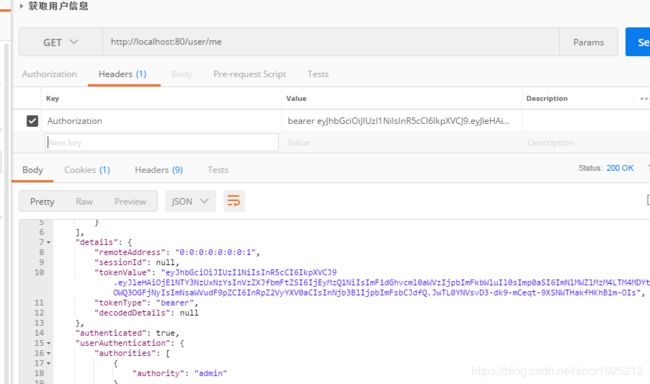
我们用这个jwt,访问用户信息看看,成功返回
JWT自定义
分析源码可知
org.springframework.security.oauth2.provider.token.DefaultTokenServices#createAccessToken(org.springframework.security.oauth2.provider.OAuth2Authentication, org.springframework.security.oauth2.common.OAuth2RefreshToken)
自定义增强器的实现
package com.rui.tiger.auth.app;

import org.springframework.security.oauth2.common.DefaultOAuth2AccessToken;
import org.springframework.security.oauth2.common.OAuth2AccessToken;
import org.springframework.security.oauth2.provider.OAuth2Authentication;
import org.springframework.security.oauth2.provider.token.TokenEnhancer;

import java.util.HashMap;
import java.util.Map;

/**
 * 自定义token增强器
 * @author CaiRui
 * @Date 2019-05-02 12:00
 */
public class TigerJwtTokenEnhancer implements TokenEnhancer {
    @Override
    public OAuth2AccessToken enhance(OAuth2AccessToken accessToken, OAuth2Authentication authentication) {
        Map info = new HashMap<>();
        // 需要增加的信息
        // 所以如果是需要动态的话,只能在该方法中去调用业务方法添加动态参数信息
        info.put("company", "tiger");
        // 设置附加信息
        ((DefaultOAuth2AccessToken)accessToken).setAdditionalInformation(info);
        return accessToken;
    }
}
TokenStoreConfig 配置bean
@Bean
        @ConditionalOnBean(TokenEnhancer.class)
        public TokenEnhancer jwtTokenEnhancer() {
            return new TigerJwtTokenEnhancer();
        }
认证服务器配置:
com.rui.tiger.auth.app.TigerAuthorizationServerConfig#configure(org.springframework.security.oauth2.config.annotation.web.configurers.AuthorizationServerEndpointsConfigurer)
@Autowired(required = false)
	private TokenEnhancer jwtTokenEnhancer;

@Override
    public void configure(AuthorizationServerEndpointsConfigurer endpoints) throws Exception {
        endpoints.authenticationManager(this.authenticationManager)
                .tokenStore(redisTokenStore);
        /**
         * 私有方法,但是在里面调用了accessTokenEnhancer.enhance所以这里使用链
         * @see  DefaultTokenServices#createAccessToken(org.springframework.security.oauth2.provider.OAuth2Authentication, org.springframework.security.oauth2.common.OAuth2RefreshToken)
         */
        if (jwtAccessTokenConverter != null && jwtTokenEnhancer != null) {
            TokenEnhancerChain enhancerChain = new TokenEnhancerChain();
            List enhancers = new ArrayList<>();
            enhancers.add(jwtTokenEnhancer);
            enhancers.add(jwtAccessTokenConverter);
            enhancerChain.setTokenEnhancers(enhancers);
            // 一个处理链,先添加,再转换
            endpoints
                    .tokenEnhancer(enhancerChain)
                    .accessTokenConverter(jwtAccessTokenConverter);
        }
    }
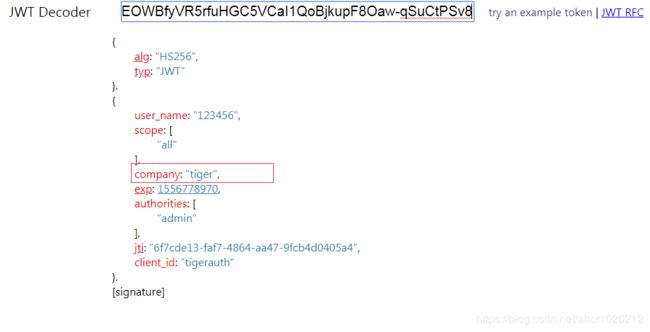
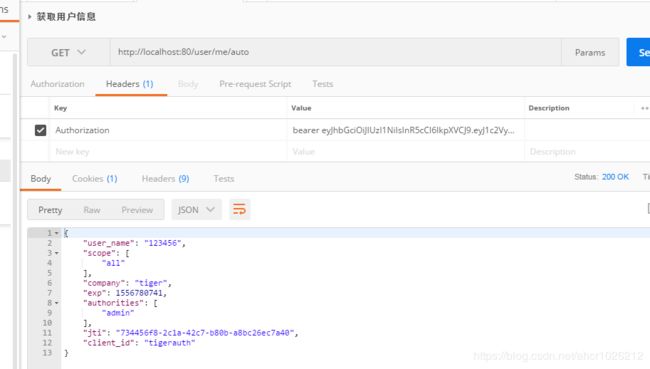
发送请求,解析jwt可以看见我们的jwt增强器实现
JWT解析
添加解析jar demo项目添加
    io.jsonwebtoken
    jjwt
    0.9.1
获取用户信息解析jwt
@GetMapping("me/auto")
	public Object getCurrentAuthentication2(Authentication authentication,HttpServletRequest request) throws UnsupportedEncodingException {
		String authorization = request.getHeader("Authorization");
		String token = StringUtils.substringAfter(authorization, "bearer ");
		String jwtSigningKey = securityProperties.getOauth2().getJwtSigningKey();
		// 生成的时候使用的是 org.springframework.security.oauth2.provider.token.store.JwtAccessTokenConverter
		// 源码里面把signingkey变成utf8了
		// JwtAccessTokenConverter类,解析出来是一个map
		// 所以这个自带的JwtAccessTokenConverter对象也是可以直接用来解析的
		byte[] bytes = jwtSigningKey.getBytes("utf-8");
		Claims body = Jwts.parser().setSigningKey(bytes).parseClaimsJws(token).getBody();
		String company = (String) body.get("company");
		log.info("公司名称:{}",company);
		return body;
	}
测试下发送请求
TOKEN刷新
请求头还要带上app client信息
token如果超时,我们后台可以自动发送用户刷新token信息,提升用户体验。刷新token超时时间,建议设置长点。
