如何来实现一个自定义刷新控件
来源于raywenderlich
-
前言
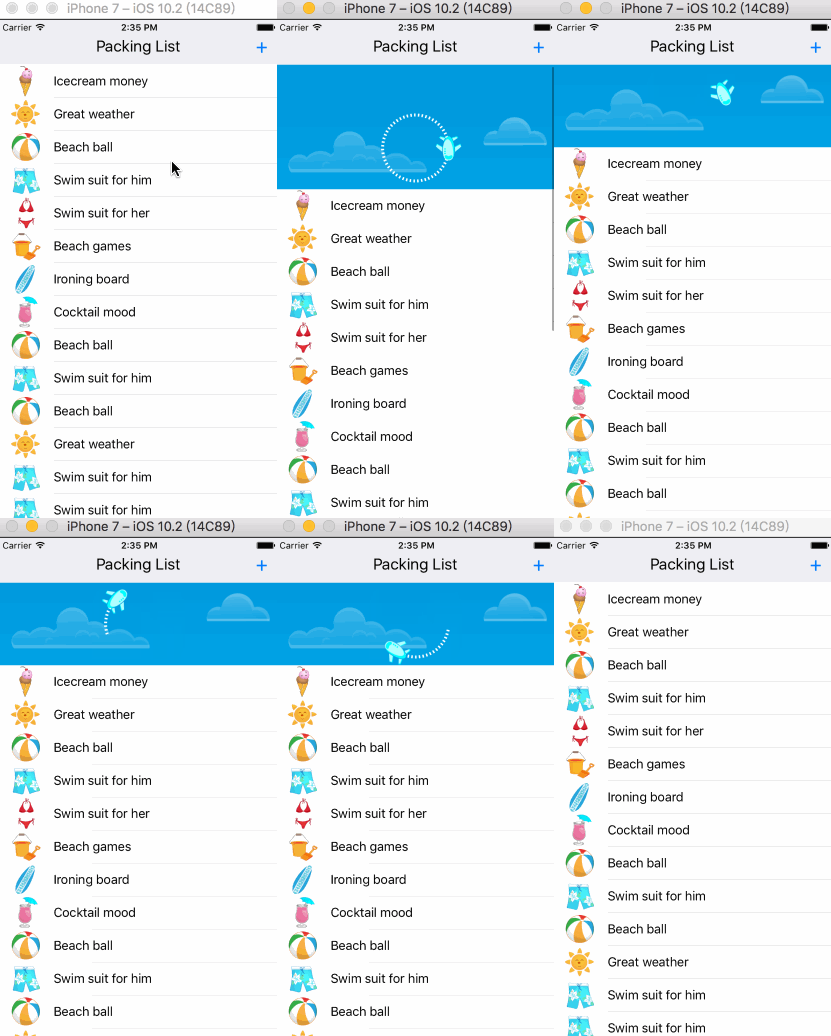
在滑动视图上添加下拉刷新是很常见的,现在大多数人都是使用MJRefresh,今天我简单讲下如果你要自己写个刷新控件怎么写。先看看效果:
首先自己创建一个继承UIView的控件
在自定义一个控件的时候我们首先考虑的是他要实现的方法,以及属性,然后再是这些方法的实现。
- 属性有4个
/** 代理*/
@property(nonatomic,weak)id delegate;
/** 填加的滑动视图*/
@property(nonatomic,strong)UIScrollView *scrollView;
/** 是否正在被刷新*/
@property(nonatomic, assign,getter=isRefreshing)BOOL refreshing;
/** 进度*/
@property(nonatomic, assign)CGFloat progress;
- 方法我们需要实现5个
/**
 初始化方法

 @param frame 初始frame
 @param scrollView 所要添加的滑动视图
 @return 实体
 */
- (instancetype)initWithFrame:(CGRect)frame scrollView:(UIScrollView*)scrollView
;

/**
 结束刷新
 */
- (void)endRefreshing;

/**
 开始刷新
 */
- (void)beginRefreshing;
还有两个是处理Scrollview的拖拽手势和将要结束拖拽代理事件(AIRefreshView这里我并没有实现Scrollview的代理,只是写了方法名一样的函数,希望把外部的UIScrollview的代理在AIRefreshView控件中处理)
- .m
.h的方法说完了,看看.m的属性,我们需要一个圆、飞机、背景图(这里飞机用的layer是想尽量使用轻量级的控件)
/** 圆CAShapeLayer */
@property(nonatomic,strong)CAShapeLayer *ovalShapeLayer;
/** 飞机layer*/
@property(nonatomic,strong)CALayer *airplaneLayer;
/** 背景图*/
@property(nonatomic,weak)UIImageView *bgImageView;
首先是初始化方法初始化方法添加圆、飞机、背景
- (instancetype)initWithFrame:(CGRect)frame scrollView:(UIScrollView*)scrollView
{
    self = [super initWithFrame:frame];
    if (self) {
        self.scrollView         = scrollView;
        _refreshing = NO;
        _progress   = 0.;
        //add the background Image
        UIImageView *imageView  = [[UIImageView alloc]initWithImage:[UIImage imageNamed:@"refresh-view-bg"]];
        imageView.contentMode   = UIViewContentModeScaleAspectFill;
        imageView.clipsToBounds = YES;
        self.bgImageView        = imageView;
        [self addSubview:imageView];

        //shapeLayer
        self.ovalShapeLayer    = [CAShapeLayer layer];
        self.ovalShapeLayer.strokeColor      = [UIColor whiteColor].CGColor;
        self.ovalShapeLayer.fillColor        = [UIColor clearColor].CGColor;
        self.ovalShapeLayer.lineWidth        = 4.;
        self.ovalShapeLayer.lineDashPattern  = @[@2,@3];

        CGFloat refreshRadius                = frame.size.height/2 *.8;

        self.ovalShapeLayer.path             = [UIBezierPath bezierPathWithOvalInRect:
                                           CGRectMake(frame.size.width *.5 - refreshRadius,
                                                      frame.size.height *.5 - refreshRadius,
                                                      2 * refreshRadius,
                                                      2 * refreshRadius)].CGPath;

        [self.layer addSublayer:self.ovalShapeLayer];

        self.airplaneLayer              = [CALayer layer];
        UIImageView *airplaneImage      = [[UIImageView alloc]initWithImage:[UIImage imageNamed:@"airplane"]];
        self.airplaneLayer.contents     = (__bridge id _Nullable)(airplaneImage.image.CGImage);
        self.airplaneLayer.bounds       = CGRectMake(0, 0, airplaneImage.frame.size.width, airplaneImage.frame.size.height);

        self.airplaneLayer.position     = CGPointMake(frame.size.width * .5 + frame.size.height *.5 *.8,
                                                      frame.size.height * .5);
        [self.layer addSublayer:self.airplaneLayer];
    }
    return self;
}
- 接下来重点就在这两个代理事件
在拖拽的代理函数中计算,内容顶部的偏移量,以及拖拽的进度(因为我们的动画显示需要这个进度)
-(void)scrollViewDidScroll:(UIScrollView *)scrollView {
    CGFloat offsetY = MAX(-(scrollView.contentOffset.y+scrollView.contentInset.top), 0.);
    _progress       = MIN(MAX(offsetY / self.frame.size.height, 0.), 1.);
    if (!self.isRefreshing) {
        [self redrawFromProgress:self.progress];
    }
}
/**
 通过进度画圆,和飞机

 @param progress 进度
 */
- (void)redrawFromProgress:(CGFloat)progress {
    self.airplaneLayer.opacity    = _progress;
    self.ovalShapeLayer.strokeEnd = _progress;
}
在拖拽结束的时候判断是否需要进行刷新动作,以及调用刷新动画、实现,刷新控件代理。
-(void)scrollViewWillEndDragging:(UIScrollView *)scrollView withVelocity:(CGPoint)velocity targetContentOffset:(inout CGPoint *)targetContentOffset {
    if (!self.isRefreshing && self.progress >= 1.) {
        if (self.delegate && [self.delegate respondsToSelector:@selector(refreshViewDidRefresh:)]) {
            [self.delegate refreshViewDidRefresh:self];
            [self beginRefreshing];
        }
    }
}
基本的开始结束方法
- (void)beginRefreshing {
    self.refreshing = YES;
    [UIView animateWithDuration:.3 animations:^{
        UIEdgeInsets newInsets       = self.scrollView.contentInset;
        newInsets.top               += self.frame.size.height;
        self.scrollView.contentInset = newInsets;
    }];
}

- (void)endRefreshing {
    self.refreshing   = NO;

    [UIView animateWithDuration:.3 delay:0. options:(UIViewAnimationOptionCurveEaseOut) animations:^{
        UIEdgeInsets newInsets       = self.scrollView.contentInset;
        newInsets.top               -= self.frame.size.height;
        self.scrollView.contentInset = newInsets;
    } completion:^(BOOL finished) {

    }];
}
- 动画
上面已经实现了基本的刷新,但是现在缺少动画。
你应该将开始动画放在获取数据的时候,代码添加在beginRefreshing最后
首先是圆圈
    CABasicAnimation *strokeStartAnimation = [CABasicAnimation animationWithKeyPath:@"strokeStart"];
    strokeStartAnimation.fromValue         = @-.5;
    strokeStartAnimation.toValue           = @1.;

    CABasicAnimation *strokeEndAnimation   = [CABasicAnimation animationWithKeyPath:@"strokeEnd"];
    strokeEndAnimation.fromValue           = @0.;
    strokeEndAnimation.toValue             = @1.;

    CAAnimationGroup *strokeAniamtionGroup = [CAAnimationGroup animation];
    strokeAniamtionGroup.duration          = 1.5;
    strokeAniamtionGroup.repeatDuration    = 5.;
    strokeAniamtionGroup.animations        = @[strokeStartAnimation,strokeEndAnimation];
    [self.ovalShapeLayer addAnimation:strokeAniamtionGroup forKey:nil];
这段代码创建了两个动画:第一个strokeStart从-0.5到1.0这是一种投机取巧的方式,当动画在-0.5到0.0的时间不会做任何事。因为这些值只是代表不可见部分的形状。
飞机动画
   //飞机动画
   CAKeyframeAnimation *flightAnimation   = [CAKeyframeAnimation animationWithKeyPath:@"position"];
   flightAnimation.path                   = self.ovalShapeLayer.path;
   flightAnimation.calculationMode        = kCAAnimationPaced;
   //旋转
   CABasicAnimation    *airplanOrientationAnimation = [CABasicAnimation animationWithKeyPath:@"transform.rotation"];
   airplanOrientationAnimation.fromValue  = @0.;
   airplanOrientationAnimation.toValue    = @(M_PI *2);

   CAAnimationGroup *flightAnimationGroup = [CAAnimationGroup animation];
   flightAnimationGroup.duration          = 1.5;
   flightAnimationGroup.repeatDuration    = 5.;
   flightAnimationGroup.animations        = @[flightAnimation,airplanOrientationAnimation];
   [self.airplaneLayer addAnimation:flightAnimationGroup forKey:nil];
飞机动画主要使用CAKeyframeAnimation动画使飞机按照圆的路径走,设置calculationMode属性为kCAAnimationPaced使动画以一个恒定的速度而且确保沿着这个路径走。当然也要设置他的旋转角度通过airplanOrientationAnimation动画
最后的效果应该是这样:
点击这里可以查看 源码第25个cell,喜欢的给个star


