创建你的数字货币
创建你的数字货币
- 数字货币(第1部分):概念和理解
- 前言
- 公钥体系PKI
- 场景:在区块链上的转账
- 理解:钱包(Wallet)
- 理解:交易 Transaction
- 没有余额?就将所有和我相关的交易记录保存在UTXOs
- 用默克尔数Merkle Tree比较,查询并验证交易
- 场景下所有区块展示
- 货币JannyCoin代码实现:代码胜千言
- 代码实现:公共工具类-JannyUtil
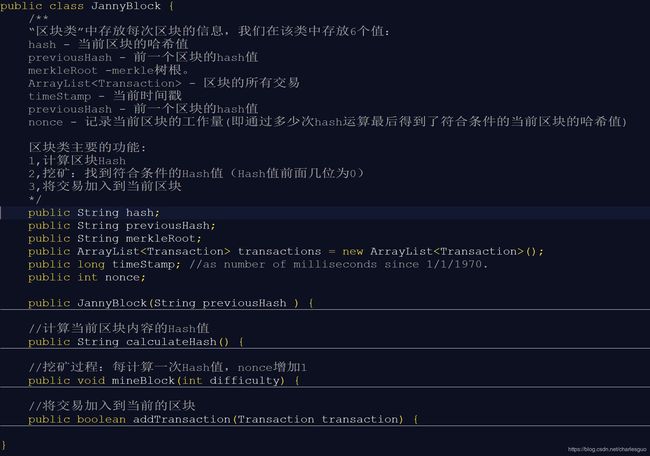
- 代码实现:区块类-JannyBlock
- 代码实现:交易类-Transaction
- 代码实现:钱包类- Wallet
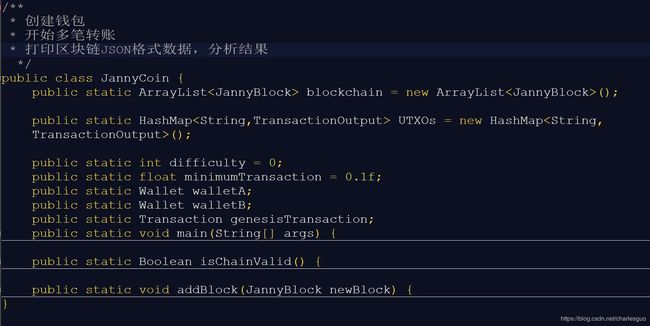
- 代码实现:区块链类- JannyCoin
- 运行和测试
- 获得示例
- 更多
- 继续阅读:跟者Charles学习区块链
数字货币(第1部分):概念和理解
“No good building without a good foundation.”
“没有好根基,盖不了高楼大厦。”
前言
区块链技术最早的应用就是数字货币。
数字货币是一种不受管制的、数字化的货币,通常由开发者发行和管理,被特定虚拟社区的成员所接受和使用。欧洲银行业管理局将虚拟货币定义为:价值的数字化表示,不由央行或当局发行,也不与法币挂钩,但由于被公众所接受,所以可作为支付手段,也可以电子形式转移、存储或交易。
我们在这里通过自己动手实现一个自己的数字货币,可以帮助我们更加完整的了解比特币等数字货币原理,过程笔你想象的要简单。
在开始之前我们需要了解相关的概念和原理。
公钥体系PKI
在实际应用中,如果要将文件从甲传送给乙,要想保密,可以采用对文件加密,这样传输过程中接触的人都看不到,或者看不懂。那这个加密过程方式可以有:
- 对称加密算法。它的特点是文件加密和解密使用相同的密钥,即加密密钥也可以用作解密密钥,这种方法在密码学中叫做对称加密算法。加密和解密均需要两个组件:加密算法和对称密钥。
甲如何将对称密钥传给乙呢?用电话通知,若电话被窃听,通过Internet发送此密钥给乙,可能被黑客截获,怎么办? - 非对称密钥算法。与对称加密算法不同,非对称加密算法需要两个密钥:公开密钥(Public Key)和私有密钥(Private Key)。公开密钥与私有密钥是一对,如果公开密钥对数据进行加密,只有用对应的私有密钥才能解密;如果用私有密钥对数据进行加密,只有用对应的公开密钥才能解密。因为加密和解密使用的是两个不同的密钥,所以这种算法叫做非对称加解密算法(公/私钥可由专门软件生成)。甲乙双方各有一对公/私钥,公钥可在Internet上传送,私钥自己保存。
前面的问题可以这样解决:甲就可以用乙的公钥加密文件,然后乙用自己的私密就可以解密查看。没有了秘钥传输的问题。
至此似乎很安全了。但仍存在安全漏洞,例如:甲虽将合同文件发给乙,但甲拒不承认在签名所显示的那一刻签署过此文件(数字签名就相当于书面合同的文字签名),并将此过错归咎于电脑,进而不履行合同,怎么办?
数字签名:
将要发送的文件先用哈希Hash算法(参见我的文档的第一部分)[1]加密形成摘要。然后将该“摘要 + 时间戳”对该文件用自己的私钥做加密(数字签名),然后将加密后的文件以及这个数字签名一起送给乙方,这样乙方就可以用甲的公钥解密数字签名从而确定是甲方的信息。同时用乙方自己的私钥解密文件查看明文。
代码:
	//生成公钥和私钥
	wallet.generateKeyPair();
	//装换成字符串打印出来
	System.out.println("公钥....... "+JannyUtil.getStringFromKey(wallet.publicKey));
	System.out.println("私钥....... "+JannyUtil.getStringFromKey(wallet.privateKey));

	//用我的私钥对于字符串“JannyDocs”签名
	byte[] bytes = JannyUtil.applyECDSASig(wallet.privateKey, "JannyDocs");
	System.out.println("签名结果....... " + new String(bytes));
运行结果如下:
公钥…
MEkwEwYHKoZIzj0CAQYIKoZIzj0DAQEDMgAEZIntGCB9CYylZ0nrj/NC7ZhENunPGvRuxvNlkTT0WgWFxOvczPCFX4Rl/ZXgquKC
私钥…
MHsCAQAwEwYHKoZIzj0CAQYIKoZIzj0DAQEEYTBfAgEBBBjI/EYOykx+yVdkWzsefOqRxU4JECzjdpygCgYIKoZIzj0DAQGhNAMyAARkie0YIH0JjKVnSeuP80LtmEQ26c8a9G7G82WRNPRaBYXE69zM8IVfhGX9leCq4oI=
签名结果… [B@7bab3f1a
场景:在区块链上的转账
我们的比特币最基本的功能就是转账。
下面我们以介绍一个场景,以便后面的讲解和示例用到它。
就是A 初始有10元,B初始0元。
第1次转账,A转给B金额4元
第2次转账,A转给B金额1元
第3次转账,B转给A金额2元
在区块链中的样子应该如下

记住:
在比特币上只存放交易(Transaction)不保存余额。要取得某个用户当前余额。需要遍历区块链;
后来以太坊出现后可以保存余额,这是后话。
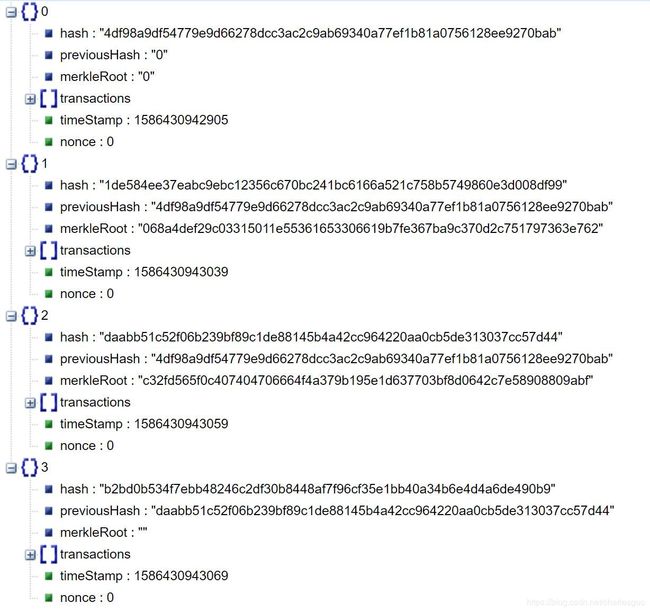
场景下的区块链样式
下图展示在场景一下面四个区块的情况。
其中交易金额隐含在Transaction中,后面会讲到。
理解:钱包(Wallet)
像现实中的情况一样,一个钱包通常情况下保存多个银行卡,每个银行卡对应一个账户(Account)。
一个账户里面存放两个值,公钥和私钥。
通常公钥对应到区块链中的一个地址,比如如果要别人给你转账,你只要告诉他你的公钥就可以,他就可以转到你的钱包中该账户下。
理解:交易 Transaction
交易类中包含下列信息。
1、付款人的公钥信息
2、收款人的公钥信息
3、转移的资金数量
4、输入,之前发生的交易,用来查询付款人的当前余额
5、输出,显示了在这次交易中接受的相关地址(这些输出被参考为新的交易中的输入)
6、这笔交易的数字签名
交易类中的功能:
1、对交易信息做Hash摘要计算
2、对交易做数字签名
3、验证交易的数字签名
4、处理交易:验证有足够的余额,并进行实际的转账
请注意,在上面图表中还有两个参数,叫交易输入(Inputs)和交易输出(Outputs)
这是由于交易中不保存余额,所以需要记录所有链中所有的交易,便于计算余额的值。
没有余额?就将所有和我相关的交易记录保存在UTXOs
比特币没有记录每个用户的余额,用户的余额都是基于未消费的交易输出 unspent tx outputs(UTXOs)。
我们来看看什么是 UTXOs , 我们来想想下「比特币」网络交易的原则:
我发送的任何比特币金额都会被发送到一个发送地址——对方的钱包地址;
你接收到任何比特币金额都会被锁定到您的接受地址——我的钱包地址;
任何时候你花费(转账,发送)比特币,你花的金额都是来自于你以前收到但是未花费的资金;
通过钱包来接收和使用比特币
在你的钱包里存的是你从别人那里收到且未使用的每一个比特币交易记录(transaction and not spent yet)。在「比特币」网络中,有人给你发送比特币被称为「输出(outputs)」。这些未使用的交易输出被称为 UTXOs(Unspent Transaction Outputs)。
这些记录按照收到的方式进行存储。
举个例子:你收到了3个交易,每次交易分别为:交易1——1 btc, 交易2——2btc, 交易3——5btc。那么你的钱包里将显示3个单独的交易,分别为1,2,3个 btc。当然你的钱包余额是这些记录的总和——8btc,但是每一笔交易都是单独存储的。
要转账4 btc 给别人,你首先要创建一个交易:
- 你要先找到一个你之前收到但是未使用的交易(也就是 UTXOs);
- 证明这个交易属于你
- 利用对方的钱包地址(公钥)创建一个输出,作为转账目的地
看似还不是特别复杂,但是你要注意:你收到了3个交易,每次交易分别为:交易1——1 btc, 交易2——2btc, 交易3——5btc。3个交易中并没有一个4 btc 的交易,那怎么办呢?
你需要将交易3的5个比特币全部花掉:将交易3进行拆分,分成4btc和1btc。4btc输出给对方,再创建另一个交易,将1btc 输出给自己。
同时,我们也说了比特币脚本语言并没有「循环」等图灵完备性功能,如果你想写一个比特币钱包的应用程序,「转账」这个功能将会非常复杂:查找用户钱包里所有的UTXOs——>将符合条件的 UTXOs 选出来作为一个集合,使这个集合中的 UTXOs 的综合大于或者等于交易的期望输出。
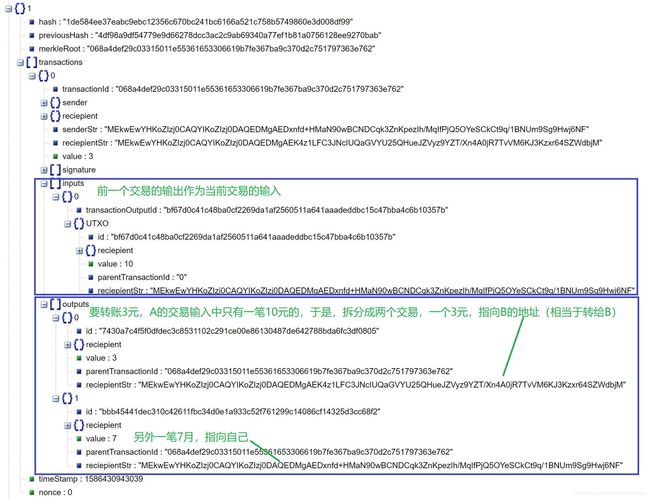
好,我们接下来看一下在场景一下第一笔交易区块1上记录的 Input(UTXOs),Output 的实际值。
用默克尔数Merkle Tree比较,查询并验证交易
在一个单一的区块中可能存放了许多个交易,这就会导致大量的hash计算,比特币中使用了交易的merkle树。Merkle Tree,通常也被称作Hash Tree,顾名思义,就是存储hash值的一棵树。Merkle树的叶子是数据。
先看它的结构。在最底层,我们把数据分成小的数据块,有相应地哈希和它对应。但是往上走,并不是直接去运算根哈希,而是把相邻的两个哈希合并成一个字符串,然后运算这个字符串的哈希,这样每两个哈希就结婚生子,得到了一个”子哈希“,最终必然形成一棵倒挂的树,到了树根的这个位置,这一代就剩下一个根哈希了,我们把它叫做 Merkle root.
再说它的优点。相对于 Hash List,Merkle Tree 的明显的一个好处是可以单独拿出一个分支来(作为一个小树)对部分数据进行校验,这个很多使用场合就带来了哈希列表所不能比拟的方便和高效。
更多信息可以参考:https://blog.csdn.net/charlesguo/article/details/105081273
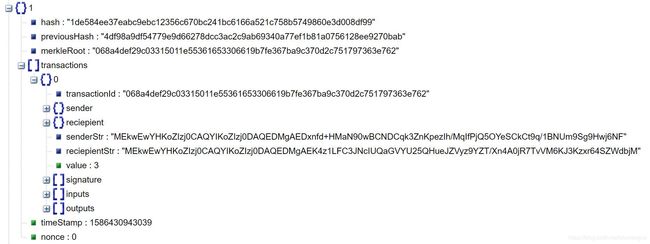
场景下所有区块展示
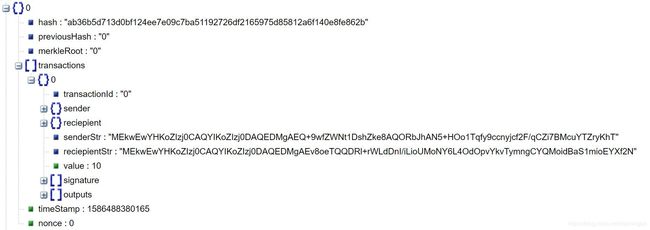
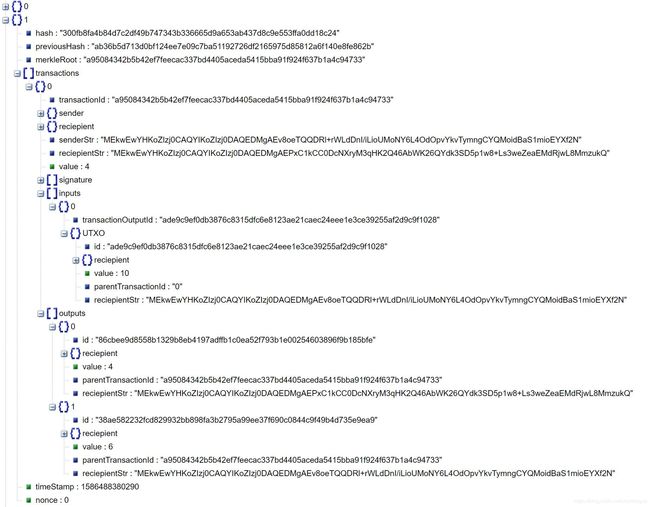
我们将场景一的实现运行后,区块中所有内容我们以Jason的方式输出,查看区块的内容如下,细心的读者可以打印出来仔细对比这些输入的关联关系,有利于深刻理解数字货币的实现过程。


货币JannyCoin代码实现:代码胜千言
“Catching dragons is to go to sea and fighting tigers is to go up the hill”
“擒龙要下海,打虎要上山。”
代码实现:公共工具类-JannyUtil
代码实现:区块类-JannyBlock
package com.janny.jannycoin;
/**
 * @Description:   Prototype code for Lib blockchain project
 *
 * @author          Janny ([email protected])
 * @version         V1.0
 * @Date            04/06/2020
 */


import java.util.ArrayList;
import java.util.Date;

public class JannyBlock {
	/**
	“区块类”中存放每次区块的信息,我们在该类中存放6个值:
	hash - 当前区块的哈希值
	previousHash - 前一个区块的hash值
	merkleRoot -merkle树根。
	ArrayList - 区块的所有交易
	timeStamp - 当前时间戳
	previousHash - 前一个区块的hash值
	nonce - 记录当前区块的工作量(即通过多少次hash运算最后得到了符合条件的当前区块的哈希值)

	区块类主要的功能:
	1,计算区块Hash
	2,挖矿:找到符合条件的Hash值(Hash值前面几位为0)
	3,将交易加入到当前区块
	*/
	public String hash;
	public String previousHash;
	public String merkleRoot;
	public ArrayList<Transaction> transactions = new ArrayList<Transaction>();
	public long timeStamp; //as number of milliseconds since 1/1/1970.
	public int nonce;

	public JannyBlock(String previousHash ) {
		this.previousHash = previousHash;
		this.timeStamp = new Date().getTime();

		this.hash = calculateHash();

	}

	//计算当前区块内容的Hash值
	public String calculateHash() {
		String calculatedhash = JannyUtil.applySha256(
				previousHash +
				Long.toString(timeStamp) +
				Integer.toString(nonce) +
				merkleRoot
				);
		return calculatedhash;
	}

	//挖矿过程:每计算一次Hash值,nonce增加1
	public void mineBlock(int difficulty) {
		merkleRoot = JannyUtil.getMerkleRoot(transactions);
		String target = JannyUtil.getDificultyString(difficulty); //Create a string with difficulty * "0"
		while(!hash.substring( 0, difficulty).equals(target)) {
			nonce ++;
			hash = calculateHash();
		}
		System.out.println("Block Mined!!! : " + hash);
	}

	//将交易加入到当前的区块
	public boolean addTransaction(Transaction transaction) {
		//process transaction and check if valid, unless block is genesis block then ignore.
		if(transaction == null) return false;
		if((previousHash != "0")) {
			if((transaction.processTransaction() != true)) {
				System.out.println("Transaction failed to process. Discarded.");
				return false;
			}
		}
		transactions.add(transaction);
		System.out.println("Transaction Successfully added to Block");
		return true;
	}

}
代码实现:交易类-Transaction
代码实现:钱包类- Wallet
代码实现:区块链类- JannyCoin
完整实现代码如下:
package com.janny.jannycoin;
/**
 * @Description:   Prototype code for Lib blockchain project
 *
 * @author          Janny ([email protected])
 * @version         V1.0
 * @Date            03/19/2020
 */
import java.security.Security;
import java.util.ArrayList;
import java.util.HashMap;

import com.janny.jannycoin.JannyBlock;
import com.janny.jannycoin.JannyUtil;


public class JannyCoin {
	public static ArrayList<JannyBlock> blockchain = new ArrayList<JannyBlock>();

	public static HashMap<String,TransactionOutput> UTXOs = new HashMap<String,TransactionOutput>();

	public static int difficulty = 0;
	public static float minimumTransaction = 0.1f;
	public static Wallet walletA;
	public static Wallet walletB;
	public static Transaction genesisTransaction;
	public static void main(String[] args) {

		//Setup Bouncey castle as a Security Provider
		Security.addProvider(new org.bouncycastle.jce.provider.BouncyCastleProvider());

		//创建用户A和用户B的两个钱包:
		walletA = new Wallet();
		walletB = new Wallet();
		Wallet mywallet = new Wallet();


		//创建区块链的创世块,并给A钱包初始为10个jannycoin币
		genesisTransaction = new Transaction(mywallet.publicKey, walletA.publicKey, 10f, null);
		genesisTransaction.generateSignature(mywallet.privateKey);
		genesisTransaction.transactionId = "0";

		//将10元的交易放置在用户A的数组中
		genesisTransaction.outputs.add(new TransactionOutput(genesisTransaction.reciepient, genesisTransaction.value, genesisTransaction.transactionId));
		UTXOs.put(genesisTransaction.outputs.get(0).id, genesisTransaction.outputs.get(0));

		JannyBlock genesis = new JannyBlock("0");
		genesis.addTransaction(genesisTransaction);
		addBlock(genesis);
		System.out.println("block0 added......"+isChainValid());


		//A 转给 B 4元
		JannyBlock myblock;
		myblock = new JannyBlock(genesis.hash);
		myblock.addTransaction(walletA.sendFunds(walletB.publicKey, 4f));
		addBlock(myblock);

		//A 转给 B 1元
		myblock = new JannyBlock(genesis.hash);
		myblock.addTransaction(walletA.sendFunds(walletB.publicKey, 1f));
		addBlock(myblock);

		//B 转给 A 2元
		myblock = new JannyBlock(myblock.hash);
		myblock.addTransaction(walletB.sendFunds(walletA.publicKey, 2f));
		addBlock(myblock);


		/*
		尝试过错误的交易(金额不足)区块的测试案例,验证交易的有效性
		myblock = new JannyBlock(previousVaildBlockHash);
		myblock.addTransaction(walletA.sendFunds(walletB.publicKey, 20f));
		System.out.println("block valid?......"+isChainValid());
		System.out.println(JannyUtil.getJson(myblock));
		*/

		System.out.println("--------------");
		System.out.println(JannyUtil.getJson(blockchain));

	}

	public static Boolean isChainValid() {
		JannyBlock currentBlock;
		JannyBlock previousBlock;
		String hashTarget = new String(new char[difficulty]).replace('\0', '0');
		HashMap<String,TransactionOutput> tempUTXOs = new HashMap<String,TransactionOutput>(); //a temporary working list of unspent transactions at a given block state.
		tempUTXOs.put(genesisTransaction.outputs.get(0).id, genesisTransaction.outputs.get(0));

		//loop through blockchain to check hashes:
		for(int i=1; i < blockchain.size(); i++) {

			currentBlock = blockchain.get(i);
			previousBlock = blockchain.get(i-1);
			//compare registered hash and calculated hash:
			if(!currentBlock.hash.equals(currentBlock.calculateHash()) ){
				System.out.println("#Current Hashes not equal");
				return false;
			}
			//compare previous hash and registered previous hash
			if(!previousBlock.hash.equals(currentBlock.previousHash) ) {
				System.out.println("#Previous Hashes not equal");
				return false;
			}
			//check if hash is solved
			if(!currentBlock.hash.substring( 0, difficulty).equals(hashTarget)) {
				System.out.println("#This block hasn't been mined");
				return false;
			}

			//loop thru blockchains transactions:
			TransactionOutput tempOutput;
			for(int t=0; t <currentBlock.transactions.size(); t++) {
				Transaction currentTransaction = currentBlock.transactions.get(t);

				if(!currentTransaction.verifiySignature()) {
					System.out.println("#Signature on Transaction(" + t + ") is Invalid");
					return false;
				}
				if(currentTransaction.getInputsValue() != currentTransaction.getOutputsValue()) {
					System.out.println("#Inputs are note equal to outputs on Transaction(" + t + ")");
					return false;
				}

				for(TransactionInput input: currentTransaction.inputs) {
					tempOutput = tempUTXOs.get(input.transactionOutputId);

					if(tempOutput == null) {
						System.out.println("#Referenced input on Transaction(" + t + ") is Missing");
						return false;
					}

					if(input.UTXO.value != tempOutput.value) {
						System.out.println("#Referenced input Transaction(" + t + ") value is Invalid");
						return false;
					}

					tempUTXOs.remove(input.transactionOutputId);
				}

				for(TransactionOutput output: currentTransaction.outputs) {
					tempUTXOs.put(output.id, output);
				}

				if( currentTransaction.outputs.get(0).reciepient != currentTransaction.reciepient) {
					System.out.println("#Transaction(" + t + ") output reciepient is not who it should be");
					return false;
				}
				if( currentTransaction.outputs.get(1).reciepient != currentTransaction.sender) {
					System.out.println("#Transaction(" + t + ") output 'change' is not sender.");
					return false;
				}

			}

		}
		System.out.println("Blockchain is valid");
		return true;
	}

	public static void addBlock(JannyBlock newBlock) {
		newBlock.mineBlock(difficulty);
		blockchain.add(newBlock);
	}
}
运行和测试
代码运行后,每笔交易发生,挖矿加到主链上,判断区块链的合法性。
最后我们将整个区块中的内容以Json的方式打印出来如下:
Transaction Successfully added to Block
treeLayer:[
  "0"
]
Block Mined!!! : ab36b5d713d0bf124ee7e09c7ba51192726df2165975d85812a6f140e8fe862b
Blockchain is valid
block0 added......true
Transaction Successfully added to Block
treeLayer:[
  "a95084342b5b42ef7feecac337bd4405aceda5415bba91f924f637b1a4c94733"
]
Block Mined!!! : 300fb8fa4b84d7c2df49b747343b336665d9a653ab437d8c9e553ffa0dd18c24
Transaction Successfully added to Block
treeLayer:[
  "24e9b824b7f8bd27cf77437d07ef82e629143c21af35c46f0a514dfb4b7caef8"
]
Block Mined!!! : d9840ea2846d2b82c962dc81c5fdf72ae25af392b3a5db2804abbef887d59106
Transaction Successfully added to Block
treeLayer:[
  "05134099ca0b6a0a92fd99f110ef0dd52437fa524136e6dcc17d98bc6220f7cb"
]
Block Mined!!! : 5510884c211fd9d5bf19278141143494dbcffa3147e1637e2dc71afd60eb5754
--------------
[
  {
    "hash": "ab36b5d713d0bf124ee7e09c7ba51192726df2165975d85812a6f140e8fe862b",
    "previousHash": "0",
    "merkleRoot": "0",
    "transactions": [
      {
...<略>
备注:运行结果也可以和源码一起下载。
获得示例
从 github 中下载:https://github.com/ecustjanny/JannyCoin
更多
如果你确认对于这里将的区块链已经能理解,并希望更深入的了解高级技术,请继续阅读后面的章节。
任何疑问或者反馈,请再评论区给我留言,或者邮件给我[email protected] 一起探讨。
如果你想转载,请注明出处,谢谢。
继续阅读:跟者Charles学习区块链
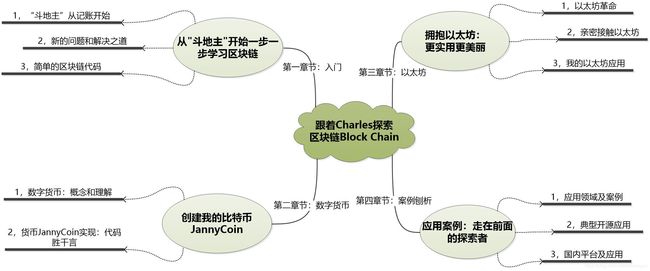
从简单到深入,编写了学习区块链系列文章,按照顺序学习,可以将你从一个不了解区块链的读者一步一步带入到区块链这一革命性的技术领域里。
- 从"斗地主"开始一步一步学习区块链
- 创建你的数字货币JannyCoin
- 拥抱以太坊,更实用更美丽
- 应用案例:走在前面的探索者
