一、 引入
上回 Spring Cloud 理论篇 介绍了 Spring Cloud 的常见组件,让读者对 Spring Cloud 有了一个宏观认识,这是从理论层面出发的。接下来我们就进入 Spring Cloud 的实战教程,撸起袖子,真枪实弹干一场。在实战演练中感受一下 Spring Cloud 的魅力所在。在教程中,我会将 Spring Cloud 常见组件进行整合。整个过程就像搭积木一样,一点一点地完成一个微服务工程的搭建。实战演练是比较繁琐的,但是只要我们真正地去做了,就会收获很多。
二、 Eureka 组件(注册中心)
作为 Spring Cloud 的注册中心,我们第一步需要把 Eureka 组件搭起来。因为接下来的消费者以及生产者都是以 Eureka 组件为基础展开的。
2.1 pom 文件
我们引入 Eureka 的依赖。
<dependency>
    <groupId>org.springframework.cloudgroupId> <artifactId>spring-cloud-starter-eureka-serverartifactId> dependency>
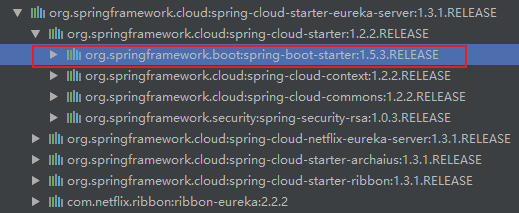
正如 Spring Cloud 理论篇 提到 Spring Cloud 是基于 SpringBoot 开发的。那么读者是否有疑惑为什么不需要
web 模块呢?当然是需要的,只不过是 Eureka 的依赖的依赖中已经包含了必要的模块。
2.2 yml 文件
引入必要模块后,我们就要去配置 yml 文件了。
server:
  port: 7001

eureka:
  instance:
 hostname: localhost # eureka 服务端的实例名称  client:  register-with-eureka: false # 表示不需要向注册中心注册自己  fetch-registry: false # false 表示自己端就是注册中心,我的职责就是维护服务实例,并不需要去检索服务  service-url:  defaultZone: http://${eureka.instance.hostname}:${server.port}/eureka # 设置与 Eureka Server 交互的地址查询服务和注册服务
至于配置相关的文件意义,注释已经说的很清楚了。详情请看注释。
2.3 启动类
最后写好启动类,就算完成的 Eureka 组件的搭建了。
@SpringBootApplication
@EnableEurekaServer
public class AppApplication7001 {
    public static void main( String[] args ) { SpringApplication.run(AppApplication7001.class, args); } }
可以看到我们的启动类的注解除了万年不变的 @SpringBootApplication ,还增加了 @EnableEurekaServer ,该注解的作用是表明该工程作为 Eureka 组件存在的。就好像我们怎么证明自己的身份呢,拿出自己的身份证即可。
2.4 启动效果
Eureka 组件启动如图所示。
三、生产者(服务提供者)
3.1 pom 文件
我们再新建一个工程,该工程其实本质也是一个 Eureka 组件,不过我们可以通过配置文件使其变成生产者。可能读者有点迷糊,我打个比方。社会上有警察、医生、码畜等等,有很多的身份类型,但本质我们都是人。我们都是有感情的生物。回到代码层面,首先我们需要引入相关依赖。
<dependency>
    <groupId>org.springframework.bootgroupId> <artifactId>spring-boot-starter-webartifactId> dependency> <dependency> <groupId>org.springframework.cloudgroupId> <artifactId>spring-cloud-starter-eurekaartifactId> dependency>
3.2 yml 文件
server:
  port: 8002  # 服务的端口
eureka:
  client:
    service-url: defaultZone: http://localhost:7001/eureka
3.3 启动类
@SpringBootApplication
@EnableEurekaClient
public class AppApllcation8002{
    public static void main( String[] args ) { SpringApplication.run(AppApllcation8002.class, args); } }
这里我们可以看到注册中心的启动类和服务提供者的注解是不一样的。
| 注册中心 | 服务提供者 |
|---|---|
| @EnableEurekaServer | @EnableEurekaClient |
3.4 启动效果
目前我们有了两个工程,启动的时候是有顺序的。首先启动注册中心然后再启动服务提供者。这就好比我们先要有房子了,才可以入住一样。
对比上图我们可以发现网页多出来一个服务提供者。说明服务提供者项目搭建完成。
四、消费者(服务消费者)
4.1 pom 文件
有个服务提供者,那么是不是应该有服务消费者呢?此时我们需要新建另外一个工程作为服务消费者。那么问题来了,作为服务消费者,我们怎样去调用服务提供者呢?此时,肯定是不能像以前直接在 controller 层调用 service 层一样了,因为服务消费者和服务提供者是两个工程了,并且分别运行在两个 tomcat 里面。这里我们就需要进行网络调用了。在 Spring Cloud 里面我们可以使用 Feign 进行不同服务的调用。
<dependency>
    <groupId>org.springframework.bootgroupId> <artifactId>spring-boot-starter-webartifactId> dependency> <dependency> <groupId>org.springframework.bootgroupId> <artifactId>spring-boot-starter-testartifactId> <scope>testscope> dependency> <dependency> <groupId>org.springframework.cloudgroupId> <artifactId>spring-cloud-starter-eurekaartifactId> dependency> <dependency> <groupId>org.springframework.cloudgroupId> <artifactId>spring-cloud-starter-feignartifactId> dependency>
4.2 yml 文件
接下来我们需要配置 yml 文件。
server:
  port: 80

eureka:
  client:
    register-with-eureka: false # 不向注册中心注册了 service-url: defaultZone: http://localhost:7001/eureka
因为工程是作为服务消费者存在的。所以我们不需要往注册中心注册服务。这样注册中心就只管理好服务提供者即可。
4.3 启动类以及 feign类 接口
@FeignClient(value = "microservicloud-dept") // 服务提供者的名字
public interface IFeignService {
    @GetMapping("/provide")
    String feign();
}

@SpringBootApplication @RestController @EnableEurekaClient @EnableFeignClients(basePackages = {"com.example"}) public class AppApplication80 { public static void main( String[] args ) { SpringApplication.run(AppApplication80.class, args); } @Autowired private IFeignService feignService; @GetMapping("/controller/feign") public String feign(){ return feignService.feign(); } }
五、总结
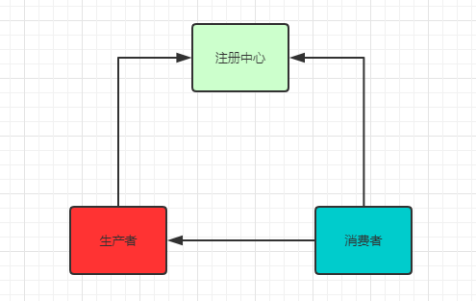
至此我们就完成了一个简单的 Spring Cloud 的微服务架构多模块项目。根据项目搭建,我们可以简单画出架构图。具体源码已经在开头引用给出,可以直接克隆运行。


