android核心技术之性能分析工具TraceView
前面的话
有一次,被一个高大上的公司面试问到TraceView是做什么的,不知道,于是被人鄙视了。当时觉得别人好高大上啊,这么牛的东西都知道,而我只是听过这个名字,完全不清楚是个什么东东,果然是好公司啊,这个东东一定非常高深。
然后晚上我百度了一下,看了几个博客,再然后自己写了一个Demo,就明白了,原来是一个性能分析定位工具,只要用过,就是如此的简单,对于所有人都是零门槛的那种,哎,一个基本的工具使用,只要留心一下,大家都会使用的。
TraceView
系统性能优化,关键是要定位其中的hotspot(热点,即bottleneck,也就是系统的瓶颈)。只要定位到了hotspot,基本上问题解决了一个大半,所以快速准确的定位hotspot是问题解决的关键。
TraceView是Android平台特有的数据采集和分析工具,它主要用于分析Android中应用程序的hotspot,特别是可以清楚的统计线程对CPU资源的占用情况,方法的调用次数,调用时间等信息。
TraceView使用方法
TraceView的使用方法有二个:
1.分析时,可以在开始的地方调用Debug类的startMethodTracing函数,在要结束的地方调用Debug类的stopMethodTracing函数。这两个函数运行过程中将采集运行时间内该应用所有线程(注意,只能是Java线程)的函数执行情况,并将采集数据保存到/sdcard/trace_view_debug.trace文件中。开发者然后需要利用SDK中的Traceview工具来分析这些数据。
代码如下:
//开始的地方
Debug.startMethodTracing("trace_view_debug");
//结束的地方
Debug.stopMethodTracing();
使用此接口,需要在AndroidManifest.xml文件中定义权限:
<uses-permission android:name="android.permission.WRITE_EXTERNAL_STORAGE"/>
<uses-permission android:name="android.permission.MOUNT_UNMOUNT_FILESYSTEMS"/>
我们将trace_view_debug.trace导出手机:
adb pull /sdcard/trace_view_debug.trace /home/android/分别使用traceview来打开此文件:
如果是Eclipse,则进入/SDK/tools目录,执行如下指令:
./traceview /home/android/trace_view_debug.trace如查是Android Studio,则进入android_studio/android-sdk-linux/tools目录,执行指令:
./traceview /home/android/trace_view_debug.trace2.直接使用DDMS工具中的Start Method Profiling按钮,如下图:
先选中一个应用进程,Start Method Profiling按钮显示可以点击,我们点击Start Method Profiling按钮,然后工具采集目标进程的数据,当我们再次点击,会直接跳转到Traceview界面。如下图:
Traceview界面包括二个部分,Timeline Panel(时间线面板)和Profile Panel(分析面板):
看上图,Timeline Panel又可细分为左右两个Pane:
- 左边Pane显示的是测试数据中所采集的线程信息。本次测试数据采集了main线程,ReferenceQueueDaemon,FinallizerDaemo,还有二个Thread的信息。
- 右边Pane所示为时间线,时间线上是每个线程测试时间段内所涉及的函数调用信息。这些信息包括函数名、函数执行时间等。由上图可知,main线程的工作内容非常多,而其他线程的工作也比较多。
Profile Panel是Traceview的核心界面。它主要展示了某个线程(先在Timeline Panel中选择线程)中各个函数调用的情况,包括CPU使用时间、调用次数等信息。而这些信息正是查找hotspot的关键依据。所以,对开发者而言,一定要了解Profile Panel中各列的含义,Profile Panel各列作用说明如下:
| 列名 | 描述 |
|---|---|
| Name | 该线程运行过程中所调用的函数名 |
| Incl Cpu Time | 某函数占用的CPU时间,包含内部调用其它函数的CPU时间 |
| Excl Cpu Time | 某函数占用的CPU时间,但不含内部调用其它函数所占用的CPU时间 |
| Incl Real Time | 某函数运行的真实时间(以毫秒为单位),内含调用其它函数所占用的真实时间 |
| Excl Real Time | 某函数运行的真实时间(以毫秒为单位),不含调用其它函数所占用的真实时间 |
| Call+Recur Calls/Total | 某函数被调用次数以及递归调用占总调用次数的百分比 |
| Cpu Time/Call | 某函数调用CPU时间与调用次数的比。相当于该函数平均执行时间 |
| Real Time/Call | 同CPU Time/Call类似,只不过统计单位换成了真实时间 |
另外,每一个Time列还对应有一个用时间百分比来统计的列(如Incl Cpu Time列对应还有一个列名为Incl Cpu Time %的列,表示以时间百分比来统计的Incl Cpu Time)。
注:
如果你是Eclipse,你可以直接看到DDMS工具中的Start Method Profiling按钮,如果你是Android Studio,你可以先Tools—Android—Android Device Monitor调出Eclipse中常用的DDMS界面。
了解完Traceview的UI后,现在介绍如何利用Traceview来查找hotspot。
如何利用Traceview来查找hotspot
一般而言,hotspot包括两种类型的函数:
- 一类是调用次数不多,但每次调用却需要花费很长时间的函数,(我们命名为hotspot01)。
- 一类是那些自身占用时间不长,但调用却非常频繁的函数,(我们命名为hotspot02)。
我们自己在一个Activity中,创建二个这样的hotspot,一个是hotspot01,只执行一次,其工作是一次执行5000次MD5计算,一个是hotspot02,其工作是一次执行50次的MD5计算,总共执行500次。
    //hotspot01,其工作是一次执行5000次MD5计算
    private Runnable hotspot01 = new Runnable() {
        @Override
        public void run() {
            Log.i(TAG,"hotspot01--run");
            while(flag01){

                getMD5Count(5000,"hotspot01--run");

                try {
                    Thread.sleep(2000);
                    flag01 = false;
                } catch (InterruptedException e) {
                    e.printStackTrace();
                }

                if(!flag01){
                    handler.sendEmptyMessage(message_hotspot_01);
                    Log.i(TAG,"handler.sendEmptyMessage(message_hotspot_01)");
                }
            }
        }
    };
//hotspot02,其工作是一次执行50次的MD5计算,总共执行500次
private Runnable hotspot02 = new Runnable() {
@Override
public void run() {
Log.i(TAG,"hotspot02--run");
getMD5Count(50,"hotspot02--run");
try {
Thread.sleep(10);
} catch (InterruptedException e) {
e.printStackTrace();
}
count = count +1;
hotspot02Count = hotspot02Count -1;
Log.i(TAG,"handler.sendEmptyMessage(message_hotspot_02)");
handler.sendEmptyMessage(message_hotspot_02);
}
};完整的代码如下:
主要实现的功能是在一个Activity中,显示二个TextView,一个Button,当点击Button后,执行二个线程,线程一中是有一个hotspot:hotspot01,其只执行一次,其工作是一次执行5000次MD5耗时计算,线程二中是有一个hotspot:hotspot02,其工作是一次执行50次的MD5计算,总共执行500次。
TextView 1会显示线程一的执行结果,TextView 2会显示线程二的执行结果,
public class MainActivity extends AppCompatActivity {

    private static final String TAG = "MainActivity";

    private TextView textView_01;
    private TextView textView_02;
    private Button button;

    private Handler handler;

    private boolean flag01 =true;
    private int count = 0;
    private int hotspot02Count = 500;

    private static final int message_hotspot_01 = 1;
    private static final int message_hotspot_02 = 2;

    private Runnable hotspot01 = new Runnable() {
        @Override
        public void run() {
            Log.i(TAG,"hotspot01--run");
            while(flag01){

                getMD5Count(5000,"hotspot01--run");

                try {
                    Thread.sleep(2000);
                    flag01 = false;
                } catch (InterruptedException e) {
                    e.printStackTrace();
                }

                if(!flag01){
                    handler.sendEmptyMessage(message_hotspot_01);
                    Log.i(TAG,"handler.sendEmptyMessage(message_hotspot_01)");
                }
            }
        }
    };
    private Runnable hotspot02 = new Runnable() {
        @Override
        public void run() {
            Log.i(TAG,"hotspot02--run");

            getMD5Count(50,"hotspot02--run");

            try {
                Thread.sleep(10);
            } catch (InterruptedException e) {
                e.printStackTrace();
            }
            count = count +1;
            hotspot02Count = hotspot02Count -1;
            Log.i(TAG,"handler.sendEmptyMessage(message_hotspot_02)");
            handler.sendEmptyMessage(message_hotspot_02);
            }
    };


    private class MyHandler extends Handler {

        @Override
        public void handleMessage(Message msg) {

            if(msg.what == message_hotspot_01){
                Log.i(TAG,"MyHandler--handleMessage---message_hotspot_01");
                textView_01.setText("ruunable 01 thread end");
            }else if(msg.what == message_hotspot_02){
                Log.i(TAG,"MyHandler--handleMessage---message_hotspot_02");
                textView_02.setText("ruunable 02 run count:"+count);
                if(hotspot02Count <500){
                    new Thread(hotspot02).start();
                }
            }
        }
    }

    @Override
    protected void onCreate(Bundle savedInstanceState) {
        super.onCreate(savedInstanceState);
        setContentView(R.layout.activity_main);

        init();
    }

    private void init() {
        handler = new MyHandler();
        textView_01 = (TextView) findViewById(R.id.textView_01);
        textView_02 = (TextView) findViewById(R.id.textView_02);
        button = (Button) findViewById(R.id.button);
        button.setOnClickListener(new View.OnClickListener() {
            @Override
            public void onClick(View v) {
                Log.i(TAG,"onClick");
                new Thread(hotspot01).start();
                new Thread(hotspot02).start();
            }
        });
    }

    @Override
    protected void onDestroy() {
        super.onDestroy();

    }


    public static String getMD5(String str) {
        String result="";
        try {
            MessageDigest md = MessageDigest.getInstance("MD5");
            md.update(str.getBytes());
            result = new BigInteger(1, md.digest()).toString(16);
        } catch (Exception e) {
            //throw new SpeedException("MD5加密出现错误");
            e.printStackTrace();
        }
        return result;
    }


    public static String getMD5Count(int count,String str) {
        String result ="";
        for (int i=0;ireturn result;
    }
}
我们在开始点击Button前,点击Start Method Profiling按钮开始收集线程信息,当TextView 1显示线程一执行完后,我们再点击Start Method Profiling按钮,停止收集线程信息,跳转到TraceView界面:
首先,我们来查找hotspot 1。
在Profile Panel中,选择按Cpu Time/Call进行降序排序(从上之下排列,每项的耗费时间由高到低),得到下图所示的结果:
我们可以明确的看到android.com.test.MainActivity$1.run()方法,hotspot Cpu Time/Call为754.527,执行次数为1+0,Incl Cpu Time为23.4%,点击此方法名,我们可以看到,android.com.test.MainActivity.getMD5Count方法占用了99.9%的Cpu资源,非常明确,此方法就是一个hotspot1.
相对来说,类型1的hotspot比较好找,步骤是先按降序对时间项进行排列(可以是时间百分比、真实时间或CPU时间),然后查找耗费时间最多的函数。
一般而言,先应对应用程序自己实现的函数进行排查,Framework的函数也有可能是hotspot,但主因一般还是在应用本身。
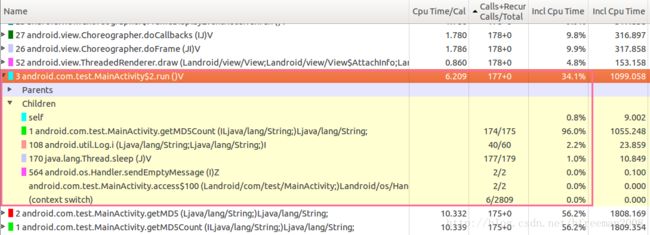
其实,我们中要再向下拉一点,我们就可以看到android.com.test.MainActivity$2.run()方法,我们会发现其Cpu Time/Call为6.209,其调用的次数为177+0次,占用的Incl Cpu Time为34.%,是不是有点偏高啊。
现在,我们来看如何查找类型2的hotspot。
点击Call/Recur Calls/Total列头,使之按降序排列。关注点放在那些调用频繁并且占用资源较多的函数。下图为降序排列的结果图:
我们可以看到android.com.test.MainActivity$2.run方法,调用了177次,Cpu Time/Call为6.209,关键是Incl Cpu Time为34.1%,明显的高于上面的数值,特别是我们看到android.com.test.MainActivity.getMD5Count方法的Call/Recur Calls/Total为174/175,Incl Cpu Time占比达到了96.0%,至此,我们可以确定此方法为类型2的hotspot,需要优化。
上面讲解了如何定位hotspot,Traceview的官方网站如下:
https://developer.android.com/studio/profile/traceview-walkthru.html
有什么不懂的,可以去官网看看,
大家是不是想要一个使用TraceView解决性能问题的例子,http://www.cnblogs.com/sunzn/p/3192231.html,这个网站给了一个如何使用TraceView定位问题,解决问题的例子,你可以去好好看看。
参考资料
1.Android 编程下的 TraceView 简介及其案例实战
http://www.cnblogs.com/sunzn/p/3192231.html
2.Android 性能优化 二 TraceView工具的使用
http://blog.csdn.net/androiddevelop/article/details/8223805
3.Android系统性能调优工具介绍
http://blog.csdn.net/innost/article/details/9008691


