手把手教学训练MTCNN模型.
手把手教学训练MTCNN模型
- 0 背景介绍
- 1.关于训练集,测试集,校验集
- 1.1 获取数据集
- 1.2 数据集预处理
- mtcnn网络结构介绍
- 预处理过程
- 1.3 开始训练
0 背景介绍
我在学习人脸识别时,发现虽然网络上关于人脸识别理论的文章非常的多,但涉及到如何获取训练样本,如何进行预处理,以及如何去训练,并研究训练中的主要耗时情况等问题的文章非常的零散.因此在这里我结合我自己训练的步骤重头进行汇众整理并加入一些自己的理解.
此github的代码提交在: https://github.com/hlzy/caffe_mtcnn (目前代码还没整理完,我几乎是在2019-09-15日前整理完)
1.关于训练集,测试集,校验集
1.1 获取数据集
我使用的是WIDER_FACE数据集,这个数据集有32203张图片,并且标记了393703张脸,数据集共有61个大分类,如下:
0--Parade            17--Ceremony      24--Soldier_Firing       31--Waiter_Waitress  39--Ice_Skating  46--Jockey                   53--Raid                  61--Street_Battle
10--People_Marching  18--Concerts      25--Soldier_Patrol       32--Worker_Laborer   3--Riot          47--Matador_Bullfighter      54--Rescue                6--Funeral
11--Meeting          19--Couple        26--Soldier_Drilling     33--Running          40--Gymnastics   48--Parachutist_Paratrooper  55--Sports_Coach_Trainer  7--Cheering
12--Group            1--Handshaking    27--Spa                  34--Baseball         41--Swimming     49--Greeting                 56--Voter                 8--Election_Campain
13--Interview        20--Family_Group  28--Sports_Fan           35--Basketball       42--Car_Racing   4--Dancing                   57--Angler                9--Press_Conference
14--Traffic          21--Festival      29--Students_Schoolkids  36--Football         43--Row_Boat     50--Celebration_Or_Party     58--Hockey
15--Stock_Market     22--Picnic        2--Demonstration         37--Soccer           44--Aerobics     51--Dresses                  59--people--driving--car
16--Award_Ceremony   23--Shoppers      30--Surgeons             38--Tennis           45--Balloonist   52--Photographers            5--Car_Accident
这些文件夹中存放是图片文件本身,其中训练,校验,测试集的比例是40%,10%,50%,区分几个集合使用的是face_annotations文件.

如:wider_face_train_bbx_gt.txt 就是训练集,打开来看看,其中有
0--Parade/0_Parade_marchingband_1_799.jpg
21
78 221 7 8 2 0 0 0 0 0
78 238 14 17 2 0 0 0 0 0
113 212 11 15 2 0 0 0 0 0
134 260 15 15 2 0 0 0 0 0
163 250 14 17 2 0 0 0 0 0
201 218 10 12 2 0 0 0 0 0
182 266 15 17 2 0 0 0 0 0
245 279 18 15 2 0 0 0 0 0
304 265 16 17 2 0 0 0 2 1
第一行是图片path
第二行代表有此图片有多少人脸
之后21行,没一行分别表示x1, y1, w, h, blur, expression, illumination, invalid, occlusion, pose,其对照含义如下:
blur:
  clear->0
  normal blur->1
  heavy blur->2

expression:
  typical expression->0
  exaggerate expression->1

illumination:
  normal illumination->0
  extreme illumination->1

occlusion:
  no occlusion->0
  partial occlusion->1
  heavy occlusion->2

pose:
  typical pose->0
  atypical pose->1

invalid:
  false->0(valid image)
  true->1(invalid image)
1.2 数据集预处理
mtcnn网络结构介绍
在说明数据预处理前首先要弄清楚训练网络模型是怎样的.这里我使用可视化工具放置一个处理12*12的网络在下面:
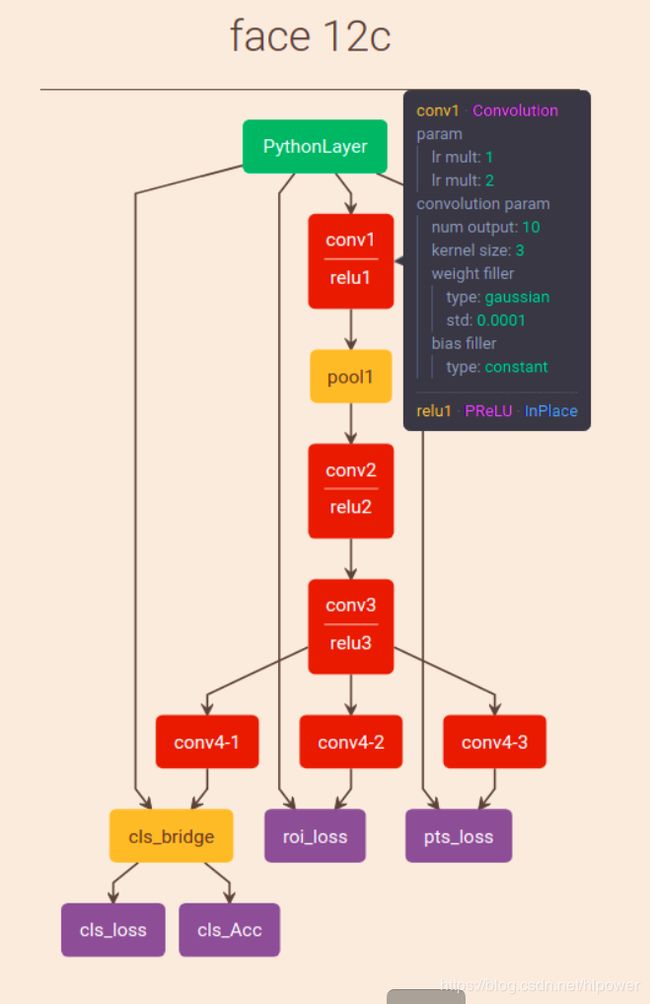
我们知道MTCNN分为三个子网络:
- Proposal Network(P-Net) 以12123为bbox进行初步预测
- Refine Network(R-Net)
- Output Network(O-Net)
预处理过程
- 负样本生成过程:
使用代码来说明:
    while neg_num < 50`
       # 截取的图片最小像素40,最大不会超过边宽的一半,基本上wider_face上也没有出现这么大的脸
       size = npr.randint(40, min(width, height) / 2)
       # 截图图片的位置是完全随机
       nx = npr.randint(0, width - size)
       ny = npr.randint(0, height - size)
       crop_box = np.array([nx, ny, nx + size, ny + size])
       # IOU选取是低于0.3作为负样本
       Iou = IoU(crop_box, boxes)

       cropped_im = img[ny : ny + size, nx : nx + size, :]
       # 所有的样本都会被resize到12*12
       resized_im = cv2.resize(cropped_im, (12, 12), interpolation=cv2.INTER_LINEAR)

       if np.max(Iou) < 0.3:
           # Iou with all gts must below 0.3
           save_file = os.path.join(neg_save_dir, "%s.jpg"%n_idx)
           f2.write("12/negative/%s"%n_idx + ' 0\n')
           cv2.imwrite(save_file, resized_im)
           n_idx += 1
           neg_num += 1
- 正样本生成过程
依然使用代码来说明
注: 除了正样本还有一个叫部分样本的:指的是IOU在0.4和0.65之间的样本
    for box in boxes:
        # box (x_left, y_top, x_right, y_bottom)
        x1, y1, x2, y2 = box
        w = x2 - x1 + 1
        h = y2 - y1 + 1

		#小脸会影响精度,抛弃掉
        if max(w, h) < 40 or x1 < 0 or y1 < 0:
            continue

        #生成正样本和部分样本
        for i in range(20):
            #为了保证较好的取得正样本,选取图的大小在0.8~1.25间波动
            size = npr.randint(int(min(w, h) * 0.8), np.ceil(1.25 * max(w, h)))

            # delta 是box中心点的偏移量
            delta_x = npr.randint(-w * 0.2, w * 0.2)
            delta_y = npr.randint(-h * 0.2, h * 0.2)

            nx1 = max(x1 + w / 2 + delta_x - size / 2, 0)
            ny1 = max(y1 + h / 2 + delta_y - size / 2, 0)
            nx2 = nx1 + size
            ny2 = ny1 + size

            if nx2 > width or ny2 > height:
                continue
            crop_box = np.array([nx1, ny1, nx2, ny2])
            # 注意这个偏移量是一个相对值,相对的是选取图的size.这样在进行正向推理时可以通过此比例得到正确的偏移
            offset_x1 = (x1 - nx1) / float(size)
            offset_y1 = (y1 - ny1) / float(size)
            offset_x2 = (x2 - nx2) / float(size)
            offset_y2 = (y2 - ny2) / float(size)

            cropped_im = img[int(ny1) : int(ny2), int(nx1) : int(nx2), :]
            resized_im = cv2.resize(cropped_im, (12, 12), interpolation=cv2.INTER_LINEAR)

            box_ = box.reshape(1, -1)
            if IoU(crop_box, box_) >= 0.65:
                save_file = os.path.join(pos_save_dir, "%s.jpg"%p_idx)
                f1.write("12/positive/%s"%p_idx + ' 1 %.2f %.2f %.2f %.2f\n'%(offset_x1, offset_y1, offset_x2, offset_y2))
                cv2.imwrite(save_file, resized_im)
                p_idx += 1
            elif IoU(crop_box, box_) >= 0.4:
                save_file = os.path.join(part_save_dir, "%s.jpg"%d_idx)
                f3.write("12/part/%s"%d_idx + ' -1 %.2f %.2f %.2f %.2f\n'%(offset_x1, offset_y1, offset_x2, offset_y2))
                cv2.imwrite(save_file, resized_im)
                d_idx += 1
        box_idx += 1
- 保存成为imdb
注意python读取图像时像素是0~256,为了网络好训练,需要将输入规范到-1 ~ 1之间. 另外样本选取比例用的是正样本全选,负样本60W,part样本30W
建立两个数据集合: 第一个是cls.imdb 这里只取正负样本,用于训练cls_loss.
第二个是roi.imdb 这里使用正样本和part样本,用于训练roi_loss.
这里有一点指的注意,这是一个模型,同事却要输入两种样本,去得到两个loss,那么如何办到的呢?
答案是在参数上数值上区别:
如: cls.imdb中,roi属性值全部设置为-1,在计算roi_loss遇到 roi属性是-1的就会抛弃掉不参与计算,同样roi.imdb也将label的标签设置为1.
roi_loss 是pythonlayer,可以自定义计算.至于如何自定义pythonlayer我在下一篇文章中在记录.
另外imdb在存储上 如果使用pickle4.0以前的上线是存储4G,具体见我写的一份记录https://blog.csdn.net/hlpower/article/details/100765278
同时要注意你自生电脑的内存情况, 使用
# free -m
              total        used        free      shared  buff/cache   available
Mem:          15718         297       15288           0         132       15183
Swap:          2047         258        1789
如我的服务器内存约15G, 而训练集转成imdb有17.5G,这就行不通,所以需要适当对训练集进行缩小(当然也可以采用分批加载的方式,但如果每次都需要读取文件就太慢了)
1.3 开始训练
我的P-NET solver.prototxt如下,R-net 和 O-net类似.
net : "train12.prototxt"
# The base learning rate, momentum and the weight decay of the network.
base_lr: 0.0001
momentum: 0.9
weight_decay: 0.004
# The learning rate policy
lr_policy: "step"
stepsize: 30000
gamma: 0.8
display: 1000   #500
max_iter: 500000
snapshot: 10000
snapshot_prefix: "./models/"
solver_mode: GPU
训练命令
caffe.bin train -gpu 0 -solver solver.prototxt [-weight 做finetunings的文件]
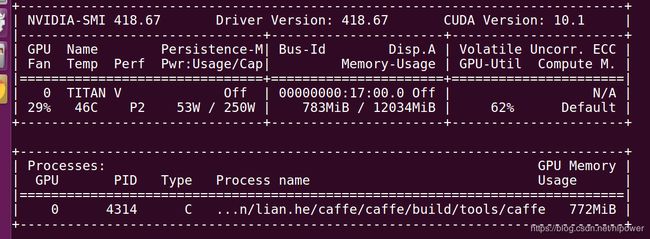
在我的服务器上GPU的利用率如下,基本20分钟就训练完了(taitan V的算力还是很快的)
我使用初始化caffemodel 得到的loss 是
I0912 17:27:59.609401 11015 caffe.cpp:309] Loss: 0.673066
I0912 17:27:59.609405 11015 caffe.cpp:321] cls_acc = 0.399063
I0912 17:27:59.609411 11015 caffe.cpp:321] cls_loss = 0.652516 (* 1 = 0.652516 loss)
I0912 17:27:59.609414 11015 caffe.cpp:321] pts_loss = 0 (* 0.5 = 0 loss)
I0912 17:27:59.609417 11015 caffe.cpp:321] roi_loss = 0.0411003 (* 0.5 = 0.0205502 loss)
不加caffemodel训练得到loss
I0912 17:31:04.192064 11143 caffe.cpp:309] Loss: 0.635713
I0912 17:31:04.192067 11143 caffe.cpp:321] cls_acc = 0.39125
I0912 17:31:04.192072 11143 caffe.cpp:321] cls_loss = 0.623744 (* 1 = 0.623744 loss)
I0912 17:31:04.192076 11143 caffe.cpp:321] pts_loss = 0 (* 0.5 = 0 loss)
I0912 17:31:04.192080 11143 caffe.cpp:321] roi_loss = 0.0239392 (* 0.5 = 0.0119696 loss)
I0912 17:33:01.592623 11199 caffe.cpp:309] Loss: 0.391268
I0912 17:33:01.592629 11199 caffe.cpp:321] cls_acc = 0.516563
I0912 17:33:01.592638 11199 caffe.cpp:321] cls_loss = 0.384439 (* 1 = 0.384439 loss)
I0912 17:33:01.592643 11199 caffe.cpp:321] pts_loss = 0 (* 0.5 = 0 loss)
I0912 17:33:01.592648 11199 caffe.cpp:321] roi_loss = 0.0136583 (* 0.5 = 0.00682914 loss)
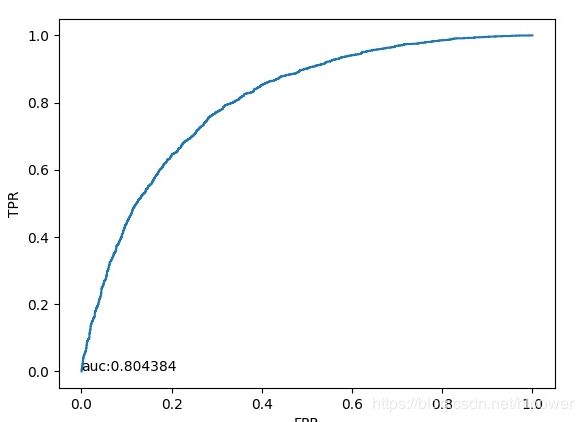
效果不理想,我需要写个代码绘制ROC曲线,来具体评估效果:
此为未经训练的初始参数做判断得到ROC曲线如下:
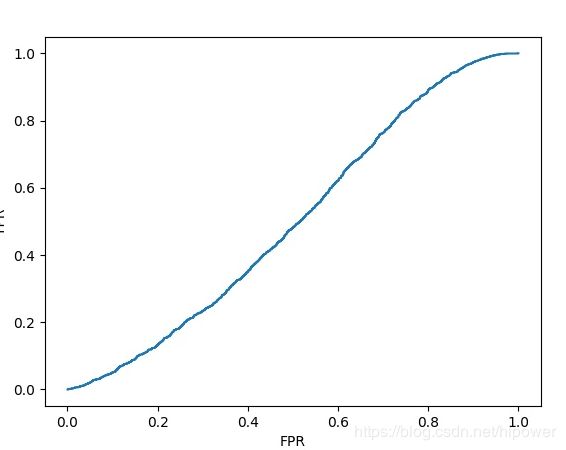
- 由于初始参数服从均匀分布,所以ROC曲线基本就如线性
通过50W次迭代之后在观察其ROC曲线:
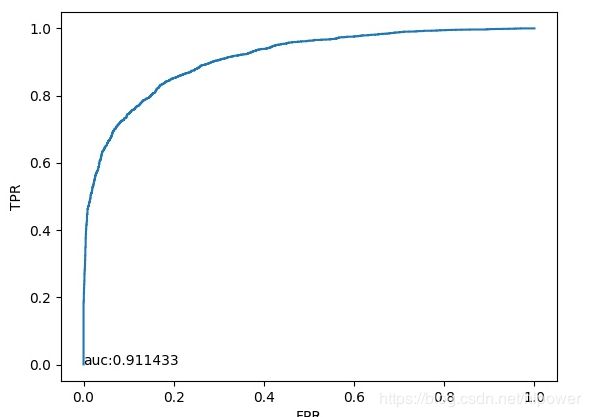
这是别人一份别人使用的ROC,看上去AUC区别不大.
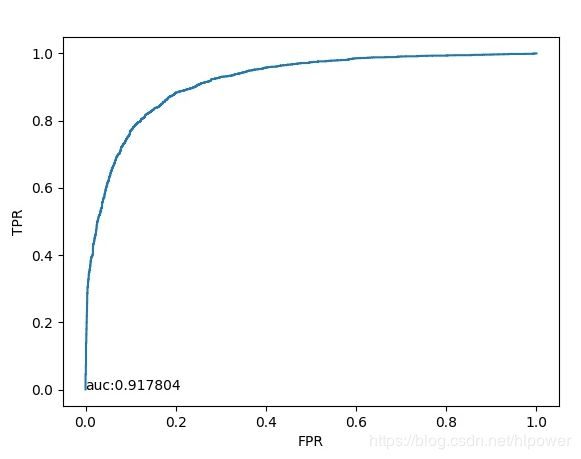
实际抛出来的效果:
- 其实还是过拟合了.部分手鼓之类的地方也被选中了.
可以看出来效果还不是很好.我们观察一下loss曲线看看.
使用solverstate做继续训练
caffe train --solver train24.prototxt -gpu 0 --snapshot models/solver_iter_100000.solverstate
迭代50W次的效果,感觉越训练越差了
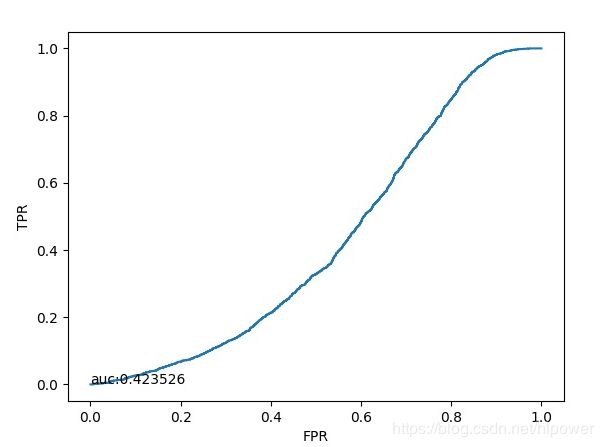
10W迭代还是正常11W时候就有问题了,所以可能会思我做snapshot的方式可能存在问题,我从头开始训练
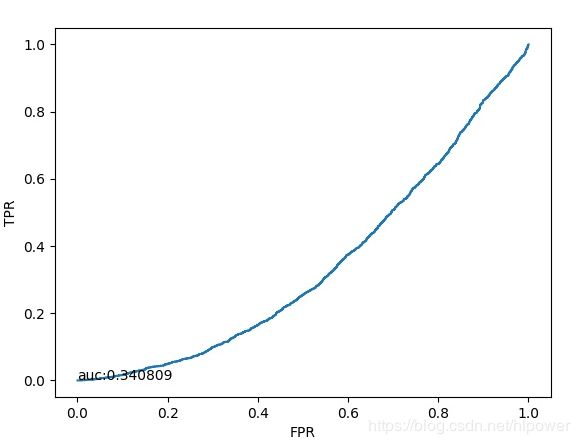
现在从头开始训练还是有问题,明天继续吧
我调整了R_net,的训练样本中正样本的IoU选取:
我观察正样本,有不少遮挡的情况:


迭代50W次后的, 全正样本的准确率
I0914 11:29:32.681480 27172 caffe.cpp:309] Loss: 0.399467
I0914 11:29:32.681488 27172 caffe.cpp:321] cls_acc = 0.840625
I0914 11:29:32.681497 27172 caffe.cpp:321] cls_loss = 0.399467 (* 1 = 0.399467 loss)
I0914 11:29:32.681502 27172 caffe.cpp:321] pts_loss = 0 (* 0.5 = 0 loss)
I0914 11:29:32.681507 27172 caffe.cpp:321] roi_loss = 0 (* 0.5 = 0 loss)
全负样本下准确率 这么看来很准呀
I0914 11:32:05.157735 27233 caffe.cpp:309] Loss: 0.0915148
I0914 11:32:05.157740 27233 caffe.cpp:321] cls_acc = 0.973125
I0914 11:32:05.157747 27233 caffe.cpp:321] cls_loss = 0.0915148 (* 1 = 0.0915148 loss)
I0914 11:32:05.157752 27233 caffe.cpp:321] pts_loss = 0 (* 0.5 = 0 loss)
I0914 11:32:05.157757 27233 caffe.cpp:321] roi_loss = 0 (* 0.5 = 0 loss)
定了了好久才终于发现问题 原来是 deploy.prototxt 和 train.prototxt的名称不一致.调整完了之后果然效果好了很多:


