是的,你没听错,这一次我来带大家直接上手运营微信公众号。
本文来自 Serverless 社区用户「乂乂又又」供稿
震惊,Awesome,哼,我才不信捏,所谓无图无真相 ~
效果展示
更多的体验,可以关注我的微信公众号: 乂乂又又 (仅供测试,不要乱搞哈~)
嗯,这次我信了,快点教一下我吧,嘤嘤嘤~
操作步骤
在上一篇《万物皆可Serverless之使用SCF+COS快速开发全栈应用》教程中,
我们用腾讯云无服务器云函数 SCF 和对象存储实现了一个后端云函数,这个云函数可以根据我们的请求返回对应的结果。
现在我们将尝试在这个云函数的基础上解析微信 XML 消息,实现公众号消息的自动回复,关键词回复,文字菜单等功能。
第一步:添加相关依赖
为了快速完成开发,这里我们选择 python 第三方开源库 wechatpy 来接入微信公众平台。
wechatpy 支持以下功能
- 普通公众平台被动响应和主动调用 API
- 企业微信 API
- 微信支付 API
- 第三方平台代公众号调用接口 API
- 小程序云开发 API
可见功能是十分完整的,不仅支持普通公众平台主被动调用,企业微信和微信支付,甚至还支持第三方平台代公众号调用接口,拿来运营微信公众号是十分绰绰有余的~
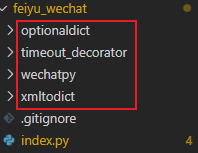
由于腾讯云函数的运行环境中缺少第三方库,需要我们自己手动上传添加依赖,这里我们需要添加的第三方依赖有:wechatpy、otionaldict、xmltodict 以及 timeout\_decorator
其中 wechatpy 需要依赖 otionaldict、xmltodict,timeout\_decorator 是用来限制函数运行时长的,具体的依赖文件可以自行 pip 安装后 copy 到云函数项目根目录,如上图。
第二步:接入微信公众号
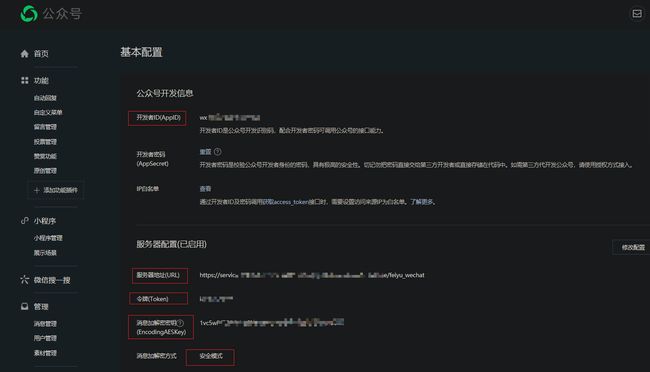
这里需要记下自己的 AppID、Token 和 EncodingAESKey,消息加密方式建议选为安全模式。这个页面先不要关,一会儿上线发布好云函数还需要过来再次修改配置。
第三步:编写云函数解析并回复微信公众号消息
这一步可以直接参考 wechatpy 的官方文档
Life is short, show me the code.
这里我就直接上代码了(原始业务代码已略去,可以按照自己的需求开发)
import json
import timeout_decorator
from wechatpy.replies import ArticlesReply
from wechatpy.utils import check_signature
from wechatpy.crypto import WeChatCrypto
from wechatpy import parse_message, create_reply
from wechatpy.exceptions import InvalidSignatureException, InvalidAppIdException

# 是否开启本地debug模式
debug = False

# 腾讯云对象存储依赖
if debug:
    from qcloud_cos import CosConfig
    from qcloud_cos import CosS3Client
    from qcloud_cos import CosServiceError
    from qcloud_cos import CosClientError
else:
    from qcloud_cos_v5 import CosConfig
    from qcloud_cos_v5 import CosS3Client
    from qcloud_cos_v5 import CosServiceError
    from qcloud_cos_v5 import CosClientError

# 配置存储桶
appid = '66666666666'
secret_id = u'xxxxxxxxxxxxxxx'
secret_key = u'xxxxxxxxxxxxxxx'
region = u'ap-chongqing'
bucket = 'name'+'-'+appid

# 对象存储实例
config = CosConfig(Secret_id=secret_id, Secret_key=secret_key, Region=region)
client = CosS3Client(config)

# cos 文件读写
def cosRead(key):
    try:
        response = client.get_object(Bucket=bucket, Key=key)
        txtBytes = response['Body'].get_raw_stream()
        return txtBytes.read().decode()
    except CosServiceError as e:
        return ""

def cosWrite(key, txt):
    try:
        response = client.put_object(
            Bucket=bucket,
            Body=txt.encode(encoding="utf-8"),
            Key=key,
        )
        return True
    except CosServiceError as e:
        return False

def getReplys():
    replyMap = {}
    replyTxt = cosRead('Replys.txt')  # 读取数据
    if len(replyTxt) > 0:
        replyMap = json.loads(replyTxt)
    return replyMap

def addReplys(reply):
    replyMap = getReplys()
    if len(replyMap) > 0:
        replyMap[reply]='我是黑名单'
    return cosWrite('Replys.txt', json.dumps(replyMap, ensure_ascii=False)) if len(replyMap) > 0 else False


def delReplys(reply):
    replyMap = getReplys()
    if len(replyMap) > 0:
        replyMap.pop(reply)
    return cosWrite('Replys.txt', json.dumps(replyMap, ensure_ascii=False)) if len(replyMap) > 0 else False


# 微信公众号对接
wecaht_id = 'xxxxxxxxxxxxxxx'
WECHAT_TOKEN = 'xxxxxxxxxxxxxxxxxxx'
encoding_aes_key = 'xxxxxxxxxxxxxxxxxxxxxx'

crypto = WeChatCrypto(WECHAT_TOKEN, encoding_aes_key, wecaht_id)

# api网关响应集成
def apiReply(reply, txt=False, content_type='application/json', code=200):
    return {
        "isBase64Encoded": False,
        "statusCode": code,
        "headers": {'Content-Type': content_type},
        "body": json.dumps(reply, ensure_ascii=False) if not txt else str(reply)
    }

def replyMessage(msg):
    txt = msg.content
    ip = msg.source
    print('请求信息--->'+ip+'%'+txt)  # 用来在腾讯云控制台打印请求日志
    replysTxtMap = getReplys() # 获取回复关键词
    if '@' in txt:
        keys = txt.split('@')
        if keys[0] == '电影': #do something
            return
        if keys[0] == '音乐': #do something
            return
        if keys[0] == '下架': #do something
            return
        if keys[0] == '上架': #do something
            return
        if keys[0] == '回复': #do something
            return
        if keys[0] == '删除': #do something
            return
    elif txt in replysTxtMap.keys(): # 如果消息在回复关键词内则自动回复
        return create_reply(replysTxtMap[txt], msg)
    return create_reply("喵呜 ฅ'ω'ฅ", msg)

def wechat(httpMethod, requestParameters, body=''):
    if httpMethod == 'GET':
        signature = requestParameters['signature']
        timestamp = requestParameters['timestamp']
        nonce = requestParameters['nonce']
        echo_str = requestParameters['echostr']
        try:
            check_signature(WECHAT_TOKEN, signature, timestamp, nonce)
        except InvalidSignatureException:
            echo_str = 'error'
        return apiReply(echo_str, txt=True, content_type="text/plain")
    elif httpMethod == 'POST':
        msg_signature = requestParameters['msg_signature']
        timestamp = requestParameters['timestamp']
        nonce = requestParameters['nonce']
        try:
            decrypted_xml = crypto.decrypt_message(
                body,
                msg_signature,
                timestamp,
                nonce
            )
        except (InvalidAppIdException, InvalidSignatureException):
            return
        msg = parse_message(decrypted_xml)
        if msg.type == 'text':
            reply = replyMessage(msg)
        elif msg.type == 'image':
            reply = create_reply('哈◔ ‸◔?\n好端端的,给我发图片干啥~', msg)
        elif msg.type == 'voice':
            reply = create_reply('哈◔ ‸◔?\n好端端的,给我发语音干啥~', msg)
        else:
            reply = create_reply('哈◔ ‸◔?\n搞不明白你给我发了啥~', msg)
        reply = reply.render()
        print('返回结果--->'+str(reply))  # 用来在腾讯云控制台打印请求日志
        reply = crypto.encrypt_message(reply, nonce, timestamp)
        return apiReply(reply, txt=True, content_type="application/xml")
    else:
        msg = parse_message(body)
        reply = create_reply("喵呜 ฅ'ω'ฅ", msg)
        reply = reply.render()
        print('返回结果--->'+str(reply))  # 用来在腾讯云控制台打印请求日志
        reply = crypto.encrypt_message(reply, nonce, timestamp)
        return apiReply(reply, txt=True, content_type="application/xml")


@timeout_decorator.timeout(4, timeout_exception=StopIteration)
def myMain(httpMethod, requestParameters, body=''):
    return wechat(httpMethod, requestParameters, body=body)


def timeOutReply(httpMethod, requestParameters, body=''):
    msg_signature = requestParameters['msg_signature']
    timestamp = requestParameters['timestamp']
    nonce = requestParameters['nonce']
    try:
        decrypted_xml = crypto.decrypt_message(
            body,
            msg_signature,
            timestamp,
            nonce
        )
    except (InvalidAppIdException, InvalidSignatureException):
        return
    msg = parse_message(decrypted_xml)
    reply = create_reply("出了点小问题,请稍后再试", msg).render()
    print('返回结果--->'+str(reply))  # 用来在腾讯云控制台打印请求日志
    reply = crypto.encrypt_message(reply, nonce, timestamp)
    return apiReply(reply, txt=True, content_type="application/xml")


def main_handler(event, context):
    body = ''
    httpMethod = event["httpMethod"]
    requestParameters = event['queryString']
    if 'body' in event.keys():
        body = event['body']
    try:
        response = myMain(httpMethod, requestParameters, body=body)
    except:
        response = timeOutReply(httpMethod, requestParameters, body=body)
    return response
请求参数解析和COS读写部分可参考上一篇《万物皆可 Serverless 之使用 SCF+COS 快速开发全栈应用》教程
下面我来捋一下整个云函数的思路
def main_handler(event, context):
    body = ''
    httpMethod = event["httpMethod"]
    requestParameters = event['queryString']
    if 'body' in event.keys():
        body = event['body']
    try:
        response = myMain(httpMethod, requestParameters, body=body)
    except:
        response = timeOutReply(httpMethod, requestParameters, body=body)
    return response
我们先从 main\_handler 入手,
这里我们通过 API 网关触发云函数在 event 里拿到了微信公众号请求的方法、头部和请求体,然后传给 myMain 函数做处理,需要注意的是 myMain 是通过 timeout\_decorator 包装的限时运行函数。
@timeout_decorator.timeout(4, timeout_exception=StopIteration)
def myMain(httpMethod, requestParameters, body=''):
    return wechat(httpMethod, requestParameters, body=body)
当 myMain 函数运行市场超过设定的 4 秒后,就会抛出异常,
然后我们可以通过设置一个 timeOutReply 函数来处理超时后的微信公众号消息回复,可是为什么要这么做呢?
可以看到,当云函数运行超时后,微信这边就会显示「该公众号提供的服务器出现故障,请稍后再试」
这对用户体验是极不友好的,所以我们需要一个函数超时后的回复来兜底。
那么对于一次微信公众号后台消息请求多长时间算是超时呢?答案是 5 秒左右,从云函数后台的调用日志我们可以得到这个结果。
不过需要注意的是对于用户的一次消息请求,微信可能会每隔 1 秒左右重拨一次请求,直到收到服务器第一次响应。另外,超过 3 次应该就不会再重拨了,并且在 5 秒超时后即使云函数调用成功并返回了数据,用户也不会再接收到消息了~
所以我们就很有必要将自己的云函数的运行时长限制在 5 秒之内了!
当然只通过配置云函数超时时长得方式来处理是不正确的,因为这样做云函数超时后就被系统停掉了,并不会向微信返回消息。所以从一开始我就导入了 timeout\_decorator 库来限制主函数的运行时长,并用一个超时后回复函数来兜底。
另外值得一提的是,在我原始的业务代码中是有一些爬虫,这些爬虫本来我是单线程顺序执行的,考虑到超时问题,我在微信云函数版这里全部改成了多线程运行来压缩时间,所以如果你也有一些比较耗时的小任务话,也可以尝试通过多线程的方式来压缩云函数的运行时长。
我们接着向下看:
def wechat(httpMethod, requestParameters, body=''):
    if httpMethod == 'GET':
        signature = requestParameters['signature']
        timestamp = requestParameters['timestamp']
        nonce = requestParameters['nonce']
        echo_str = requestParameters['echostr']
        try:
            check_signature(WECHAT_TOKEN, signature, timestamp, nonce)
        except InvalidSignatureException:
            echo_str = 'error'
        return apiReply(echo_str, txt=True, content_type="text/plain")
    elif httpMethod == 'POST':
        msg_signature = requestParameters['msg_signature']
        timestamp = requestParameters['timestamp']
        nonce = requestParameters['nonce']
        try:
            decrypted_xml = crypto.decrypt_message(
                body,
                msg_signature,
                timestamp,
                nonce
            )
        except (InvalidAppIdException, InvalidSignatureException):
            return
        msg = parse_message(decrypted_xml)
        if msg.type == 'text':
            reply = replyMessage(msg)
        elif msg.type == 'image':
            reply = create_reply('哈◔ ‸◔?\n好端端的,给我发图片干啥~', msg)
        elif msg.type == 'voice':
            reply = create_reply('哈◔ ‸◔?\n好端端的,给我发语音干啥~', msg)
        else:
            reply = create_reply('哈◔ ‸◔?\n搞不明白你给我发了啥~', msg)
        reply = reply.render()
        print('返回结果--->'+str(reply))  # 用来在腾讯云控制台打印请求日志
        reply = crypto.encrypt_message(reply, nonce, timestamp)
        return apiReply(reply, txt=True, content_type="application/xml")
    else:
        msg = parse_message(body)
        reply = create_reply("喵呜 ฅ'ω'ฅ", msg)
        reply = reply.render()
        print('返回结果--->'+str(reply))  # 用来在腾讯云控制台打印请求日志
        reply = crypto.encrypt_message(reply, nonce, timestamp)
        return apiReply(reply, txt=True, content_type="application/xml")
这里的 wechat 函数就是整个微信消息的解析过程,首先判断请求方法是 GET 还是 POST,GET 方法只在第一次绑定微信后台时会用到,这时我们会从微信服务器推送的请求参数中拿到 signature, timestamp, echostr 和 nonce 参数,
check_signature(WECHAT_TOKEN, signature, timestamp, nonce)
我们只需根据自己的公众号 token 和来生成签名与微信服务器传过来的 signature 对比看是否一致,若一致就说明我们的消息加解密验证是OK的,然后再将 echostr 原样返回即可接入微信公众号后台。
接入好微信公众号后,如果有用户在后台给我们发送消息,这里云函数收到的就是 POST 方法,
elif httpMethod == 'POST':
        msg_signature = requestParameters['msg_signature']
        timestamp = requestParameters['timestamp']
        nonce = requestParameters['nonce']
        try:
            decrypted_xml = crypto.decrypt_message(
                body,
                msg_signature,
                timestamp,
                nonce
            )
        except (InvalidAppIdException, InvalidSignatureException):
            return
        msg = parse_message(decrypted_xml)
        if msg.type == 'text':
            reply = replyMessage(msg)
        elif msg.type == 'image':
            reply = create_reply('哈◔ ‸◔?\n好端端的,给我发图片干啥~', msg)
        elif msg.type == 'voice':
            reply = create_reply('哈◔ ‸◔?\n好端端的,给我发语音干啥~', msg)
        else:
            reply = create_reply('哈◔ ‸◔?\n搞不明白你给我发了啥~', msg)
        reply = reply.render()
        print('返回结果--->'+str(reply))  # 用来在腾讯云控制台打印请求日志
        reply = crypto.encrypt_message(reply, nonce, timestamp)
        return apiReply(reply, txt=True, content_type="application/xml")
然后我们根据前面在微信公众号后台拿到的 id,token 和 aes 加密 key 来初始化消息加解密实例并解密还原用户发送的消息
# 微信公众号对接
wecaht_id = 'xxxxxxxxxxxxxxx'
WECHAT_TOKEN = 'xxxxxxxxxxxxxxxxxxx'
encoding_aes_key = 'xxxxxxxxxxxxxxxxxxxxxx'

crypto = WeChatCrypto(WECHAT_TOKEN, encoding_aes_key, wecaht_id)
接着判断一下消息类型,不同类型的消息可自行处理
        msg = parse_message(decrypted_xml)
        if msg.type == 'text':
            reply = replyMessage(msg)
        elif msg.type == 'image':
            reply = create_reply('哈◔ ‸◔? 好端端的,给我发图片干啥~', msg)
        elif msg.type == 'voice':
            reply = create_reply('哈◔ ‸◔? 好端端的,给我发语音干啥~', msg)
        else:
            reply = create_reply('哈◔ ‸◔? 搞不明白你给我发了啥~', msg)
需要注意的是当一个用户新关注自己的公众号时,我们收到的是一个其他类型的消息,也就是上面的最后一个判断项,这里你可以自己设置新关注用户的欢迎语
        reply = create_reply('哈◔ ‸◔?\n搞不明白你给我发了啥~', msg)
        reply = reply.render()
        print('返回结果--->'+str(reply))  # 用来在腾讯云控制台打印请求日志
        reply = crypto.encrypt_message(reply, nonce, timestamp)
        return apiReply(reply, txt=True, content_type="application/xml")
之后我们通过 create\_reply 来快速创建一个文本回复,并通过 render() 来生成 xml 回复消息文本。因为我之前在后台设置的是安全模式,所以还需要把 xml 重新通过 crypto.encrypt\_message 方法加密,然后才能把加密后的回复消息返回给微信服务器。
上一篇文章我有提到我们不能直接返回消息,需要按照特定的格式返回数据(API 网关需要开启响应集成)
# api网关响应集成
def apiReply(reply, txt=False, content_type='application/json', code=200):
    return {
        "isBase64Encoded": False,
        "statusCode": code,
        "headers": {'Content-Type': content_type},
        "body": json.dumps(reply, ensure_ascii=False) if not txt else str(reply)
    }
第四步:上线发布云函数、添加 API 网关触发器、启用响应集成
参考上一篇教程 《万物皆可 Serverless 之使用 SCF+COS 快速开发全栈应用》
第五步:修改微信公众号后台服务器配置
终于到最后一步了,如果你已经上线发布了好自己的云函数,那么快去微信公众号后台绑定一下自己的后台服务器配置吧~
呼~ 大功告成
Serverless Framework 30 天试用计划
我们诚邀您来体验最便捷的 Serverless 开发和部署方式。在试用期内,相关联的产品及服务均提供免费资源和专业的技术支持,帮助您的业务快速、便捷地实现 Serverless!
详情可查阅:Serverless Framework 试用计划
One More Thing
3 秒你能做什么?喝一口水,看一封邮件,还是 —— 部署一个完整的 Serverless 应用?
复制链接至 PC 浏览器访问:https://serverless.cloud.tencent.com/deploy/express
3 秒极速部署,立即体验史上最快的 Serverless HTTP 实战开发!
传送门:
- GitHub: github.com/serverless
- 官网:serverless.com
欢迎访问:Serverless 中文网,您可以在 最佳实践 里体验更多关于 Serverless 应用的开发!
推荐阅读:《Serverless 架构:从原理、设计到项目实战》


