Linux 程序设计学习笔记----终端及串口编程及实例应用
转载请注明出处,http://blog.csdn.net/suool/article/details/38385355。
部分内容类源于网络。
终端属性详解及设置
属性
为了控制终端正常工作,终端的属性包括输入属性、输出属性、控制属性、本地属性、线路规程属性以及控制字符。
其在系统源代码的termios.h中定义(具体的说明文档http://pubs.opengroup.org/onlinepubs/7908799/xsh/termios.h.html),其结构体成员主要是
Thetermiosstructure is defined, and includes at least the following members:
tcflag_t  c_iflag     // input modes 输入属性
tcflag_t  c_oflag     // output modes 输出。。
tcflag_t  c_cflag     // control modes 控制。。
tcflag_t  c_lflag     // local modes 本地。。
cc_t      c_cc[NCCS]  // control chars 控制字符
应用层可以通过tcgetattr()函数来获取某个打开终端的属性,通过tcsetattr()函数设置某个终端的属性。
终端控制选项
包括:波特率、数据位长、停止位长度、奇偶校验等与终端通信相关的信息。
1. 波特率
1> 表示每秒传输的比特数,串口通信的双方必须保持一致才能通信。
2> 说明:若波特率为115200,它表示什么呢?
Ø 对于发送断,即每秒钟发送115200bit。
Ø 对于接收端,115200波特率意味着串口通信在数据线上的采样率为115200HZ.
注:波特率和距离之间成反比,距离相隔很近的设备之间可以实现高波特率通信。
2. 数据位
1> 表示通信中实际数据位的参数。在计算机发送的数据包中,实际的数据往往不会是8位。
2> 说明:在串口通信中,可以选择5,6,7,8位。设定数据位时,主要考虑所要传输的数据内容。
3> 事例:如果要传输的是标准的ASCII码。那么又该如何设定数据位呢?
Ø 由于ASCII码的范围是0~127,因此设定数据位为7就OK了。
Ø 若为扩展ASCII码,其范围是0~255,必须使用8位。
注:7位或8位数据中不仅仅是数据,还包括开始/停止位,数据位以及奇偶校验位等。
3. 奇偶校验位
1> 作用:该位用于串口通信中的简单检验错,在通信前,可以约定是否使用以及使用多少位。
2> 类型:主要有偶校验,奇校验,标记,空格的方式
在ARM7(LPC2200)中,只有偶校验,奇校验两种方式。
3> 方法:如何进行校验?
Ø 奇偶校验是通过统计数据中高位或低位的个数来实现校验的。
Ø 标记,空格并不是真正校验错误的,只是通过简单的置位来实现对数据的检测。通过置位方式,可以判断出是否存在噪声干扰数据通信或数据传输,以及是否存在不同步的现象
4. 停止位
1> 作用:停止位用于标志该数据包数据结束,可以取1位,1.5位或2位。
2> 说明:
Ø 停止位不仅仅用于数据包的传输结束标志,还提供了计算机之间校正同步时钟的机会。
Ø 用于停止位的位数越多,不同时钟同步的容忍程序越大。
Ø 但是由于停止位占用了数据空间,过多的停止位将导致数据传输速度的下降。
5. 数据流控制
1> 通过串口传输数据时,由于计算机之间处理速度或其他因素的影响,会造成丢失数据的现象。
2> 作用:数据流控制用于解决上面的问题,通过控制发送数据的速度,确保数据不会出现丢失。
3> 类型:数据流控制可以分为软件流控制(Xon/Xoff)和硬件流控制,当然你可以选择不使用数据流控制。
Ø 软件流控制使用特殊的字符作为启动或停止的标志
Ø 硬件流控制通过使用硬件信号(CTR/RTS)来实现。
注:使用硬件流控制时,在接收端准备好接收数据后,设为CTS为1,否则CTS为0。同样,如果发送端准备好要发送数据时,则设定RTS为1;如果还未准备好,设置CTS为0.
其他的各个终端选项具体使用的时候搜索相关的信息即可,没有必要再赘述了。
串口编程
串口编程的步骤如下:
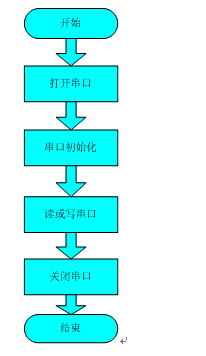
1. 打开串口
2. 串口初始化
3. 读串口或写串口
4. 关闭串口
串口终端的基本操作
需要的头文件
#include           /*标准输入输出定义*/
#include          /*标准函数库定义*/
#include          /*Unix 标准函数定义*/
#include
#include
#include           /*文件控制定义*/
#include         /*PPSIX 终端控制定义*/
#include           /*错误号定义*/
打开一个终端
打开一个串口设备(/dev/ttyS0)可以直接使用open函数
在 Linux 下串口文件是位于 /dev 下的
串口一 为 /dev/ttyS0
串口二 为 /dev/ttyS1
打开串口是通过使用标准的文件打开函数操作:
int fd;
/*以读写方式打开串口*/
fd = open( "/dev/ttyS0", O_RDWR);
if (-1 == fd){
/* 不能打开串口一*/
perror(" 提示错误!");
}
设置串口
最基本的设置串口包括波特率设置,效验位和停止位设置。
串口的设置主要是设置 struct termios 结构体的各成员值。
struct termio
{	unsigned short  c_iflag;	/* 输入模式标志 */
	unsigned short  c_oflag;		/* 输出模式标志 */
	unsigned short  c_cflag;		/* 控制模式标志*/
	unsigned short  c_lflag;		/* local mode flags */
	unsigned char  c_line;		    /* line discipline */
	unsigned char  c_cc[NCC];    /* control characters */
};
设置这个结构体很复杂,我这里就只说说常见的一些设置:
波特率设置
下面是修改波特率的代码:
struct  termios Opt;
tcgetattr(fd, &Opt);
cfsetispeed(&Opt,B19200);     /*设置为19200Bps*/
cfsetospeed(&Opt,B19200);
tcsetattr(fd,TCANOW,&Opt);
设置波特率的例子函数:
/**
*@brief  设置串口通信速率
*@param  fd     类型 int  打开串口的文件句柄
*@param  speed  类型 int  串口速度
*@return  void
*/
int speed_arr[] = { B38400, B19200, B9600, B4800, B2400, B1200, B300,
          B38400, B19200, B9600, B4800, B2400, B1200, B300, };
int name_arr[] = {38400,  19200,  9600,  4800,  2400,  1200,  300, 38400,
          19200,  9600, 4800, 2400, 1200,  300, };
void set_speed(int fd, int speed){
  int   i;
  int   status;
  struct termios   Opt;
  tcgetattr(fd, &Opt);
  for ( i= 0;  i < sizeof(speed_arr) / sizeof(int);  i++) {
    if  (speed == name_arr[i]) {
      tcflush(fd, TCIOFLUSH);
      cfsetispeed(&Opt, speed_arr[i]);
      cfsetospeed(&Opt, speed_arr[i]);
      status = tcsetattr(fd1, TCSANOW, &Opt);
      if  (status != 0) {
        perror("tcsetattr fd1");
        return;
      }
      tcflush(fd,TCIOFLUSH);
    }
  }
}
效验位和停止位的设置
| 无效验 | 8位 | Option.c_cflag &= ~PARENB; Option.c_cflag &= ~CSTOPB; Option.c_cflag &= ~CSIZE; Option.c_cflag |= ~CS8; |
|---|---|---|
| 奇效验(Odd) | 7位 | Option.c_cflag |= ~PARENB; Option.c_cflag &= ~PARODD; Option.c_cflag &= ~CSTOPB; Option.c_cflag &= ~CSIZE; Option.c_cflag |= ~CS7; |
| 偶效验(Even) | 7位 | Option.c_cflag &= ~PARENB; Option.c_cflag |= ~PARODD; Option.c_cflag &= ~CSTOPB; Option.c_cflag &= ~CSIZE; Option.c_cflag |= ~CS7; |
| Space效验 | 7位 | Option.c_cflag &= ~PARENB; Option.c_cflag &= ~CSTOPB; Option.c_cflag &= &~CSIZE; Option.c_cflag |= CS8; |
设置效验的函数
/**
*@brief   设置串口数据位,停止位和效验位
*@param  fd     类型  int  打开的串口文件句柄
*@param  databits 类型  int 数据位   取值 为 7 或者8
*@param  stopbits 类型  int 停止位   取值为 1 或者2
*@param  parity  类型  int  效验类型 取值为N,E,O,,S
*/
int set_Parity(int fd,int databits,int stopbits,int parity)
{
	struct termios options;
	if  ( tcgetattr( fd,&options)  !=  0) {
		perror("SetupSerial 1");
		return(FALSE);
	}
	options.c_cflag &= ~CSIZE;
	switch (databits) /*设置数据位数*/
	{
	case 7:
		options.c_cflag |= CS7;
		break;
	case 8:
		options.c_cflag |= CS8;
		break;
	default:
		fprintf(stderr,"Unsupported data size\n"); return (FALSE);
	}
switch (parity)
{
	case 'n':
	case 'N':
		options.c_cflag &= ~PARENB;   /* Clear parity enable */
		options.c_iflag &= ~INPCK;     /* Enable parity checking */
		break;
	case 'o':
	case 'O':
		options.c_cflag |= (PARODD | PARENB); /* 设置为奇效验*/
		options.c_iflag |= INPCK;             /* Disnable parity checking */
		break;
	case 'e':
	case 'E':
		options.c_cflag |= PARENB;     /* Enable parity */
		options.c_cflag &= ~PARODD;   /* 转换为偶效验*/
		options.c_iflag |= INPCK;       /* Disnable parity checking */
		break;
	case 'S':
	case 's':  /*as no parity*/
	    options.c_cflag &= ~PARENB;
		options.c_cflag &= ~CSTOPB;break;
	default:
		fprintf(stderr,"Unsupported parity\n");
		return (FALSE);
	}
/* 设置停止位*/
switch (stopbits)
{
	case 1:
		options.c_cflag &= ~CSTOPB;
		break;
	case 2:
		options.c_cflag |= CSTOPB;
	   break;
	default:
		 fprintf(stderr,"Unsupported stop bits\n");
		 return (FALSE);
}
/* Set input parity option */
if (parity != 'n')
	options.c_iflag |= INPCK;
tcflush(fd,TCIFLUSH);
options.c_cc[VTIME] = 150; /* 设置超时15 seconds*/
options.c_cc[VMIN] = 0; /* Update the options and do it NOW */
if (tcsetattr(fd,TCSANOW,&options) != 0)
{
	perror("SetupSerial 3");
	return (FALSE);
}
return (TRUE);
}
需要注意的是:
如果不是开发终端之类的,只是串口传输数据,而不需要串口来处理,那么使用原始模式(Raw Mode)方式来通讯,设置方式如下:
options.c_lflag  &= ~(ICANON | ECHO | ECHOE | ISIG);  /*Input*/
options.c_oflag  &= ~OPOST;   /*Output*/
读写串口
设置好串口之后,读写串口就很容易了,把串口当作文件读写就是。
发送数据char buffer[1024];int Length;int nByte;nByte = write(fd, buffer ,Length)读取串口数据
使用文件操作read函数读取,如果设置为原始模式(Raw Mode)传输数据,那么read函数返回的字符数是实际串口收到的字符数。
可以使用操作文件的函数来实现异步读取,如fcntl,或者select等来操作。
char buff[1024];int Len;int readByte = read(fd,buff,Len);关闭串口
关闭串口就是关闭文件。
close(fd);实例应用
下面是一个简单的读取串口数据的例子,使用了上面定义的一些函数和头文件
/**********************************************************************
代码说明:使用串口二测试的,发送的数据是字符,
但是没有发送字符串结束符号,所以接收到后,后面加上了结束符号。
我测试使用的是单片机发送数据到第二个串口,测试通过。
**********************************************************************/
#include           /*标准输入输出定义*/
#include          /*标准函数库定义*/
#include          /*Unix标准函数定义*/
#include       /**/
#include        /**/
#include           /*文件控制定义*/
#include         /*PPSIX终端控制定义*/
#include           /*错误号定义*/

/***@brief  设置串口通信速率
*@param  fd     类型 int  打开串口的文件句柄
*@param  speed  类型 int  串口速度
*@return  void*/

int speed_arr[] = { B38400, B19200, B9600, B4800, B2400, B1200, B300,
	    B38400, B19200, B9600, B4800, B2400, B1200, B300, };
int name_arr[] = {38400,  19200,  9600,  4800,  2400,  1200,  300,
	    38400,  19200,  9600, 4800, 2400, 1200,  300, };
void set_speed(int fd, int speed)
{
  int   i;
  int   status;
  struct termios   Opt;
  tcgetattr(fd, &Opt);
  for ( i= 0;  i < sizeof(speed_arr) / sizeof(int);  i++)
   {
   	if  (speed == name_arr[i])
   	{
   	    tcflush(fd, TCIOFLUSH);
    	cfsetispeed(&Opt, speed_arr[i]);
    	cfsetospeed(&Opt, speed_arr[i]);
    	status = tcsetattr(fd, TCSANOW, &Opt);
    	if  (status != 0)
            perror("tcsetattr fd1");
     	return;
     	}
   tcflush(fd,TCIOFLUSH);
   }
}
/**
*@brief   设置串口数据位,停止位和效验位
*@param  fd     类型  int  打开的串口文件句柄*
*@param  databits 类型  int 数据位   取值 为 7 或者8*
*@param  stopbits 类型  int 停止位   取值为 1 或者2*
*@param  parity  类型  int  效验类型 取值为N,E,O,,S
*/
int set_Parity(int fd,int databits,int stopbits,int parity)
{
	struct termios options;
 if  ( tcgetattr( fd,&options)  !=  0)
  {
  	perror("SetupSerial 1");
  	return(FALSE);
  }
  options.c_cflag &= ~CSIZE;
  switch (databits) /*设置数据位数*/
  {
  	case 7:
  		options.c_cflag |= CS7;
  		break;
  	case 8:
		options.c_cflag |= CS8;
		break;
	default:
		fprintf(stderr,"Unsupported data size\n");
		return (FALSE);
	}
  switch (parity)
  	{
  	case 'n':
	case 'N':
		options.c_cflag &= ~PARENB;   /* Clear parity enable */
		options.c_iflag &= ~INPCK;     /* Enable parity checking */
		break;
	case 'o':
	case 'O':
		options.c_cflag |= (PARODD | PARENB);  /* 设置为奇效验*/
		options.c_iflag |= INPCK;             /* Disnable parity checking */
		break;
	case 'e':
	case 'E':
		options.c_cflag |= PARENB;     /* Enable parity */
		options.c_cflag &= ~PARODD;   /* 转换为偶效验*/
		options.c_iflag |= INPCK;       /* Disnable parity checking */
		break;
	case 'S':
	case 's':  /*as no parity*/
		options.c_cflag &= ~PARENB;
		options.c_cflag &= ~CSTOPB;
		break;
	default:
		fprintf(stderr,"Unsupported parity\n");
		return (FALSE);
		}
  /* 设置停止位*/
  switch (stopbits)
  	{
  	case 1:
  		options.c_cflag &= ~CSTOPB;
		break;
	case 2:
		options.c_cflag |= CSTOPB;
		break;
	default:
		fprintf(stderr,"Unsupported stop bits\n");
		return (FALSE);
	}
  /* Set input parity option */
  if (parity != 'n')
  		options.c_iflag |= INPCK;
    options.c_cc[VTIME] = 150; // 15 seconds
    options.c_cc[VMIN] = 0;

  tcflush(fd,TCIFLUSH); /* Update the options and do it NOW */
  if (tcsetattr(fd,TCSANOW,&options) != 0)
  	{
  		perror("SetupSerial 3");
		return (FALSE);
	}
  return (TRUE);
 }
/**
*@breif 打开串口
*/
int OpenDev(char *Dev)
{
int	fd = open( Dev, O_RDWR );         //| O_NOCTTY | O_NDELAY
	if (-1 == fd)
		{ /*设置数据位数*/
			perror("Can't Open Serial Port");
			return -1;
		}
	else
	return fd;

}
/**
*@breif 	main()
*/
int main(int argc, char **argv)
{
	int fd;
	int nread;
	char buff[512];
	char *dev ="/dev/ttyS1";
	fd = OpenDev(dev);
	if (fd>0)
    set_speed(fd,19200);
	else
		{
		printf("Can't Open Serial Port!\n");
		exit(0);
		}
  if (set_Parity(fd,8,1,'N')== FALSE)
  {
    printf("Set Parity Error\n");
    exit(1);
  }
  while(1)
  	{
   		while((nread = read(fd,buff,512))>0)
   		{
      		printf("\nLen %d\n",nread);
      		buff[nread+1]='\0';
      		printf("\n%s",buff);
   	 	}
  	}
    //close(fd);
    //exit(0);
}
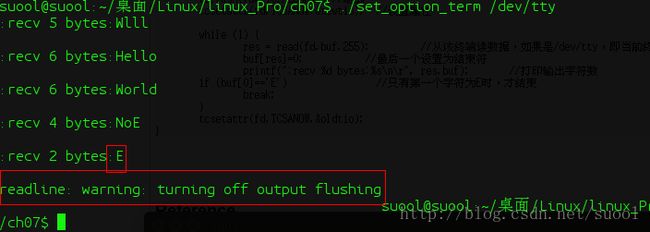
下面是一个简单的对终端属性进行修改的程序,取消了终端本地。
(1)以O_NOCTTY方式打开,不允许Ctrl+C结束当前进程。
(2)设置波特率位B38400,数据位为8bit,忽略奇偶校验。
(3)将CR映射为NL,从而回车表示一次输入结束。
(4)将输入回显功能取消,输出模式设置为原始模式。
完成以上设置后,将从给定的终端读取相应的数据(不回显),遇到CR结束,然后将输入的内容在标准设备输出。整个过程是死循环,只有遇到第一个字符shiE的时候,结束,无法Ctrl+C结束。代码如下:
#include
#include
#include
#include
#include
#include
#include
int main(int argc,char *argv[])
{
	int fd,c, res;
	struct termios oldtio,newtio;
	char buf[255];
	fd = open(argv[1], O_RDWR | O_NOCTTY ); // O_NOCTTY不能被ctrl+c中止
	if (fd <0) {
		perror("open"); exit(EXIT_FAILURE);
	}
	memset(&newtio,'\0', sizeof(newtio));
	newtio.c_cflag = B38400  | CS8 | CLOCAL | CREAD;//设置波特率,数据位,使能读
	newtio.c_iflag = IGNPAR | ICRNL;//忽略奇偶校验,映射CR
 	newtio.c_oflag = 0;		//输出模式为RAW模式
  	newtio.c_lflag = ICANON;//本地模式,不回显
	tcflush(fd, TCIFLUSH);	//刷新
 	tcsetattr(fd,TCSANOW,&newtio);	//设置属性

 	while (1) {
  	  	res = read(fd,buf,255); 	//从该终端读数据,如果是/dev/tty,即当前终端,遇到CR结束
 	   	buf[res]=0;           //最后一个设置为结束符
  	  	printf(":recv %d bytes:%s\n\r", res,buf);	//打印输出字符数
    	if (buf[0]=='E')		//只有第一个字符为E时,才结束
		break;
 	}
	tcsetattr(fd,TCSANOW,&oldtio);
} 
示例控制终端字体颜色、光标位置、固定显示:
#include
#include
#include

int main(int argc,char *argv[])
{
	int i=0;
	system("clear");
for(i=0;i #include
#include
#include
int main(void)
{
while (1)
{
fprintf(stderr, "\033[;\033[s"); /*使用stderr是因为其是不带缓存的*/
fprintf(stderr, "\033[47;31mhello world\033[5m");
sleep(1);
fprintf(stderr, "\033[;\033[u");
fprintf(stderr, "\033[;\033[K");
sleep(1);
}
return 0;
} 编译运行后将会闪烁显示。
下一个示例是终端获取信息不回显:
#include
#include
#include
#include
#include
#define PASSWD_LEN 8
char *getpasswd(char *prompt)
{
	FILE *fp=NULL;

	if(NULL==(fp=fopen(ctermid(NULL),"r+")))
	{
		perror("fopen");exit(EXIT_FAILURE);
	}
	printf("%s\n",ctermid(NULL));
	setvbuf(fp, (char *) NULL, _IONBF, 0);
	sigset_t myset,setsave;
	sigemptyset(&myset);
	sigaddset(&myset,SIGINT);
	sigaddset(&myset,SIGTSTP);
	sigprocmask(SIG_BLOCK,&myset,&setsave);

	struct termios termnew,termsave;
	tcgetattr(fileno(fp),&termsave);
	termnew=termsave;
	termnew.c_lflag=termnew.c_lflag &~(ECHO|ECHOCTL|ECHOE|ECHOK);

	tcsetattr(fileno(fp),TCSAFLUSH,&termnew);

	fputs(prompt,fp);
	static char buf[PASSWD_LEN+1];
	int c;
	char *ptr=buf;
	while((c=getc(fp))!=EOF&&c!='\0'&&c!='\n'&&c!='\r')
	{
		if(ptr<&buf[PASSWD_LEN])
			*ptr++=c;
		fflush(fp);
	}
	*ptr='\0';
	putc('\n',fp);
	tcsetattr(fileno(fp),TCSAFLUSH,&termsave);
	sigprocmask(SIG_BLOCK,&setsave,NULL);
	return buf;
}
int main(void)
{
	char *ptr=NULL;
	ptr=getpasswd("#");
	printf("%s\n",ptr);
} 
Reference
http://digilander.libero.it/robang/rubrica/serial.htm
Next:
进程及其概念
转载请注明出处,http://blog.csdn.net/suool/article/details/38385355。
部分内容类源于网络。