PyQt5教程(一)使用pycharm及qtdesigner搭建界面调取摄像头
PyQt5教程(一)使用pycharm及qtdesigner搭建界面调取摄像头
第一步使用pip命令安装pyqt5和pyqt5-tools,我们要用到的qt designer一般在pyqt5的安装目录中,如果找不到,在确定安装了PyQt5-tools的情况下,那么打开Python安装文件夹\Lib\site-packages\pyqt5_tools,designer.exe应该在这里。
如果还是没找到,那么打开Python安装文件夹\Scripts,不出意外的话designer.exe和其他的一些.exe文件都在这里。
第二步打开pycharm,file-settings-tools-external tools,点加号,如下图填写:

name写pyqt5,program是EXE文件,参数填文件目录如图,工作目录填写EXE所在目录,点击ok
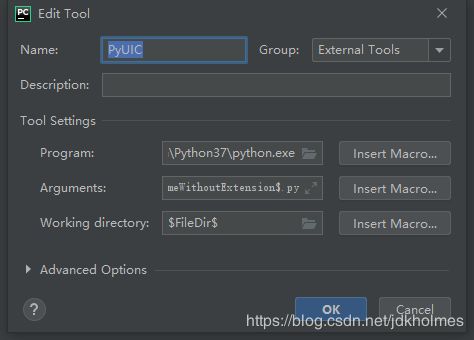
接下来配置pyuic,这是为了将qtdesigner生成的UI文件转换成py文件。program填写python解释器,参数填写![]()
工作目录填写如图。
配置好之后新建一个qt Windows,选择菜单栏tools-external tools-pyqt5,就会打开GUI界面。左侧有一些widget可以用于界面的设计。

这里为了调用摄像头并显示,我们置入了一个pushbutton和一个label。

设计好界面后点击保存,在生成的UI文件上右键点击external tools-pyuic,会转换成同名的脚本文件。此脚本文件将GUI控件以代码形式展出,为了能运行GUI界面,我们需要新建一个py文件。本文目的在于将摄像头捕捉到的画面进行截取,之后送入训练好的神经网络中进行预测,进一步给出预测结果。具体代码如下。
from keras.applications.vgg16 import VGG16
from keras.layers import Input, Dense, Flatten, Conv2D, BatchNormalization, MaxPooling2D, Dropout
from keras.models import Model
import numpy as np
import load_data
import random
import sys
from PyQt5.QtWidgets import QApplication, QMainWindow
from PyQt5.QtGui import QImage,QPixmap
import cv2
import EyeSignal


def prepare_data(file):
    X, Y = load_data.get_data(file)
    # print('total images:{0}'.format(len(X)))
    return X, Y


def predict_mean_metrics(img,dictionary):

    X = np.asarray(img, dtype=np.float32)
    X=np.expand_dims(X,0)
    X -= np.array([111.40537, 120.87209, 136.82808])
    X /= np.array([43.77899962, 43.45094616, 49.08783324])
    result = model.predict(X)
    result = np.argmax(result, axis=1)
    result=dictionary[str(result[0])]
    return result


def vgg_model():
    base_model = VGG16(include_top=False, weights=None, input_shape=(200, 400, 3))
    x = Flatten(name='flatten')(base_model.output)
    x = Dense(4096, activation='relu', name='fc1')(x)
    x = Dense(4096, activation='relu', name='fc2')(x)
    x = Dense(6, activation='softmax', name='pred')(x)
    model = Model(inputs=base_model.input, outputs=x)
    model.load_weights('./weights/checkpoint.h5', by_name=True)
    return model


def cvimg_to_qtimg(cvimg):
    height, width, depth = cvimg.shape
    cvimg = cv2.cvtColor(cvimg, cv2.COLOR_BGR2RGB)
    cvimg = QImage(cvimg.data, width, height, width * depth, QImage.Format_RGB888)

    return cvimg


def show_video():
    cap = cv2.VideoCapture(0)
    h, w = 200, 400
    y_offset, x_offset = 100, 120
    ls = 1
    ui.label_2.resize(w, h)
    dictionary={'0':'accelerate','1':'decelerate','2':'turn left','3':'turn right','4':'start','5':'stop'}
    while True:
        # Capture frame-by-frame
        ret, frame = cap.read()
        frame = cv2.flip(frame, 1)
        cv2.rectangle(frame, (x_offset, y_offset), (x_offset + w, y_offset + h), (0, 0, 255), ls)
        frame_cut = frame[y_offset:y_offset + h, x_offset:x_offset + w]
        image = cvimg_to_qtimg(frame_cut)
        ui.label_2.setPixmap(QPixmap(image).scaled(ui.label_2.width(), ui.label_2.height()))
        result=predict_mean_metrics(frame_cut,dictionary)
        ui.textEdit.setText(result)
        # Display the resulting frame
        # cv2.imshow('frame', frame)
        c = cv2.waitKey(30) & 0xff
        if c == 27:
            cap.release()
            break


if __name__ == "__main__":
    model = vgg_model()
    app = QApplication(sys.argv)
    MainWindow = QMainWindow()
    ui = EyeSignal.Ui_MainWindow()
    ui.setupUi(MainWindow)
    MainWindow.show()
    ui.OpenCamera.clicked.connect(show_video)
    sys.exit(app.exec_())
使用信号和槽的方式连接控件和函数,需要注意的是OpenCV读取的图片需要按照代码中的转换操作转换为QImage对象再转为Qpixmap以在label中显示。