UE4 Perforce
客户端使用版
0.
![]()
1.

2.

3.打开工程后,如果其他人更新了功能或者资源(最好事先沟通好是否有修改相同文件,防止覆盖丢失)需要同步工程
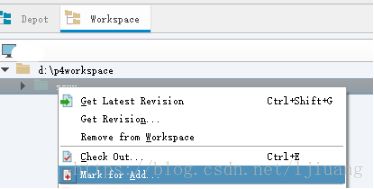
4.添加文件或者文件夹add


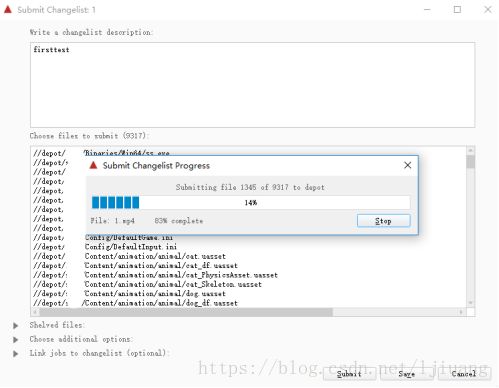
5.check in
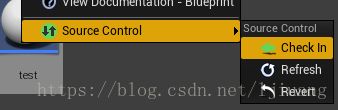
如果向撤销add,点击Revert

6.修改文件或文件夹


此时你可对给文件或文件夹进行修改,如果组内其他成员已经check out了这个文件,那你此时就无法check out
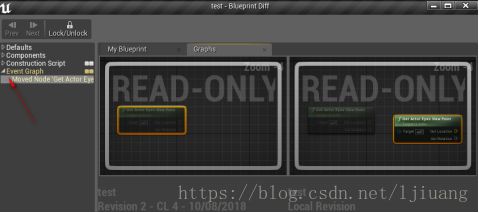
7.diff
在check out 状态下

此时你可以查看修改的异同(为checkin)
8.撤回上一个版本
方法一

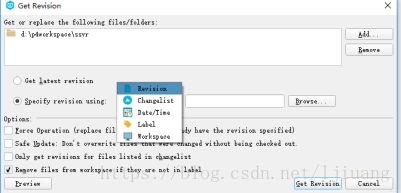
根据你提交时选择的分类进行选择之前的版本
等P4V同步完成时,UE4程序中可能也需要右击选择sync选项卡进行同步
方法二
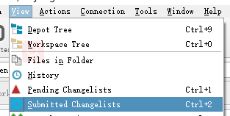

此时会回退到你选择的revision或者changelist等任务列中,如图:

在UE4中Refresh会出现!此时当你打开的时候其中就是之前你想要回退的版本

此时不要Sync同步,不然又回到最新版本,这里可以复制一个副本在add-submit或者打开两个UE4进行复制
安装配置版本
Perforce&UE4视频介绍
https://www.youtube.com/watch?v=VUN5P4_fqYk&list=PL4Aiqqv5C1J6Bnm9Gsmex6of01ZKpQJsH&index=2
工作流相关代码管理
https://blog.csdn.net/noahzuo/article/details/77417064
1.下载

2.安装
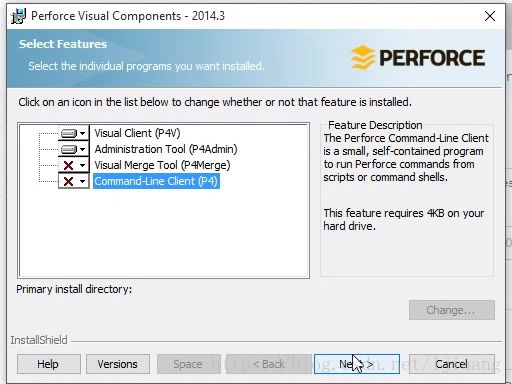
3.安装p4服务器(helix-versioning-engine-x64)的时候需要注意的:
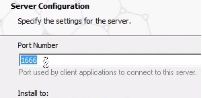
此处Port Number上面填如图所示
待安装完毕时会显示这样的server:

安装客户端(p4v)

Server一栏填写安装完成服务器时给的端口(如:DESKTOP-T41N2LO:1666)
User Name随意,写自己好记的就行
3.1打开p4v

3.2新建工作空间

3.3.get lastst revision
3.4.mark for add
3.4.1如果是修改文件,则是先check out
3.5submit

4.命令行(P4 INFO)
错误
Perforce client error:
Connect to server failed; check $P4PORT.
TCP connect to DT001:1666 failed.
connect: 192.168.0.129:1666: WSAETIMEDOUT

参考:
https://forums.perforce.com/index.php?/topic/3622-unable-to-connect-to-p4-server-from-p4v/
https://community.perforce.com/s/article/2960
https://blog.csdn.net/brucexu1978/article/details/7181768
https://www.perforce.com/perforce/doc.051/manuals/p4guide/02_connect.html
除了网上说的方式,还有的原因就是防火墙设置问题,这里解决的方式是直接关闭了防火墙
5.使用管理员账号执行命令( p4 typemap),在弹出的编辑器中增加以下规则
TypeMap:
                binary+w //depot/....exe
	        binary+w //depot/....pdb
                binary+w //depot/....dll
                binary+w //depot/....lib
                binary+w //depot/....app
                binary+w //depot/....dylib
                binary+w //depot/....stub
                binary+w //depot/....ipa
                binary //depot/....bmp
	        text+w //depot/....References
	        text+w //depot/....uproject
                text //depot/....ini
                text //depot/....config
                text //depot/....cpp
                text //depot/....h
                text //depot/....c
                text //depot/....cs
                text //depot/....m
                text //depot/....mm
                text //depot/....py
                binary+l //depot/....uasset
                binary+l //depot/....umap
                binary+l //depot/....upk
                binary+l //depot/....udk
6.忽略文件(p4 set P4IGNORE=.p4ignore.txt)
.p4ignore.txt
| # # This file tells Git about engine files that never really belong in source control. They are usually build products, log # files and intermediate files generated from a compiler or the engine runtime. # # # NOTE: # Paths that start with / match paths relative to the root (where the .gitignore file is) # Paths that end with / will match a folder and all files under it (but not a regular file with no extension) # Use * for wildcards. Wildcards stop at path separators # Use ** for a wildcard that spans path separators # Paths in this file should use forward slash characters, not back slashes # Use \ to escape special characters like ! and # # Use ! to negate a previous pattern. But it doesn't work if the parent sub-folder was masked out already. #
# Ignore Unix backup files *~
# Exceptions /Movies/*.mp4 /*.sln /*.xcodeproj /Makefile /CMakeLists.txt *.target.xml *.exe.config *.exe.manifest *.dll.config *.dll.manifest # *.modules *.target *.tmp
# Ignore the automatically created mono symlink /Engine/Binaries/ThirdParty/Mono/Mac/bin/mono
# Ignore DDC /Engine/DerivedDataCache/**
# Ignore intermediate folders Intermediate/ obj/
# Ignore Build folder Build/
# Ignore any saved local files Saved/ /Engine/Programs/UnrealBuildTool/** /LocalBuilds/ /.vs/**
# Explcitly ignore Mac DS_Store files, regardless of where they are .DS_Store |
(这里要注意的是插件要重新开启)
7.add
8.向服务器提交
9.UE4接入


这里我是在工作空间(workspace)中得工程文件配置得,之前用其他地方得工程居然不显示,可能是之前有配置了其他服务地址,又或者是必须在制定得workspace中进行配置
10.关于checkin/checkout
http://docs.manew.com/ue4/666.html
工作流程
在虚幻编辑器中,对于资源的工作流程基本上都是遵循了 Perforce 的流程。文件,或者叫资源文件(扩展名为 .uasset 和 .umap)是编辑器主要的工作对象。 由于这些文件是二进制的格式,因此并不能被作为文本文件打开,也不能在文本合并工具中合并。因此,当对一个文件进行改动时,编辑器将会锁定该文件(在 Perforce 中被叫做 Check Out), 这样其他用户就无法对它同时也进行修改。当该用户完成了对这个锁定的文件的修改编辑,则需要签入(check in 或者 commit)那些文件,将文件上传到服务器上,并且释放文件的锁定状态。
如图:且会显示被谁check out

11.如何创建分支以及怎么分配权限

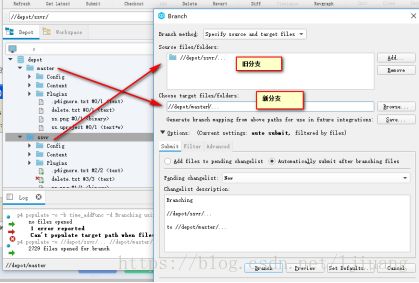
注意对应的files/folders中的文件夹填写,不同名称
11.1合并分支


注意对应的files/folders中的文件夹填写,不同名称
12.说明一个情况
当拿作为服务器的机器与客户机进行局域网联机时(开发的游戏时局域网联机的)
前提:已经关闭了两台机器的防火墙并且设置了ip为同一个网段
此时作为服务器的机器ping客户机时能够ping通
但是反过来时就ping不通
分析原因:一:p4服务器有自己的防火墙,禁止客户机对服务器的私自访问
二:端口的问题,p4服务器内部端口设置的时候是:1666,客户机可能是80什么的。
(不能用作为服务器的机器与其他机器进行联机)
13.marketplace (search "ArtV1") Animation Rigging Tool这个要在虚幻商城里安装
安装完之后在("C:\Program Files\Epic Games\UE_4.19\Engine\Plugins\Marketplace")之下会有一个(ARTv1)目录
Maya的安装如下
(https://docs.unrealengine.com/en-us/Engine/Content/Tools/MayaRiggingTool)
这里面的Perforce功能好像有点问题,其他动画功能用(出现致命错误)
Perforce官方网站上有专门针对Adobe设计类软件的版本管理插件(P4GT)
14.Pending Changelist
1.选择对应的要改的资源文件,点”Add”,新建pending changelist

2.check out 的时候在Select Pending Changelist中选择之前新建的list(这里注意,如果在UE4中直接check out会check out到Default Pendinglist中去,容易混淆,还有就是做完之后需要在UE4中刷新)
15.如果在引擎内进行了asset的移动,那么务必在提交前修复重定向器:

16.*.ini文件迁出问题