Springboots + Redis
一、Redis简介
Redis是NoSql(非关系型数据库)中的一种,是C语言开发的一个高性能键值数据库,即通过一些键值类型来存储数据。Redis的键值类型有:String字符类型、map散列类型、list列表类型、set集合类型、sortedset有序集合类型。
Redis适用场景:秒杀库存核减,常用访问数据量高的相对固定数据,分布式集群架构中的session分离,聊天室的好友列表,任务队列等。
Redis 优势:(1)性能极高 , Redis能读的速度是110000次/s,写的速度是81000次/s;(2)丰富的数据类型; (3)Redis的所有操作都是原子性的,同时Redis还支持对几个操作全并后的原子性执行;(4) Redis还支持 publish/subscribe, 通知, key 过期等等特性。
Redis的详细介绍、配置及命令可以参考官方文档:https://www.redis.net.cn/tutorial/3504.html
Linux下的Redis安装可以参考:Linux服务器搭建——Redis的安装
Windows下的Redis安装:
(1)下载Windows版本Redis:https://github.com/MSOpenTech/redis/releases,下载最新的windows X64版本的压缩包(选择.zip)
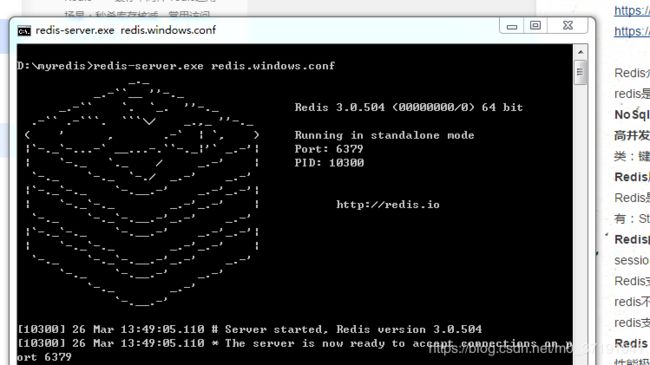
(2)下载之后解压redis,在redis目录打开cmd,启动redis:redis-server.exe redis.windows.conf
(PS:此处指定了配置文件:redis.windows.conf。打开该文件可修改配置。常见的配置修改是将bind 127.0.0.1和requirepass foobared,这两行注释掉,即在前面加上#)
二、SpringBoots整合Redis
在SpringBoot中一般使用RedisTemplate提供的方法来操作Redis。
(1)首先搭建一个Springboot项目,注意依赖中引入包的版本,我直接用的spring initial搭的项目。
    org.springframework.boot
    spring-boot-starter-parent
    2.2.2.RELEASE
(2)引入redis的依赖:
    org.springframework.boot
    spring-boot-starter


    org.springframework.boot
    spring-boot-starter-data-redis
    2.2.0.RELEASE
Redis自1.4.7之后,依赖包已经改成spring-boot-starter-data-redis了。这个依赖中集成了一些redis需要的配置(比如工厂模型JedisConnectionFactory、JredisConnectionFactory、LettuceConnectionFactory、SrpConnectionFactory),不需要自己再配置RedisConfig类(但是如果不满足自己需要,也可以重写,可以参考以下两篇博文:
spring data redis快速上手
SpringBoot整合Redis及Redis工具类撰写)。引入包版本不正确会导致类找不到等系列问题。
(3)在application.properties中添加redis的相关配置
# Redis数据库索引(默认为0)
spring.redis.database=0
# Redis服务器地址
spring.redis.host=127.0.0.1
# Redis服务器连接端口
spring.redis.port=6379
# Redis服务器连接密码(默认为空)
spring.redis.password=
# 连接池最大连接数(使用负值表示没有限制)
#spring.redis.pool.max-active=200
spring.redis.jedis.pool.max-active=200
# 连接池最大阻塞等待时间(使用负值表示没有限制)
#spring.redis.pool.max-wait=-1
spring.redis.jedis.pool.max-wait=-1ms
# 连接池中的最大空闲连接
#spring.redis.pool.max-idle=10
spring.redis.jedis.pool.max-idle=10
# 连接池中的最小空闲连接
#spring.redis.pool.min-idle=0
spring.redis.jedis.pool.min-idle=0
# 连接超时时间(毫秒)
spring.redis.timeout=1000ms
(4)测试
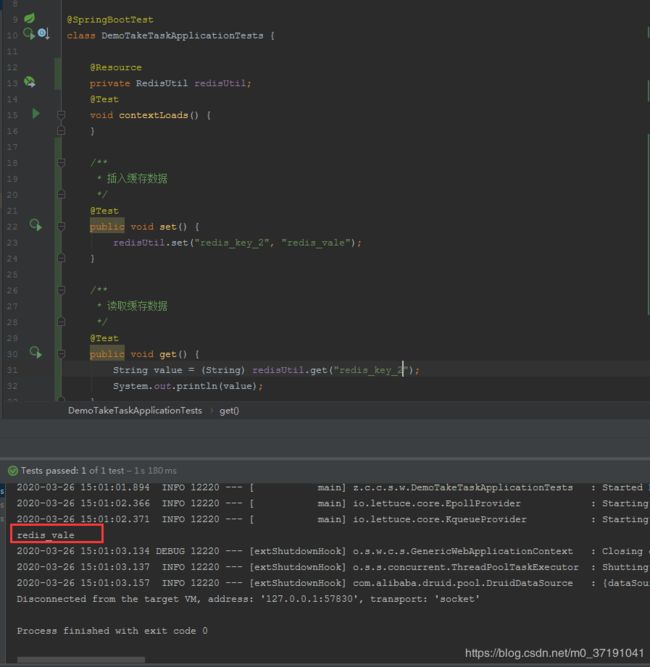
操作完以上三步就可以直接注入RedisTemplate来操作redis了,这里我是将RedisTemplate的一些方法全都封装进了RedisUtil,直接使用注入的redisUtil进行的测试。另外我也重新写了RedisConfig。
RedisConfig:
import com.fasterxml.jackson.annotation.JsonAutoDetect;
import com.fasterxml.jackson.annotation.PropertyAccessor;
import com.fasterxml.jackson.databind.ObjectMapper;
import org.springframework.cache.annotation.CachingConfigurerSupport;
import org.springframework.cache.annotation.EnableCaching;
import org.springframework.context.annotation.Bean;
import org.springframework.context.annotation.Configuration;
import org.springframework.data.redis.connection.RedisConnectionFactory;
import org.springframework.data.redis.core.RedisTemplate;
import org.springframework.data.redis.serializer.Jackson2JsonRedisSerializer;
import org.springframework.data.redis.serializer.StringRedisSerializer;

/**
 * redis配置
 * @author zhangy
 * @date 2020-03-25 18:29
 * @version 1.0
 **/
@Configuration
@EnableCaching //开启注解
public class RedisConfig extends CachingConfigurerSupport {

    @Bean
    public RedisTemplate redisTemplate(RedisConnectionFactory factory){
        RedisTemplate template = new RedisTemplate();
        template.setConnectionFactory(factory);
        Jackson2JsonRedisSerializer jackson2JsonRedisSerializer = new Jackson2JsonRedisSerializer(Object.class);
        ObjectMapper om = new ObjectMapper();
        om.setVisibility(PropertyAccessor.ALL, JsonAutoDetect.Visibility.ANY);
        om.enableDefaultTyping(ObjectMapper.DefaultTyping.NON_FINAL);
        jackson2JsonRedisSerializer.setObjectMapper(om);
        StringRedisSerializer stringRedisSerializer = new StringRedisSerializer();
        // key采用String的序列化方式
        template.setKeySerializer(stringRedisSerializer);
        // hash的key也采用String的序列化方式
        template.setHashKeySerializer(stringRedisSerializer);
        // value序列化方式采用jackson
        template.setValueSerializer(jackson2JsonRedisSerializer);
        // hash的value序列化方式采用jackson
        template.setHashValueSerializer(jackson2JsonRedisSerializer);
        template.afterPropertiesSet();
        return template;
    }
}
RedisUtil:(只贴了格式为String的部分方法,还有hash、set等的数据类型可以自己继续完善)
@Component
public class RedisUtil {

    @Autowired
    private RedisTemplate redisTemplate;

    /**
     * 指定缓存失效时间
     * @param key
     * @param time
     * @return
     */
    public boolean expire(String key, long time){
        try {
            if(time > 0){
                redisTemplate.expire(key, time, TimeUnit.SECONDS);
            }
            return true;
        }catch (Exception e){
            e.printStackTrace();
            return false;
        }
    }

    /**
     * 根据key获取过期时间
     * @param key
     * @return
     */
    public long getExipire(String key){
        return redisTemplate.getExpire(key, TimeUnit.SECONDS);
    }

    /**
     * 判断key是否存在
     * @param key
     * @return
     */
    public boolean hasKey(String key){
        try{
            return  redisTemplate.hasKey(key);
        }catch (Exception e){
            e.printStackTrace();
            return false;
        }
    }

    /**
     * 删除缓存
     * @param key 可以传一个或多个
     */
    public void del(String ...key){
        if (key != null && key.length > 0){
            if(key.length == 1){
                redisTemplate.delete(key[0]);
            }else{
                redisTemplate.delete(CollectionUtils.arrayToList(key));
            }
        }
    }

    /**
     * 普通缓存获取
     * @param key
     * @return
     */
    public Object get(String key){
        return key == null?null:redisTemplate.opsForValue().get(key);
    }

    /**
     * 普通缓存放入
     * @param key
     * @param value
     * @return
     */
    public boolean set(String key, Object value){
        try{
            redisTemplate.opsForValue().set(key, value);
            return true;
        }catch (Exception e){
            e.printStackTrace();
            return false;
        }
    }
}
测试用例直接贴代码:
参考了很多文章,也是以上面几个步骤为主,但是我操作完执行项目的时候遇到了很多问题(当时没有截图记录,不能提供具体的异常信息,还请将就!):
1、启动时报错:
Caused by: org.springframework.beans.factory.support.BeanDefinitionOverrideException: Invalid bean definition with name 'stringRedisTemplate' defined in class path resource
这是由于我自己实现了RedisConfig,但是注入的bean的名称不正确,此处的方法名为redisTemplate才可以覆盖spring-boot-starter-data-redis中自动配置的redisTemplate(详细解释可以参考:SpringBoot整合Redis及Redis工具类撰写)。(此处RedisConfig继承了CachingConfigurerSupport,没有太多必要,可以不用继承)
2、启动时报错:
'org.springframework.data.redis.connection.RedisConnectionFactory' that could not be found.
这个问题困扰了我两天,一直没有解决,后来发现还是redis包依赖的问题。(其实一开始也发现,但是依赖一直没有引对,也有可能是别的一些依赖有影响)所以pom中引入依赖的时候一定要注意版本号(可参考:springboot+redis项目实战)。(如果想查看工程用的包所依赖的包的版本可以去http://mvnrepository.com/输入对应的包如spring-data-redis)
3、连接不上redis:
ERR Client sent AUTH, but no password is set
这个就是上面提到的redis的配置问题了,注释掉相应的配置就可以了。
(有些问题可能也是我误打误撞解决了,有不足的地方还请指出)
项目工程:https://github.com/CoolITDog/test-redis.git


