Android Things:外设I/O接口-UART
一、接口简介
UART(Universal Asynchronous Receiver Transmitter)是用来和外围设备交互数据的通用接口,如GPS模块,LCD显示器,XBee收音机等复杂的外围设备,通常使用UART端口(通常简称为串行端口)来通信。
它是通用的:因为数据传输速率和数据字节格式是可配置的。
它是异步的:因为没有时钟信号来同步两个设备之间的数据传输,设备的硬件在一个先进先出的缓冲中收集所有的输入数据,直到你的app读取它。
它是全双工:意味着可以同时发送和接口数据。
它比I2C更快:但是缺少共享时钟,意味着所有的设备必须同意一个相同的数据传输速率,每个设备可以坚持独立最小定时误差。
它仅支持点对点通信:不像API和I2C,它仅支持两个设备之间的点对点通信。

UART外围设备通常有两种类型:
3线端口包含数据接收(RX),数据发送(TX),和接地引用(GUD)信号;
5线端口添加了请求发送(RTS)和清除发送(CTS)信号,用于硬件流量控制。流量控制允许接收设备标识它的缓冲已满,发送设备应该在发送更多数据之前等待。
二、使用步骤
1.打开连接:创建PeripheralManagerService对象,使用你想打开端口的名称,调用open()方法打开连接。
每个通过UART发送的字符都被包装在数据帧中,它包含以下组件:

起始位:在发送数据之前,这行保持固定1位持续时间间隔的时间,来指示新的字符的开始。
数据位:标识数据字符的单个的位。UART可能配置发送5-9数据位来代表字符。更少的比特减少数据的范围,但是可以提高数据传输效率。
校验位:可选的错误检查值。如果UART被配置为奇偶校验,一个额外的帧将会添加到这个位,预示着数据内容是否匹配奇偶校验。设置为none则从帧移除这位。
结束位:在所有数据传输后,该行被重置为可配置的时间间隔,指示字符的结尾。它能配置为1或者2位闲置时间。
通过UART传输数据的速率被称为波特率,它代表了接受和发送的速度,比特每秒。
通过UART连接的连个设备没有共享时钟,都需要使用相同的波特率提前配置来保证数据的正确解码。
硬件流控制启动之后,当设备的接收缓冲区已满不能接受任何数据的时候,UART发出发送请求(RTS)信号。一旦缓冲区被耗尽这个信号将被清除。相似的,UART监视清除发送(CTS)信号,如果它发现外部设备这行生效,将会增加数据传输。

UART读取是非阻塞的,如果在FIFO中没有有效数据它将会立即返回。UartDevice将会返回在读取时候FIFO有效字节的数目,达到要求的数量。为了确保所有的数据都被读取,UART循环读取直到它报告没有数据存在了。
当缓冲为空的时候,为了避免不必要的轮询,使用UartDevice注册一个UartDeviceCallback。当还有数据可读的时候,这个回调调用onUartDeviceDataAvailable()方法。当你的应用程序不再监听输入数据的时候,你应该注销这个回调。
onUartDeviceDataAvailable()回调返回一个布尔值,指示回调是否自动注销获取将来的中断事件。这里返回true在UART FIFO每次数据出现时继续获取事件。
这里我们和大家演示一下,电脑和树莓派如何通过FTDI TTL-232R连接线进行信息传递,该线使用的是UART接口。
1.硬件准备
树莓派3开发板 1块
FTDI芯片 TTL-232R-3V3 USB转TTL线 1根
广告时间咯:如果你还没有自己的开发板和元器件,到我们的“1024工场旗舰店”来逛逛一逛吧(文章底部二维码),这里能一次性有买到你想要的!
2.电路搭建

注意:在连接线的时候是连接线的TX连接线插入树莓派的RX引脚,同理RX插入TX。
2.代码编写
UARTDemo\app\src\main\java\com\chengxiang\uartdemo\MainActivity.java

在终端输入hello uart(蓝色),就收到返回的hello uart(红色)


UART(Universal Asynchronous Receiver Transmitter)是用来和外围设备交互数据的通用接口,如GPS模块,LCD显示器,XBee收音机等复杂的外围设备,通常使用UART端口(通常简称为串行端口)来通信。
它是通用的:因为数据传输速率和数据字节格式是可配置的。
它是异步的:因为没有时钟信号来同步两个设备之间的数据传输,设备的硬件在一个先进先出的缓冲中收集所有的输入数据,直到你的app读取它。
它是全双工:意味着可以同时发送和接口数据。
它比I2C更快:但是缺少共享时钟,意味着所有的设备必须同意一个相同的数据传输速率,每个设备可以坚持独立最小定时误差。
它仅支持点对点通信:不像API和I2C,它仅支持两个设备之间的点对点通信。

UART外围设备通常有两种类型:
3线端口包含数据接收(RX),数据发送(TX),和接地引用(GUD)信号;
5线端口添加了请求发送(RTS)和清除发送(CTS)信号,用于硬件流量控制。流量控制允许接收设备标识它的缓冲已满,发送设备应该在发送更多数据之前等待。
二、使用步骤
1.打开连接:创建PeripheralManagerService对象,使用你想打开端口的名称,调用open()方法打开连接。
@Override
protected void onCreate(Bundle savedInstanceState) {
    super.onCreate(savedInstanceState);
    try {
        PeripheralManagerService manager = new PeripheralManagerService();
        mDevice = manager.openUartDevice(UART_DEVICE_NAME);
    } catch (IOException e) {
        Log.w(TAG, "Unable to access UART device", e);
    }
}每个通过UART发送的字符都被包装在数据帧中,它包含以下组件:
起始位:在发送数据之前,这行保持固定1位持续时间间隔的时间,来指示新的字符的开始。
数据位:标识数据字符的单个的位。UART可能配置发送5-9数据位来代表字符。更少的比特减少数据的范围,但是可以提高数据传输效率。
校验位:可选的错误检查值。如果UART被配置为奇偶校验,一个额外的帧将会添加到这个位,预示着数据内容是否匹配奇偶校验。设置为none则从帧移除这位。
结束位:在所有数据传输后,该行被重置为可配置的时间间隔,指示字符的结尾。它能配置为1或者2位闲置时间。
通过UART传输数据的速率被称为波特率,它代表了接受和发送的速度,比特每秒。
通过UART连接的连个设备没有共享时钟,都需要使用相同的波特率提前配置来保证数据的正确解码。
public void configureUartFrame(UartDevice uart) throws IOException {
    uart.setBaudrate(115200);
    uart.setDataSize(8);
    uart.setParity(UartDevice.PARITY_NONE);
    uart.setStopBits(1);
}硬件流控制启动之后,当设备的接收缓冲区已满不能接受任何数据的时候,UART发出发送请求(RTS)信号。一旦缓冲区被耗尽这个信号将被清除。相似的,UART监视清除发送(CTS)信号,如果它发现外部设备这行生效,将会增加数据传输。

public void setFlowControlEnabled(UartDevice uart, boolean enable) throws IOException {
    if (enable) {
        // Enable hardware flow control
        uart.setHardwareFlowControl(UartDevice.HW_FLOW_CONTROL_AUTO_RTSCTS);
    } else {
        // Disable flow control
        uart.setHardwareFlowControl(UartDevice.HW_FLOW_CONTROL_NONE);
    }
}public void writeUartData(UartDevice uart) throws IOException {
byte[] buffer = {...};
int count = uart.write(buffer, buffer.length);
Log.d(TAG, "Wrote " + count + " bytes to peripheral");
}UART读取是非阻塞的,如果在FIFO中没有有效数据它将会立即返回。UartDevice将会返回在读取时候FIFO有效字节的数目,达到要求的数量。为了确保所有的数据都被读取,UART循环读取直到它报告没有数据存在了。
当缓冲为空的时候,为了避免不必要的轮询,使用UartDevice注册一个UartDeviceCallback。当还有数据可读的时候,这个回调调用onUartDeviceDataAvailable()方法。当你的应用程序不再监听输入数据的时候,你应该注销这个回调。
onUartDeviceDataAvailable()回调返回一个布尔值,指示回调是否自动注销获取将来的中断事件。这里返回true在UART FIFO每次数据出现时继续获取事件。
@Override
protected void onStart() {
    super.onStart();
    // Begin listening for interrupt events
    mDevice.registerUartDeviceCallback(mUartCallback);
}
public void readUartBuffer(UartDevice uart) throws IOException {
    // Maximum amount of data to read at one time
    final int maxCount = ...;
    byte[] buffer = new byte[maxCount];

    int count;
    while ((count = uart.read(buffer, buffer.length)) > 0) {
        Log.d(TAG, "Read " + count + " bytes from peripheral");
    }
}
@Override
protected void onStop() {
    super.onStop();
    // Interrupt events no longer necessary
    mDevice.unregisterUartDeviceCallback(mUartCallback);
}
private UartDeviceCallback mUartCallback = new UartDeviceCallback() {
    @Override
    public boolean onUartDeviceDataAvailable(UartDevice uart) {
        // Read available data from the UART device
        try {
            readUartBuffer(uart);
        } catch (IOException e) {
            Log.w(TAG, "Unable to access UART device", e);
        }
        // Continue listening for more interrupts
        return true;
    }
    @Override
    public void onUartDeviceError(UartDevice uart, int error) {
        Log.w(TAG, uart + ": Error event " + error);
    }
};@Override
protected void onDestroy() {
super.onDestroy();
if (mDevice != null) {
try {
mDevice.close();
mDevice = null;
} catch (IOException e) {
Log.w(TAG, "Unable to close UART device", e);
}
}
}这里我们和大家演示一下,电脑和树莓派如何通过FTDI TTL-232R连接线进行信息传递,该线使用的是UART接口。
1.硬件准备
树莓派3开发板 1块
FTDI芯片 TTL-232R-3V3 USB转TTL线 1根
广告时间咯:如果你还没有自己的开发板和元器件,到我们的“1024工场旗舰店”来逛逛一逛吧(文章底部二维码),这里能一次性有买到你想要的!
2.电路搭建

注意:在连接线的时候是连接线的TX连接线插入树莓派的RX引脚,同理RX插入TX。
2.代码编写
UARTDemo\app\src\main\java\com\chengxiang\uartdemo\MainActivity.java
public class MainActivity extends AppCompatActivity {
    private static final String TAG = "LoopbackActivity";
    private static final String UART_DEVICE_NAME = "UART0";
    private static final int BAUD_RATE = 115200;
    private static final int DATA_BITS = 8;
    private static final int STOP_BITS = 1;
    private static final int CHUNK_SIZE = 512;

    private UartDevice mUartDevice;

    @Override
    protected void onCreate(Bundle savedInstanceState) {
        super.onCreate(savedInstanceState);
        setContentView(R.layout.activity_main);

        PeripheralManagerService peripheralManagerService = new PeripheralManagerService();
        try {
            //通过UART接口名称UART0,打开接口
            mUartDevice = peripheralManagerService.openUartDevice(UART_DEVICE_NAME);
            //设置波特率、数据大小、校验等参数
            mUartDevice.setBaudrate(BAUD_RATE);
            mUartDevice.setDataSize(DATA_BITS);
            mUartDevice.setParity(UartDevice.PARITY_NONE);
            mUartDevice.setStopBits(STOP_BITS);
            //注册数据监听,在有数据可读的时候回调
            mUartDevice.registerUartDeviceCallback(mUartDeviceCallback);
        } catch (IOException e) {
            e.printStackTrace();
        }
    }

    private UartDeviceCallback mUartDeviceCallback = new UartDeviceCallback() {
        @Override
        public boolean onUartDeviceDataAvailable(UartDevice uart) {
            try {
                //读取PC终端发来的数据 ,并原封返回给PC
                byte[] buffer = new byte[CHUNK_SIZE];
                int read;
                while ((read = mUartDevice.read(buffer, buffer.length)) > 0) {
                    Log.w(TAG, "read from PC:"+ new String(buffer));
                    mUartDevice.write(buffer, read);
                }
            } catch (IOException e) {
                Log.w(TAG, "Unable to transfer data over UART", e);
            }
            return true;
        }

        @Override
        public void onUartDeviceError(UartDevice uart, int error) {
            Log.w(TAG, uart + ": Error event " + error);
        }
    };

    @Override
    protected void onDestroy() {
        super.onDestroy();
        //在不需要的时候,关闭连接
        if (mUartDevice != null) {
            try {
                mUartDevice.close();
                mUartDevice = null;
            } catch (IOException e) {
                Log.w(TAG, "Unable to close UART device", e);
            }
        }
    }
}
代码库:https://github.com/ThingsDeveloper/uartdemo
3.运行结果
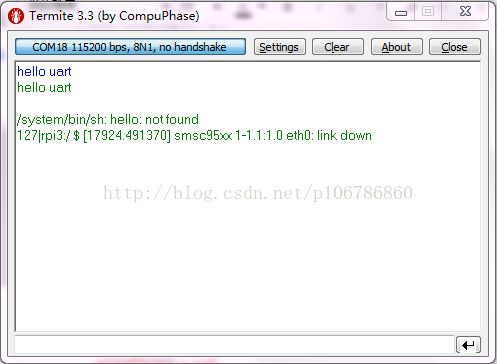
我们是以windows系统演示,故使用了Termite终端,设置串口(相关驱动推荐使用驱动人生自动安装) 连接参数(与代码中一致,相关操作这里就不详细介绍)。
在终端输入hello uart(蓝色),就收到返回的hello uart(红色)
1.抛弃各种找元器件的烦恼,来“1024工场”旗舰店,一次性买到你所想要的:树莓派套装—专为Android Things打造。

电脑用户,点击如下链接进入淘宝宝贝页面:
https://item.taobao.com/item.htm?spm=686.1000925.0.0.3f11c9ed68fPu7&id=549263158263
手机用户,打开淘宝客户端扫描二维码:

电脑用户,点击如下链接进入淘宝宝贝页面:
https://item.taobao.com/item.htm?spm=686.1000925.0.0.3f11c9ed68fPu7&id=549263158263
手机用户,打开淘宝客户端扫描二维码:
2.完整和持续更新的《使用Android打开物联网开发大门——Andoid Thigns开发》文档,欢迎大家阅读!
https://www.kancloud.cn/workshop1024/android_things_develop/360773

https://www.kancloud.cn/workshop1024/android_things_develop/360773
3.新技术,新未来!欢迎大家关注
“1024工场”微信服务号
,时刻关注我们的最新的技术讯息。
4.加入
“Android Things开发”QQ讨论群
,一起学习一起Hi。(甭客气!尽情的扫描或者长按!)
