Unity Shader-GodRay,体积光(BillBoard,Volume Shadow,Raidal Blur,Ray-Marching)
前言
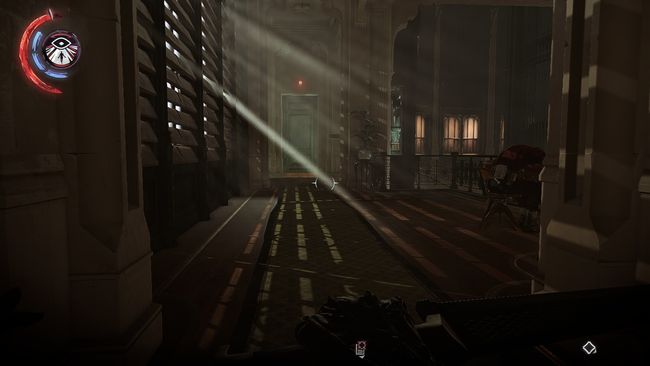
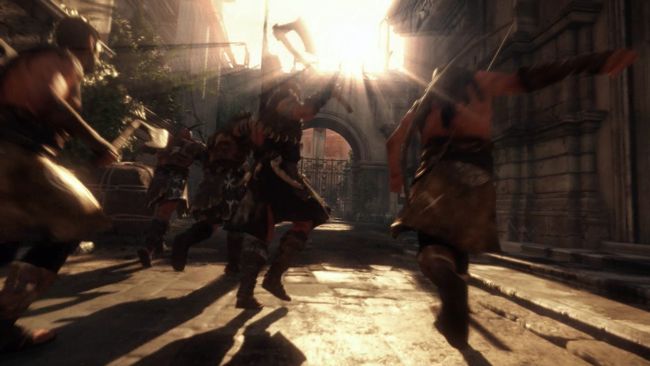
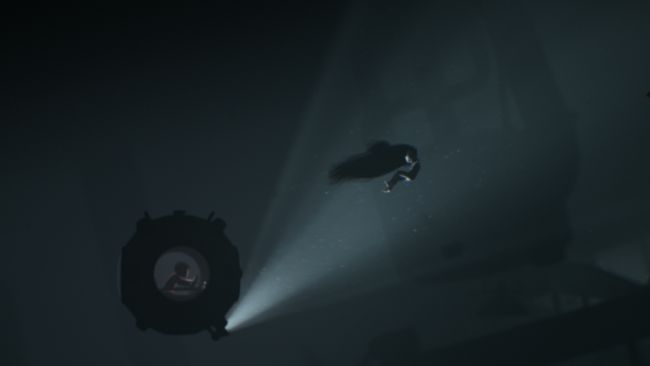
好久没有更新博客了,经历了不少事情,好在最近回归了一点正轨,决定继续Unity Shader的学习之路。作为回归的第一篇,来玩一个比较酷炫的效果(当然废话也比较多),一般称之为GodRay(圣光),也有人叫它云隙光,还有人叫它体积光(探照灯)。这几个名字对应几种类似的效果,但是实现方式相差甚远。先来几张照片以及其他游戏的截图看一下:
ps:这张图片是一张照片哈,是本屌丝看别人的云南游记发现的,哎呀,看着好美好想去>_<
ps:这张截图是《耻辱-外魔之死》的一张截图,窗缝中透过的光形成了一道道光束。也不知道《耻辱》系列还有没有后续了,超级喜欢的一个系列,最近才买的这一部,一共五关,还剩一关就通关了,我竟然有点舍不得玩了...
ps:这张图是《罗马之子》中的一个截图,抬头看太阳会发现一个很耀眼的光束,啥时候能自带个这样的光效哈,CryEngine渲染就是棒。这个游戏玩得有点心酸,感觉主角好悲剧。
ps:《剑灵》中云隙光的效果,很明显,很给力!
ps:来张《天涯明月刀》中的动态效果,天刀人模的渲染和天气系统太给力了,技能也很流畅,对,还有萌萌哒萝莉,萝莉,萝莉!!!本来是想着去看看有啥效果可以玩一下的,结果一不小心沉迷了好几个月,差点玩成《天涯上班刀》。
ps:《Inside》打水怪的一关,潜艇探照灯的效果;这是个人很喜欢的一部游戏,当初只是感觉这个游戏玩法很好,直到看了他们GDC的分享,反过来再玩这个游戏的时候,才意识到这个游戏的渲染技术竟然也如此超前,可能游戏本身的玩法太好玩,以至于我第一遍玩的时候,完全没注意这些效果相关的东东。
额,赶脚我是一个写游戏评测的的...回归正题,GodRay效果对游戏的画面提升很大,也成了当今各种大型游戏中很常见的一个效果,所以今天本人打算把上面的这几个效果用四种不同的方式实现一遍,当然,上面的都是3A大作,我这个小菜鸟只能简单模拟一下,权当实践一遍当今游戏中常见的体积光实现的技术,疏漏之处,还望各位高手不吝赐教。
简介
首先得了解一下真实世界中GodRay现象的原理,然后我们再去模拟(虽然大多数情况实现跟原理相差十万八千里)。这种光的现象是中学物理学过的一个东东,叫丁达尔效应。胶体中粒子对光线进行了散射形成光亮的通路。自然界中,云,雾,空气中的烟尘等都是胶体,所以当光照射过去的时候,发生散射,就形成了我们看到的GodRay了。
我们要在游戏中模拟这种现象,·当然不太可能完全按照现实世界中的方式去做,如果真的按照现实方式去渲染体积光,可能需要非常非常大量的粒子,这在PC端实时计算都很困难,在目前的移动设备上就更不可能了。对于游戏中我们所要的,就是在需要的地方,能显示出一道光线就好了。今天主要介绍以下几种实现方式,BillBoard特效贴片,Volume Shadow沿光方向挤出顶点,Raidal Blur Postprocessing基于后处理的实现,Ray-Marching基于光线追踪的实现。几种方式殊途同归,都是尽可能用最省的消耗来近似模拟这一酷炫的现象。
BillBoard特效贴片
最简单的方法,直接在需要有GodRay的地方,放一个特效片,模拟一个光效,就完成啦!
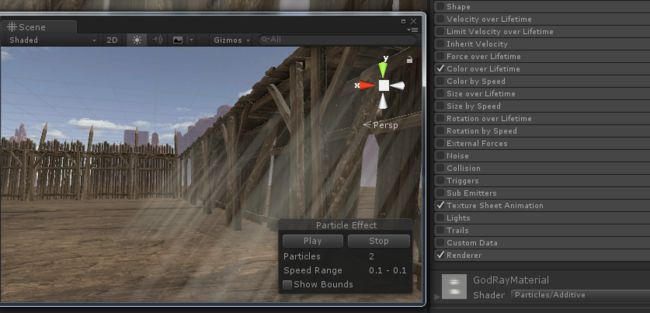
通过Unity自带的粒子系统,控制粒子贴图采样uv变换,以及颜色的alpha变换,模拟灯光摇曳的状态(今天找到了一个Gif录屏软件,GifCam,感觉还不错,终于摆脱了先录视频再转Gif的费劲工作流...):
这是最简单粗暴的方法,不过往往也是最行之有效的,同时也是性能最好的。对于场景中的一些简单装饰性的效果,其实用这种方式就可以满足了,这也是最适合手游的一种方案。《耻辱-外魔之死》的窗缝中透光的效果,如果不考虑近处穿帮的问题,其实就可以使用这种方式进行近似模拟。
不过,这个方式过于简单了点儿,远景效果还可以,如果离近了可能会显得不是很真实,所以就有很多针对这个效果的变种,最著名的应该就是Shadow Gun里面的实现了,Shadow Gun确实是一个好东东,里面很多效果的实现都很经典,下面来分析一下ShadowGun的体积光效果。
Shadow Gun中的体积光有两个重要的特性,第一个是根据距离远近 ,动态调整体积光的颜色及透明度,来达到更加真实的体积光的效果,在远距离看不清体积光,距离近些时逐渐清晰,当距离很近时,降低强度,使之更容易看清背后物体。第二个特性是动态调整体积光网格的位置,当摄像机贴近体积光时,避免了相机与半透穿插,同时也避免了因半透占屏比高导致的像素计算暴涨的性能问题。
下面附上一段代码:
//puppet_master
//2018.4.15
//Shadow Gun中贴片方式实现GodRay代码,升级unity2017.3,增加一些注释
Shader "GodRay/ShadowGunSimple"
{

	Properties
	{
		_MainTex ("Base texture", 2D) = "white" {}
		_FadeOutDistNear ("Near fadeout dist", float) = 10
		_FadeOutDistFar ("Far fadeout dist", float) = 10000
		_Multiplier("Multiplier", float) = 1
		_ContractionAmount("Near contraction amount", float) = 5
		//增加一个颜色控制(仅RGB生效)
		_Color("Color", Color) = (1,1,1,1)
	}

	SubShader
	{
		Tags { "Queue"="Transparent" "IgnoreProjector"="True" "RenderType"="Transparent" }

		//叠加方式Blend
		Blend One One
		Cull Off
		Lighting Off
		ZWrite Off
		Fog { Color (0,0,0,0) }

		CGINCLUDE
		#include "UnityCG.cginc"
		sampler2D _MainTex;

		float _FadeOutDistNear;
		float _FadeOutDistFar;
		float _Multiplier;
		float _ContractionAmount;
		float4 _Color;

		struct v2f {
			float4	pos	: SV_POSITION;
			float2	uv		: TEXCOORD0;
			fixed4	color	: TEXCOORD1;
		};

		v2f vert (appdata_full v)
		{
			v2f 		o;
			//update mul(UNITY_MATRIX_MV, v.vertex) 根据UNITY_USE_PREMULTIPLIED_MATRICES宏控制,可以预计算矩阵,减少逐顶点计算
			float3		viewPos		= UnityObjectToViewPos(v.vertex);
			float		dist		= length(viewPos);
			float		nfadeout	= saturate(dist / _FadeOutDistNear);
			float		ffadeout	= 1 - saturate(max(dist - _FadeOutDistFar,0) * 0.2);

			//乘方扩大影响
			ffadeout *= ffadeout;
			nfadeout *= nfadeout;
			nfadeout *= nfadeout;
			nfadeout *= ffadeout;

			float4 vpos = v.vertex;
			//沿normal反方向根据fade系数控制顶点位置缩进,刷了顶点色控制哪些顶点需要缩进
			//黑科技:mesh是特制的,normal方向是沿着面片方向的,而非正常的垂直于面片
			vpos.xyz -=   v.normal * saturate(1 - nfadeout) * v.color.a * _ContractionAmount;

			o.uv	= v.texcoord.xy;
			o.pos	= UnityObjectToClipPos(vpos);
			//直接在vert中计算淡出效果
			o.color	= nfadeout * v.color * _Multiplier* _Color;

			return o;
		}

		fixed4 frag (v2f i) : COLOR
		{
				return tex2D (_MainTex, i.uv.xy) * i.color ;
		}
		ENDCG

		Pass
		{
			CGPROGRAM
			#pragma vertex vert
			#pragma fragment frag
			#pragma fragmentoption ARB_precision_hint_fastest
			ENDCG
		}
	}
}
效果如下:
简单分析一下:根据远近控制淡入淡出比较简单,只要设置两个距离的系数,根据距离去计算即可,如果感觉效果不够强,就乘方一下,这个也是shader中比较常用的一个提高某个属性对效果影响强度的手段。另一点,根据距离去动态调整顶点的位置,本身这个思想就比较有想法,但是实现更加惊艳到我了。首先刷顶点色这个也是比较常用的控制模型不同位置不同表现的一个方法,但是Shadow Gun不光刷了顶点色,还把法线的内容改了(本身不需要光照计算,没有法线的需求),直接在制作模型的时候将面片的法线改为沿着面片的方向,而不是正常的垂直于面片的方向,这样在计算时,就可以很容易地让模型的缩进方向改为沿着面片。所以这个shader必须结合特制的mesh来使用,并且model设置的法线必须为Import方式,如果改为calculate方式,Unity自己计算出的法线的话,效果就完全不对了。
Shadow Gun中还有一个稍微复杂一些的GodRay Shader,除上面的效果外,又增加了一个根据正弦波等模拟的灯光忽明忽暗的效果,与最上面粒子的控制效果大同小异。这种shader的变种其实可以模拟做一个聚光灯的效果,用一个圆筒形的Mesh,根据菲涅尔计算一个柔和的边缘,然后光柱本身采样一下噪声图,做一个UV滚动,也可以刷一下顶点数控制一下光渐变,就有一个比较好的探照灯效果啦。
Volume Shadow光方向挤出
这个方案也是一个相对比较省的方案,但是效果的局限性很大,只是某些特殊情况下可以出比较好的效果,主要的思想是阴影的一种实现-体积阴影的扩展。这个效果在《黑魂2》里面我曾经见过一次,然而这个游戏我实在没有兴趣再被虐一遍,所以木有找到游戏截图,另外天刀的神威职业选人界面的效果与这个有些类似。
Shader代码如下:
//puppet_master
//2018.4.15
//GodRay,体积阴影扩展,沿光方向挤出顶点实现
Shader "GodRay/VolumeShadow"
{

	Properties
	{
		_Color("Color", Color) = (1,1,1,0.002)
		_MainTex ("Base texture", 2D) = "white" {}
		_ExtrusionFactor("Extrusion", Range(0, 2)) = 0.1
		_Intensity("Intensity", Range(0, 10)) = 1
		_WorldLightPos("LightPos", Vector) = (0,0,0,0)
	}

	SubShader
	{
		Tags { "Queue"="Transparent" "IgnoreProjector"="True" "RenderType"="Transparent + 1" }

		Blend SrcAlpha OneMinusSrcAlpha
		Cull Off
		ZWrite Off
		Fog { Color (0,0,0,0) }

		CGINCLUDE
		#include "UnityCG.cginc"

		float4 _Color;
		float4 _WorldLightPos;
		sampler2D _MainTex;
		float _ExtrusionFactor;
		float _Intensity;

		struct v2f {
			float4	pos		: SV_POSITION;
			float2	uv		: TEXCOORD0;
			float distance : TEXCOORD1;
		};

		v2f vert (appdata_base v)
		{
			v2f o;
			//转化到物体空间计算
			float3 objectLightPos = mul(unity_WorldToObject, _WorldLightPos.xyz).xyz;
			float3 objectLightDir = objectLightPos - v.vertex.xyz;
			float dotValue = dot(objectLightDir, v.normal);
			//light dot normal,*0.5+0.5转化为0,1控制变量,控制受光面挤出
			float controlValue = sign(dotValue) * 0.5 + 0.5;
			float4 vpos = v.vertex;
			//受光面沿法线反方向挤出顶点
			vpos.xyz -= objectLightDir * _ExtrusionFactor * controlValue;

			o.uv	= v.texcoord.xy;
			o.pos	= UnityObjectToClipPos(vpos);
			o.distance = length(objectLightDir);

			return o;
		}

		fixed4 frag (v2f i) : COLOR
		{
			fixed4 tex = tex2D(_MainTex, i.uv);
			//顶点到光的距离与物体到光的距离控制一个衰减值
			float att = i.distance / _WorldLightPos.w;
			return _Color * tex * att * _Intensity;
		}
		ENDCG

		Pass
		{
			CGPROGRAM
			#pragma vertex vert
			#pragma fragment frag
			#pragma fragmentoption ARB_precision_hint_fastest
			ENDCG
		}
	}
}
另外,这里没有使用真正的光源位置,而是自己控制了一个光源的位置,这样比较灵活,不过需要一个脚本把光源位置传递给shader。另外,如果要渲染体积光,除了体积光,还需要渲染对象本身,可以用RenderWithShader,Command Buffer,Graphics.DrawMesh等等,不过,我直接用了最简单偷懒的方法,直接给对象加了个材质,一个正常渲染,一个渲染体积光。脚本如下:
/********************************************************************
 FileName: GodRayVolumeHelper.cs
 Description:
 Created: 2018/04/20
 history: 20:4:2018 0:24 by zhangjian
*********************************************************************/
using UnityEngine;

[ExecuteInEditMode]
public class GodRayVolumeHelper : MonoBehaviour {

    public Transform lightTransform;
    private Material godRayVolumeMateril;

    void Awake()
    {
        var renderer = GetComponentInChildren();
        foreach(var mat in renderer.sharedMaterials)
        {
            if (mat.shader.name.Contains("VolumeShadow"))
                godRayVolumeMateril = mat;
        }
    }

	// Update is called once per frame
	void Update ()
    {
        if (lightTransform == null || godRayVolumeMateril == null)
            return;
        float distance = Vector3.Distance(lightTransform.position, transform.position);
        godRayVolumeMateril.SetVector("_WorldLightPos", new Vector4(lightTransform.position.x, lightTransform.position.y, lightTransform.position.z, distance));
    }
}
效果如下(恩,参数调的猛了点,不过我喜欢!):
简单分析一下这个效果的实现。首先,我们需要确定只有受光面才沿着光方向挤出,所以这个时候就要想起diffuse的计算方式,直接用法线方向点乘光线方向,这里我们直接把世界空间光位置转到模型空间进而计算了模型空间的光方向。点乘的结果就代表了光方向与法线方向的贴合程度,我们通过sign函数直接把这个值变成一个-1,1的控制值,然后再进行一个最常见的*0.5+0.5变换,-1,1变化为0,1。这样这个点乘结果就可以作为我们判断是受光面还是背光面的控制值了。然后我们将物体受光面的每个顶点沿着光的反方向增加一个偏移值,就达到了“挤出”的效果,关于顶点偏移,在描边效果以及溶解效果也都有使用。上面的操作都是在vertex阶段进行,在pixel阶段,我们只需要采样一下贴图,个人感觉还是直接采样对象本身的贴图就好了,有一种对象自身的颜色被光“照”出来的感觉(恩,这么说非常不专业,然而我也没有想好要怎么解释这个现象)。为了让效果好一些,可以适当控制一下光线沿距离的衰减等等。
Raidal Blur Postprocessing径向模糊后处理
哇,终于到了后处理了,我还是这个观点,后处理是最能提升游戏画面效果的方式之一,所以我也是最喜欢后处理的,哈哈。GodRay的后处理实现的效果也是要比前两种更加真实,也适用于更多情况,当然也比前两者耗费更多。文章开头截图中除了《Inside》和《耻辱-外魔之死》外的几个圣光效果,个人感觉应该是用这种方式实现的。径向模糊后处理方式实现GodRay,可以参考《GPU Gems 3 -Volumetric Light Scattering as a Post-Process》这篇文章。
在后处理中,我们只有一张屏幕的RT。所以,我们需要用图像的方式来进行处理。首先,我们要找到光点,最简单的方式,就是直接用颜色阈值提取高亮部分,这个就是我们在Bloom效果中使用的方法,通过亮度提取出一张所谓高光点的部分;然后将这张图进行径向模糊,把亮度部分向一个方向延伸,迭代几次之后我们就能够得到一个光束的效果;最终我们再将这个光束图与屏幕原始图像叠加就得到了体积光的效果。
比如一个原始的天空效果:
经过提取高亮=>径向模糊=>增大模糊半径再次径向模糊=>与原图叠加的效果分别如下图:
下面附上shader代码:
//puppet_master
//2018.4.20
//后处理方式实现GodRay
Shader "GodRay/PostEffect" {

	Properties{
		_MainTex("Base (RGB)", 2D) = "white" {}
		_BlurTex("Blur", 2D) = "white"{}
	}

	CGINCLUDE
	#define RADIAL_SAMPLE_COUNT 6
	#include "UnityCG.cginc"

	//用于阈值提取高亮部分
	struct v2f_threshold
	{
		float4 pos : SV_POSITION;
		float2 uv : TEXCOORD0;
	};

	//用于blur
	struct v2f_blur
	{
		float4 pos : SV_POSITION;
		float2 uv  : TEXCOORD0;
		float2 blurOffset : TEXCOORD1;
	};

	//用于最终融合
	struct v2f_merge
	{
		float4 pos : SV_POSITION;
		float2 uv  : TEXCOORD0;
		float2 uv1 : TEXCOORD1;
	};

	sampler2D _MainTex;
	float4 _MainTex_TexelSize;
	sampler2D _BlurTex;
	float4 _BlurTex_TexelSize;
	float4 _ViewPortLightPos;

	float4 _offsets;
	float4 _ColorThreshold;
	float4 _LightColor;
	float _LightFactor;
	float _PowFactor;
	float _LightRadius;

	//高亮部分提取shader
	v2f_threshold vert_threshold(appdata_img v)
	{
		v2f_threshold o;
		o.pos = UnityObjectToClipPos(v.vertex);
		o.uv = v.texcoord.xy;

		//dx中纹理从左上角为初始坐标,需要反向
#if UNITY_UV_STARTS_AT_TOP
		if (_MainTex_TexelSize.y < 0)
			o.uv.y = 1 - o.uv.y;
#endif
		return o;
	}

	fixed4 frag_threshold(v2f_threshold i) : SV_Target
	{
		fixed4 color = tex2D(_MainTex, i.uv);
		float distFromLight = length(_ViewPortLightPos.xy - i.uv);
		float distanceControl = saturate(_LightRadius - distFromLight);
		//仅当color大于设置的阈值的时候才输出
		float4 thresholdColor = saturate(color - _ColorThreshold) * distanceControl;
		float luminanceColor = Luminance(thresholdColor.rgb);
		luminanceColor = pow(luminanceColor, _PowFactor);
		return fixed4(luminanceColor, luminanceColor, luminanceColor, 1);
	}

	//径向模糊 vert shader
	v2f_blur vert_blur(appdata_img v)
	{
		v2f_blur o;
		o.pos = UnityObjectToClipPos(v.vertex);
		o.uv = v.texcoord.xy;
		//径向模糊采样偏移值*沿光的方向权重
		o.blurOffset = _offsets * (_ViewPortLightPos.xy - o.uv);
		return o;
	}

	//径向模拟pixel shader
	fixed4 frag_blur(v2f_blur i) : SV_Target
	{
		half4 color = half4(0,0,0,0);
		for(int j = 0; j < RADIAL_SAMPLE_COUNT; j++)
		{
			color += tex2D(_MainTex, i.uv.xy);
			i.uv.xy += i.blurOffset;
		}
		return color / RADIAL_SAMPLE_COUNT;
	}

	//融合vertex shader
	v2f_merge vert_merge(appdata_img v)
	{
		v2f_merge o;
		//mvp矩阵变换
		o.pos = UnityObjectToClipPos(v.vertex);
		//uv坐标传递
		o.uv.xy = v.texcoord.xy;
		o.uv1.xy = o.uv.xy;
#if UNITY_UV_STARTS_AT_TOP
		if (_MainTex_TexelSize.y < 0)
			o.uv.y = 1 - o.uv.y;
#endif
		return o;
	}

	fixed4 frag_merge(v2f_merge i) : SV_Target
	{
		fixed4 ori = tex2D(_MainTex, i.uv1);
		fixed4 blur = tex2D(_BlurTex, i.uv);
		//输出= 原始图像,叠加体积光贴图
		return ori + _LightFactor * blur * _LightColor;
	}

		ENDCG

	SubShader
	{
		//pass 0: 提取高亮部分
		Pass
		{
			ZTest Off
			Cull Off
			ZWrite Off
			Fog{ Mode Off }

			CGPROGRAM
			#pragma vertex vert_threshold
			#pragma fragment frag_threshold
			ENDCG
		}

		//pass 1: 径向模糊
		Pass
		{
			ZTest Off
			Cull Off
			ZWrite Off
			Fog{ Mode Off }

			CGPROGRAM
			#pragma vertex vert_blur
			#pragma fragment frag_blur
			ENDCG
		}

		//pass 2: 将体积光模糊图与原图融合
		Pass
		{

			ZTest Off
			Cull Off
			ZWrite Off
			Fog{ Mode Off }

			CGPROGRAM
			#pragma vertex vert_merge
			#pragma fragment frag_merge
			ENDCG
		}
	}
}
C#部分代码如下,PostEffectBase基类在屏幕校色这篇文章里(>_<半年没更新。。。发现最多的评论就是问这个类在哪的。。。唉,我记得我应该每篇文章都有注明的呀。。。):
using UnityEngine;
using System.Collections;

[ExecuteInEditMode]
public class GodRayPostEffect : PostEffectBase
{
    //高亮部分提取阈值
    public Color colorThreshold = Color.gray;
    //体积光颜色
    public Color lightColor = Color.white;
    //光强度
    [Range(0.0f, 20.0f)]
    public float lightFactor = 0.5f;
    //径向模糊uv采样偏移值
    [Range(0.0f, 10.0f)]
    public float samplerScale = 1;
    //Blur迭代次数
    [Range(1,3)]
    public int blurIteration = 2;
    //降低分辨率倍率
    [Range(0, 3)]
    public int downSample = 1;
    //光源位置
    public Transform lightTransform;
    //产生体积光的范围
    [Range(0.0f, 5.0f)]
    public float lightRadius = 2.0f;
    //提取高亮结果Pow倍率,适当降低颜色过亮的情况
    [Range(1.0f, 4.0f)]
    public float lightPowFactor = 3.0f;

    private Camera targetCamera = null;

    void Awake()
    {
        targetCamera = GetComponent();
    }

    void OnRenderImage(RenderTexture source, RenderTexture destination)
    {
        if (_Material && targetCamera)
        {
            int rtWidth = source.width >> downSample;
            int rtHeight = source.height >> downSample;
            //RT分辨率按照downSameple降低
            RenderTexture temp1 = RenderTexture.GetTemporary(rtWidth, rtHeight, 0, source.format);

            //计算光源位置从世界空间转化到视口空间
            Vector3 viewPortLightPos = lightTransform == null ? new Vector3(.5f, .5f, 0) : targetCamera.WorldToViewportPoint(lightTransform.position);

            //将shader变量改为PropertyId,以及将float放在Vector中一起传递给Material会更省一些,but,我懒
            _Material.SetVector("_ColorThreshold", colorThreshold);
            _Material.SetVector("_ViewPortLightPos", new Vector4(viewPortLightPos.x, viewPortLightPos.y, viewPortLightPos.z, 0));
            _Material.SetFloat("_LightRadius", lightRadius);
            _Material.SetFloat("_PowFactor", lightPowFactor);
            //根据阈值提取高亮部分,使用pass0进行高亮提取,比Bloom多一步计算光源距离剔除光源范围外的部分
            Graphics.Blit(source, temp1, _Material, 0);

            _Material.SetVector("_ViewPortLightPos", new Vector4(viewPortLightPos.x, viewPortLightPos.y, viewPortLightPos.z, 0));
            _Material.SetFloat("_LightRadius", lightRadius);
            //径向模糊的采样uv偏移值
            float samplerOffset = samplerScale / source.width;
            //径向模糊,两次一组,迭代进行
            for (int i = 0; i < blurIteration; i++)
            {
                RenderTexture temp2 = RenderTexture.GetTemporary(rtWidth, rtHeight, 0, source.format);
                float offset = samplerOffset * (i * 2 + 1);
                _Material.SetVector("_offsets", new Vector4(offset, offset, 0, 0));
                Graphics.Blit(temp1, temp2, _Material, 1);

                offset = samplerOffset * (i * 2 + 2);
                _Material.SetVector("_offsets", new Vector4(offset, offset, 0, 0));
                Graphics.Blit(temp2, temp1, _Material, 1);
                RenderTexture.ReleaseTemporary(temp2);
            }

            _Material.SetTexture("_BlurTex", temp1);
            _Material.SetVector("_LightColor", lightColor);
            _Material.SetFloat("_LightFactor", lightFactor);
            //最终混合,将体积光径向模糊图与原始图片混合,pass2
            Graphics.Blit(source, destination, _Material, 2);

            //释放申请的RT
            RenderTexture.ReleaseTemporary(temp1);
        }
        else
        {
            Graphics.Blit(source, destination);
        }
    }
}
效果如下:
上面的效果在提取高亮部分有一个将高亮部分阈值转灰度的操作,不过个人感觉不转灰度也挺好看的,直接用带颜色信息的体积光进行Blur在叠回去,有一种散射的赶脚,不过就是颜色不好控制了:
恩,阳光透过云层洒下万丈光芒,瞬间整个人心情都变好啦,哈哈哈哈哈。
再来一张动态的类似文章开头天刀截图的那种效果:
but,这个效果还没有完,因为还有一个很严重的问题,提取高亮部分采用的是颜色提取的方式,那么,不管远近,如果镜头前本身就有很亮的东西,那瞬间就会被闪瞎眼,比如上面的模型加了一个自发光效果的话,就真的变成God了:
所以,这是直接用颜色提取高亮部分的弊端,因为仅靠一张RT图像信息,我们没有办法分辨哪些才真正的光。我们需要做的是在提取高亮或者最终混合阶段,剔除掉不应该显示高光的部分,这样遮挡效果会更好,并且不会出现上图所示的情况。
所以下面要搞得就是用一个Mask,剔除掉不应该显示为高亮的部分。首先来个实现上最简单的,但是可能比较费的方法,我们可以直接用深度进行剔除,因为所谓的GodRay大部分应该都是天空部分的光源,而天空盒的深度为最大值,在计算时把深度很小的部分直接剔除掉。不多说,上代码:
//puppet_master
//2018.4.20
//后处理方式实现GodRay,使用深度剔除无需产生光源的部分
Shader "GodRay/PostEffect" {

	Properties{
		_MainTex("Base (RGB)", 2D) = "white" {}
		_BlurTex("Blur", 2D) = "white"{}
	}

	CGINCLUDE
	#define RADIAL_SAMPLE_COUNT 6
	#include "UnityCG.cginc"

	//用于阈值提取高亮部分
	struct v2f_threshold
	{
		float4 pos : SV_POSITION;
		float2 uv : TEXCOORD0;
	};

	//用于blur
	struct v2f_blur
	{
		float4 pos : SV_POSITION;
		float2 uv  : TEXCOORD0;
		float2 blurOffset : TEXCOORD1;
	};

	//用于最终融合
	struct v2f_merge
	{
		float4 pos : SV_POSITION;
		float2 uv  : TEXCOORD0;
		float2 uv1 : TEXCOORD1;
	};

	sampler2D _CameraDepthTexture;
	sampler2D _MainTex;
	float4 _MainTex_TexelSize;
	sampler2D _BlurTex;
	float4 _BlurTex_TexelSize;
	float4 _ViewPortLightPos;

	float4 _offsets;
	float4 _ColorThreshold;
	float4 _LightColor;
	float _LightFactor;
	float _PowFactor;
	float _LightRadius;
	float _DepthThreshold;

	//高亮部分提取shader
	v2f_threshold vert_threshold(appdata_img v)
	{
		v2f_threshold o;
		o.pos = UnityObjectToClipPos(v.vertex);
		o.uv = v.texcoord.xy;

		//dx中纹理从左上角为初始坐标,需要反向
#if UNITY_UV_STARTS_AT_TOP
		if (_MainTex_TexelSize.y < 0)
			o.uv.y = 1 - o.uv.y;
#endif
		return o;
	}

	fixed4 frag_threshold(v2f_threshold i) : SV_Target
	{
		fixed4 color = tex2D(_MainTex, i.uv);
		float distFromLight = length(_ViewPortLightPos.xy - i.uv);
		float distanceControl = saturate(_LightRadius - distFromLight);
		//仅当color大于设置的阈值的时候才输出
		float4 thresholdColor = saturate(color - _ColorThreshold) * distanceControl;
		float luminanceColor = Luminance(thresholdColor.rgb);
		luminanceColor = pow(luminanceColor, _PowFactor);
		//采样深度贴图
		float depth = SAMPLE_DEPTH_TEXTURE(_CameraDepthTexture, i.uv);
		//转换回01区间
		depth = Linear01Depth (depth);
		//将深度小于阈值的部分直接变为0作为系数乘原来的结果,剃掉近处的内容
		luminanceColor *= sign(saturate(depth - _DepthThreshold));
		return fixed4(luminanceColor, luminanceColor, luminanceColor, 1);
	}

	//径向模糊 vert shader
	v2f_blur vert_blur(appdata_img v)
	{
		v2f_blur o;
		o.pos = UnityObjectToClipPos(v.vertex);
		o.uv = v.texcoord.xy;
		//径向模糊采样偏移值*沿光的方向权重
		o.blurOffset = _offsets * (_ViewPortLightPos.xy - o.uv);
		return o;
	}

	//径向模拟pixel shader
	fixed4 frag_blur(v2f_blur i) : SV_Target
	{
		half4 color = half4(0,0,0,0);
		for(int j = 0; j < RADIAL_SAMPLE_COUNT; j++)
		{
			color += tex2D(_MainTex, i.uv.xy);
			i.uv.xy += i.blurOffset;
		}
		return color / RADIAL_SAMPLE_COUNT;
	}

	//融合vertex shader
	v2f_merge vert_merge(appdata_img v)
	{
		v2f_merge o;
		//mvp矩阵变换
		o.pos = UnityObjectToClipPos(v.vertex);
		//uv坐标传递
		o.uv.xy = v.texcoord.xy;
		o.uv1.xy = o.uv.xy;
#if UNITY_UV_STARTS_AT_TOP
		if (_MainTex_TexelSize.y < 0)
			o.uv.y = 1 - o.uv.y;
#endif
		return o;
	}

	fixed4 frag_merge(v2f_merge i) : SV_Target
	{
		fixed4 ori = tex2D(_MainTex, i.uv1);
		fixed4 blur = tex2D(_BlurTex, i.uv);

		//输出= 原始图像,叠加体积光贴图
		fixed4 lightColor =  _LightFactor * blur * _LightColor;
		return lightColor + ori;
	}

		ENDCG

	SubShader
	{
		//pass 0: 提取高亮部分
		Pass
		{
			ZTest Off
			Cull Off
			ZWrite Off
			Fog{ Mode Off }

			CGPROGRAM
			#pragma vertex vert_threshold
			#pragma fragment frag_threshold
			ENDCG
		}

		//pass 1: 径向模糊
		Pass
		{
			ZTest Off
			Cull Off
			ZWrite Off
			Fog{ Mode Off }

			CGPROGRAM
			#pragma vertex vert_blur
			#pragma fragment frag_blur
			ENDCG
		}

		//pass 2: 将体积光模糊图与原图融合
		Pass
		{

			ZTest Off
			Cull Off
			ZWrite Off
			Fog{ Mode Off }

			CGPROGRAM
			#pragma vertex vert_merge
			#pragma fragment frag_merge
			ENDCG
		}

	}
}
/********************************************************************
 FileName: GodRayPostEffect.cs
 Description:
 Created: 2018/04/24
 history: 24:4:2018 0:11 by zhangjian
*********************************************************************/
using UnityEngine;

[ExecuteInEditMode]
public class GodRayPostEffect : PostEffectBase
{
    //深度控制阈值
    [Range(0.0f, 1.0f)]
    public float depthThreshold = 0.8f;
    //高亮部分提取阈值
    public Color colorThreshold = Color.gray;
    //体积光颜色
    public Color lightColor = Color.white;
    //光强度
    [Range(0.0f, 20.0f)]
    public float lightFactor = 0.5f;
    //径向模糊uv采样偏移值
    [Range(0.0f, 10.0f)]
    public float samplerScale = 1;
    //Blur迭代次数
    [Range(1,3)]
    public int blurIteration = 2;
    //降低分辨率倍率
    [Range(0, 3)]
    public int downSample = 1;
    //光源位置
    public Transform lightTransform;
    //产生体积光的范围
    [Range(0.0f, 5.0f)]
    public float lightRadius = 2.0f;
    //提取高亮结果Pow倍率,适当降低颜色过亮的情况
    [Range(1.0f, 4.0f)]
    public float lightPowFactor = 3.0f;

    private Camera targetCamera = null;

    void Awake()
    {
        targetCamera = GetComponent();
    }

    void OnEnable()
    {
        targetCamera.depthTextureMode = DepthTextureMode.Depth;
    }

    void OnDistable()
    {
        targetCamera.depthTextureMode = DepthTextureMode.None;
    }

    void OnRenderImage(RenderTexture source, RenderTexture destination)
    {
        if (_Material && targetCamera)
        {
            int rtWidth = source.width >> downSample;
            int rtHeight = source.height >> downSample;
            //RT分辨率按照downSameple降低
            RenderTexture temp1 = RenderTexture.GetTemporary(rtWidth, rtHeight, 0, source.format);

            //计算光源位置从世界空间转化到视口空间
            Vector3 viewPortLightPos = lightTransform == null ? new Vector3(.5f, .5f, 0) : targetCamera.WorldToViewportPoint(lightTransform.position);

            //将shader变量改为PropertyId,以及将float放在Vector中一起传递给Material会更省一些,but,我懒
            _Material.SetVector("_ColorThreshold", colorThreshold);
            _Material.SetVector("_ViewPortLightPos", new Vector4(viewPortLightPos.x, viewPortLightPos.y, viewPortLightPos.z, 0));
            _Material.SetFloat("_LightRadius", lightRadius);
            _Material.SetFloat("_PowFactor", lightPowFactor);
            _Material.SetFloat("_DepthThreshold", depthThreshold);
            //根据阈值提取高亮部分,使用pass0进行高亮提取,比Bloom多一步计算光源距离剔除光源范围外的部分
            Graphics.Blit(source, temp1, _Material, 0);

            _Material.SetVector("_ViewPortLightPos", new Vector4(viewPortLightPos.x, viewPortLightPos.y, viewPortLightPos.z, 0));
            _Material.SetFloat("_LightRadius", lightRadius);
            //径向模糊的采样uv偏移值
            float samplerOffset = samplerScale / source.width;
            //径向模糊,两次一组,迭代进行
            for (int i = 0; i < blurIteration; i++)
            {
                RenderTexture temp2 = RenderTexture.GetTemporary(rtWidth, rtHeight, 0, source.format);
                float offset = samplerOffset * (i * 2 + 1);
                _Material.SetVector("_offsets", new Vector4(offset, offset, 0, 0));
                Graphics.Blit(temp1, temp2, _Material, 1);

                offset = samplerOffset * (i * 2 + 2);
                _Material.SetVector("_offsets", new Vector4(offset, offset, 0, 0));
                Graphics.Blit(temp2, temp1, _Material, 1);
                RenderTexture.ReleaseTemporary(temp2);
            }

            _Material.SetTexture("_BlurTex", temp1);
            _Material.SetVector("_LightColor", lightColor);
            _Material.SetFloat("_LightFactor", lightFactor);
            //最终混合,将体积光径向模糊图与原始图片混合,pass2
            Graphics.Blit(source, destination, _Material, 2);

            //释放申请的RT
            RenderTexture.ReleaseTemporary(temp1);
        }
        else
        {
            Graphics.Blit(source, destination);
        }
    }
}
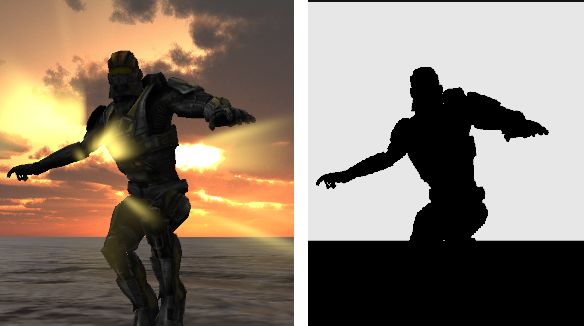
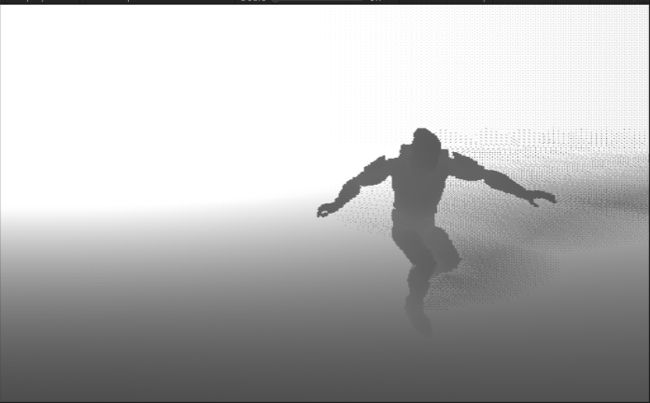
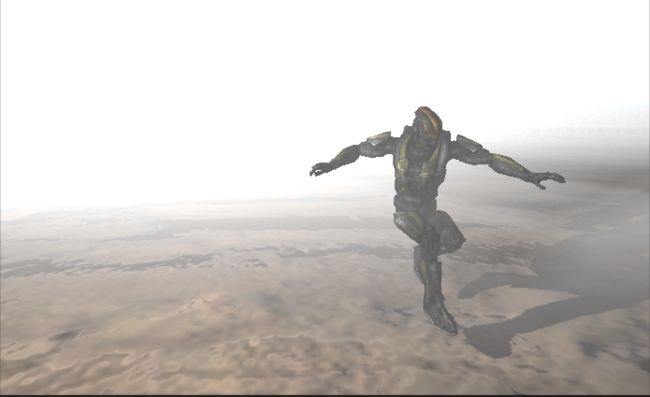
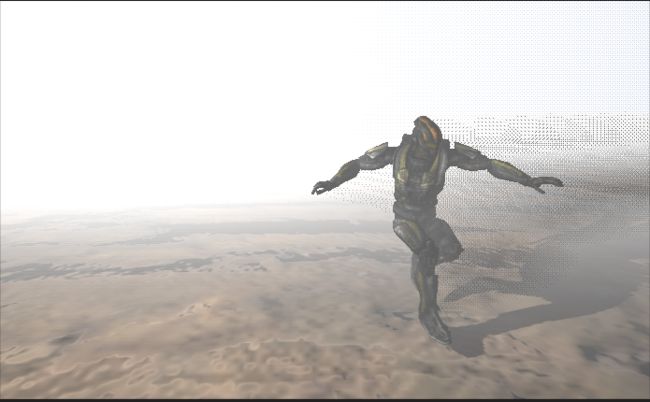
这样,即使我们贴脸一个闪瞎眼的模型,也不会出现上面那种情况,因为我们在提取阈值的时候,就把它扣掉啦,下图左侧是抠图的Pass,右图是最终结果:
but,上面的情况其实也有一定局限,如果我们的光源并不是在最远,近处光源仍然想表现这个效果,或者这个超级亮的对象本身不会写入深度图,加之开启深度本身也是有很大消耗的。所以,我们可以换一种方式,自己去生成一张Mask图进行抠图操作。比较方便的一个方法是额外生成一个和当前相机一样的相机,使用RenderWithShader方式生成一张Mask图。
Replace Shader代码如下,只把Geometry的替换了,其他类型看个人喜好咯:
//puppet_master
//2018.4.24
//后处理Mask生成ReplaceMentShader
Shader "GodRay/MaskGen" {

	CGINCLUDE
	#include "UnityCG.cginc"
	fixed4 frag_maskGen(v2f_img i) : SV_Target
	{
		return fixed4(0, 0, 0, 1.0f);
	}
	ENDCG

	SubShader
	{
		Tags
		{
			"Queue" = "Geometry"
			"RenderType" = "Opaque"
		}

		Pass
		{
			ZTest Off
			Cull Off
			ZWrite Off
			Lighting Off
			Fog{ Mode Off }

			CGPROGRAM
			#pragma vertex vert_img
			#pragma fragment frag_maskGen
			ENDCG
		}
	}
}
GodRay Shader基本和Depth方式没什么区别,只是改为采样Mask贴图了:
//puppet_master
//2018.4.20
//后处理方式实现GodRay,使用Mask剔除不显示光的部分
Shader "GodRay/PostEffectMask" {

	Properties{
		_MainTex("Base (RGB)", 2D) = "white" {}
		_BlurTex("Blur", 2D) = "white"{}
		_MainTex("Mask", 2D) = "white"{}
	}

	CGINCLUDE
	#define RADIAL_SAMPLE_COUNT 6
	#include "UnityCG.cginc"

	//用于阈值提取高亮部分
	struct v2f_threshold
	{
		float4 pos : SV_POSITION;
		float2 uv : TEXCOORD0;
	};

	//用于blur
	struct v2f_blur
	{
		float4 pos : SV_POSITION;
		float2 uv  : TEXCOORD0;
		float2 blurOffset : TEXCOORD1;
	};

	//用于最终融合
	struct v2f_merge
	{
		float4 pos : SV_POSITION;
		float2 uv  : TEXCOORD0;
		float2 uv1 : TEXCOORD1;
	};

	sampler2D _MaskTexture;
	sampler2D _MainTex;
	float4 _MainTex_TexelSize;
	sampler2D _BlurTex;
	float4 _BlurTex_TexelSize;
	float4 _ViewPortLightPos;

	float4 _offsets;
	float4 _ColorThreshold;
	float4 _LightColor;
	float _LightFactor;
	float _PowFactor;
	float _LightRadius;

	//高亮部分提取shader
	v2f_threshold vert_threshold(appdata_img v)
	{
		v2f_threshold o;
		o.pos = UnityObjectToClipPos(v.vertex);
		o.uv = v.texcoord.xy;

		//dx中纹理从左上角为初始坐标,需要反向
#if UNITY_UV_STARTS_AT_TOP
		if (_MainTex_TexelSize.y < 0)
			o.uv.y = 1 - o.uv.y;
#endif
		return o;
	}

	fixed4 frag_threshold(v2f_threshold i) : SV_Target
	{
		fixed4 color = tex2D(_MainTex, i.uv);
		float distFromLight = length(_ViewPortLightPos.xy - i.uv);
		float distanceControl = saturate(_LightRadius - distFromLight);
		//仅当color大于设置的阈值的时候才输出
		float4 thresholdColor = saturate(color - _ColorThreshold) * distanceControl;
		float luminanceColor = Luminance(thresholdColor.rgb);
		luminanceColor = pow(luminanceColor, _PowFactor);
		//采样深度贴图
		float depth = tex2D(_MaskTexture, i.uv);
		//转换回01区间
		depth = Linear01Depth (depth);
		//将深度小于阈值的部分直接变为0作为系数乘原来的结果,剃掉近处的内容
		luminanceColor *= depth;
		return fixed4(luminanceColor, luminanceColor, luminanceColor, 1);
	}

	//径向模糊 vert shader
	v2f_blur vert_blur(appdata_img v)
	{
		v2f_blur o;
		o.pos = UnityObjectToClipPos(v.vertex);
		o.uv = v.texcoord.xy;
		//径向模糊采样偏移值*沿光的方向权重
		o.blurOffset = _offsets * (_ViewPortLightPos.xy - o.uv);
		return o;
	}

	//径向模拟pixel shader
	fixed4 frag_blur(v2f_blur i) : SV_Target
	{
		half4 color = half4(0,0,0,0);
		for(int j = 0; j < RADIAL_SAMPLE_COUNT; j++)
		{
			color += tex2D(_MainTex, i.uv.xy);
			i.uv.xy += i.blurOffset;
		}

		return color / RADIAL_SAMPLE_COUNT;
	}

	//融合vertex shader
	v2f_merge vert_merge(appdata_img v)
	{
		v2f_merge o;
		//mvp矩阵变换
		o.pos = UnityObjectToClipPos(v.vertex);
		//uv坐标传递
		o.uv.xy = v.texcoord.xy;
		o.uv1.xy = o.uv.xy;
#if UNITY_UV_STARTS_AT_TOP
		if (_MainTex_TexelSize.y < 0)
			o.uv.y = 1 - o.uv.y;
#endif
		return o;
	}

	fixed4 frag_merge(v2f_merge i) : SV_Target
	{
		fixed4 ori = tex2D(_MainTex, i.uv1);
		fixed4 blur = tex2D(_BlurTex, i.uv);
		//输出= 原始图像,叠加体积光贴图
		fixed4 lightColor =  _LightFactor * blur * _LightColor;
		return lightColor + ori;
	}

		ENDCG

	SubShader
	{
		//pass 0: 提取高亮部分
		Pass
		{
			ZTest Off
			Cull Off
			ZWrite Off
			Fog{ Mode Off }

			CGPROGRAM
			#pragma vertex vert_threshold
			#pragma fragment frag_threshold
			ENDCG
		}

		//pass 1: 径向模糊
		Pass
		{
			ZTest Off
			Cull Off
			ZWrite Off
			Fog{ Mode Off }

			CGPROGRAM
			#pragma vertex vert_blur
			#pragma fragment frag_blur
			ENDCG
		}

		//pass 2: 将体积光模糊图与原图融合
		Pass
		{

			ZTest Off
			Cull Off
			ZWrite Off
			Fog{ Mode Off }

			CGPROGRAM
			#pragma vertex vert_merge
			#pragma fragment frag_merge
			ENDCG
		}

	}
}
C#脚本部分变化较大:
/********************************************************************
 FileName: GodRayPostEffectMask.cs
 Description:
 Created: 2018/04/24
 history: 24:4:2018 0:11 by puppet_master
*********************************************************************/
using UnityEngine;
using UnityEngine.Rendering;

[ExecuteInEditMode]
public class GodRayPostEffectMask : PostEffectBase
{
    //高亮部分提取阈值
    public Color colorThreshold = Color.gray;
    //体积光颜色
    public Color lightColor = Color.white;
    //光强度
    [Range(0.0f, 20.0f)]
    public float lightFactor = 15.0f;
    //径向模糊uv采样偏移值
    [Range(0.0f, 10.0f)]
    public float samplerScale = 10.0f;
    //Blur迭代次数
    [Range(1,3)]
    public int blurIteration = 2;
    //降低分辨率倍率
    [Range(0, 3)]
    public int downSample = 1;
    //光源位置
    public Transform lightTransform;
    //产生体积光的范围
    [Range(0.0f, 5.0f)]
    public float lightRadius = 2.0f;
    //提取高亮结果Pow倍率,适当降低颜色过亮的情况
    [Range(1.0f, 4.0f)]
    public float lightPowFactor = 3.0f;

    public Shader replaceMentShader = null;

    private Camera targetCamera = null;
    private Camera maskCamera = null;

    public RenderTexture maskTexture = null;

    void Start()
    {
        targetCamera = GetComponent();
        if (maskTexture == null)
            maskTexture = new RenderTexture(512, 512, 0);
        //创建一个相机渲染Mask
        var maskCamTransform = transform.Find("maskCameraGo");
        if (maskCamTransform == null)
        {
            GameObject go = new GameObject("maskCameraGo");
            go.transform.parent = transform;
            maskCamera = go.AddComponent();
        }
        else
        {
            maskCamera = maskCamTransform.GetComponent();
            if (maskCamera == null)
                maskCamera = maskCamTransform.gameObject.AddComponent();
        }
        maskCamera.CopyFrom(targetCamera);
        maskCamera.targetTexture = maskTexture;
        maskCamera.depth = -999;
        //默认Mask图为白色
        maskCamera.clearFlags = CameraClearFlags.Color;
        maskCamera.backgroundColor = Color.white;
    }

    void OnEnable()
    {
        if (maskCamera != null)
        {
            maskCamera.targetTexture = maskTexture;
            maskCamera.enabled = true;
        }
    }

    void OnDisable()
    {
        if (maskCamera != null)
        {
            maskCamera.targetTexture = null;
            maskCamera.enabled = false;
        }
    }

    void OnDestroy()
    {
        if (maskCamera != null)
        {
            DestroyImmediate(maskCamera.gameObject);
            maskCamera = null;
        }
        if (maskTexture != null)
        {
            DestroyImmediate(maskTexture);
            maskTexture = null;
        }
    }

    void OnPreRender()
    {
        if (maskCamera != null)
        {
            //使用RenderWithShader绘制Mask图
            maskCamera.RenderWithShader(replaceMentShader, "RenderType");
        }
    }

    void OnRenderImage(RenderTexture source, RenderTexture destination)
    {
        if (_Material && targetCamera)
        {
            int rtWidth = source.width >> downSample;
            int rtHeight = source.height >> downSample;
            //RT分辨率按照downSameple降低
            RenderTexture temp1 = RenderTexture.GetTemporary(rtWidth, rtHeight, 0, source.format);

            //计算光源位置从世界空间转化到视口空间
            Vector3 viewPortLightPos = lightTransform == null ? new Vector3(.5f, .5f, 0) : targetCamera.WorldToViewportPoint(lightTransform.position);

            //将shader变量改为PropertyId,以及将float放在Vector中一起传递给Material会更省一些,but,我懒
            _Material.SetVector("_ColorThreshold", colorThreshold);
            _Material.SetVector("_ViewPortLightPos", new Vector4(viewPortLightPos.x, viewPortLightPos.y, viewPortLightPos.z, 0));
            _Material.SetFloat("_LightRadius", lightRadius);
            _Material.SetFloat("_PowFactor", lightPowFactor);
            _Material.SetTexture("_MaskTexture", maskTexture);
            //根据阈值提取高亮部分,使用pass0进行高亮提取,比Bloom多一步计算光源距离剔除光源范围外的部分
            Graphics.Blit(source, temp1, _Material, 0);

            _Material.SetVector("_ViewPortLightPos", new Vector4(viewPortLightPos.x, viewPortLightPos.y, viewPortLightPos.z, 0));
            _Material.SetFloat("_LightRadius", lightRadius);
            //径向模糊的采样uv偏移值
            float samplerOffset = samplerScale / source.width;
            //径向模糊,两次一组,迭代进行
            for (int i = 0; i < blurIteration; i++)
            {
                RenderTexture temp2 = RenderTexture.GetTemporary(rtWidth, rtHeight, 0, source.format);
                float offset = samplerOffset * (i * 2 + 1);
                _Material.SetVector("_offsets", new Vector4(offset, offset, 0, 0));
                Graphics.Blit(temp1, temp2, _Material, 1);

                offset = samplerOffset * (i * 2 + 2);
                _Material.SetVector("_offsets", new Vector4(offset, offset, 0, 0));
                Graphics.Blit(temp2, temp1, _Material, 1);
                RenderTexture.ReleaseTemporary(temp2);
            }

            _Material.SetTexture("_BlurTex", temp1);
            _Material.SetVector("_LightColor", lightColor);
            _Material.SetFloat("_LightFactor", lightFactor);
            //最终混合,将体积光径向模糊图与原始图片混合,pass2
            Graphics.Blit(source, destination, _Material, 2);

            //释放申请的RT
            RenderTexture.ReleaseTemporary(temp1);
        }
        else
        {
            Graphics.Blit(source, destination);
        }
    }
}
效果与之前一致,左侧为最终效果,右侧为Mask图:
用后处理方式实现体积光效果,还有一个比较硬性的要求就是屏幕内至少应该能看到所谓的光源,也就是高亮点,否则提取高亮失败的话,再怎么径向模糊都生成不了光线效果。不过既然要这样用了,没有光的地方,强行加个高光亮点也不是不可以哈。
RayMarching光线追踪
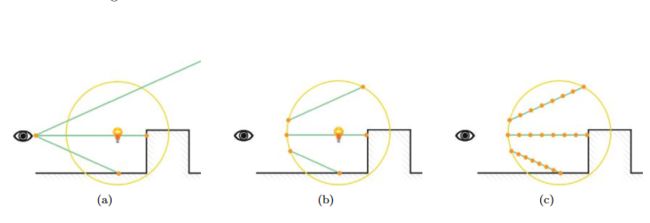
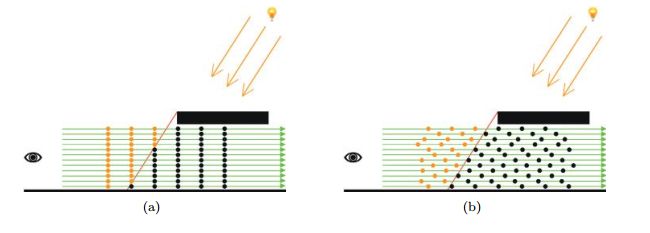
ShaderToy上大部分都是基于RayMarching的,每次去看都给这些大神跪了,不禁惊叹一声,“我去,还有这种操作???”。Ray-Marching简单地来说就是用数学来绘图,纯数学的方式去计算物体的颜色,比光栅化渲染更容易模拟一些云,雾等特殊效果。关于RayMarching我不做太多介绍了,下文中的RayMarching与正常的SDF等不太一样,用Ray-Marching实现体积光还是挺好玩的,现在部分国外大型PC游戏已经采用这种方式进行体积光的渲染了,比如《Inside》,《KillZone》。关于RayMarching实现体积光效果,可以参考《GPU Pro 5-Volumetric Light Effects in Killzone: Shadow Fall》,里面也引用了一些链接,包括原论文,下文中公式以及部分原理图也来自《KillZone》的技术分享,另外知乎上的大佬也写过一篇很好的关于体积光的文章。原理如下图所示:
首先,体积光不是一个类似正常物体只有表面有颜色,而是一个介质(假设是均匀介质),光线在这个介质中传播时,经过的每个路径点上都会对最终进入我们眼睛的光强有影响,所以我们计算时,从视线点开始,每次沿着视线方向推进一点,采样每个采样点的亮度,所有经过的采样点上的亮度和就是最终的亮度值,如上图(c)所示。
体积光的实现,Git上有一个很好的开源项目,Star也很多,下文中的实现有参考该项目,不过为了方便(就是懒),我决定做一个比较简单的PointLight的体积光效果,Directironal Light的通过相机视锥体边角反推全屏幕像素点对应的世界位置再进行Ray-Marching,实现也差不多,最麻烦的是SpotLight,形状不是很方便完美地用数学贴合光照值,不过也可以用一个贴近的载体mesh去计算,等过一阵子闲下来再来实现一发。
首先,我们要知道的是点光源在某一点上的光强度值,因为点光源本身是有一个衰减的,虽然我很想直接除以距离的平方作为衰减值,但是无意中发现乐乐大佬分享过一个关于Unity中点光源衰减计算的帖子,再去看了一下Unity cginc里面那些计算,发现事情没有这么简单:Unity的点光源衰减计算,实际上是采样了一张衰减贴图,首先计算当前位置距离点光源的距离平方,然后除以光源范围的平方,结果去采样衰减图,附上Untiy中计算:
float3 tolight = wpos - _LightPos.xyz;
half3 lightDir = -normalize (tolight);
float att = dot(tolight, tolight) * _LightPos.w;
float atten = tex2D (_LightTextureB0, att.rr).UNITY_ATTEN_CHANNEL;
atten *= UnityDeferredComputeShadow (tolight, fadeDist, uv);

#if defined (POINT_COOKIE)
atten *= texCUBEbias(_LightTexture0, float4(mul(unity_WorldToLight, half4(wpos,1)).xyz, -8)).w;
#endif //POINT_COOKIE
所以,根据上面的结果,最基本的Ray-Marching实现如下:
//点光源体积光RayMarching
float4 RayMarching(float3 rayOri, float3 rayDir, float rayLength)
{
	//ori:相机位置
	//raydir:从相机到当前像素点对应世界坐标值的方向
	//rayLength:长度

	//步进值
	float delta = rayLength / RAYMARCHING_STEP_COUNT;
	float3 step = rayDir * delta;
	float3 curPos = rayOri + step;

	float totalAtten = 0;
	for(int t = 0; t < RAYMARCHING_STEP_COUNT; t++)
	{
		float3 tolight = (curPos - _VolumeLightPos.xyz);
		float att = dot(tolight, tolight) * _MieScatteringFactor.w;
		float atten = tex2D(_LightTextureB0, att.rr).UNITY_ATTEN_CHANNEL;
		//每次步进增加该点光强
		totalAtten += atten;
		curPos += step;
	}

	float4 color = float4(totalAtten, totalAtten, totalAtten, totalAtten);
	return color * _TintColor;
}
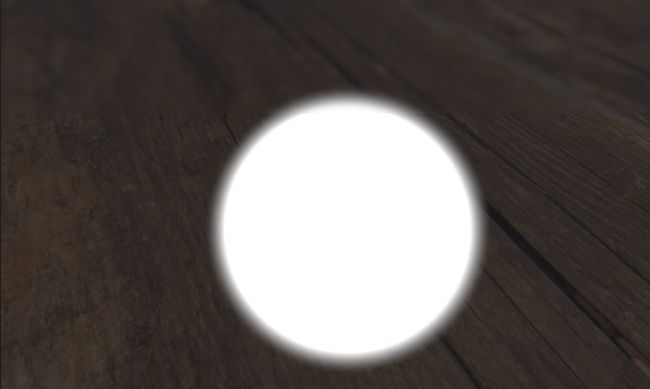
这样,我们可以得到一个边缘虚化的球:
但是,这并不是我们想要的体积光,这就是一个体积...再来分析一下体积光的形成,使用Ray-Marching方式实现体积光,相比于其他三种方式,稍微“基于物理”了一些,所以也就有必要说一下光的物理现象。当光透过一些介质时,通常是灰尘之类的,会造成光的反射,这个反射是四面八方的,如果都反射到我们的眼睛里,那么大概就是上面的这个效果,but,并不是,所以光线是朝向四面八方反射的,以灰尘为球心的球体每个方向都可能反射,并且反射的概率不同,并且需要满足能量守恒定律,这个现象简单称之为光的散射。另一个现象就是光在传播过程中会被吸收一部分,剩下的才会传递到我们眼中。数学不好的我,先无耻地抄俩关于光散射和吸收的公式:
第一个名字非常萌Mie-Scattering HG(咩-散射公式,喵喵喵?)
简单来说,g所表示的就是光的散射系数,g越大,光束越集中,散射越少,g越小,散射越强,θ为光线方向和视线方向的夹角。
第二个是Beer-Lambert法则,表现为入射光强和透光强度的比:OutLight = InLight * exp(- c * d), c为物质密度,d为距离。我们可以使用3D噪声纹理+uv流动来动态采样每个点的密度值,这样就可以模拟灰尘在灯光下流动的效果。此处我假设密度值相同。
在Shader里面增加Mie-Scattering散射和Beer-Lambert衰减:
float MieScatteringFunc(float3 lightDir, float3 rayDir)
{
	//MieScattering公式
	// (1 - g ^2) / (4 * pi * (1 + g ^2 - 2 * g * cosθ) ^ 1.5 )
	//_MieScatteringFactor.x = (1 - g ^ 2) / 4 * pai
	//_MieScatteringFactor.y =  1 + g ^ 2
	//_MieScatteringFactor.z =  2 * g
	float lightCos = dot(lightDir, -rayDir);
	return _MieScatteringFactor.x / pow((_MieScatteringFactor.y - _MieScatteringFactor.z * lightCos), 1.5);
}

//Beer-Lambert法则
float ExtingctionFunc(float stepSize, inout float extinction)
{
	float density = 1.0; //密度,暂且认为为1吧,可以采样3DNoise贴图
	float scattering = _ScatterFactor * stepSize * density;
	extinction += _ExtictionFactor * stepSize * density;
	return scattering * exp(-extinction);
}

float4 RayMarching(float3 rayOri, float3 rayDir, float rayLength)
{
	float delta = rayLength / RAYMARCHING_STEP_COUNT;
	float3 step = rayDir * delta;
	float3 curPos = rayOri + step;

	float totalAtten = 0;
	float extinction = 0;
	for(int t = 0; t < RAYMARCHING_STEP_COUNT; t++)
	{
		float3 tolight = (curPos - _VolumeLightPos.xyz);
		float atten = 1.0;
		float att = dot(tolight, tolight) * _MieScatteringFactor.w;
		atten *= tex2D(_LightTextureB0, att.rr).UNITY_ATTEN_CHANNEL;
		atten *= MieScatteringFunc(normalize(-tolight), rayDir);
		atten *= ExtingctionFunc(delta, extinction);

		totalAtten += atten;
		curPos += step;
	}

	float4 color = float4(totalAtten, totalAtten, totalAtten, totalAtten);
	return color * _TintColor;
}
增加了散射之后的光,便有了一点光的感觉,调整Mie-Scattering的g值就可以改变散射值:
下面一个问题是这个对象本身的渲染,我们是把这个模型作为一个载体进行渲染的,为了更好的表现效果,不至于被其他东西遮挡住,所以开了ZTest Always,Transparent的Queue是最好。但是我们关闭了ZTest,换句话说,这个东东就不会被遮住了,这也是不现实的,所以,我们要自己进行一个深度测试,类似原理图(b)所示,在进行Ray-Marching的过程中,先采样深度值,计算ray的距离,在当前像素对应点的世界坐标距离初始点的距离和当前深度值计算出来的视空间距离比较,用一个更近的距离作为RayMarching的最终距离,这样就可以处理遮挡相关的问题。
另一方面,我们需要处理体积光对于对象的阴影,没有体积光的阴影,体积光就变成了雾。为了让这个对象有照射到其他对象上阴影的效果,我们再采样一下ShadowMap。因为直接受该对象自身上的点光阴影,所以这里我直接把这个shader改为AddPass,不过这里有一个很严重的问题,Unity对于透明的物体是不接受(Dither可以投射,但是不接受!)阴影的,所以没有办法,我暂且把这个对象放在AlphaTest队列里,但是这样还会有对象被其他后渲染的内容遮挡或者天空盒遮挡的问题,问题总是很多,不过解决办法总是有的,下文再说。
Shader代码如下:
//puppet_master
//2018.4.28
//体积光:RayMarching方式实现点光源体积光效果
Shader "GodRay/RayMarchingPointLight"
{

Properties
{
	_TintColor ("Tint Color", Color) = (0.5,0.5,0.5,0.5)
	_ExtictionFactor("ExtictionFactor", Range(0, 0.1)) = 0.01
	_ScatterFactor("ScatterFactor", Range(0, 1)) = 1
}

Category {
	//受自身Add点光阴影
	Name "FORWARD_DELTA"
	Tags { "LightMode" = "ForwardAdd"  "RenderType"="Opaque" "Queue" = "AlphaTest"}
	Blend SrcAlpha One
	Cull Off
	Lighting Off
	//不写深度,永远通过ZTest,自己做检测
	ZWrite Off
	ZTest Always
	Fog { Color (0,0,0,0) }

	SubShader {
		Pass {

			CGPROGRAM
			#pragma vertex vert
			#pragma fragment frag
			#pragma fragmentoption ARB_precision_hint_fastest

			#include "UnityCG.cginc"
			#include "UnityDeferredLibrary.cginc"
			//RayMarching步进次数
			#define RAYMARCHING_STEP_COUNT 64

			#pragma shader_feature SHADOWS_CUBE
			#pragma shader_feature POINT

			fixed4 _TintColor;
			sampler2D _DitherMap;
			float4x4 _LightMatrix;
			float4 _VolumeLightPos;
			float4 _MieScatteringFactor;
			float _ExtictionFactor;
			float _ScatterFactor;

			struct v2f {
				float4 pos : POSITION;
				float3 worldNormal : TEXCOORD0;
				float3 worldPos : TEXCOORD1;
				float4 screenUV : TEXCOORD2;
			};

			float MieScatteringFunc(float3 lightDir, float3 rayDir)
			{
				//MieScattering公式
				// (1 - g ^2) / (4 * pi * (1 + g ^2 - 2 * g * cosθ) ^ 1.5 )
				//_MieScatteringFactor.x = (1 - g ^ 2) / 4 * pai
				//_MieScatteringFactor.y =  1 + g ^ 2
				//_MieScatteringFactor.z =  2 * g
				float lightCos = dot(lightDir, -rayDir);
				return _MieScatteringFactor.x / pow((_MieScatteringFactor.y - _MieScatteringFactor.z * lightCos), 1.5);
			}

			//Beer-Lambert法则
			float ExtingctionFunc(float stepSize, inout float extinction)
			{
				float density = 1.0; //密度,暂且认为为1吧,可以采样3DNoise贴图得到
				float scattering = _ScatterFactor * stepSize * density;
				extinction += _ExtictionFactor * stepSize * density;
				return scattering * exp(-extinction);
			}

			float4 RayMarching(float3 rayOri, float3 rayDir, float rayLength)
			{
				float delta = rayLength / RAYMARCHING_STEP_COUNT;
				float3 step = rayDir * delta;
				float3 curPos = rayOri + step;

				float totalAtten = 0;
				float extinction = 0;
				for(int t = 0; t < RAYMARCHING_STEP_COUNT; t++)
				{

					float3 tolight = (curPos - _VolumeLightPos.xyz);
					//光源衰减
					float atten = 2.0;
					float att = dot(tolight, tolight) * _MieScatteringFactor.w;
					atten *= tex2D(_LightTextureB0, att.rr).UNITY_ATTEN_CHANNEL;
					//Mie散射
					atten *= MieScatteringFunc(normalize(-tolight), rayDir);
					//传播过程中吸收
					atten *= ExtingctionFunc(delta, extinction);
					#if defined (SHADOWS_CUBE)
					//阴影
					atten *= UnityDeferredComputeShadow(tolight, 0, float2(0, 0));
					#endif
					totalAtten += atten;
					curPos += step;
				}

				float4 color = float4(totalAtten, totalAtten, totalAtten, totalAtten);
				return color * _TintColor;
			}

			v2f vert (appdata_base v)
			{
				v2f o;
				o.pos = UnityObjectToClipPos(v.vertex);
				o.worldPos = mul(unity_ObjectToWorld, v.vertex).xyz;
				o.screenUV = ComputeScreenPos(o.pos);
				return o;
			}

			fixed4 frag (v2f i) : COLOR
			{
				float3 worldPos = i.worldPos;
				float3 worldCamPos = _WorldSpaceCameraPos.xyz;
				float rayDis = length(worldCamPos - worldPos);

				float depth = SAMPLE_DEPTH_TEXTURE(_CameraDepthTexture, i.screenUV.xy / i.screenUV.w);
				float linearEyeDepth = LinearEyeDepth(depth);
				rayDis = min(rayDis, linearEyeDepth);

				return RayMarching(worldCamPos, normalize(worldPos - worldCamPos), rayDis);
			}
			ENDCG
		}
	}
}
}
C#代码如下:
/********************************************************************
 FileName: VolumeRayMarchingLight.cs
 Description:
 Created: 2018/04/28
 history: 28:4:2018 20:33 by puppet_master
*********************************************************************/
using UnityEngine;

[ExecuteInEditMode]
public class VolumeRayMarchingLight : MonoBehaviour {

    private Material lightMaterial = null;

    private Light lightComponent = null;

    //Mie-Scattering g 参数
    [Range(0.0f, 0.99f)]
    public float MieScatteringG = 0.5f;

    void OnEnable()
    {
        if (Camera.main != null)
            Camera.main.depthTextureMode = DepthTextureMode.Depth;
        InitVolumeLight();
    }

    void OnDisable()
    {
        if (Camera.main != null)
            Camera.main.depthTextureMode = DepthTextureMode.None;
    }

    private void InitVolumeLight()
    {
        var render = GetComponent();
        //sharedMaterial方便一点...
        lightMaterial = render.sharedMaterial;
        lightComponent = GetComponent();
        if (lightComponent == null)
        {
            lightComponent = gameObject.AddComponent();
        }
    }

    void Update ()
    {
        if (lightMaterial == null || lightComponent == null)
            return;
        //世界->光源矩阵
        Matrix4x4 lightMatrix = Matrix4x4.TRS(transform.position, transform.rotation, Vector3.one).inverse;
        transform.localScale = new Vector3(lightComponent.range * 2.0f, lightComponent.range * 2.0f, lightComponent.range * 2.0f);

        lightMaterial.EnableKeyword("POINT");
        if (lightComponent.shadows == LightShadows.None)
        {
            lightMaterial.DisableKeyword("SHADOWS_CUBE");
        }
        else
        {
            lightMaterial.EnableKeyword("SHADOWS_CUBE");
        }

        float g2 = MieScatteringG * MieScatteringG;
        float lightRange = lightComponent.range;
        lightMaterial.SetMatrix("_LightMatrix", lightMatrix);
        lightMaterial.SetVector("_VolumeLightPos", transform.position);
        lightMaterial.SetVector("_MieScatteringFactor", new Vector4((1 - g2) * 0.25f / Mathf.PI, 1 + g2, 2 * MieScatteringG, 1.0f / (lightRange * lightRange)));
	}
}
再来一张:
通过Ray-Marching实现的体积光,进行了N(上图为64)次射线步进的操作,这个如果在性能差一点的机器上,基本就挂掉了。所以,下面来看看Ray-Marching的优化。
第一点,也是最重要的优化方式,降低RayMarching的步进次数,但是这个数如果特别低的话,会出现比较明显的穿帮现象,如下,左侧是4次步进,右侧是64次步进的效果,光强度较低,阴影部分比较明显:
有一个很好的方式来解决这个问题,就是Dither,简单来说就是随机采样,更直白点说就是运用噪声。俗话说得好,有什么解决不了的问题?那就加个噪声试试吧!
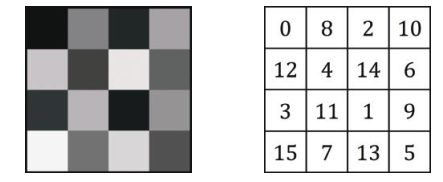
所谓Dither,就是一个噪声格子,我们可以定义一个4*4的贴图,这个就直接从《KillZone》的分享里面摘抄一下啦:
这样,起始点的时候我们给每个点增加一个偏移值,让采样更加随机:
//dither
float2 offsetUV = (fmod(floor(ditherUV), 4.0));
float ditherValue = tex2D(_DitherMap, offsetUV / 4.0).a;
float delta = rayLength / RAYMARCHING_STEP_COUNT;
float3 step = rayDir * delta;
float3 curPos = rayOri + step * ditherValue;
左侧为没有Dither的Ray-Marching,右侧为有Dither的Ray-Marching。增加了Dither之后,我们发现原来断层的效果又变得连续了,Magic!!!感觉想出这个办法的人简直是个天才,用这个方法,性能直接好几十倍的提升。
不过仔细看上图,虽然用了Dither让效果变得连续了,但是图像中出现了一堆类似蜂巢的小格子,我们需要把这个处理掉,Dither需要配合Blur使用,这个东西需要套餐,单独用不好使。 既然要Blur,我们自然是需要将体积光本身抽取出来单独进行Blur,类似径向模糊中提取高亮部分,否则整个画面就模糊了。那么,最好的方法,我们就直接把体积光渲染到一张RT上,然后进行Blur最后在叠加回原图。
说道单独渲染到RT上, 此处又可以进行第二个优化,Ray-Marching的大部分操作是在Pixel阶段进行的,所以我们如果能降低Pixel运行的次数,就可以大大降低消耗了。所以,这里渲染体积光Mesh的RT我们就可以降低分辨率,降低为一半甚至四分之一。
要把对象渲染到RT上,这时候我们就想到了最方便的东东:CommandBuffer,简直是一些奇怪效果的救星,自从有了CommandBuffer,单独创建摄像机的事情就少了好多。我们要找一个合适的时机来渲染这个对象,一个比较麻烦的问题在于我们需要采样ShadowMap,上文我们也提到了,之前让对象在Geomerty队列或者AlphaTest队列才能采样ShadowMap,放在Transparent队列的话,ShadowMap就变成了一个默认的贴图了,直接用CommandBuffer渲染,放到Before Opaque也不行(也可能是我姿势不对,希望各位遇到同样问题的大佬赐教)。那么我们强行把渲染的时机插入到ShadowMap结束的阶段,此时激活的RT仍然是ShadowMap,然后我们把当前渲染的RT手动设置到ShadowMap中,然后再将CommandBuffer中设置当前相机的RT为渲染体积光的RT就可以实现了。但是这样做又出了一个新问题,此时相机的MVP矩阵并不是我们正常渲染的MVP,而是渲染ShadowMap时相机的矩阵,我们直接用Unity内置的矩阵进行顶点变换,结果是错误的,所以,需要手动设置一个正常的相机MVP矩阵传给shader。(上面的过程简直就是为达目的,无所不用其极....)
体积光shader:
//puppet_master
//2018.4.28
//体积光:RayMarching方式实现点光源体积光效果
Shader "GodRay/RayMarchingPointLight"
{

Properties
{
	_TintColor ("Tint Color", Color) = (1.0,1.0,1.0,1.0)
	_ExtictionFactor("ExtictionFactor", Range(0, 0.1)) = 0.01
	_ScatterFactor("ScatterFactor", Range(0, 1)) = 1
}

Category {
	//受自身Add点光阴影
	//Name "FORWARD_DELTA"
	Tags {   "RenderType"="Opaque" "Queue" = "AlphaTest"}
	Blend SrcAlpha One
	Cull Off
	Lighting Off
	//不写深度,永远通过ZTest,自己做检测
	ZWrite Off
	ZTest Always
	Fog { Color (0,0,0,0) }

	SubShader {
		Pass {

			CGPROGRAM
			#pragma vertex vert
			#pragma fragment frag
			#pragma fragmentoption ARB_precision_hint_fastest

			#include "UnityCG.cginc"
			#include "UnityDeferredLibrary.cginc"
			//RayMarching步进次数
			#define RAYMARCHING_STEP_COUNT 4

			#pragma shader_feature SHADOWS_CUBE
			#pragma shader_feature POINT

			fixed4 _TintColor;
			sampler2D _DitherMap;
			float4x4 _LightMatrix;
			float4x4 _CustomMVP;
			float4 _VolumeLightPos;
			float4 _MieScatteringFactor;
			float _ExtictionFactor;
			float _ScatterFactor;

			struct v2f {
				float4 pos : POSITION;
				float3 worldNormal : TEXCOORD0;
				float3 worldPos : TEXCOORD1;
				float4 screenUV : TEXCOORD2;
			};

			float MieScatteringFunc(float3 lightDir, float3 rayDir)
			{
				//MieScattering公式
				// (1 - g ^2) / (4 * pi * (1 + g ^2 - 2 * g * cosθ) ^ 1.5 )
				//_MieScatteringFactor.x = (1 - g ^ 2) / 4 * pai
				//_MieScatteringFactor.y =  1 + g ^ 2
				//_MieScatteringFactor.z =  2 * g
				float lightCos = dot(lightDir, -rayDir);
				return _MieScatteringFactor.x / pow((_MieScatteringFactor.y - _MieScatteringFactor.z * lightCos), 1.5);
			}

			//Beer-Lambert法则
			float ExtingctionFunc(float stepSize, inout float extinction)
			{
				float density = 1.0; //密度,暂且认为为1吧,可以采样3DNoise贴图得到
				float scattering = _ScatterFactor * stepSize * density;
				extinction += _ExtictionFactor * stepSize * density;
				return scattering * exp(-extinction);
			}

			float4 RayMarching(float3 rayOri, float3 rayDir, float rayLength, float2 ditherUV)
			{
				//dither
				float2 offsetUV = (fmod(floor(ditherUV), 4.0));
				float ditherValue = tex2D(_DitherMap, offsetUV / 4.0).a;

				float delta = rayLength / RAYMARCHING_STEP_COUNT;
				float3 step = rayDir * delta;
				float3 curPos = rayOri + step * ditherValue;

				float totalAtten = 0;
				float extinction = 0;
				for(int t = 0; t < RAYMARCHING_STEP_COUNT; t++)
				{

					float3 tolight = (curPos - _VolumeLightPos.xyz);
					//光源衰减
					float atten = 2.0;
					float att = dot(tolight, tolight) * _MieScatteringFactor.w;
					atten *= tex2D(_LightTextureB0, att.rr).UNITY_ATTEN_CHANNEL;
					//Mie散射
					atten *= MieScatteringFunc(normalize(-tolight), rayDir);
					//传播过程中吸收
					atten *= ExtingctionFunc(delta, extinction);
					#if defined (SHADOWS_CUBE)
					//阴影
					atten *= UnityDeferredComputeShadow(tolight, 0, float2(0, 0));
					#endif
					totalAtten += atten;
					curPos += step;
				}
				//totalAtten = 0.1;
				float4 color = float4(totalAtten, totalAtten, totalAtten, totalAtten);
				return color * _TintColor;
			}

			v2f vert (appdata_base v)
			{
				v2f o;
				//o.pos = UnityObjectToClipPos(v.vertex);
				o.pos = mul(_CustomMVP, v.vertex);
				o.worldPos = mul(unity_ObjectToWorld, v.vertex).xyz;
				o.screenUV = ComputeScreenPos(o.pos);
				return o;
			}

			fixed4 frag (v2f i) : COLOR
			{
				float3 worldPos = i.worldPos;
				float3 worldCamPos = _WorldSpaceCameraPos.xyz;
				float rayDis = length(worldCamPos - worldPos);

				float depth = SAMPLE_DEPTH_TEXTURE(_CameraDepthTexture, i.screenUV.xy / i.screenUV.w);
				float linearEyeDepth = LinearEyeDepth(depth);
				rayDis = min(rayDis, linearEyeDepth);

				return RayMarching(worldCamPos, normalize(worldPos - worldCamPos), rayDis, i.pos.xy);
			}
			ENDCG
		}
	}
}
}
体积光脚本:
/********************************************************************
 FileName: VolumeRayMarchingLight.cs
 Description:
 Created: 2018/04/28
 history: 28:4:2018 20:33 by puppet_master
*********************************************************************/
using UnityEngine;
using UnityEngine.Rendering;

[ExecuteInEditMode]
public class VolumeRayMarchingLight : MonoBehaviour {

    private Material lightMaterial = null;

    private Light lightComponent = null;

    private Texture2D ditherMap = null;

    private CommandBuffer commandBuffer = null;

    public static RenderTexture volumeLightRT = null;

    private Renderer lightRenderer = null;

    //Mie-Scattering g 参数
    [Range(0.0f, 0.99f)]
    public float MieScatteringG = 0.0f;

    void OnEnable()
    {
        if (Camera.main != null)
            Camera.main.depthTextureMode = DepthTextureMode.Depth;

        Init();
        lightComponent.AddCommandBuffer(LightEvent.AfterShadowMap, commandBuffer);
    }

    void OnDisable()
    {
        lightComponent.RemoveCommandBuffer(LightEvent.AfterShadowMap, commandBuffer);
        if (Camera.main != null)
            Camera.main.depthTextureMode = DepthTextureMode.None;
    }

    private void Init()
    {
        InitVolumeLight();
        InitCommandBuffer();
        InitPostEffectComponent();
    }

    private void InitVolumeLight()
    {
        lightRenderer = GetComponent();
        lightMaterial = lightRenderer.sharedMaterial;
        lightComponent = GetComponent();
        if (lightComponent == null)
            lightComponent = gameObject.AddComponent();
        lightComponent.shadows = LightShadows.Hard;
        lightRenderer.enabled = false;
        if (ditherMap == null)
            ditherMap = GenerateDitherMap();
        if (volumeLightRT == null)
            volumeLightRT = new RenderTexture(512, 512, 16);
    }

    private void InitCommandBuffer()
    {
        if (commandBuffer == null)
            commandBuffer = new CommandBuffer();
        commandBuffer.Clear();
        commandBuffer.name = "RayMarchingVolumePointLight";
        commandBuffer.SetGlobalTexture("_ShadowMapTexture", BuiltinRenderTextureType.CurrentActive);
        commandBuffer.SetRenderTarget(volumeLightRT);
        commandBuffer.ClearRenderTarget(true, true, Color.black);
        commandBuffer.DrawRenderer(lightRenderer, lightMaterial);
    }

    private void InitPostEffectComponent()
    {
        if (Camera.main == null)
            return;
       var postEffect = Camera.main.gameObject.GetComponent();
       if (postEffect == null)
           postEffect = Camera.main.gameObject.AddComponent();
        postEffect.RegistVolumeLightRT(volumeLightRT);
        postEffect.shader = Shader.Find("GodRay/VolumeLightRayMarchingPostEffect");
    }

    void Update ()
    {
        if (lightMaterial == null || lightComponent == null)
            return;
        //世界->光源矩阵
        Matrix4x4 lightMatrix = Matrix4x4.TRS(transform.position, transform.rotation, Vector3.one).inverse;
        transform.localScale = new Vector3(lightComponent.range * 2.0f, lightComponent.range * 2.0f, lightComponent.range * 2.0f);

        lightMaterial.EnableKeyword("POINT");
        if (lightComponent.shadows == LightShadows.None)
        {
            lightMaterial.DisableKeyword("SHADOWS_CUBE");
        }
        else
        {
            lightMaterial.EnableKeyword("SHADOWS_CUBE");
        }

        float g2 = MieScatteringG * MieScatteringG;
        float lightRange = lightComponent.range;
        lightMaterial.SetMatrix("_LightMatrix", lightMatrix);
        lightMaterial.SetVector("_VolumeLightPos", transform.position);
        lightMaterial.SetVector("_MieScatteringFactor", new Vector4((1 - g2) * 0.25f / Mathf.PI, 1 + g2, 2 * MieScatteringG, 1.0f / (lightRange * lightRange)));
        lightMaterial.SetTexture("_DitherMap", ditherMap);
        //自己计算MVP矩阵传给shader,用Camera.main可能导致编辑器Scene窗口显示有问题
        Matrix4x4 world = transform.localToWorldMatrix;
        Matrix4x4 proj = GL.GetGPUProjectionMatrix(Camera.main.projectionMatrix, true);
        Matrix4x4 mat =  proj * Camera.main.worldToCameraMatrix * world;
        lightMaterial.SetMatrix("_CustomMVP", mat);
    }

    private Texture2D GenerateDitherMap()
    {
        int texSize = 4;
        var ditherMap = new Texture2D(texSize, texSize, TextureFormat.Alpha8, false, true);
        ditherMap.filterMode = FilterMode.Point;
        Color32[] colors = new Color32[texSize * texSize];

        colors[0] = GetDitherColor(0.0f);
        colors[1] = GetDitherColor(8.0f);
        colors[2] = GetDitherColor(2.0f);
        colors[3] = GetDitherColor(10.0f);

        colors[4] = GetDitherColor(12.0f);
        colors[5] = GetDitherColor(4.0f);
        colors[6] = GetDitherColor(14.0f);
        colors[7] = GetDitherColor(6.0f);

        colors[8] = GetDitherColor(3.0f);
        colors[9] = GetDitherColor(11.0f);
        colors[10] = GetDitherColor(1.0f);
        colors[11] = GetDitherColor(9.0f);

        colors[12] = GetDitherColor(15.0f);
        colors[13] = GetDitherColor(7.0f);
        colors[14] = GetDitherColor(13.0f);
        colors[15] = GetDitherColor(5.0f);

        ditherMap.SetPixels32(colors);
        ditherMap.Apply();
        return ditherMap;
    }

    private Color32 GetDitherColor(float value)
    {
        byte byteValue = (byte)(value / 16.0f * 255);
        return new Color32(byteValue, byteValue, byteValue, byteValue);
    }
}
后处理脚本,PS 后处理基类在上面提到过啦!!!!!!:
/********************************************************************
 FileName: VolumeRayMarchingPostEffect.cs
 Description:体积光后处理脚本,用于模糊+叠加
 Created: 2018/04/29
 history: 29:4:2018 1:47 by puppet_master
*********************************************************************/
using UnityEngine;

public class VolumeRayMarchingPostEffect : PostEffectBase
{
    //分辨率
    public int downSample = 1;
    //采样率
    public int samplerScale = 1;

    private RenderTexture volumeLightRT = null;

    public void RegistVolumeLightRT(RenderTexture rt)
    {
        volumeLightRT = rt;
    }

    void OnRenderImage(RenderTexture source, RenderTexture destination)
    {
        if (_Material && volumeLightRT)
        {
            Graphics.Blit(volumeLightRT, destination);
            //申请RT,并且分辨率按照downSameple降低
            RenderTexture tempRT = RenderTexture.GetTemporary(volumeLightRT.width >> downSample, volumeLightRT.height >> downSample, 0, source.format);

            //高斯模糊,两次模糊,横向纵向,使用pass1进行高斯模糊
            _Material.SetVector("_offsets", new Vector4(0, samplerScale, 0, 0));
            Graphics.Blit(volumeLightRT, tempRT, _Material, 0);
            _Material.SetVector("_offsets", new Vector4(samplerScale, 0, 0, 0));
            Graphics.Blit(tempRT, volumeLightRT, _Material, 0);

            _Material.SetTexture("_VolumeLightTex", volumeLightRT);
            Graphics.Blit(source, destination, _Material, 1);

            //释放申请的RT
            RenderTexture.ReleaseTemporary(tempRT);
        }
        else
        {
            Graphics.Blit(source, destination);
        }

    }
}
模糊以及最终叠加shader:
//puppet_master
//2018.4.29
//体积光:RayMarching方式实现点光源体积光效果配合后处理shader,实现高斯模糊+叠加效果
Shader "GodRay/VolumeLightRayMarchingPostEffect" {

	Properties{
		_MainTex("Base (RGB)", 2D) = "white" {}
		_VolumeLightTex("Volume", 2D) = "white"{}
	}

	CGINCLUDE
	#include "UnityCG.cginc"

	//用于blur
	struct v2f_blur
	{
		float4 pos : SV_POSITION;
		float2 uv  : TEXCOORD0;
		float4 uv01 : TEXCOORD1;
		float4 uv23 : TEXCOORD2;
		float4 uv45 : TEXCOORD3;
	};

	//用于叠加
	struct v2f_add
	{
		float4 pos : SV_POSITION;
		float2 uv  : TEXCOORD0;
		float2 uv1 : TEXCOORD1;
	};

	sampler2D _MainTex;
	float4 _MainTex_TexelSize;
	sampler2D _VolumeLightTex;
	float4 _VolumeLightTex_TexelSize;
	float4 _offsets;
	float4 _colorThreshold;

	//高斯模糊 vert shader
	v2f_blur vert_blur(appdata_img v)
	{
		v2f_blur o;
		_offsets *= _MainTex_TexelSize.xyxy;
		o.pos = UnityObjectToClipPos(v.vertex);
		o.uv = v.texcoord.xy;

		o.uv01 = v.texcoord.xyxy + _offsets.xyxy * float4(1, 1, -1, -1);
		o.uv23 = v.texcoord.xyxy + _offsets.xyxy * float4(1, 1, -1, -1) * 2.0;
		o.uv45 = v.texcoord.xyxy + _offsets.xyxy * float4(1, 1, -1, -1) * 3.0;

		return o;
	}

	//高斯模糊 pixel shader
	fixed4 frag_blur(v2f_blur i) : SV_Target
	{
		fixed4 color = fixed4(0,0,0,0);
		color += 0.40 * tex2D(_MainTex, i.uv);
		color += 0.15 * tex2D(_MainTex, i.uv01.xy);
		color += 0.15 * tex2D(_MainTex, i.uv01.zw);
		color += 0.10 * tex2D(_MainTex, i.uv23.xy);
		color += 0.10 * tex2D(_MainTex, i.uv23.zw);
		color += 0.05 * tex2D(_MainTex, i.uv45.xy);
		color += 0.05 * tex2D(_MainTex, i.uv45.zw);
		return color;
	}

	v2f_add vert_add(appdata_img v)
	{
		v2f_add o;
		//mvp矩阵变换
		o.pos = UnityObjectToClipPos(v.vertex);
		//uv坐标传递
		o.uv.xy = v.texcoord.xy;
		o.uv1.xy = o.uv.xy;
#if UNITY_UV_STARTS_AT_TOP
		if (_MainTex_TexelSize.y < 0)
			o.uv.y = 1 - o.uv.y;
#endif
		return o;
	}

	fixed4 frag_add(v2f_add i) : SV_Target
	{
		fixed4 ori = tex2D(_MainTex, i.uv1);
		fixed4 light = tex2D(_VolumeLightTex, i.uv);
		return ori + light;
	}

	ENDCG

	SubShader
	{
		//pass 0: 高斯模糊
		Pass
		{
			ZTest Off
			Cull Off
			ZWrite Off
			Fog{ Mode Off }

			CGPROGRAM
			#pragma vertex vert_blur
			#pragma fragment frag_blur
			ENDCG
		}

		//pass 1: 叠加效果
		Pass
		{

			ZTest Off
			Cull Off
			ZWrite Off
			Fog{ Mode Off }

			CGPROGRAM
			#pragma vertex vert_add
			#pragma fragment frag_add
			ENDCG
		}

	}
}
模糊的话,我就直接沿用了之前写的高斯模糊,横向+纵向两遍模糊,最终直接把颜色值叠加回原始贴图,与Bloom效果或者上文的Raial Blur后处理体积光类似。
我们把体积光渲染到RT上,效果如下:
把上图进行降分辨率(1/2)+高斯模糊后效果:
下面用几张图对比一下效果,第一张128次步进,原始效果:
4次步进效果,完全乱套了:
4次步进,Dither效果,有网格:
4次步进,Dither,RT降低1/2分辨率高斯模糊后叠加效果:
当然,我只是简单粗暴地加上去了,也可以尝试一些更好玩的叠加方式。
通过Dither技术,可以大大降低Ray-Marching的消耗,不过这个效果的整体计算量还是蛮大的,尤其对于阴影方面的处理,也比较麻烦,如果不考虑阴影,单纯计算体积光,可能会容易许多。不知道这个效果能不能在移动设备上跑得动,我也没敢尝试,哈哈。
总结
本篇文章尝试了四种目前实时渲染中常见的体积光实现的方式:BillBoard贴片,Volume Shadow体积阴影沿光方向挤出顶点,Radial Blur PostProcessing径向模糊后处理,Ray-Marching光线追踪体积光。四种实现,效果,耗费,实现困难度都是逐渐递增的。

