网站升级HTTPS,免费SSL证书Let’s Encrypt安装使用教程:Apache和Nginx配置方法
推荐方式
参考:https://certbot.eff.org/#ubuntutrusty-nginx
此处只记录ubuntu14.04安装方法
安装
$ sudo apt-get update
$ sudo apt-get install software-properties-common
$ sudo add-apt-repository ppa:certbot/certbot
$ sudo apt-get update
$ sudo apt-get install python-certbot-nginx
安装HTTPS证书
$ sudo certbot --nginx- 实例
wangsai@ubuntu /etc/letsencrypt % sudo certbot --nginx
Saving debug log to /var/log/letsencrypt/letsencrypt.log
Plugins selected: Authenticator nginx, Installer nginx

Which names would you like to activate HTTPS for?
-------------------------------------------------------------------------------
1: xxx.cn
2: www.xxx.cn
3: abc.xxx.cn
4: xxx.com
5: www.xxx.com
6: api.xxx.com
7: backend.xxx.com
-------------------------------------------------------------------------------
Select the appropriate numbers separated by commas and/or spaces, or leave input
blank to select all options shown (Enter 'c' to cancel): 7 # 这里想将 backend.xxx.com 设为https
Obtaining a new certificate
Performing the following challenges:
http-01 challenge for backend.xxx.com
Waiting for verification...
Cleaning up challenges
Deployed Certificate to VirtualHost /etc/nginx/sites-enabled/up for backend.xxx.com

Please choose whether or not to redirect HTTP traffic to HTTPS, removing HTTP access.
-------------------------------------------------------------------------------
1: No redirect - Make no further changes to the webserver configuration.
2: Redirect - Make all requests redirect to secure HTTPS access. Choose this for
new sites, or if you're confident your site works on HTTPS. You can undo this
change by editing your web server's configuration.
-------------------------------------------------------------------------------
Select the appropriate number [1-2] then [enter] (press 'c' to cancel): 2
Redirecting all traffic on port 80 to ssl in /etc/nginx/sites-enabled/up
Redirecting all traffic on port 80 to ssl in /etc/nginx/sites-enabled/up

-------------------------------------------------------------------------------
Congratulations! You have successfully enabled https://backend.xxx.com and
https://backend.xxx.com

You should test your configuration at:
https://www.ssllabs.com/ssltest/analyze.html?d=backend.xxx.com
-------------------------------------------------------------------------------

IMPORTANT NOTES:
 - Congratulations! Your certificate and chain have been saved at:
   /etc/letsencrypt/live/backend.xxx.com/fullchain.pem
   Your key file has been saved at:
   /etc/letsencrypt/live/backend.xxx.com/privkey.pem
   Your cert will expire on 2018-05-27. To obtain a new or tweaked
   version of this certificate in the future, simply run certbot again
   with the "certonly" option. To non-interactively renew *all* of
   your certificates, run "certbot renew"
 - If you like Certbot, please consider supporting our work by:

   Donating to ISRG / Let's Encrypt:   https://letsencrypt.org/donate
   Donating to EFF:                    https://eff.org/donate-le
HTTPS 证书已经完成了,下面的内容与上面无关
二、利用脚本快速获取Let’s Encrypt SSL证书
1、嫌上面的麻烦,不妨来试试利用脚本快速获取Let’s Encrypt SSL证书,调用 acme_tiny.py 认证、获取、更新证书,不需要额外的依赖。
项目主页:https://github.com/xdtianyu/scripts/tree/master/lets-encrypt
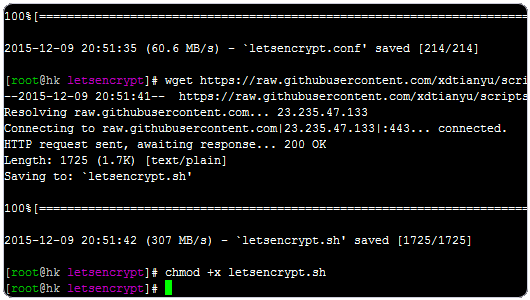
2、下载到本地:
wget https://raw.githubusercontent.com/xdtianyu/scripts/master/lets-encrypt/letsencrypt.conf
wget https://raw.githubusercontent.com/xdtianyu/scripts/master/lets-encrypt/letsencrypt.sh
chmod +x letsencrypt.sh
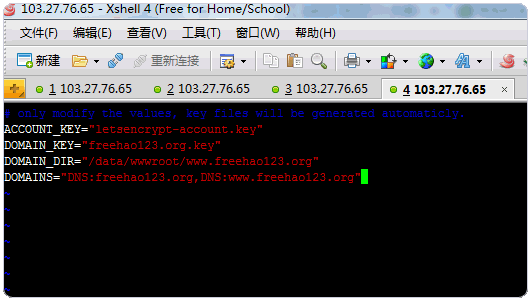
3、配置文件。只需要修改 DOMAIN_KEY DOMAIN_DIR DOMAINS 为你自己的信息
ACCOUNT_KEY="letsencrypt-account.key"
DOMAIN_KEY="freehao123.com.key"
DOMAIN_DIR="/var/www/freehao123.com"
DOMAINS="DNS:freehao123.com,DNS:www.freehao123.com"./letsencrypt.sh letsencrypt.conf看到以下信息表示生成/更新成功
Generate CSR…
Parsing account key…
Parsing CSR…
Registering account…
Already registered!
Verifying www.hdj.me…
www.hdj.me verified!
Signing certificate…
Certificate signed!
New cert: www.chained.crt has been generated
生成证书包括
-rw-r–r– 1 root root 3.2K Dec 28 17:04 letsencrypt-account.key
-rw-r–r– 1 root root 192 Dec 28 17:03 letsencrypt.conf
-rwxr-xr-x 1 root root 1.7K Dec 28 16:57 letsencrypt.sh
-rw-r–r– 1 root root 1.7K Dec 24 00:58 lets-encrypt-x1-cross-signed.pem
-rw-r–r– 1 root root 3.4K Dec 29 08:38 www.chained.crt
-rw-r–r– 1 root root 1.8K Dec 29 08:38 www.crt
-rw-r–r– 1 root root 920 Dec 29 08:37 www.csr
-rw-r–r– 1 root root 1.7K Dec 28 17:04 example.com.key- nginx配置
listen 443 ssl;
ssl_certificate /path/letsencrypt/www.chained.crt;
ssl_certificate_key /path/letsencrypt/example.com.key;
ssl_protocols TLSv1 TLSv1.1 TLSv1.2;- 将原http网址 重定向到https
server {
  listen      80;
  server_name    my.domain.com;
  return      301 https://$server_name$request_uri;
}- cron 定时任务
每个月自动更新一次证书,可以在脚本最后加入 service nginx reload等重新加载服务。
0 0 1 * * /etc/nginx/certs/letsencrypt.sh /etc/nginx/certs/letsencrypt.conf >> /var/log/lets-encrypt.log 2>&16、注意需要已经绑定域名到 /var/www/www.freehao123.com 目录,即通过 http://freehao123.com https://www.freehao123.com 可以访问到 /var/www/freehao123.com目录,用于域名的验证。

7、正常按照上面的操作即可成功获取到Let’s Encrypt SSL证书,不过经过部落测试最大的问题就是“DNS query timed out”,由于域名DNS解析的问题导致无法验证域名从而获取SSL证书不成功。
Traceback (most recent call last):
  File "/tmp/acme_tiny.py", line 198, in main(sys.argv[1:])
  File "/tmp/acme_tiny.py", line 194, in main signed_crt = get_crt(args.account_key, args.csr, args.acme_dir, log=LOGGER, CA=args.ca)
  File "/tmp/acme_tiny.py", line 149, in get_crt domain, challenge_status))
ValueError: hkh.freehao123.info challenge did not pass: {u'status': u'invalid', u'validationRecord': [{u'url': u'http://hkh.freehao123.info/.well-known/acme-challenge/sikHlqvbN4MrWkScgr1oZ9RX-lR1l__Z7FWVLhlYR0Q', u'hostname': u'hkh.freehao123.info', u'addressUsed': u'', u'port': u'80', u'addressesResolved': None}],  u'https://acme-v01.api.letsencrypt.org/acme/challenge/5m1su6O5MmJYlGzCJnEUAnvhweAJwECBhEcvsQi5B2Q/1408863', u'token': u'sikHlqvbN4MrWkScgr1oZ9RX-lR1l__Z7FWVLhlYR0Q', u'error': {u'type': u'urn:acme:error:connection', u'detail': u'DNS query timed out'}, u'type': u'http-01'}
四、 Ngnix配置Let’s Encrypt免费SSL
1、注意查看你的Let’s Encrypt免费SSL证书保存位置,一般是在/etc/letsencrypt/live/freehao123.com这样的下面。
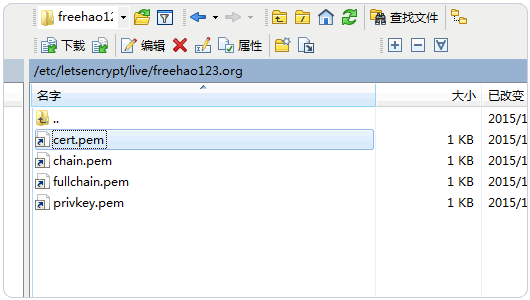
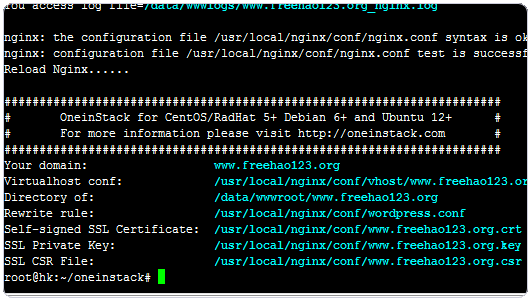
2、fullchain.pem就是公钥,privkey.pem就是私钥。有了这两个文件我们就可以在Ngnix上配置SSL证书了。OneinStack一键工具在创建虚拟主机时可以选择为网站配置SSL。
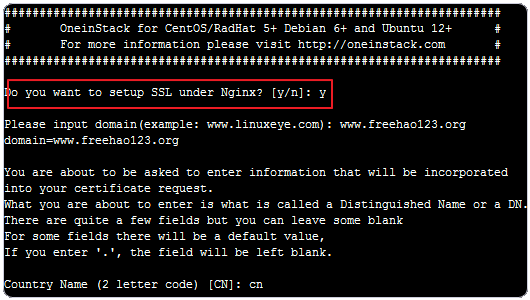
3、如果有用OneinStack,那么最简单的方法就是用fullchain.pem和privkey.pem替代原来生成的CRT和Key文件,这样做的好处就可以保留Ngnix配置的SSL证书路径,只要简单修改引用的公钥和私钥即可。
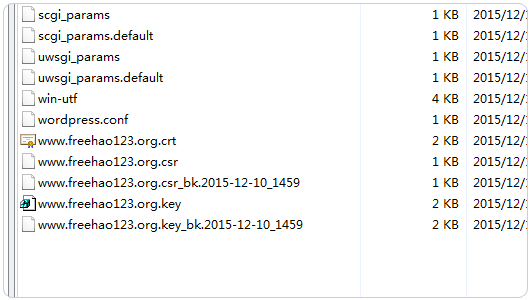
4、当然,为了后面的操作方便,我们建议保留Let’s Encrypt生成的SSL证书,直接在网站的配置中修改SSL证书引用路径。使用VPS主机创建网站时会为网站生成一个.conf文件。
5、这个这个.conf文件,直接替换掉ssl_certificate和ssl_certificate路径即可,如下图:
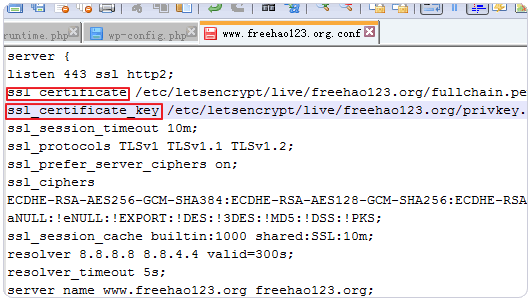
6、OneinStack的Nginx配置SSL证书代码示例:
server {
    listen 443 ssl http2;

    ssl_certificate /etc/letsencrypt/live/freehao123.org/fullchain.pem;//改动地方1
    ssl_certificate_key /etc/letsencrypt/live/freehao123.org/privkey.pem;//改动地方2

    ssl_session_timeout 10m;
    ssl_protocols TLSv1 TLSv1.1 TLSv1.2;
    ssl_prefer_server_ciphers on;
    ssl_ciphers ECDHE-SHA384:ECDHE-RSA-:ECDHE:!DES:!3DES:!MD5:!DSS:!PKS;
    ssl_session_cache builtin:1000 shared:SSL:10m;
    resolver 8.8.8.8 8.8.4.4 valid=300s;
    resolver_timeout 5s;

    root /data/wwwroot/www.freehao123.org;
    server_name www.freehao123.org freehao123.org;
    index index.html index.htm index.php;

    access_log /data/wwwlogs/www.freehao123.org_nginx.log combined;

    include /usr/local/nginx/conf/wordpress.conf;

    if ($host != www.freehao123.org) {
        rewrite ^/(.*)$ $scheme://www.freehao123.org/$1 permanent;
    }
}
server {
    listen 80;
    server_name www.freehao123.org;
    rewrite ^/(.*) https://$server_name/$1 permanent;
}
7、最后重启Nginx,打开浏览器就可以看到SSL证书已经成功配置好了。
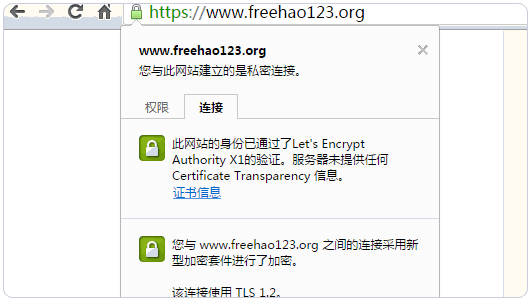
8、对于安装了LNMP的朋友,可以参考以下代码修改自己的Nginx配置。
server
{
    listen 443 ssl;   //如果需要spdy也可以加上,lnmp1.2及其后版本都默认支持spdy,lnmp1.3 nginx 1.9.5以上版本默认支持http2
    server_name www.freehao123.com;     //域名
    index index.html index.htm index.php default.html default.htm default.php;
    root /home/wwwroot/www.freehao123.com;            //网站目录

    ssl_certificate /etc/letsencrypt/live/www.freehao123.com/fullchain.pem;    //前面生成的证书
    ssl_certificate_key /etc/letsencrypt/live/www.freehao123.com/privkey.pem;   //前面生成的密钥
    ssl_ciphers "EECDH+AESGCM:EDH+AESGCM:AES256+EECDH:AES256+EDH";
    ssl_protocols TLSv1 TLSv1.1 TLSv1.2;
    ssl_prefer_server_ciphers on;
    ssl_session_cache shared:SSL:10m;

    include wordpress.conf;  //这个是伪静态
    #error_page 404 /404.html;
    location ~ [^/]\.php(/|$){
        # comment try_files $uri =404; to enable pathinfo
        try_files $uri =404;
        fastcgi_pass unix:/tmp/php-cgi.sock;
        fastcgi_index index.php;
        include fastcgi.conf;     //lnmp 1.0及之前版本替换为include fcgi.conf;
        #include pathinfo.conf;
    }
}
五、Apache配置Let’s Encrypt免费SSL
1、首先,我们需要对Apache的配置进行修改,打开 /usr/local/apache/conf/httpd.conf ,查找httpd-ssl将前面的#去掉,然后执行命令(注意将路径换你自己的):
    cat >/usr/local/apache/conf/extra/httpd-ssl.conf<<EOF
        Listen 443
        AddType application/x-x509-ca-cert .crt
        AddType application/x-pkcs7-crl .crl
        SSLCipherSuite EECDH+AESGCM:EDH+AESGCM:AES256+EECDH:AES256+EDH
        SSLProxyCipherSuite EECDH+AESGCM:EDH+AESGCM:AES256+EECDH:AES256+EDH
        SSLHonorCipherOrder on
        SSLProtocol all -SSLv2 -SSLv3
        SSLProxyProtocol all -SSLv2 -SSLv3
        SSLPassPhraseDialog builtin
        SSLSessionCache "shmcb:/usr/local/apache/logs/ssl_scache(512000)"
        SSLSessionCacheTimeout 300
        SSLMutex "file:/usr/local/apache/logs/ssl_mutex"
    EOF
2、接着,在你创建的网站的Apache配置的最后下面添加上SSL部分的配置文件:
    443>
    DocumentRoot /home/wwwroot/www.freehao123.com   //网站目录
    ServerName www.freehao123.com:443   //域名
    ServerAdmin admin@freehao123.com      //邮箱
    ErrorLog "/home/wwwlogs/www.freehao123.com-error_log"   //错误日志
    CustomLog "/home/wwwlogs/www.freehao123.com-access_log" common    //访问日志
    SSLEngine on
    SSLCertificateFile /etc/letsencrypt/live/www.freehao123.com/fullchain.pem   //之前生成的证书
    SSLCertificateKeyFile /etc/letsencrypt/live/www.freehao123.com/privkey.pem    //之前生成的密钥
    "/home/wwwroot/www.freehao123.com">   //网站目录
    SetOutputFilter DEFLATE
    Options FollowSymLinks
    AllowOverride All
    Order allow,deny
    Allow from all
    DirectoryIndex index.html index.php
3、最后就是重启Apache,然后打开浏览器就可以看到SSL证书配置成功了。
六、 Let’s Encrypt免费SSL证书续期
1、Let’s Encrypt免费SSL证书有效期是90天,也就是每三个月你就得续期一次。采用官方的方法获取到的免费SSL证书,你不需要更改Apache和Nginx配置代码,执行以下代码即可自动替换证书为新的(注意修改域名和邮箱):
./letsencrypt-auto certonly --renew-by-default --email freehao123@gmail.com -d freehao123.org -d www.freehao123.org2、采用上面脚本快速获取Let’s Encrypt免费SSL证书的,在90天内再次执行命令即可:
./letsencrypt.sh letsencrypt.conf3、cron 定时任务。每个月自动更新一次证书,可以在脚本最后加入 service nginx reload等重新加载服务。
0 0 1 * * /etc/nginx/certs/letsencrypt.sh /etc/nginx/certs/letsencrypt.conf >> /var/log/lets-encrypt.log 2>&1文章出自:免费资源部落
