MobileNet V2 tensorflow复现
前言
在网上搜索很了很多也没看到关于tensorflow版的MobileNet V2网络架构。于是自己花了一天时间来完成了一个简单版本的复现。理论就不说了,搜其它资料吧
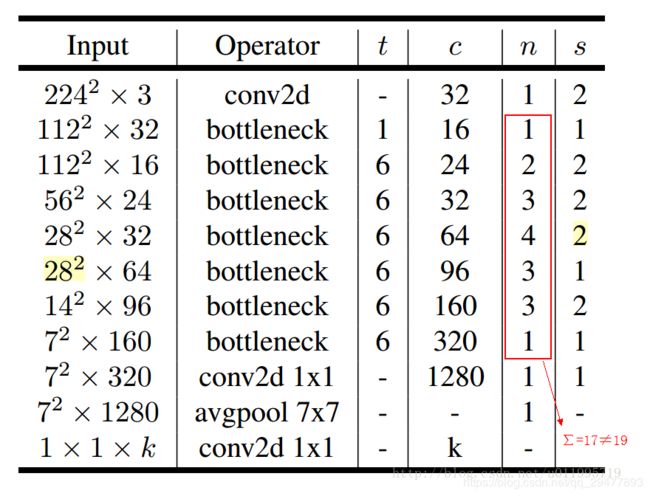
网络结构如下:

先理一下思路。MobileNet V2中最重要的就是bottleneck块。我们先看看块内内容

1)可以看到input进去后会经过一个1*1的普通卷积来扩张维度。扩张倍数即网络结构表中的t。(表中为6倍)。其实还有细节部分,归纳为卷积+偏置,然后正则化,最后relu6非线性激活。这里的卷积步长为1,不会改变特征图尺寸。
2)第二部分就是深度卷积了,关于深度卷积和普通卷积的不同自行查询其它资料了解。这里要提的是深度卷积(tf.nn.depthwise_conv2d)操作与普通卷积(tf.nn.conv2d)的函数不同。里面参数形式也有不同之处,具体看下面代码def DepthwiseConv2D()部分。
另外深度卷积的步长是有改变的,比如上面的网络结构表中的n和s,n表示当前这个bottleneck的重复次数,而s表示第一个bottleneck中的深度卷积步长为2,而后面重复的bottleneck都为1。为什么要这样做?MobileNet V2中其实还用到了shortcut,第一次使用步长为2的深度卷积是为了起到类似pooling的作用,减小特征图尺寸,这里不使用shortcut,因为特征图大小不匹配(即上图右边部分)。而后面的bottleneck中深度卷积步长都为1,不改变尺寸大小,所以需要进行shortcut(即上图左边部分)。
3)最后是点卷积,进行降维。残差网络一半是先降维再扩维,而MobileNet V2的Inverted residuals的思想反过来的,这里需要将维度降回去。最后注意的一点就是这里是线性激活。即不使用relu等非线性函数,而是直接输出。
总结一下:
关于普通卷积操作Conv2D和深度卷积操作DepthwiseConv2D,里面包括了卷积计算+偏置+批量正则化(BN)。这里模块内没有加relu6操作,因为最后的点卷积不需要这步,为了提高代码的可复用性,我们在外部进行relu6。
代码细节:
# -*- coding: utf-8 -*-
"""
Created on Wed Apr  8 11:33:35 2020

@author: Ke
"""

# -*- coding: utf-8 -*-
"""
Created on Wed Apr  8 11:31:50 2020

@author: Ke
"""
import tensorflow as tf
import matplotlib.pyplot as plt
import cv2
import numpy as np

class MobileNet(object):
    def __init__(self, inputs, num_classes=8, is_training=True,
                 width_multiplier=1, scope="MobileNet_v2"):
        self.inputs = inputs
        self.num_classes = num_classes
        self.is_training = is_training
        self.width_multiplier = width_multiplier

        with tf.variable_scope(scope):
            self.predictions = self.forward(inputs)


    def forward(self,img_input):#224*224*3

        conv1 = self.Conv2D('convlayer1',img_input,3,3,32,2) #输出大小112*112*32

        #只有步长为1并且输入维度等于输出时,才使用残差
        b1_1=self.BottleNeck('bottlelayer1_1',conv1,32,1,16,1,False) #输出大小112*112*16,一层不使用残差


        b2_1=self.BottleNeck('bottlelayer2_1',b1_1,16,6,24,2,False)#输出大小56*56*24
        b2_2=self.BottleNeck('bottlelayer2_2',b2_1,24,6,24,1,True)#输出大小56*56*24

        b3_1=self.BottleNeck('bottlelayer3_1',b2_2,24,6,32,2,False)#输出大小28*28*32
        b3_2=self.BottleNeck('bottlelayer3_2',b3_1,32,6,32,1,True)#输出大小28*28*32
        b3_3=self.BottleNeck('bottlelayer3_3',b3_2,32,6,32,1,True)#输出大小28*28*32

        b4_1=self.BottleNeck('bottlelayer4_1',b3_3,32,6,64,2,False)#输出大小14*14*64
        b4_2=self.BottleNeck('bottlelayer4_2',b4_1,64,6,64,1,True)#输出大小14*14*64
        b4_3=self.BottleNeck('bottlelayer4_3',b4_2,64,6,64,1,True)#输出大小14*14*64
        b4_4=self.BottleNeck('bottlelayer4_4',b4_3,64,6,64,1,True)#输出大小14*14*64

        b5_1=self.BottleNeck('bottlelayer5_1',b4_4,64,6,96,1,False)#输出大小14*14*96
        b5_2=self.BottleNeck('bottlelayer5_2',b5_1,96,6,96,1,True)#输出大小14*14*96
        b5_3=self.BottleNeck('bottlelayer5_3',b5_2,96,6,96,1,True)#输出大小14*14*96

        b6_1=self.BottleNeck('bottlelayer6_1',b5_3,96,6,160,2,False)#输出大小7*7*160
        b6_2=self.BottleNeck('bottlelayer6_2',b6_1,160,6,160,1,True)#输出大小7*7*160
        b6_3=self.BottleNeck('bottlelayer6_3',b6_2,160,6,160,1,True)#输出大小7*7*160

        b7_1=self.BottleNeck('bottlelayer7_1',b6_3,160,6,320,1,False)#输出大小7*7*320

        conv8 = self.Conv2D('convlayer8_1',b7_1,1,320,1280,1) #输出大小7*7*1280

        pool9_1 = tf.reduce_mean(conv8, [1,2], name='global_pool', keep_dims=True)#输出大小1*1*1280

        conv10_1 = self.Conv2D('convlayer10_1',pool9_1,1,1280,self.num_classes,1) #输出大小1*1*8

        result=tf.squeeze(conv10_1)#输出大小8

        return result

    #定义两种不同的卷积:普通卷积和深度卷积
    def Conv2D(self,name, inputs, kernel_size, in_channels, out_channels, stride):
        with tf.variable_scope(name, reuse=tf.AUTO_REUSE):
            #tf.get_variable如果已经创建的变量对象,就把那个对象返回,如果没有创建变量对象的话,就创建一个新的。
            kernel = tf.get_variable('weight',shape=[kernel_size,kernel_size,in_channels,out_channels],
                                     initializer=tf.truncated_normal_initializer(mean=0.0, stddev=1.0, dtype=tf.float32))
            conv = tf.nn.conv2d(inputs, kernel, [1,stride,stride,1], padding='SAME')
            biases = tf.get_variable('biase',initializer=tf.constant(0.01, shape=[out_channels],
                                                             dtype=tf.float32))
            output = tf.nn.bias_add(conv, biases)

            output_bn = tf.layers.batch_normalization(output, name='bn',
                                                      training=self.is_training)

            return output_bn

    def DepthwiseConv2D(self,name,inputs,channels,stride):
        with tf.variable_scope(name, reuse=tf.AUTO_REUSE):

            kernel = tf.get_variable('weight',shape=[3,3,channels,self.width_multiplier],
                                initializer=tf.truncated_normal_initializer(mean=0.0, stddev=1.0, dtype=tf.float32))


            conv = tf.nn.depthwise_conv2d(inputs, kernel,[1,stride,stride,1],rate=[1,1], padding='SAME')
            #偏置为channels*channel_multiplier
            biases = tf.get_variable('biase',initializer=tf.constant(0.01, shape=[channels*self.width_multiplier],
                                                                     dtype=tf.float32))
            output = tf.nn.bias_add(conv, biases)

            output_bn = tf.layers.batch_normalization(output, name='bn',training=self.is_training)

            return tf.nn.relu6(output_bn)

    #瓶颈块
    def BottleNeck(self,name,inputs,in_channels,t,out_channels,stride,r=False):
        '''
        参数r:表示是否用残差(只有当步长为1并且输入维度等于输出维度时才用)
        '''
        with tf.variable_scope(name, reuse=tf.AUTO_REUSE):

            expand_dim=t*in_channels
            conv1 = self.Conv2D('conv1',inputs,1,in_channels,expand_dim,1) #1*1卷积升维,步长为1
            output = tf.nn.relu6(conv1)

            dwconv=self.DepthwiseConv2D('dw_conv',output,expand_dim,stride)#深度卷积

            outputs = self.Conv2D('conv3',dwconv,1,expand_dim,out_channels,1) #点卷积

            if r:
                outputs = tf.add(outputs, inputs)
            return outputs
关于tf.nn_conv2d和tf.nn.depthwise_conv2d之间的区别:
假设您有一个长度为100,宽度为100的输入彩色图像。因此尺寸为100x100x3。对于这两个示例,我们都使用相同的宽度和高度5过滤器。假设我们希望下一层的深度为8。
在tf.nn.conv2d中,将内核形状定义为[width,height,in_channels,out_channels]。在我们的例子中,这意味着内核的形状为[5,5,3,out_channels]。跨过图像的权重内核的形状为5x5x3,并跨过整个图像8次,以生成8个不同的特征图。
在tf.nn.depthwise_conv2d中,将内核形状定义为[width,height,in_channels,channel_multiplier]。现在,产生的输出有所不同。在输入图像的每个维度上跨越5x5x1的单独滤镜,每个维度一个滤镜,每个滤镜每个维度产生一个特征图。因此,这里的内核大小[5,5,3,1]会产生深度为3的输出。channel_multiplier告诉您每个维要应用多少个不同的过滤器。因此,对于3个输入尺寸,深度8的原始期望输出是不可能的。只能是3的倍数。
参考:
网络结构
keras实现