前端面试题汇总 - webpack
目录
- 1、基本配置
- 2、高级配置
- 3、webpack性能优化
- (1)优化打包效率(优化打包构建速度 - 开发体验和效率)
- (2)优化产出代码 - 产品性能
- 4、babel
- (1)环境搭建 & 基本配置
- (2)babel-polyfill
- (3)babel-runtime
- 5、前端代码为何要进行构建和打包?
- 6、module、chunk、bundle 分别是什么意思?有何区别?
- 7、loader 和 plugin 的区别?
- 8、常见的 loader 和 plugin 有哪些?
- 9、babel 和 webpack 的区别?
- 10、如何产出一个lib?
- 11、babel-runtime 和 babel-polyfill 的区别
- 12、webpack 如何实现懒加载?
- 13、为何 Proxy 不能被 Polyfill?
1、基本配置
(1)拆分配置和 merge
const webpackCommonConf = require('./webpack.common.js')
const { smart } = require('webpack-merge')

module.exports = smart(webpackCommonConf, {
	// ...
})
(2)启动本地服务
- 安装 webpack-dev-server
devServer: {
	port: 3000,
    progress: true,  // 显示打包的进度条
    open: true,  // 自动打开浏览器
    compress: true,  // 启动 gzip 压缩
    contentBase: path.join(__dirname, 'dist'),  // 根目录
	// 设置代理
	proxy: {
		// 将本地 /api/xxx 代理到 localhost:3000/api/xxx
		'/api': 'http://localhost:3000',

		// 将本地 /api2/xxx 代理到 localhost:3000/xxx
		'/api2': {
			target: 'http://localhost:3000',
			pathRewrite: {
				'api2': ''
			}
		}
	}
}
(3)处理ES6
- 使用babel-loader
module: {
    rules: [
        {
            test: /\.js$/,
            loader: ['babel-loader'],
            include: path.join(__dirname, 'src'),
            exclude: /node_modules/
        }
    ]
}
- 配置.babelrc
{
	"presets": ["@babel/preset-env"],
	"plugins": []
}
- 处理样式
module: {
    rules: [
        {
            test: /\.css$/,
            // loader 的执行顺序是:从后往前
            loader: ['style-loader', 'css-loader', 'postcss-loader']
        }
    ]
}
- 处理图片
// dev 环境
module: {
    rules: [
    	// 直接引入图片 url
        {
            test: /\.(png|jpg|jpeg|gif)$/,
            use: 'file-loader'
        }
    ]
}
// 生产环境
module: {
    rules: [
    	// 图片 - 考虑 base64 编码的情况
        {
            test: /\.(png|jpg|jpeg|gif)$/,
            use: {
            	loader: 'url-loader',
            	option: {
            		// 小于 5kb 的图片用 base64 格式产出
            		// 否则,依然延用 file-loader 的形式,产出 url
            		limit: 5 * 1024,

					// 打包到 img 目录下
					outputPath: '/img1/',

					// 设置图片的 cdn 地址(也可以统一在外面的output 中设置,那将作用于所有静态资源)
					// publicPath: 'http://cdn.abc.com'
            	}
            }
        }
    ]
}
- 模块化
2、高级配置
(1)多入口
module.exports = {
	index: path.join(srcPath, 'index.js'),
	other: path.join(srcPath, 'other.js')  // 定义两个入口
}
output: {
	filename: '[name].[contentHash:8].js',  // name 即多入口时 entry 的 key
	path: distPath
}
plugins: [
	// 多入口 - 生成 index.html
	new HtmlWebpackPlugin({
		template: path.join(srcPath, 'index.html'),
		filename: 'index.html',
		// chunks 表示该页面要引用哪些 chunk (即上面的 index 和 other)
		chunks: ['index']  // 只引用 index.js
	}),
	// 多入口 - 生成 other.html
	new HtmlWebpackPlugin({
		teplate: path.join(srcPath, 'other.html'),
		filename: 'other.html',
		chunks: ['other']  // 只引用 other.js
	})
]
每次打包清除原有dist中文件
plugins: [
	new CleanWebpackPlugin()  // 会清空 output.path 配置的文件夹
]
(2)抽离CSS文件
- 安装mini-css-extract-plugin
module: {
	rules: [
		// 抽离 css
		{
			test: /\.css$/,
			loader: [
				MiniCssExtractPlugin.loader, // 注意,这里不再用 style-loader
				'css-loader',
				'postcss-loader'
			]
		}
	]
}
plugins: [
	// 抽离 css 文件
	new MiniCssExtractPlugin({
		filename: 'css/main.[contentHash:8].css'
	})
]
optimization: {
	// 压缩 css
	minimizer: [new TerserJSPlugin({}), new OptimizeCSSAssetsPlugin({})]
}
(3)抽离公共代码及第三方代码
// 分割代码块
optimization: {
	splitChunks: {
		chunks: 'all',
		/**
		 * initial 入口 chunk,对于异步导入的文件不处理
		   async异步 chunk,只对异步导入的文件处理
		   all 全部 chunk
		 */

		// 缓存分组
		cacheGroups: {
			// 第三方模块
			vendor: {
				name: 'vendor', // chunk 名称
				priority: 1, // 权限更高,有限抽离,重要!!!
				test: /node_modules/,
				minSize: 0, // 大小限制,如3kb
				minChunks: 1 // 最少复用过几次
			},

			// 公共的模块
			common: {
				name: 'common', // chunk 名称
				priority: 0, //优先级
				minSize: 0, //公共模块的大小限制
				minChunks: 2 //公共模块最少复用过几次
			}
		}
	}
}
plugins: [
	// 多入口 - 生成 index.html
	new HtmlWebpackPlugin({
		template: path.join(srcPath, 'index.html'),
		filename: 'index.html',
		// chunks 表示该页面要引用哪些 chunk (即上面的 index 和 other)
		chunks: ['index', 'vendor', 'common']  // 考虑代码分割
	}),
	// 多入口 - 生成 other.html
	new HtmlWebpackPlugin({
		teplate: path.join(srcPath, 'other.html'),
		filename: 'other.html',
		chunks: ['other', 'common']  // 考虑代码分割
	})
]
(4)懒加载
index.js
// 引入动态数据 - 懒加载
setTimeout(() => {
	// 定义 chunk
	import('./dynamic-data.js').then(res => {
		console.log(res.default.message) // 注意这里的default
	})
}, 1500)
(5)处理JSX
npm install --save-dev @babel/preset-react
.babelrc文件
{
	"presets": ["@babel/preset-react"]
}
webpack
module: {
    rules: [
        {
            test: /\.js$/,
            loader: ['babel-loader'],
            include: path.join(__dirname, 'src'),
            exclude: /node_modules/
        }
    ]
}
(6)处理Vue
npm i vue-loader
module: {
    rules: [
        {
            test: /\.vue$/,
            loader: ['vue-loader'],
            include: srcPath
        }
    ]
}
3、webpack性能优化
(1)优化打包效率(优化打包构建速度 - 开发体验和效率)
- 优化babel-loader(可用于生产环境)
{
	test: /\.js$/,
	use: ['babel-loader?cacheDirectory'],  // 开启缓存
	include: path.resolve(__dirname, 'src'),  // 明确范围
	// 排除范围,include 和 exclude 两者选一个即可
	// exclude: path.resolve(__dirname, 'node_modules')
}
- IgnorePlugin - 避免引入无用模块(可用于生产环境)
import moment from 'moment'
引入 moment 库会默认引入所有语言JS代码,代码过大
import moment from 'moment'
import 'moment/locale/zh-cn'  // 手动引入中文语言包
moment.locale('zh-cn')  // 设置语言为中文
console.log('locale', moment.locale())
console.log('date', moment().format('ll'))  // 2020年xx月xx日
plugins: [
	// 忽略 moment 下的 /locale 目录
	new webpack.IgnorePlugin(/\.\/locale/, /moment/)
]
- noParse - 避免重复打包(可用于生产环境)
module.exports = {
	module: {
		// 独完整的 'react.min.js' 文件就没有采用模块化
		// 忽略对 'react.min.js' 文件的递归解析处理
		noParse: [/react\.min\.js$/]
	}
}
IgnorePlugin vs noParse 区别
a. IgnorePlugin - 直接不引入,代码中没有(减少产出体积)
b. noParse - 引入,但不打包
- happyPack - 多进程打包工具,开启多进程,打包更快(可用于生产环境)
JS单线程,开启多进程打包
提高构建速度(特别是多核CPU)
// 安装happyPack后在 webpack.prod.js 中引入
const HappyPack = require('happypack')
module: {
	rules: [
		{
			test: /\.js$/,
			// 把对 .js 文件的处理转交给 id 为 babel 的 HappyPack 实例
			use: ['happypack/loader?id=babel'],
			include: srcPath
		}
	]
}
plugins: [
	// happyPack 开启多进程打包
	new HappyPack({
		// 用唯一的标识符 id 来代表当前的 HappyPack 是用来处理一类特定的文件
		id: 'babel',
		// 如何处理 .js 文件,用法和 loader 配置中一样
		loaders: ['babel-loader?cacheDirectory']
	})
]
- ParallelUglifyPlugin - 多进程压缩JS(可用于生产环境)
webpack内置 Uglify 工具压缩 JS
JS 单线程,开启多进程压缩更快
和happyPack同理
const ParallelUglifyPlugin = require('webpack-parallel-uglify-plugin')
plugins: [
	// 使用 ParallelUglifyPlugin 并进行压缩输出的 JS 代码
	new ParallelUglifyPlugin({
		// 传递给 UglifyJS 的参数
		// (还是使用 UglifyJS 压缩,只不过帮助开启了多进程)
		uglifyJS: {
			output: {
				beautify: false, // 是紧凑的输出
				comments: false // 删除所有的注释
			},
			compress: {
				// 删除所有的 'console' 语句,可以兼容ie浏览器
				drop_console: true,
				// 内嵌定义了但是只用到一次的变量
				collapse_vars: true,
				// 提取出出现多次但是没有定义成变量去引用的静态值
				reduce_vars: true
			}
		}
	})
]
关于开启多进程
a. 项目较大,打包较慢,开启多进程能提高速度
b. 项目较小,打包很快,开启多进程会降低速度(进程开销)
- 自动刷新(不用于生产环境)
一般使用dev-server时会自动开启自动刷新功能,无需手动配置
module.export = {
	watch: true, // 开启监听,默认为 false
	// 注意,开启监听之后,webpack-dev-server 会自动开启刷新浏览器

	// 监听配置
	watchOptions: {
		ignored: /node_modules/,  // 忽略哪些
		// 监听到变化发生后会等300ms再去执行动作,防止文件更新太快导致重新编译频率太高
		aggregateTimeout: 300,  // 默认为 300ms
		// 判断文件是否发生变化是通过不停地去询问系统指定文件有没有变化实现的
		poll: 1000  // 默认每隔1000毫秒询问一次
	}
}
- 热更新(不用于生产环境)
自动刷新:整个网页全部刷新,速度较慢,状态会丢失
热更新:新代码生效,网页不刷新,状态不丢失
const HotModuleReplacementPlugin = require('webpack/lib/HotModuleReplacementPlugin')
entry: {
	index: [
		'webpack-dev-server/client?http://localhost:8080/',
		'webpack/hot/dev-server',
		path.join(srcPath, 'index.js')
	]
}
plugins: [
	new HotModuleReplacementPlugin()
]
devServer: {
	hot: true
}
index.js
// 增加,开启热更新之后的代码逻辑
if(module.hot){
	module.hot.accept(['./math'], () => {  // math 是某一个模块名称
		const sumRes = sum(10, 20)
		console.log('sumRes in hot', sumRes)
	})
}
- DllPlugin - 动态链接库插件(不用于生产环境)
前端框架如 vue、react,体积大,构建慢
较稳定,不常升级版本
同一个版本只构建一次即可,不用每次都重新构建
webpack已内置 DllPlugin 支持
DllPlugin - 打包出dll文件
DllReferencePlugin - 使用 dll 文件
webpack.dll.js
const path = require('path')
const DllPlugin = require('webpack/lib/DllPlugin')
const { srcPath, distPath } = require('./paths')

module.exports = {
  mode: 'development',
  // JS 执行入口文件
  entry: {
    // 把 React 相关模块的放到一个单独的动态链接库
    react: ['react', 'react-dom']
  },
  output: {
    // 输出的动态链接库的文件名称,[name] 代表当前动态链接库的名称,
    // 也就是 entry 中配置的 react 和 polyfill
    filename: '[name].dll.js',
    // 输出的文件都放到 dist 目录下
    path: distPath,
    // 存放动态链接库的全局变量名称,例如对应 react 来说就是 _dll_react
    // 之所以在前面加上 _dll_ 是为了防止全局变量冲突
    library: '_dll_[name]',
  },
  plugins: [
    // 接入 DllPlugin
    new DllPlugin({
      // 动态链接库的全局变量名称,需要和 output.library 中保持一致
      // 该字段的值也就是输出的 manifest.json 文件 中 name 字段的值
      // 例如 react.manifest.json 中就有 "name": "_dll_react"
      name: '_dll_[name]',
      // 描述动态链接库的 manifest.json 文件输出时的文件名称
      path: path.join(distPath, '[name].manifest.json'),
    }),
  ],
}
webpack.dev.js
const path = require('path')
const webpack = require('webpack')
const { smart } = require('webpack-merge')
const webpackCommonConf = require('./webpack.common.js')
const { srcPath, distPath } = require('./paths')

// 第一,引入 DllReferencePlugin
const DllReferencePlugin = require('webpack/lib/DllReferencePlugin');

module.exports = smart(webpackCommonConf, {
    mode: 'development',
    module: {
        rules: [
            {
                test: /\.js$/,
                loader: ['babel-loader'],
                include: srcPath,
                exclude: /node_modules/ // 第二,不要再转换 node_modules 的代码
            },
        ]
    },
    plugins: [
        new webpack.DefinePlugin({
            // window.ENV = 'production'
            ENV: JSON.stringify('development')
        }),
        // 第三,告诉 Webpack 使用了哪些动态链接库
        new DllReferencePlugin({
            // 描述 react 动态链接库的文件内容
            manifest: require(path.join(distPath, 'react.manifest.json')),
        }),
    ],
    devServer: {
        port: 8080,
        progress: true,  // 显示打包的进度条
        contentBase: distPath,  // 根目录
        open: true,  // 自动打开浏览器
        compress: true,  // 启动 gzip 压缩

        // 设置代理
        proxy: {
            // 将本地 /api/xxx 代理到 localhost:3000/api/xxx
            '/api': 'http://localhost:3000',

            // 将本地 /api2/xxx 代理到 localhost:3000/xxx
            '/api2': {
                target: 'http://localhost:3000',
                pathRewrite: {
                    '/api2': ''
                }
            }
        }
    }
})
(2)优化产出代码 - 产品性能
特点:
- 体积更小
- 合理分包,不重复加载
- 速度更快、内存使用更少
如何做:
- 小图片base64编码
- bundle加hash
- 懒加载 - import()
- 提取公共代码
- IgnorePlugin
- 使用CDN加速
output: {
	publicPath: 'http://cdn.abc.com'  // 修改所有静态文件 url 都前缀(如 cdn 域名),这里暂时用不到
- 使用production
mode: 'production'
- 自动开启代码压缩(代码体积更小,速度更快)
- Vue,React等会自动删掉调试代码(如开发环境的warning)
- 启动Tree-Shaking(声明后没有用到的东西自动忽略不打包)
Tree Shaking
mode: ‘production’ 就可以开启Tree Shaking
ES6 Module 才能让tree-shaking生效,Commonjs不行
ES6 Module 和 Commonjs 区别
a. ES6 Module 静态引入,编译时引入(引用必须是无条件的直接引用过来的,打包中能直接识别到,不能在条件中去引用,不能通过代码判断它是否引用)
b. Commonjs动态引入,执行时引入
c. 只有ES6 Module 才能静态分析,实现 Tree-Shaking
// Commonjs 方式引入
let apiList = require('../config/api.js')
if(isDev){
	// 可以动态引入,执行时引入
	apiList = require('../config/api_dev.js')
}
// ES6 方式引入
import apiList from '../config/api.js'
if(isDev){
	// 编译时报错,只能静态引入
	import apiList from '../config/api_dev.js'
}
- Scope Hosting
代码体积更小
创建函数作用域更少
代码可读性更好
// hello.js
export defauot 'Hello 小可爱'

// main.js
import str from './hello.js'
console.log(str)
打包之后的结果是两个函数,如下
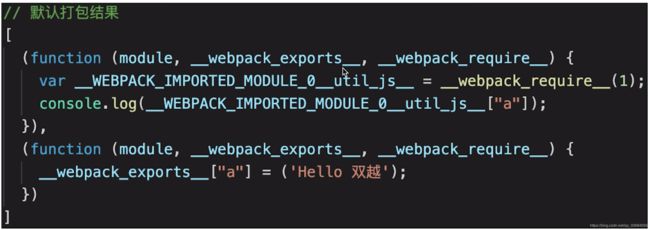
两个函数有两个作用域,对js执行不好,我们希望打包成一个函数,如下
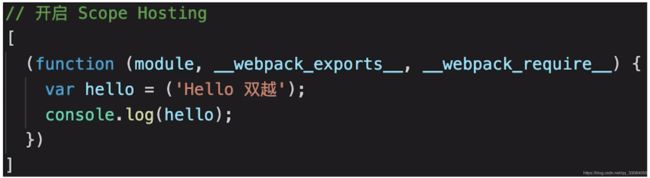
如何做?
const ModuleConcatenationPlugin = require('webpack/lib/optimize/ModuleConcatenationPlugin')
module.exports = {
	resolve: {
		// 针对 Npm 中的第三方模块优先采用 jsnext:main 中指向的 ES6 模块化语法的文件
		mainFields: ['jsnext:main', 'browser', 'main']
	},
	plugins: [
		// 开启 Scope Hosting
		new ModuleConcatenationPlugin()
	]
}
4、babel
(1)环境搭建 & 基本配置
安装 @babel/cli, @babel/core, @babel/preset-env, @babel/plugin-transform-runtime, @babel/polyfill, @babel/runtime
.babelrc
{
	"presets": [
		"@babel/preset-env"
	],
	"plugins": []
}
(2)babel-polyfill
- polyfill - 补丁
- core-js - 集成的polyfill库
- regenerator - core-js不支持generator函数,所以需要这个插件
- babel-polyfill 即上面两者的结合
- 在babel 7.4之后被弃用了
- 推荐直接使用core-js 和 regenerator
babel 只解析语法,不关注是否有新的API
babel 不处理模块化,用 webpack 处理模块化
- babel-polyfill 文件较大
- 只有一部分功能,无需全部引入
- 配置按需引入
// .babelrc
{
	"presets": [
		"@babel/preset-env",
		{
			"useBuiltIns": "usage",
			"corjs": 3
		}
	]
}
- 会污染全剧环境
- 如果做一个独立的 web 系统,则无碍
- 如果做一个第三方lib,则会有问题
// 污染全剧环境
window.Promise = function(){}
Array.prototype.includes = function(){}
如何不污染全局环境? 用babel-runtime
(3)babel-runtime
安装 @babel/plugin-transform-runtime
// .babelrc
{
	"presets": [
		"@babel/preset-env",
		{
			"useBuiltIns": "usage",
			"corjs": 3
		}
	],
	"plugins": [
		{
			"@babel/plugin-transform-runtime",
			{
				"absoluteRuntime": false,
				"corejs": 3,
				"helpers": true,
				"regenerator": true,
				"useESModules": false
			}
		}
	]
}
5、前端代码为何要进行构建和打包?
(1)代码方面
- 体积更小(Tree-Shaking、压缩、合并),加载更快
- 可以编辑高级语言或语法(TS,ES6+,模块化,scss)
- 兼容性和错误检查(Polyfill,postcss,eslint)
(2)研发流程方面
- 统一、高效的开发环境
- 统一的构建流程和产出标准
- 集成公司构建规范(提测、上线等)
6、module、chunk、bundle 分别是什么意思?有何区别?
- module - 各个源码文件,webpack 中一切皆模块
- chunk - 多模块合并成的,如 entry,import(),splitChunk
- bundle - 最终的输出文件
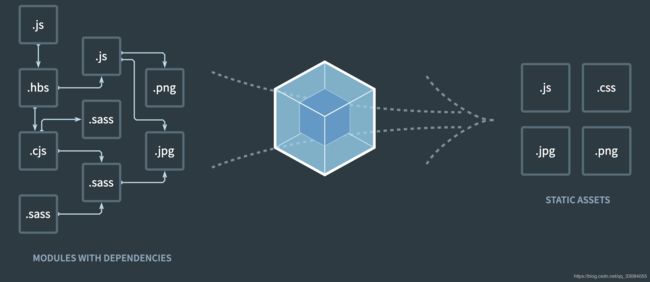
左侧是module,中间是chunk,右侧是bundle
7、loader 和 plugin 的区别?
- loader - 模块转换器,如less -> css
- plugin - 扩展插件,如HtmlWebpackPlugin
8、常见的 loader 和 plugin 有哪些?
https://www.webpackjs.com/loaders/
https://www.webpackjs.com/plugins/
9、babel 和 webpack 的区别?
- babel - JS 新语法编译工具,不关心模块化
- webpack - 打包构建工具,是多个 loader、plugin 的集合
10、如何产出一个lib?
参考 webpack.dll.js
output: {
	// lib 的文件名
	filename: 'lodash.js',
	// 输出 lib 到 dist 目录下
	path: distPath,
	// lib 的全局变量名
	library: 'lodash'
}
11、babel-runtime 和 babel-polyfill 的区别
- babel-polyfill 会污染全局
- babel-runtime 不会污染全局
- 产出第三方 lib 时要用 babel-runtime
12、webpack 如何实现懒加载?
- import()
- 结合 vue 或 react 异步组件
- 结合 Vue-router 和 React-router 异步加载路由
13、为何 Proxy 不能被 Polyfill?
可以 polyfill 的情况:
- 如 Class 可以用 function 模拟
- 如 Promise 可以用 callback 来模拟
但是 Proxy 的功能用 Object.defineProperty 无法模拟