Spring Cloud学习笔记---Spring Cloud Sleuth--新建两个互相调用的服务测试zipkin(简单易懂一看就会)(2018-08-10)
之前已经介绍了如何手动搭建一个zipkin,但是那个是很久之前的东西了,没啥技术含量还浪费时间,所以今天就来一个有意思的,好玩的,其实这个也没啥技术含量。233333
https://zipkin.io/pages/quickstart.html
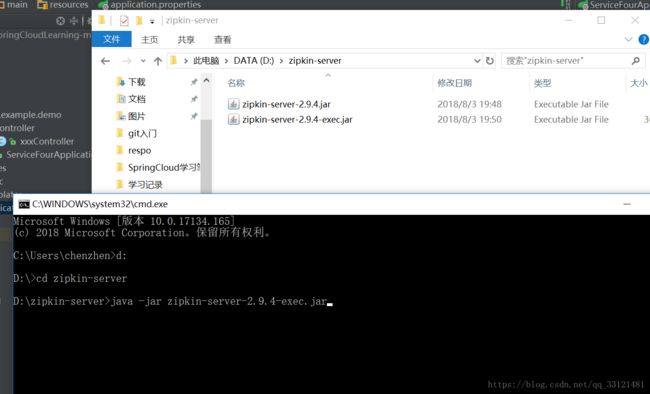
这个是zipkin的官网,我们可以进行下载它的jar包,直接运行。

启动成功后,zipkin默认是在9411端口的,访问
http://localhost:9411/zipkin/
就可以看到zipkin的追踪界面
接下来,我们写两个互相调用的小的demo。
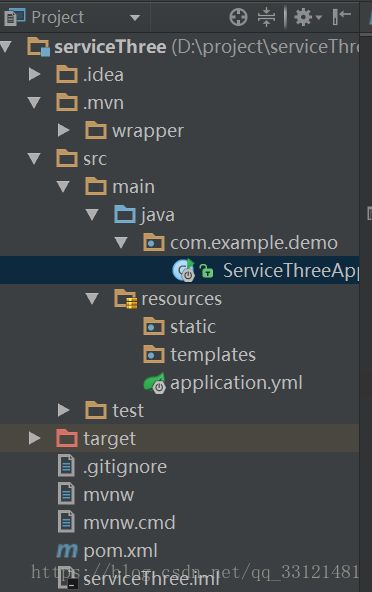
首先是我们的serviceThree.
其整个demo的目录结构如下

pom文件如下。
<project xmlns="http://maven.apache.org/POM/4.0.0" xmlns:xsi="http://www.w3.org/2001/XMLSchema-instance"
    xsi:schemaLocation="http://maven.apache.org/POM/4.0.0 http://maven.apache.org/xsd/maven-4.0.0.xsd">
    <modelVersion>4.0.0modelVersion>

    <groupId>com.examplegroupId>
    <artifactId>demoartifactId>
    <version>0.0.1-SNAPSHOTversion>
    <packaging>jarpackaging>

    <name>serviceThreename>
    <description>Demo project for Spring Bootdescription>

    <parent>
        <groupId>org.springframework.bootgroupId>
        <artifactId>spring-boot-starter-parentartifactId>
        <version>2.0.4.RELEASEversion>
        <relativePath/>
    parent>

    <properties>
        <project.build.sourceEncoding>UTF-8project.build.sourceEncoding>
        <project.reporting.outputEncoding>UTF-8project.reporting.outputEncoding>
        <java.version>1.8java.version>
        <spring-cloud.version>Finchley.SR1spring-cloud.version>
    properties>

    <dependencies>
        <dependency>
            <groupId>org.springframework.bootgroupId>
            <artifactId>spring-boot-starter-webartifactId>
        dependency>

        <dependency>
            <groupId>org.springframework.cloudgroupId>
            <artifactId>spring-cloud-starter-zipkinartifactId>
        dependency>

        <dependency>
            <groupId>org.springframework.bootgroupId>
            <artifactId>spring-boot-starter-testartifactId>
            <scope>testscope>
        dependency>
    dependencies>

    <dependencyManagement>
        <dependencies>
            <dependency>
                <groupId>org.springframework.cloudgroupId>
                <artifactId>spring-cloud-dependenciesartifactId>
                <version>${spring-cloud.version}version>
                <type>pomtype>
                <scope>importscope>
            dependency>
        dependencies>
    dependencyManagement>

    <build>
        <plugins>
            <plugin>
                <groupId>org.springframework.bootgroupId>
                <artifactId>spring-boot-maven-pluginartifactId>
            plugin>
        plugins>
    build>


project>
然后就是application.yml
spring:
  application:
    name: serviceThree
  zipkin:
    base-url: http://localhost:9411


#eureka:
#  client:
#    serviceUrl:
#      defaultZone: http://localhost:9999/eureka/

server:
  port: 7779
注释掉注册中心的原因是,zipkin进行服务追踪的时候并不需要注册中心。
为了方便我就直接在入口函数写了
package com.example.demo;

import brave.sampler.Sampler;
import org.springframework.beans.factory.annotation.Autowired;
import org.springframework.boot.SpringApplication;
import org.springframework.boot.autoconfigure.SpringBootApplication;

import org.springframework.context.annotation.Bean;
import org.springframework.web.bind.annotation.RequestMapping;
import org.springframework.web.bind.annotation.RestController;
import org.springframework.web.client.RestTemplate;


@RestController
@SpringBootApplication
public class ServiceThreeApplication {

    public static void main(String[] args) {
        SpringApplication.run(ServiceThreeApplication.class, args);
    }


    @Autowired
    private RestTemplate restTemplate;

    @Bean
    public RestTemplate getRestTemplate(){
        return new RestTemplate();
    }

    @RequestMapping("/getInfo")
    public String info(){
        return "I'm serviceThree";
    }

    @RequestMapping("/callServiceFour")
    public String callServiceTwo(){
        return restTemplate.getForObject("http://localhost:7780/getInfo",String.class)
                +"form serviceThree";
    }
    @Bean
    public Sampler defaultSampler() {
        return Sampler.ALWAYS_SAMPLE;
    }

}
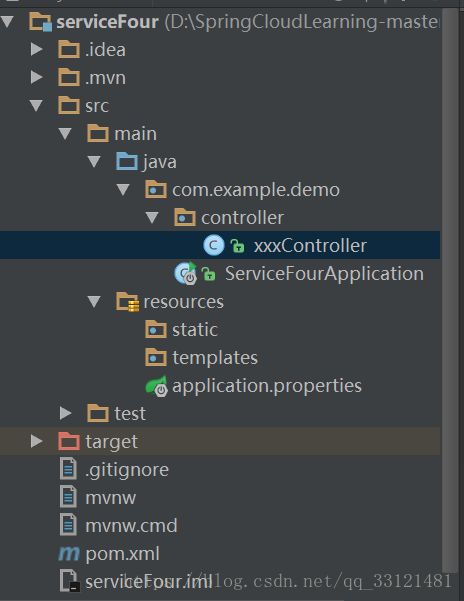
接下来就是serviceFour,这次为了稍微规范一点,改了一下目录结构,这个无所谓的。

然后是pom文件,
<project xmlns="http://maven.apache.org/POM/4.0.0" xmlns:xsi="http://www.w3.org/2001/XMLSchema-instance"
    xsi:schemaLocation="http://maven.apache.org/POM/4.0.0 http://maven.apache.org/xsd/maven-4.0.0.xsd">
    <modelVersion>4.0.0modelVersion>

    <groupId>com.examplegroupId>
    <artifactId>demoartifactId>
    <version>0.0.1-SNAPSHOTversion>
    <packaging>jarpackaging>

    <name>serviceFourname>
    <description>Demo project for Spring Bootdescription>

    <parent>
        <groupId>org.springframework.bootgroupId>
        <artifactId>spring-boot-starter-parentartifactId>
        <version>2.0.4.RELEASEversion>
        <relativePath/>
    parent>

    <properties>
        <project.build.sourceEncoding>UTF-8project.build.sourceEncoding>
        <project.reporting.outputEncoding>UTF-8project.reporting.outputEncoding>
        <java.version>1.8java.version>
        <spring-cloud.version>Finchley.SR1spring-cloud.version>
    properties>

    <dependencies>
        <dependency>
            <groupId>org.springframework.bootgroupId>
            <artifactId>spring-boot-starter-webartifactId>
        dependency>
        <dependency>
            <groupId>org.springframework.cloudgroupId>
            <artifactId>spring-cloud-starter-zipkinartifactId>
        dependency>


        <dependency>
            <groupId>org.springframework.bootgroupId>
            <artifactId>spring-boot-starter-testartifactId>
            <scope>testscope>
        dependency>
    dependencies>

    <dependencyManagement>
        <dependencies>
            <dependency>
                <groupId>org.springframework.cloudgroupId>
                <artifactId>spring-cloud-dependenciesartifactId>
                <version>${spring-cloud.version}version>
                <type>pomtype>
                <scope>importscope>
            dependency>
        dependencies>
    dependencyManagement>

    <build>
        <plugins>
            <plugin>
                <groupId>org.springframework.bootgroupId>
                <artifactId>spring-boot-maven-pluginartifactId>
            plugin>
        plugins>
    build>


project>
然后就是配置文件
spring.application.name=serviceFour
spring.zipkin.base-url=http://localhost:9411
server.port=7780
#eureka.client.service-url.defaultZone=http://localhost:9999/eureka/
之后就是写的测试调用
package com.example.demo.controller;

import brave.sampler.Sampler;
import org.slf4j.Logger;
import org.slf4j.LoggerFactory;
import org.springframework.beans.factory.annotation.Autowired;
import org.springframework.context.annotation.Bean;
import org.springframework.web.bind.annotation.RequestMapping;
import org.springframework.web.bind.annotation.RestController;
import org.springframework.web.client.RestTemplate;

/**
 * Created by chenzhen on 2018/8/7.
 */
@RestController
public class xxxController {

    private Logger logger = LoggerFactory.getLogger(xxxController.class);

    @Autowired
    RestTemplate restTemplate;

    @Bean
    public RestTemplate getRestTemplate(){
        return new RestTemplate();
    }

    @RequestMapping("/getInfo")
    public String getInfo(){
        return "I'm serviceFour";
    }

    @RequestMapping("/callServiceThree")
    public String callServiceThree(){
        return restTemplate.getForObject("http://localhost:7779/getInfo",String.class)
                +" form serviceFour";
    }
    @Bean
    public Sampler defaultSampler() {
        return Sampler.ALWAYS_SAMPLE;
    }
}
两个都写完之后,访问
http://localhost:7780/callServiceThree
http://localhost:7779/callServiceFour
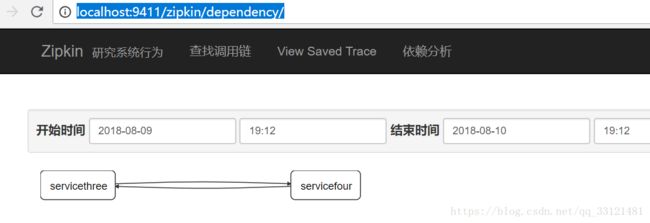
之后再打开zipkin的追踪页面就会发现
http://localhost:9411/zipkin/dependency/

至此,整个小demo的服务依赖关系已经追踪完毕。
但是就目前来看,用zipkin来进行服务链路追踪,对代码有入侵,比如
代码中加的如下的代码就很重要。
@Bean
    public Sampler defaultSampler() {
        return Sampler.ALWAYS_SAMPLE;
    }
还有就是配置文件中需要配置zipkin的url,
spring.zipkin.base-url=http://localhost:9411以及在pom中要引入zipkin依赖
<dependency>
            <groupId>org.springframework.cloudgroupId>
            <artifactId>spring-cloud-starter-zipkinartifactId>
        dependency>
以上三者缺一不可。