VGGNet

论文名称:VERY DEEP CONVOLUTIONAL NETWORKS FOR LARGE-SCALE IMAGE RECOGNITION
开源代码:VGG
VGGNet是2014年ImageNet竞赛的亚军,当年的冠军是GoogleNet,VGGNet主要是从深度方面对卷积神经网络做改进,在它的文章中探讨了很多改进思路的对比,对作者测试过程中的结果也做了总结,而不是只给出一个最终的结果,这是一个比较值得学习的地方。
1.网络整体思路
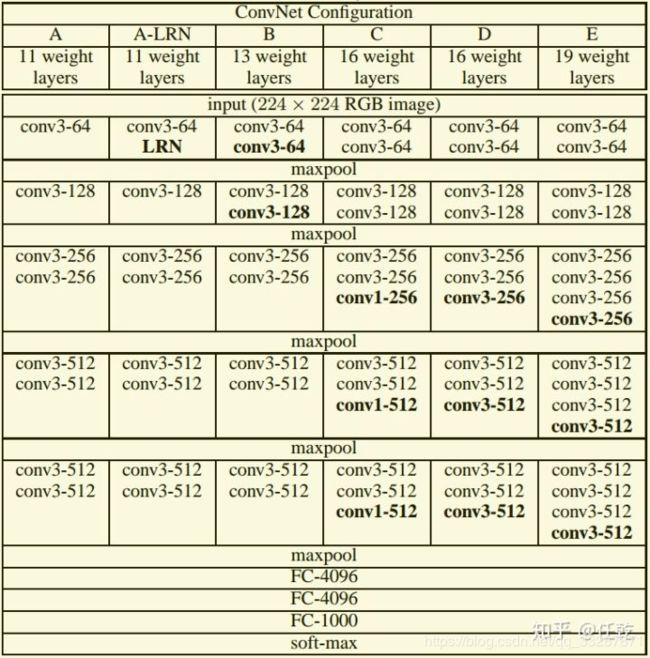
我们先通过一张表看一下VGGNet网络的整体结构

从表中可以看出,VGG是一个框架,它并不是有固定的层数,而是可以根据需要调整某些模块,以实现网络规模和性能的平衡。网络共有5个卷积模块,每个卷积模块后面跟一个池化层,最后是3个全连接层,调整网络规模指的就是调整卷积模块中的卷积层数量和卷积核大小。表中的weight layers的数目指的是所有卷积层和全连接层的数量之和。
A: 11 weight layers = 1 + 1 + 2 + 2 +2 + 3
A-LRN: 11 weight layers = 1 + 1 + 2 + 2 +2 + 3,和A的区别是在第一个卷积模块后面加了个LRN
B: 13 weight layers = 2 + 2 + 2 + 2 + 2 + 3
C: 16 weight layers = 2 + 2 + 3 + 3 + 3 + 3
D: 16 weight layers = 2 + 2 + 3 + 3 + 3 + 3,和C的区别是后三个卷积模块的最后一个卷积层的卷积核大小都从1变成了3
E: 19 weight layers = 2 + 2 + 4 + 4 + 4 + 3
可见,作者的对比思路就是:
1)A和A-LRN对比:分析LRN在网络中的效果
2)A和B对比:分析在网络靠近输入部分增加卷积层数的效果
3)B和C对比:分析在网络靠近输出部分增加卷积层数的效果
4)C和D对比:分析1X1卷积核和3X3卷积核的对比效果
5)D和E对比:分析在网络靠近输出部分增加卷积层数的效果(这个和3)的作用有点像,只是网络进一步加深)
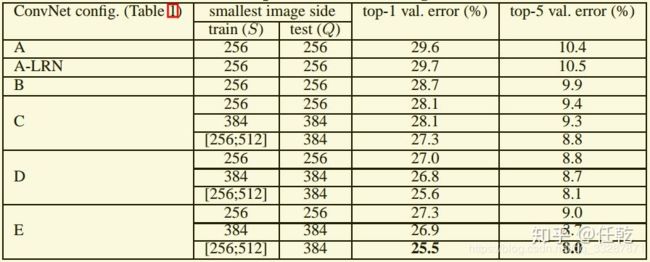
下面就可以通过结果来看以上各个思路的结论,各个网络的对比结果如下:

从这个表中,我们可以对上面5个对比思路下结论:
1)A和A-LRN对比:精度提高0.1%,可以认为精度变化不大,但是LRN操作会增大计算量,所以作者认为在网络中添加LRN意义不大
2)A和B对比:top-1提高0.9%,说明在靠近输入部分增加深度可以提高精度
3)B和C对比:top-1提高0.6%,说明在靠近输出部分增加深度也可以提高精度
4)C和D对比:top-1提高1.1%,说明3X3卷积核的效果要明显由于1X1卷积核的效果
5)D和E对比:top-1下降0.3%,这个我解释不了,不清楚是不是因为网络更深以后,更容易出现过拟合
通过以上各个对比,可以下一个总的结论:
网络深度增加可以提高精度,但是增加到一定程度之后就不适合再增加,增加3X3的卷积核比1X1的效果好。
2.亮点介绍
所谓亮点,就是在作者的论文中首次提出,并通过实验或者理论分析证明过的结论,这些均被运用在最终设计的网络中,主要包括:
1)加深比加宽有优势如果要增大感受野,一般的思路是直接增加卷积核的大小,而作者认为,用小的卷积核串联,不仅同样能起到增大感受野的作用,而且能够减小参数数量,同时由于加深增加了非线性激励的次数,可以提高网络精度。在计算量上,作者做了这样的分析:加入通道数是C,如果使用7X7的卷积核,需要的参数数量就是(7C)(7C) = 49 ,而用3个3X3的卷积层串联,同样能达到7X7的感受野,但参数数量变成了3(3C)*(3C)=27 ,数量只是前者的55%。
2)卷积代替全连接
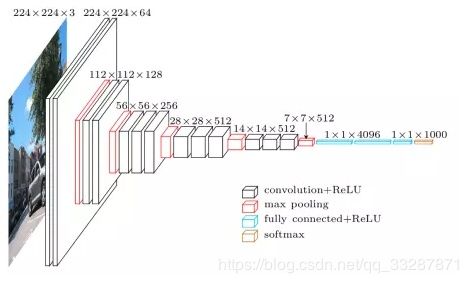
VGGNet的特征图如下

从图中可以看出,它的特征图的空间分辨率单调递减,通道数单调增加。这样做是合理的。对于卷积神经网络而言,输入图像的维度是HxWx3(彩色图)或者是HxWx1(灰度图),而最后的全连接层的输出是一个1x1xC的向量,C等于分类的类别数(例如ImageNet中的1000类)。如何从一个HxWx3或HxWx1的图像转换到1x1xC的向量呢?上文所说的VGGNet的特点就是答案:特征图的空间分辨率单调递减,特征图的通道数单调递增,使得输入图像在维度上流畅地转换到分类向量。用于相同ImageNet图像分类任务的AlexNet的通道数无此规律,而GoogLeNet和Resnet均遵循此维度变化的规律。3.参数数量计算VGGNet的参数所占内存是144M,具体的计算可以参考下面的提示。
INPUT: [224x224x3]        memory:  224*224*3=150K   weights: 0
CONV3-64: [224x224x64]  memory:  224*224*64=3.2M   weights: (3*3*3)*64 = 1,728
CONV3-64: [224x224x64]  memory:  224*224*64=3.2M   weights: (3*3*64)*64 = 36,864
POOL2: [112x112x64]  memory:  112*112*64=800K   weights: 0
CONV3-128: [112x112x128]  memory:  112*112*128=1.6M   weights: (3*3*64)*128 = 73,728
CONV3-128: [112x112x128]  memory:  112*112*128=1.6M   weights: (3*3*128)*128 = 147,456
POOL2: [56x56x128]  memory:  56*56*128=400K   weights: 0
CONV3-256: [56x56x256]  memory:  56*56*256=800K   weights: (3*3*128)*256 = 294,912
CONV3-256: [56x56x256]  memory:  56*56*256=800K   weights: (3*3*256)*256 = 589,824
CONV3-256: [56x56x256]  memory:  56*56*256=800K   weights: (3*3*256)*256 = 589,824
POOL2: [28x28x256]  memory:  28*28*256=200K   weights: 0
CONV3-512: [28x28x512]  memory:  28*28*512=400K   weights: (3*3*256)*512 = 1,179,648
CONV3-512: [28x28x512]  memory:  28*28*512=400K   weights: (3*3*512)*512 = 2,359,296
CONV3-512: [28x28x512]  memory:  28*28*512=400K   weights: (3*3*512)*512 = 2,359,296
POOL2: [14x14x512]  memory:  14*14*512=100K   weights: 0
CONV3-512: [14x14x512]  memory:  14*14*512=100K   weights: (3*3*512)*512 = 2,359,296
CONV3-512: [14x14x512]  memory:  14*14*512=100K   weights: (3*3*512)*512 = 2,359,296
CONV3-512: [14x14x512]  memory:  14*14*512=100K   weights: (3*3*512)*512 = 2,359,296
POOL2: [7x7x512]  memory:  7*7*512=25K  weights: 0
FC: [1x1x4096]  memory:  4096  weights: 7*7*512*4096 = 102,760,448
FC: [1x1x4096]  memory:  4096  weights: 4096*4096 = 16,777,216
FC: [1x1x1000]  memory:  1000 weights: 4096*1000 = 4,096,000

TOTAL memory: 24M * 4 bytes ~= 93MB / image (only forward! ~*2 for bwd)
TOTAL params: 138M parameters
源码分析:github链接是:添加链接描述
这个代码中同时包含了VGG-16和VGG-19,两个网络整体结构差不多,所以我们只对VGG-16的代码做介绍。
网络结构的代码如下:
import inspect
import os

import numpy as np
import tensorflow as tf
import time

VGG_MEAN = [103.939, 116.779, 123.68]


class Vgg16:
    def __init__(self, vgg16_npy_path=None):
        if vgg16_npy_path is None:
            path = inspect.getfile(Vgg16)
            path = os.path.abspath(os.path.join(path, os.pardir))
            path = os.path.join(path, "vgg16.npy")
            vgg16_npy_path = path
            print(path)

        self.data_dict = np.load(vgg16_npy_path, encoding='latin1').item()
        print("npy file loaded")
    # 生成网络
    def build(self, rgb):
        """
        load variable from npy to build the VGG
        :param rgb: rgb image [batch, height, width, 3] values scaled [0, 1]
        """

        start_time = time.time()
        print("build model started")
        rgb_scaled = rgb * 255.0

        # 转换图片格式,从 RGB 转到 BGR
        red, green, blue = tf.split(axis=3, num_or_size_splits=3, value=rgb_scaled)
        assert red.get_shape().as_list()[1:] == [224, 224, 1]
        assert green.get_shape().as_list()[1:] == [224, 224, 1]
        assert blue.get_shape().as_list()[1:] == [224, 224, 1]
        bgr = tf.concat(axis=3, values=[
            blue - VGG_MEAN[0],
            green - VGG_MEAN[1],
            red - VGG_MEAN[2],
        ])
        assert bgr.get_shape().as_list()[1:] == [224, 224, 3]

        # 第一个卷积模块,包含两个卷积层
        self.conv1_1 = self.conv_layer(bgr, "conv1_1")
        self.conv1_2 = self.conv_layer(self.conv1_1, "conv1_2")
        # 池化
        self.pool1 = self.max_pool(self.conv1_2, 'pool1')

        # 第二个卷积模块,包含两个卷积层
        self.conv2_1 = self.conv_layer(self.pool1, "conv2_1")
        self.conv2_2 = self.conv_layer(self.conv2_1, "conv2_2")
        # 池化
        self.pool2 = self.max_pool(self.conv2_2, 'pool2')

        # 第三个卷积模块,包含三个卷积层
        self.conv3_1 = self.conv_layer(self.pool2, "conv3_1")
        self.conv3_2 = self.conv_layer(self.conv3_1, "conv3_2")
        self.conv3_3 = self.conv_layer(self.conv3_2, "conv3_3")
        # 池化
        self.pool3 = self.max_pool(self.conv3_3, 'pool3')

        # 第四个卷积模块,包含三个卷积层
        self.conv4_1 = self.conv_layer(self.pool3, "conv4_1")
        self.conv4_2 = self.conv_layer(self.conv4_1, "conv4_2")
        self.conv4_3 = self.conv_layer(self.conv4_2, "conv4_3")
        # 池化
        self.pool4 = self.max_pool(self.conv4_3, 'pool4')

        # 第五个卷积模块,包含三个卷积层
        self.conv5_1 = self.conv_layer(self.pool4, "conv5_1")
        self.conv5_2 = self.conv_layer(self.conv5_1, "conv5_2")
        self.conv5_3 = self.conv_layer(self.conv5_2, "conv5_3")
        # 池化
        self.pool5 = self.max_pool(self.conv5_3, 'pool5')

        # 全连接层1
        self.fc6 = self.fc_layer(self.pool5, "fc6")
        assert self.fc6.get_shape().as_list()[1:] == [4096]
        self.relu6 = tf.nn.relu(self.fc6)

        # 全连接层2
        self.fc7 = self.fc_layer(self.relu6, "fc7")
        self.relu7 = tf.nn.relu(self.fc7)

        # 全连接层3
        self.fc8 = self.fc_layer(self.relu7, "fc8")

        # softmax 输出分类
        self.prob = tf.nn.softmax(self.fc8, name="prob")

        self.data_dict = None
        print(("build model finished: %ds" % (time.time() - start_time)))

    # 平均池化
    def avg_pool(self, bottom, name):
        return tf.nn.avg_pool(bottom, ksize=[1, 2, 2, 1], strides=[1, 2, 2, 1], padding='SAME', name=name)

    # 最大池化
    def max_pool(self, bottom, name):
        return tf.nn.max_pool(bottom, ksize=[1, 2, 2, 1], strides=[1, 2, 2, 1], padding='SAME', name=name)

    # 自定义卷积层函数
    def conv_layer(self, bottom, name):
        with tf.variable_scope(name):
            filt = self.get_conv_filter(name)

            conv = tf.nn.conv2d(bottom, filt, [1, 1, 1, 1], padding='SAME')

            conv_biases = self.get_bias(name)
            bias = tf.nn.bias_add(conv, conv_biases)

            relu = tf.nn.relu(bias)
            return relu

    # 自定义全连接层函数
    def fc_layer(self, bottom, name):
        with tf.variable_scope(name):
            shape = bottom.get_shape().as_list()
            dim = 1
            for d in shape[1:]:
                dim *= d
            x = tf.reshape(bottom, [-1, dim])

            weights = self.get_fc_weight(name)
            biases = self.get_bias(name)

            # Fully connected layer. Note that the '+' operation automatically
            # broadcasts the biases.
            fc = tf.nn.bias_add(tf.matmul(x, weights), biases)

            return fc

    def get_conv_filter(self, name):
        return tf.constant(self.data_dict[name][0], name="filter")

    def get_bias(self, name):
        return tf.constant(self.data_dict[name][1], name="biases")

    def get_fc_weight(self, name):
        return tf.constant(self.data_dict[name][0], name="weights")
网络测试的执行文件代码如下:
作者:任乾
链接:https://zhuanlan.zhihu.com/p/73805739
来源:知乎
著作权归作者所有。商业转载请联系作者获得授权,非商业转载请注明出处。

import numpy as np
import tensorflow as tf

import vgg16
import utils

img1 = utils.load_image("./test_data/tiger.jpeg")
img2 = utils.load_image("./test_data/puzzle.jpeg")

batch1 = img1.reshape((1, 224, 224, 3))
batch2 = img2.reshape((1, 224, 224, 3))

batch = np.concatenate((batch1, batch2), 0)

# with tf.Session(config=tf.ConfigProto(gpu_options=(tf.GPUOptions(per_process_gpu_memory_fraction=0.7)))) as sess:
with tf.device('/cpu:0'):
    with tf.Session() as sess:
        images = tf.placeholder("float", [2, 224, 224, 3])
        feed_dict = {images: batch}

        # 调用网络
        vgg = vgg16.Vgg16()
        with tf.name_scope("content_vgg"):
            # 创建网络模型
            vgg.build(images)

        # 运行网络,并返回结果
        prob = sess.run(vgg.prob, feed_dict=feed_dict)
        print(prob)
        utils.print_prob(prob[0], './synset.txt')
        utils.print_prob(prob[1], './synset.txt')
参考:
https://www.zhihu.com/people/ren-gan-16/posts?page=8