【TensorFlow2.0】张量的索引&切片、维度变换、广播机制、数学运算、前向传播实战
文章目录
- 一、索引与切片
- 1.1 索引
- 1.2 切片
- 二、维度变换
- 2.1 改变视图reshape
- 2.2 增删维度
- 2.3 交换维度transpose
- 2.4 复制数据tile
- 三、Broadcasting
- 四、数学运算
- 4.1 加、减、乘、除运算
- 4.2 乘方运算
- 4.3 指数和对数运算
- 4.4 矩阵相乘
- 五、前向传播实战
一、索引与切片
通过索引与切片操作可以提取张量的部分数据。
1.1 索引
import tensorflow as tf
#创建shape为【4,32,32,3】的张量,表示4张彩色图片
x=tf.random.normal([4,32,32,3])
'''
x代表四张图片的张量,形状为(4,32,32,3)索引方式:
    x[0]读第一个图片
    x[0][1]读取第一张图片的第二行像素
    x[2][3][1]读取第三张图片的第四行第一列像素
    x[1][2][3][2]读取第二章图片,第三行,第四列第3通道的数据

    维数较高时:x[i][j]...[k]可以写成x[i,j,...k]
'''

'''读取第一张图片'''
print(x[0])#shape为(32,32,3)
# tf.Tensor(
# [[[-0.600948    1.6635281   0.14328034]
#   [ 0.58177394  0.10810173  0.90349156]
#   [ 0.4779166   1.1766691  -0.7581653 ]
#   ...
#   [ 0.11189133  0.31094697  0.5574308 ]
#   [-0.6126091   1.1173424  -0.7959514 ]
#   [ 0.72426957 -0.25512362 -1.2790121 ]]], shape=(32, 32, 3), dtype=float32)

'''读取第1张图片的第2行'''
print(x[0][1])#shape(32, 3)
# tf.Tensor(
# [[ 1.0022326  -1.1242224  -1.7169887 ]
#  [-0.31862545 -0.76167876 -1.6511184 ]
# ...
#  [-1.49326     2.2508385  -0.07440948]
#  [ 0.51081806 -1.2449898   0.34478065]
#  [ 1.0149834  -0.08061621  0.3788385 ]], shape=(32, 3), dtype=float32)
'''读取第1张图片的第2行,第3列'''
print(x[0][1][2])
#tf.Tensor([-1.2239455 -1.2028881 -1.2292697], shape=(3,), dtype=float32)
'''读取第1张图片的第2行,第3列,第2个通道'''
print(x[0][1][2][1])
#tf.Tensor(-0.5858954, shape=(), dtype=float32)
1.2 切片
通过start:end:step切片方式方便的提取一段数据。


import tensorflow as tf
'''
	start:end:step形式切片数据
	简易表示使用:...
'''

'''(1)正序切片:'''
#创建shape为【4,32,32,3】的张量,表示4张彩色图片
x=tf.random.normal([4,32,32,3])
#读取第2,3张图片'''
print(x[1:3])#shape(2, 32, 32, 3)
#读取第一张图片的所有行,等价于x[0]'''
print(x[0,::])
#读取所有图片,隔行取样,隔列采样,读取所有通道'''
print(x[:,::2,::2,:])

'''(2)逆序切片:'''
#step可以是负数:step为负数表示从star逆序读取到end,索引号end<=start'''
x=tf.range(9)
print(x[8:0:-1])#tf.Tensor([8 7 6 5 4 3 2 1], shape=(8,), dtype=int32)
#逆序读取所有元素'''
print(x[::-1])#tf.Tensor([8 7 6 5 4 3 2 1 0], shape=(9,), dtype=int32)
#逆序间隔采样'''
print(x[::-2])#tf.Tensor([8 6 4 2 0], shape=(5,), dtype=int32)

'''(3)切片:使用。。。'''
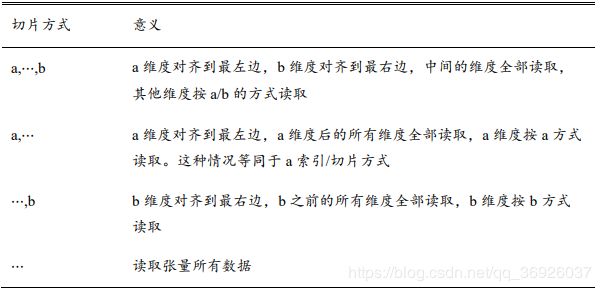
'''为了避免出现想像[:,:,:,:,2]的情况,使用...符号表示读取多个维度上的所有数据'''
#创建shape为【4,32,32,3】的张量,表示4张彩色图片
x=tf.random.normal([4,32,32,3])
#读取第1通道的数据
print(x[:,:,:,1])
print(x[...,1])
#读取第二张图片的1和2通道的数据
print(x[1,...,0:2])
#读取最后两张图片
print(x[2:,...])
#读取第2、3通道的数据
print(x[...,1:2])
二、维度变换
神经网络中维度变换是最核心的张量操作,算法的每个模块对于数据张量的格式有不同的逻辑要求,当现有的数据格式不满足算法要求时,通过维度变换将数据调整为正确的格式。
基本的维度变换操作:改变视图reshape、插入新维度expand_dims、删除维度squeeze、交换维度transpose、复制数据tile
2.1 改变视图reshape
张量的存储和视图:
(1)张量的存储:体现在张量在内存上保存为一段连续的内存区域。在存储数据时内存并不支持维度的概念,而是将数据以平铺的方式写入内存。
(2)张量的视图:同一存储,从不同的角度观察数据,可以产生不同的视图。维度的概念是在视图下定义的。改变视图reshape仅仅是改变张量的理解方式,不改变存储
语法:tf.reshape(数据,形状)
import tensorflow as tf
x=tf.range(96)#生成向量
print(x)
# tf.Tensor(
# [ 0  1  2  3  4  5  6  7  8  9 10 11 12 13 14 15 16 17 18 19 20 21 22 23
#  24 25 26 27 28 29 30 31 32 33 34 35 36 37 38 39 40 41 42 43 44 45 46 47
#  48 49 50 51 52 53 54 55 56 57 58 59 60 61 62 63 64 65 66 67 68 69 70 71
#  72 73 74 75 76 77 78 79 80 81 82 83 84 85 86 87 88 89 90 91 92 93 94 95], shape=(96,), dtype=int32)


#改变视图;获得4维张量
x=tf.reshape(x,[2,4,4,3])
print(x.ndim,x.shape)#4 (2, 4, 4, 3)
print(x)
# tf.Tensor(
# [[[[ 0  1  2]
#    [ 3  4  5]
#    [ 6  7  8]
#    [ 9 10 11]]
#
#   [[12 13 14]
#    [15 16 17]
#    [18 19 20]
#    [21 22 23]]
#
#   [[24 25 26]
#    [27 28 29]
#    [30 31 32]
#    [33 34 35]]
#
#   [[36 37 38]
#    [39 40 41]
#    [42 43 44]
#    [45 46 47]]]
#
#
#  [[[48 49 50]
#    [51 52 53]
#    [54 55 56]
#    [57 58 59]]
#
#   [[60 61 62]
#    [63 64 65]
#    [66 67 68]
#    [69 70 71]]
#
#   [[72 73 74]
#    [75 76 77]
#    [78 79 80]
#    [81 82 83]]
#
#   [[84 85 86]
#    [87 88 89]
#    [90 91 92]
#    [93 94 95]]]], shape=(2, 4, 4, 3), dtype=int32)


#改变视图;生成指定行,自动推导数量列的张量
x=tf.reshape(x,[2,-1])
print(x.shape)#(2, 48)
print(x)
# tf.Tensor(
# [[ 0  1  2  3  4  5  6  7  8  9 10 11 12 13 14 15 16 17 18 19 20 21 22 23
#   24 25 26 27 28 29 30 31 32 33 34 35 36 37 38 39 40 41 42 43 44 45 46 47]
#  [48 49 50 51 52 53 54 55 56 57 58 59 60 61 62 63 64 65 66 67 68 69 70 71
#   72 73 74 75 76 77 78 79 80 81 82 83 84 85 86 87 88 89 90 91 92 93 94 95]], shape=(2, 48), dtype=int32)

x=tf.reshape(x,[2,-1,3])
print(x.shape)#(2, 16, 3)
print(x)
# tf.Tensor(
# [[[ 0  1  2]
#   [ 3  4  5]
#   [ 6  7  8]
#   [ 9 10 11]
#   [12 13 14]
#   [15 16 17]
#   [18 19 20]
#   [21 22 23]
#   [24 25 26]
#   [27 28 29]
#   [30 31 32]
#   [33 34 35]
#   [36 37 38]
#   [39 40 41]
#   [42 43 44]
#   [45 46 47]]
#
#  [[48 49 50]
#   [51 52 53]
#   [54 55 56]
#   [57 58 59]
#   [60 61 62]
#   [63 64 65]
#   [66 67 68]
#   [69 70 71]
#   [72 73 74]
#   [75 76 77]
#   [78 79 80]
#   [81 82 83]
#   [84 85 86]
#   [87 88 89]
#   [90 91 92]
#   [93 94 95]]], shape=(2, 16, 3), dtype=int32)
2.2 增删维度
(1)增加维度expand_dims:增加维度只能是增加长度为1的维度。仅仅是改变数据的理解方式,可以理解为改变视图的一种方式,并不改变数据的存储。
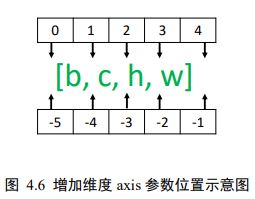
语法:tf.expand_dims(数据,axis=) 当axis为正时,表示在当前维度axis之前插入一个新维度

import tensorflow as tf
#生成矩阵
x=tf.random.uniform([28,28],maxval=10,dtype=tf.int32)
print(x.shape)#(28, 28)
print(x)

#在指定维度之前插入一个新维度
x=tf.expand_dims(x,axis=2)
print(x.shape)#(28, 28, 1)
print(x)

x=tf.expand_dims(x,axis=0)
print(x.shape)#(1, 28, 28, 1)
print(x)#
(2)删除维度squeeze:增加维度的逆操作,删除维度只能删除长度为1的维度。仅仅是改变数据的理解方式,可以理解为改变视图的一种方式,并不改变数据的存储。
语法:tf.squeeze(数据,axis=) axis参数表示待删除的维度的索引号。如果不指定维度参数,默认删除所有维度为1的维度。
import tensorflow as tf
#生成矩阵,代表图片
x=tf.random.uniform([1,28,28,1],maxval=10,dtype=tf.int32)
print(x.shape)#(1, 28, 28, 1)

'''指定维度删除某维度为1的维度'''
#删除图片数量的维度
x=tf.squeeze(x,axis=0)
print(x.shape)#(28, 28, 1)

#删除图片通道的维度
x=tf.squeeze(x,axis=2)
print(x.shape)#(28, 28)

'''不指定维度删除所有维度为1的维度'''
x=tf.random.uniform([1,28,28,1],maxval=10,dtype=tf.int32)
print(x.shape)#(1, 28, 28, 1)
x=tf.squeeze(x)
print(x.shape)#(28, 28)
2.3 交换维度transpose
改变视图reshape和增删维度(expand_dims/squeeze)都不改变张量的存储。通过交换维度,改变了张量的存储顺序,同时也改变了张量的视图。
案例:张量的默认存储格式为通道后行格式:【b,h,w,c】,但是部分库的图片格式是通道先行格式:【b,c,h,w】,因此需要维度交换。
语法:tf.transpose(数据,perm) ,perm表示新维度的顺序list。
import tensorflow as tf
#生成矩阵,代表图片
x=tf.random.normal([2,32,32,3])
print(x.shape)#(2, 32, 32, 3)
#交换维度
x=tf.transpose(x,[0,3,1,2])
print(x.shape)#(2, 3, 32, 32)
2.4 复制数据tile
在指定维度上,进行数据的复制。注意tile会创建一个新的张量来保存复制后的张量
语法:tf.tile(x,multiples),在指定维度上复制数据,multiples分别指定了每个维度上的复制倍数。1时表示不复制,2表示为原来的2倍…。
import tensorflow as tf
'''例1:'''
#创建向量b
b=tf.constant([1,2])
print(b)#tf.Tensor([1 2], shape=(2,), dtype=int32)
#为b增加维度
b=tf.expand_dims(b,axis=0)
print(b)#tf.Tensor([[1 2]], shape=(1, 2), dtype=int32)

#在0维度上复制数据一份
b=tf.tile(b,multiples=[2,1])#0维度上复制1倍,1维度上不变
print(b)
# [[1 2]
#  [1 2]], shape=(2, 2), dtype=int32)

'''例2:'''
#生成矩阵
x=tf.range(4)
x=tf.reshape(x,[2,2])
print(x)
# #[[0 1]
#  [2 3]], shape=(2, 2), dtype=int32)
#列维度复制一份数据
x=tf.tile(x,[1,2])
print(x)
# tf.Tensor(
# [[0 1 0 1]
#  [2 3 2 3]], shape=(2, 4), dtype=int32)
#行维度复制一份数据
x=tf.tile(x,multiples=[2,1])
print(x)
# tf.Tensor(
# [[0 1 0 1]
#  [2 3 2 3]
#  [0 1 0 1]
#  [2 3 2 3]], shape=(4, 4), dtype=int32)
三、Broadcasting
Broadcasting称为广播机制,他是一种轻量级的张量复制手段。title复制时会创建一个新的张量,broadcasting并不会立即复制数据,他会在逻辑上改变张量的形状,使得视图上变成了复制后的形状。
语法:(1)自动调用(2)手动创建tf.broadcast_to(x,new_shape)
import tensorflow as tf
x=tf.random.normal([2,4])
w=tf.random.normal([4,3])

b=tf.random.normal([3])#创建长度为3的向量
#自动调用广播机制
y=x@w+b#不同shape的张量直接相加
#手动调用广播机制
y=x@w+tf.broadcast_to(b,[2,3])
四、数学运算
4.1 加、减、乘、除运算
- 1.加:tf.add(a,b) 或 a+b
- 2.减:tf.subtract(a,b) 或 a-b
- 3.乘:tf.multiply(a,b) 或 a*b
- 4.除:tf.divide(a,b) 或a/b
- 5.整除://
- 6.求余:%
4.2 乘方运算
语法:通过tf.pow(x,a)或者 x**a 完成x的a次乘方操作。通过设置指数为1/a形式,实现根号运算。
特例:tf.square()平方运算,tf.sqrt()平方根运算
import tensorflow as tf
x=tf.range(4)
print(x)#tf.Tensor([0 1 2 3], shape=(4,), dtype=int32)

#乘方运算
x1=tf.pow(x,3)
x2=x**3
print(x1)#tf.Tensor([ 0  1  8 27], shape=(4,), dtype=int32)
print(x2)#tf.Tensor([ 0  1  8 27], shape=(4,), dtype=int32)

#根号运算
x=tf.constant([1.0,4.0,9.0])
x1=tf.pow(x,0.5)
x2=x**0.5
print(x1)#tf.Tensor([1. 2. 3.], shape=(3,), dtype=float32)
print(x2)#tf.Tensor([1. 2. 3.], shape=(3,), dtype=float32)

#常见平方,平方根运算
x=range(5)
x=tf.cast(x,dtype=tf.float32)#类型转换
x1=tf.square(x)
x2=tf.sqrt(x)
print(x1)#tf.Tensor([ 0.  1.  4.  9. 16.], shape=(5,), dtype=float32)
print(x2)#tf.Tensor([0.        1.        1.4142135 1.7320508 2.       ], shape=(5,), dtype=float32)
4.3 指数和对数运算
(1)指数运算:tf.pow(a,x)或者a**x,对于自然指数可以使用tf.exp(x)实现。
(2)对数运算:tf.math.log(x)表示以e为底的对数,可以通过tf.math.log(x)和换底公式实现任何底数的对数。
import tensorflow as tf
x=tf.constant([1.,2.,3.])
#指数运算
x1=2**x
x2=tf.pow(2,x)
print(x1)#tf.Tensor([2. 4. 8.], shape=(3,), dtype=float32)
print(x2)#tf.Tensor([2. 4. 8.], shape=(3,), dtype=float32)
#自然指数
x3=tf.exp(x)
print(x3)#tf.Tensor([ 2.7182817  7.389056  20.085537 ], shape=(3,), dtype=float32)
#自然对数
x4=tf.math.log(x)
print(x4)#tf.Tensor([0.        0.6931472 1.0986123], shape=(3,), dtype=float32)
#任意对数《通过换底公式实现》
x=tf.constant([1.,2.])
x=10**x
x5=tf.math.log(x)/tf.math.log(10.0)#换底公式实现以10为底x的对数
print(x5)#tf.Tensor([1. 2.], shape=(2,), dtype=float32)
4.4 矩阵相乘
矩阵相乘的条件:
A和B两个矩阵能够相乘的条件是A的倒数第一个维度长度(列)和B的倒数第二个维度(行)必须相等。
矩阵相乘语法:
(1)通过@实现两个矩阵的相乘
(2)tf.matmul(a,b)
import tensorflow as tf

#批量形式的矩阵相乘
a=tf.random.normal([4,3,28,32])
b=tf.random.normal([4,3,32,2])
c=a@b
print(c)

#自动扩展再矩阵相乘
a=tf.random.normal([4,28,32])
b=tf.random.normal([32,16])
c=tf.matmul(a,b)
print(c)
五、前向传播实战
利用学过的创建张量、张量索引与切片、维度变换和常见数学运算等操作实现三层神经网络,数据集是minist手写数据集。
import matplotlib.pyplot as plt
import tensorflow as tf
import tensorflow.keras.datasets as datasets
plt.rcParams['font.size'] = 16
plt.rcParams['font.family'] = ['STKaiti']
plt.rcParams['axes.unicode_minus'] = False


'''数据集加载与预处理'''
def load_data():
    # 加载 MNIST 数据集
    (x, y), (x_val, y_val) = datasets.mnist.load_data()
    # 转换为浮点张量, 并缩放到-1~1
    x = tf.convert_to_tensor(x, dtype=tf.float32) / 255.
    # 转换为整形张量
    y = tf.convert_to_tensor(y, dtype=tf.int32)
    # one-hot 编码
    y = tf.one_hot(y, depth=10)
    # 改变视图, [b, 28, 28] => [b, 28*28],将张量调整为向量特征,便于网络输入
    x = tf.reshape(x, (-1, 28 * 28))

    # 构建数据集对象,tf.data.Dataset.from_tensor_slices加载数据集。
    train_dataset = tf.data.Dataset.from_tensor_slices((x, y))
    # 批量训练
    train_dataset = train_dataset.batch(200)
    return train_dataset#返回批量的数据集,将数据设置成批量的形式


'''权重参数定义:定义为变量variable,因为权重张量需要梯度进行优化'''
def init_paramaters():
    # 每层的张量都需要被优化,故使用 Variable 类型,并使用截断的正太分布初始化权值张量
    # 偏置向量初始化为 0 即可
    # 第一层的参数
    w1 = tf.Variable(tf.random.truncated_normal([784, 256], stddev=0.1))#第一层输出节点数256
    b1 = tf.Variable(tf.zeros([256]))
    # 第二层的参数
    w2 = tf.Variable(tf.random.truncated_normal([256, 128], stddev=0.1))#第二层输出节点数128
    b2 = tf.Variable(tf.zeros([128]))
    # 第三层的参数
    w3 = tf.Variable(tf.random.truncated_normal([128, 10], stddev=0.1))#第三层输出节点数10
    b3 = tf.Variable(tf.zeros([10]))
    return w1, b1, w2, b2, w3, b3


'''训练函数:更新权重参数'''
def train_epoch(epoch, train_dataset, w1, b1, w2, b2, w3, b3, lr=0.001):
    for step, (x, y) in enumerate(train_dataset):#加载批量的数据
        with tf.GradientTape() as tape:#前项计算包裹在tf.GradientTape() 的上下文,使得前项计算时能够保存计算图,方便自动求导。
            # 第一层计算, [b, 784]@[784, 256] + [256] => [b, 256] + [256] => [b,256] + [b, 256]
            h1 = x @ w1 + tf.broadcast_to(b1, (x.shape[0], 256))
            h1 = tf.nn.relu(h1)  # 通过激活函数

            # 第二层计算, [b, 256] => [b, 128]
            h2 = h1 @ w2 + b2
            h2 = tf.nn.relu(h2)
            # 输出层计算, [b, 128] => [b, 10]
            out = h2 @ w3 + b3

            # 计算网络输出与标签之间的均方差, mse = mean(sum(y-out)^2)
            # [b, 10]
            loss = tf.square(y - out)
            # 误差标量, mean: scalar
            loss = tf.reduce_mean(loss)

            # 自动梯度,需要求梯度的张量有[w1, b1, w2, b2, w3, b3]
            grads = tape.gradient(loss, [w1, b1, w2, b2, w3, b3])

        # 梯度更新, assign_sub 将当前值减去参数值,原地更新
        w1.assign_sub(lr * grads[0])
        b1.assign_sub(lr * grads[1])
        w2.assign_sub(lr * grads[2])
        b2.assign_sub(lr * grads[3])
        w3.assign_sub(lr * grads[4])
        b3.assign_sub(lr * grads[5])

        if step % 100 == 0:
            print(epoch, step, 'loss:', loss.numpy())
    return loss.numpy()#返回标量的损失

'''网络训练:'''
def train(epochs):
    losses = []#损失值列表
    train_dataset = load_data()#加载数据集
    w1, b1, w2, b2, w3, b3 = init_paramaters()#定义权重
    for epoch in range(epochs):#训练epoch次
        loss = train_epoch(epoch, train_dataset, w1, b1, w2, b2, w3, b3, lr=0.001)#返回训练一次的损失
        losses.append(loss)

    x = [i for i in range(0, epochs)]
    # 绘制曲线
    plt.plot(x, losses, color='blue', marker='s', label='训练')
    plt.xlabel('Epoch')
    plt.ylabel('MSE')
    plt.legend()
    plt.savefig('MNIST数据集的前向传播训练误差曲线.png')
    plt.close()
if __name__ == '__main__':
    train(epochs=20)