springboot-分布式实例开发(三)
文章目录
- 1.商品发布实现
- 1.1商品分类实现
- 1.1.1 业务需求
- 1.1.2 商品分类信息数据库如何存储
- 1.1.3 EasyUI的树形结构
- 1.1.4代码实现
- 1.2 商品新增实现(商品图片上传单独讲解,此节教程先忽略)
- 1.3 商品编辑
- 1.4 1.5 商品上架/下架
- GitHub地址
- 总结
上一个教程我们实现了商品的展示和商品类型的展示,本文教程就要实现商品的发布。
1.商品发布实现
1.1商品分类实现
1.1.1 业务需求
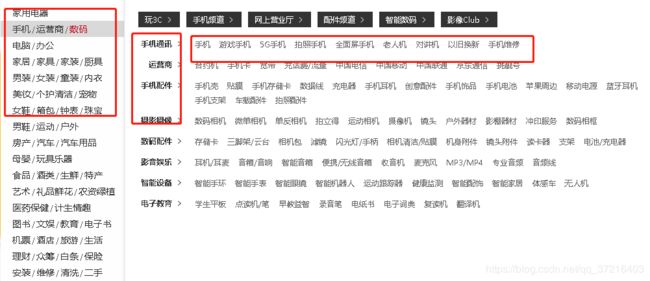
说明:一般电商网站商品分类信息都为三级.如果多了或者少了都影响用户的体验.
1.1.2 商品分类信息数据库如何存储
说明:一般有子父级关系的数据结构通过一张表进行维护.通过parent的字段维护子父级关系.
1.1.3 EasyUI的树形结构
详细教程可以查看官网开发文档 http://www.jeasyui.net/plugins/185.html.
<script type="text/javascript">
	/*通过js创建树形结构 */
	$(function(){
		//ajax请求
		$("#tree").tree({
			url:"tree.json",		//加载远程JSON数据
			method:"get",			//请求方式  POST
			animate:true,			//表示显示折叠端口动画效果
			checkbox:true,			//表述复选框
			lines:false,				//表示显示连接线
			dnd:true,				//是否拖拽
			onClick:function(node){	//添加点击事件

				//控制台
				console.info(node);
			}
		});
	})
</script>
</head>
	<body>
		<h1>EasyUI-树形结构</h1>

		<ul id="tree"></ul>
	</body>
我们在IndexController中加入:
	/**
	 * 用于看easyUIdemo
	 * @param modelName
	 * @return
	 */
	@RequestMapping("/easy-ui/{modelName}")
	public String easyUI(@PathVariable String modelName) {
		return "/easy-ui/"+modelName;
	}
页面从GitHub上下载下来即可:https://github.com/lmy1965673628/jingtao.git.
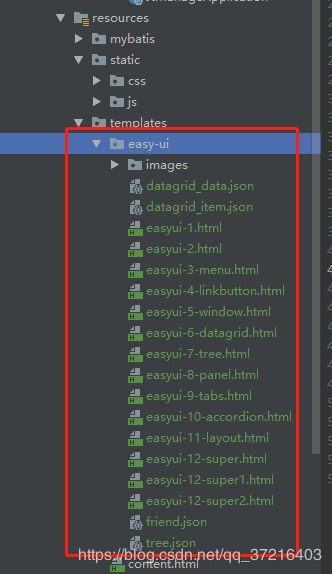 查看效果:
查看效果:

我们分析一下tree.json这个文件:
[
	{
		"id":"1",
		"text":"英雄联盟",
		"iconCls":"icon-save",
		"children":[
			{
				"id":"4",
				"text":"沙漠死神"
			},{
				"id":"5",
				"text":"德玛西亚"
			},{
				"id":"6",
				"text":"诺克萨斯之手"
			},
			{
				"id":"7",
				"text":"蛮族之王"
			},
			{
				"id":"8",
				"text":"孙悟空"
			}
		],
		"state":"open"
	},{
		"id":"2",
		"text":"王者荣耀",
		"children":[
			{
				"id":"10",
				"text":"阿科"
			},{
				"id":"11",
				"text":"吕布"
			},{
				"id":"12",
				"text":"陈咬金"
			},{
				"id":"13",
				"text":"典韦"
			}
		],
		"state":"closed"
	},
	{
		"id":"3",
		"text":"吃鸡游戏",
		"iconCls":"icon-save"
	}
]
这文件的格式是按照官方的开发文档写的实例。不需追究为啥这么写。
总结为:
[{id:1,text:"英雄联盟",state:"open/closed"},{…},{…}]
这是easyUI内部的规则,那我们只需按照它设置的规则去完成我们的业务就可以了
1.1.4代码实现
在jt-manager中的vo包中创建此json格式的VO对象:
EasyUITree:
@Data
@Accessors(chain = true)
public class EasyUITree {
	/**
	 * 节点Id
	 */
	private Long id;
	/**
	 * 节点名称
	 */
	private String text;
	/**
	 * 节点开关 open/closed
	 */
	private String state;
}
点击新增商品,会看到相应的界面,点击选择类目,F12查看请求链接:
 在去看页面源码:
 查找common.js
// 初始化选择类目组件
initItemCat : function(data){
$(".selectItemCat").each(function(i,e){//i= index 下标,e:element:元素
var _ele = $(e);
if(data && data.cid){
_ele.after(""+data.cid+"");
}else{
_ele.after("");
}
_ele.unbind('click').click(function(){
$("").css({padding:"5px"}).html(""
)
.window({
width:'500',
height:"450",
modal:true,
closed:true,
iconCls:'icon-save',
title:'选择类目',
onOpen : function(){ //当窗口打开后执行
var _win = this;
$("ul",_win).tree({
url:'/item/cat/list',
animate:true,
onClick : function(node){
if($(this).tree("isLeaf",node.target)){
// 填写到cid中,cid是input的name属性
_ele.parent().find("[name=cid]").val(node.id);
_ele.next().text(node.text).attr("cid",node.id);
$(_win).window('close');
if(data && data.fun){
data.fun.call(this,node);
}
}
}
});
},
onClose : function(){
$(this).window("destroy");
}
}).window('open');
});
});
}
分析一下:
我们看到他的请求路径为 /item/cat/list 。点击事件的意思大概就是:
树控件读取URL。子节点的加载依赖于父节点的状态。当展开一个封闭的节点,如果节点没有加载子节点,它将会把节点id的值作为http请求参数并命名为’id’,通过URL发送到服务器上面检索子节点。
结论:
请求路径为 /item/cat/list。那在展开封闭节点的时候就会触发一个事件,将当前节点的id作为参数,回调路径。再次获得请求结果。开始写代码
ItemCatController:
/**
* @RequestParam
* defaultValue: 当参数为null时 设定默认值
* name/value: 获取用户传递的数据信息
* required: 是否为必须传递的数据
* @param parentId 默认值是0的时候,是先获取一级菜单
* @return
*/
@RequestMapping("/list")
public List<EasyUITree> findItemCatList(@RequestParam(defaultValue="0",name ="id") Long parentId){
//查询一级商品分类信息
return itemCatService.findEasyUITreeList(parentId);
}
切记,若写的参数跟请求的参数不一致时,需要指定一下
ItemCatService
List<EasyUITree> findEasyUITreeList(Long parentId);
ItemCatServiceImpl:
实现方法设计的时候,我们要考虑俩点,第一获取到商品分类列表,第二还要让每条数据都要符合页面要求的json格式:
- 指定id是主键id
- 指定text为分类名称
- 指定节点状态(如果是父级菜单应该关闭,否则应该打开)因为先有一级菜单才能有二级菜单。而为了用户体验,一级菜单较多时,一级菜单的节点为关闭状态
/**
* EasyUITree VO对象
* 依赖
* ItemCat 数据库对象
*
* 思路:
* 1.先查询数据库List信息
* 2.将数据库对象转化为VO对象.
*/
public List<ItemCat> findItemCatList(Long parentId) {
QueryWrapper<ItemCat> queryWrapper =
new QueryWrapper<ItemCat>();
queryWrapper.eq("parent_id", parentId);
List<ItemCat> itemCatList = itemCatMapper.selectList(queryWrapper);
return itemCatList;
}
@Override
public List<EasyUITree> findEasyUITreeList(Long parentId) {
//1.定义返回数据
List<EasyUITree> treeList = new ArrayList<EasyUITree>();
List<ItemCat> itemCatList = findItemCatList(parentId);
for (ItemCat itemCat : itemCatList) {
EasyUITree easyUITree = new EasyUITree();
String state = itemCat.getIsParent() ? "closed" : "open";
easyUITree.setId(itemCat.getId())
.setText(itemCat.getName())
//如果是父级菜单应该关闭,否则应该打开
.setState(state);
treeList.add(easyUITree);
}
return treeList;
}
在这再推荐一个idea插件热部署插件

热部署配置教程可以百度,因为百度上太多了,我就不写了。
运行结果:
 可以看到所有的一级类型都处于节点关闭状态,我们打开一个节点,看看请求,传了一个参数id,并回调了链接。

1.2 商品新增实现(商品图片上传单独讲解,此节教程先忽略)
上一节是介绍了商品分类的实现,这节我们分析页面其他的部分以及如何实现商品保存
当我们鼠标在其他部分时,会实时显示提示信息,我们再去看看页面源码:
 数据非空校验
<td><input class="easyui-textbox" type="text" name="title" data-options="required:true" style="width: 280px;"></input></td>
定义数值范围
<td><input class="easyui-numberbox" type="text" name="priceView" data-options="min:1,max:99999999,precision:2,required:true" />
查看提交
$.post("/item/save",$("#itemAddForm").serialize(), function(data){
if(data.status == 200){
$.messager.alert('提示','新增商品成功!');
}else{
$.messager.alert("提示","新增商品失败!");
}
});
我们可以看到他是将表单的所有信息进行格式化后作为参数。返回信息中它接收了status值
因此我们需要自定义一个专门用于返回状态的VO对象:
在jt-common先创建VO包,
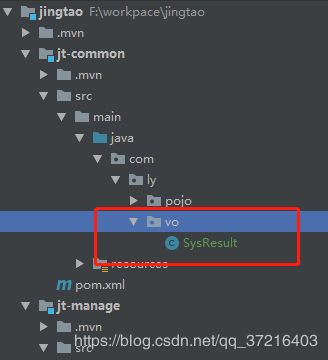
在创建VO对象SysResult :
/**
* 定义系统返回值VO对象
*
*/
@Data
@Accessors(chain = true)
@NoArgsConstructor
@AllArgsConstructor
public class SysResult implements Serializable {
private static final long serialVersionUID = 1L;
/**
* 200表示正确 201表示失败
*/
private Integer status;
/**
* 服务器返回提示信息
*/
private String msg;
/**
* 服务器返回业务数据
*/
private Object data;
public static SysResult success() {
return new SysResult(200, "服务器执行成功!!!", null);
}
public static SysResult success(String msg, Object data) {
return new SysResult(200, msg, data);
}
public static SysResult success(Object data) {
return new SysResult(200, "服务器执行成功!!!", data);
}
public static SysResult fail() {
return new SysResult(201, "服务器处理失败!!!", null);
}
public static SysResult success(String name) {
return new SysResult(200, name, null);
}
}
ItemController:
/**
* 实现商品数据新增
* 改进方法:定义全局异常处理机制
*/
@RequestMapping("/save")
public SysResult saveItem(Item item) {
itemService.saveItem(item);
return SysResult.success();
}
ItemService:
void saveItem(Item item);
ItemServiceImpl:
@Override
public void saveItem(Item item) {
item.setStatus(1) //表示正常
.setCreated(new Date())
.setUpdated(item.getCreated());
itemMapper.insert(item);
}
在此过程中我们忽略了图片的上传目的是为了单独讲解上传的原理以及如何使用nginx实现反向代理
我们在Controller中使用到了try{ }catch(){}捕获异常。借此我们创建一个全局异常处理机制
在jt-common中添加异常处理机制.
 代码:
代码:
//@ControllerAdvice //定义全局异常处理机制
@RestControllerAdvice //该注解对Controller层生效
@Slf4j //引入日志API
public class SysResultControllerAdvice {
//当发生什么异常时使用该处理方式
@ExceptionHandler(RuntimeException.class)
//@ResponseBody
public SysResult sysResultException(Exception exception) {
exception.printStackTrace();
log.error("服务器异常:"+exception.getMessage());
return SysResult.fail();
}
}
1.3 商品编辑
页面JS分析
$.post("/item/update",$("#itemeEditForm").serialize(), function(data){
if(data.status == 200){
$.messager.alert('提示','修改商品成功!','info',function(){
$("#itemEditWindow").window('close');
$("#itemList").datagrid("reload");
});
}else{
$.message.alert("提示",data.msg);
}
});
ItemController
/**
* 实现商品信息修改
*/
@RequestMapping("/update")
public SysResult updateItem(Item item) {
itemService.updateItem(item);
return SysResult.success();
}
ItemService
void updateItem(Item item);
ItemServiceImpl
@Transactional
@Override
public void updateItem(Item item) {
item.setUpdated(new Date());
itemMapper.updateById(item);
}
1.4 1.5 商品上架/下架
商品如果由于店家的需求可以进行上架/下架处理.需要将Item对象中的status属性进行修改.
页面分析
$.messager.confirm('确认','确定下架ID为 '+ids+' 的商品吗?',function(r){
if (r){
var params = {"ids":ids};
$.post("/item/instock",params, function(data){
if(data.status == 200){
$.messager.alert('提示','下架商品成功!',undefined,function(){
$("#itemList").datagrid("reload");
});
}
});
}
});
ItemController
/**
* 实现商品的下架操作
* $.post("/item/instock",{"ids":1001,1002}
*
* 规则:
* 如果用户传参使用","号分割参数,则springMVC
* 接收参数时可以使用数组接收.由程序内部实现自动
* 转化
* ids:1001,1002,1003
*/
@RequestMapping("/instock")
public SysResult instock(Long[] ids) {
int status = 2; //表示下架
itemService.upateStatus(ids,status);
return SysResult.success();
}
@RequestMapping("/reshelf")
public SysResult reshelf(Long[] ids) {
int status = 1; //表示上架
itemService.upateStatus(ids,status);
return SysResult.success();
}
ItemService:
void upateStatus(Long[] ids, int status) ;
ItemServiceImpl:
/**
* 批量更新
*/
@Override
public void upateStatus(Long[] ids, int status) {
Item item = new Item();
item.setStatus(status)
.setUpdated(new Date());
//sql: update tb_item set status=2 where id in (1001,1002)
UpdateWrapper<Item> updateWrapper = new UpdateWrapper<Item>();
List<Long> idList = Arrays.asList(ids);
updateWrapper.in("id", idList);
itemMapper.update(item, updateWrapper);
}
.写完即可进行测试
GitHub地址
https://github.com/lmy1965673628/jingtao.git.
总结
此教程完成了商品的类型,商品添加,编辑,上架,下架。下节则介绍如何实现图片上传并实现nginx反向代理和域名代理以及nginx的负载均衡的相关知识