如何将ELMo词向量用于中文
ELMo于今年二月由AllenNLP提出,与word2vec或GloVe不同的是其动态词向量的思想,其本质即通过训练language model,对于一句话进入到language model获得不同的词向量。根据实验可得,使用了Elmo词向量之后,许多NLP任务都有了大幅的提高。
论文:Deep contextualized word representations
AllenNLP一共release了两份ELMo的代码,一份是Pytorch版本的,另一份是Tensorflow版本的。Pytorch版本的只开放了使用预训练好的词向量的接口,但没有给出自己训练的接口,因此无法使用到中文语料中。Tensorflow版本有提供训练的代码,因此本文记录如何将ELMo用于中文语料中,但本文只记录使用到的部分,而不会分析全部的代码。
需求:
使用预训练好的词向量作为句子表示直接传入到RNN中(也就是不使用代码中默认的先过CNN),在训练完后,将模型保存,在需要用的时候load进来,对于一个特定的句子,首先将其转换成预训练的词向量,传入language model之后最终得到ELMo词向量。
准备工作:
- 将中文语料分词
- 训练好GloVe词向量或者word2vec
- 下载bilm-tf代码
- 生成词表 vocab_file (训练的时候要用到)
- optional:阅读Readme
- optional:通读bilm-tf的代码,对代码结构有一定的认识
思路:
- 将预训练的词向量读入
- 修改bilm-tf代码
- option部分
- 添加给embedding weight赋初值
- 添加保存embedding weight的代码
- 开始训练,获得checkpoint和option文件
- 运行脚本,获得language model的weight文件
- 将embedding weight保存为hdf5文件形式
- 运行脚本,将语料转化成ELMo embedding。
训练GloVe或word2vec
可参见我以前的博客或者网上的教程。
注意到,如果要用gensim导入GloVe训好的词向量,需要在开头添加num_word embedding_dim。 如:
![]()
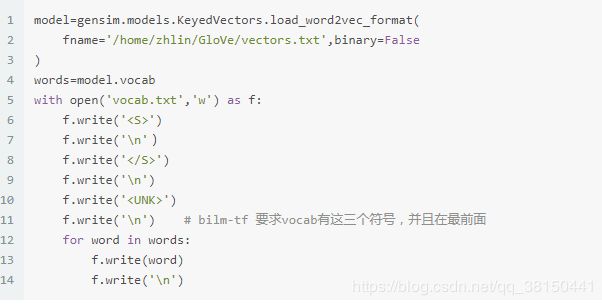
获得vocab词表文件
注意到,词表文件的开头必须要有
如:
![]()
代码:
修改train_elmo.py
bin文件夹下的train_elmo.py是程序的入口。
主要修改的地方:
- load_vocab的第二个参数应该改为None
- n_gpus CUDA_VISIBLE_DEVICES 根据自己需求改
- n_train_tokens 可改可不改,影响的是输出信息。要查看自己语料的行数,可以通过
wc -l corpus.txt查看。 - option的修改,将char_cnn部分都注释掉,其他根据自己需求修改
![]()
修改LanguageModel类
由于我需要传入预训练好的GloVe embedding,那么还需要修改embedding部分,这部分在bilm文件夹下的training.py,进入到LanguageModel类中_build_word_embeddings函数中。注意到,由于前三个是 embedding_weights的trainable应当设为True
如:
![]()
修改train函数
添加代码,使得在train函数的最后保存embedding文件。
![]()
训练并获得weights文件
训练需要语料文件corpus.txt,词表文件vocab.txt。
训练
cd到bilm-tf文件夹下,运行
![]()
根据实际情况设定不同的值和路径。
运行情况:
PS:运行过程中可能会有warning:
‘list’ object has no attribute ‘name’
WARNING:tensorflow:Error encountered when serializing lstm_output_embeddings.
Type is unsupported, or the types of the items don’t match field type in CollectionDef.
应该不用担心,还是能够继续运行的,后面也不受影响。
在等待了相当长的时间后,在save_dir文件夹内生成了几个文件,其中checkpoint和options是关键,checkpoint能够进一步生成language model的weights文件,而options记录language model的参数。
![]()
获得language model的weights
接下来运行bin/dump_weights.py将checkpoint转换成hdf5文件。
|
|
其中save_dir是checkpoint和option文件保存的地址。
接下来等待程序运行:
![]()
最终获得了想要的weights和option:
![]()
将语料转化成ELMo embedding
由于我们有了vocab_file、与vocab_file一一对应的embedding h5py文件、以及language model的weights.hdf5和options.json。
接下来参考usage_token.py将一句话转化成ELMo embedding。
参考代码:
|
|
转自:
http://www.linzehui.me/2018/08/12/%E7%A2%8E%E7%89%87%E7%9F%A5%E8%AF%86/%E5%A6%82%E4%BD%95%E5%B0%86ELMo%E8%AF%8D%E5%90%91%E9%87%8F%E7%94%A8%E4%BA%8E%E4%B8%AD%E6%96%87/
