opencv图像处理教程(2)——矩阵的掩膜操作
1、获取图像像素指针
Mat.ptr(int i = 0) 获取像素矩阵的指针,索引i表示第几行,从0开始记行数。
获取当前行指针:
const uchar* current = myimage.ptr(row);
myimage.depth() = CV_8U,图像的类型为8U。
获取当前像素点(row,col)的像素值:
p(row,col) = current[col];
2、像素范围处理saturate_cast<uchar>
saturate_cast(-100),返回 0。
saturate_cast(288),返回255
saturate_cast(100),返回100
这个函数的功能是确保RGB值得范围在0~255之间。
3、掩膜操作

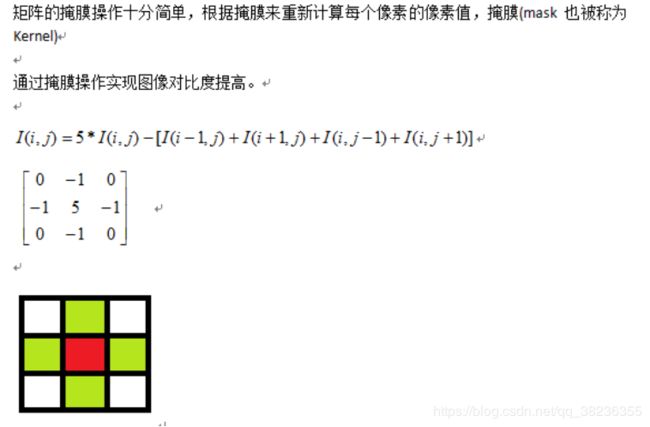
红色是中心像素,中心像素的像素值由其自身和上下左右的五个像素的像素值按照上面的公式进行计算。
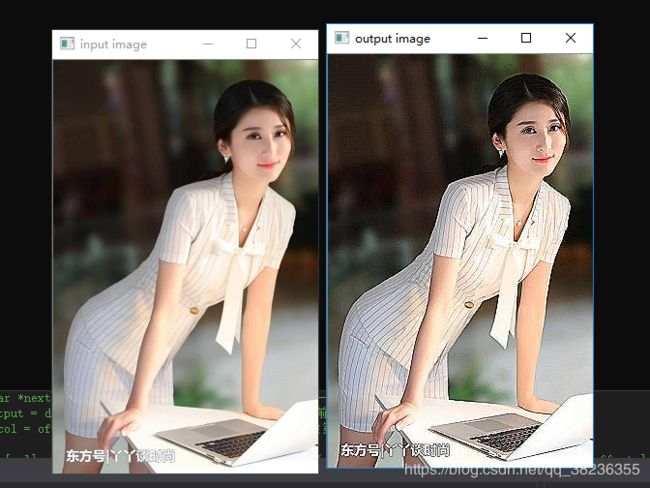
从上到下,从左到右对每个像素做同样的处理操作,得到最终结果就是对比度提高之后的输出图像Mat对象。
由于边缘的像素没法完全采集到周围的像素点,所以要去除对边缘像素的掩膜计算。
4、函数调用filter2D功能
定义掩膜:Mat kernel = (Mat_
filter2D( src, dst, src.depth(), kernel );其中src与dst是Mat类型变量、src.depth表示位图深度,有32、24、8等。
5、完整代码演示
#include
#include
#include
using namespace cv;

int main(int argc, char **argv)
{
	Mat src = imread("D:/opencv learning/meinv.jpg", -1);
	if (src.empty())
	{
		printf("could not load image....\n");
		return -1;
	}
	namedWindow("input image", WINDOW_AUTOSIZE);
	imshow("input image", src);

	//进行掩膜操作的代码

	Mat dst = Mat::zeros(src.size(), src.type());//输出图片进行初始化。
	//不调用filter 2D 函数,自己编写掩膜操作
	/*
	int cols = (src.cols-1) * src.channels(); //实际的长度cols等于RGB图像的长度乘以通道数。col为列,去除了最后一列
	int offsetx = src.channels();//图像的通道数,例如RGB图像为3通道
	int rows = (src.rows-1); //图像的高度。row为行,去除了最后一行
	for (int row = 1; row < rows; row++) //从第二行到倒数第二行,去除边缘的行
	{
		const uchar *previous = src.ptr(row - 1);//定义指向上一行的指针,指针是uchar型,不能是int型,会引起图像变形
		const uchar *count = src.ptr(row);//定义指向当前行的指针
		const uchar *next = src.ptr(row + 1);//定义指向下一行的指针
		uchar *output = dst.ptr(row);//定义指向输出图像当前行的指针
		for (int col = offsetx; col< cols; col++)//从第二列到倒数第二列,去除边缘列
		{
			output[col] = saturate_cast(5 * count[col] - (previous[col] + next[col] + count[col + offsetx] + count[col - offsetx]));
			//掩膜计算公式
		}
	}
	*/
	//显示运行时间
	double t = getTickCount();//当前的运行周期数

	//用filter 2D 函数进行掩膜操作
	Mat kernel = (Mat_(3, 3) << 0, -1, 0, -1, 5, -1, 0, -1, 0);//定义掩膜
	filter2D(src, dst, src.depth(), kernel);

	t = ((double)getTickCount() - t) / getTickFrequency();//运行时间
	std::cout << "消耗的时间:" << t << std::endl;

	namedWindow("output image", WINDOW_AUTOSIZE);
	imshow("output image", dst);
	waitKey(0);
	return 0;
}
