如何在 Windows 上 使用 ONLYOFFICE 协作编辑文档
1、说明——可以加我qq504284沟通。
ONLYOFFICE Document Server提供文档协作的服务功能,支持Word,Excel和PowerPoint的协作。但是这里告诉我们,需要进行文档管理和存储的二次开发。
Please note, that ONLYOFFICE Document Server includes the documenteditor, document editing service, document command service and documentconversion service.The document manager and documentstorage service areeither included to Community Server or must be implemented by the softwareintegrators who use ONLYOFFICE Document Server on their own server.
它自己的ONLYOFFICE/CommunityServer就是管理文件用的。
ONLYOFFICE CommunityServer is a free open source collaborative system developed to managedocuments, projects, customer relationship and email correspondence, all in oneplace.
Nextcloud,可道云等云盘系统也支持ONLYOFFICE协作服务,我用Golang语言开发的EngineerCMS来实现ONLYOFFICE的文档管理和存储,调用ONLYOFFICE Document Server服务来进行文档协作。
协作的好处在于少了来回传递文档,少了汇总的负责人,特别是十多人合作编写文档的时候,汇总的工作量大,容易出错,任何人稍微修改一点,都要重新传递整个文档,汇总后还要再次发给大家核对……。
协作也可以应用于校审流程,校核和审查直接在文档上修改即可。
其他如月报的合作,工作任务表的更新:每个人的任务表要随时更新,除非用专业的任务管理软件,否则用Excel表格的话,也是要负责人汇总更新表格,应付领导检查。
会议纪要写好了,把链接发给大家,有意见直接在上面修改补充。
投标要多人协作的话,用这个平台也是不错的。
市场上协作的平台不下几十种,著名的如石墨,一起写,腾讯文档协作,Google Doc,office365,office online等,基本按人月收费,免费的有人数限制,并且想自己部署在局域网的话也不大可能。
所以,我就在ONLYOFFICE Document Server基础上用Golang语言开发了文档管理和存储功能,方便大家免费无限制任意部署的需求。
总的思路就是比如在局域网的某台windows电脑上安装docker容器来运行ONLYOFFICE Document Server,然后运行EngineerCMS来调用ONLYOFFICE Document Server的服务。在云服务器上部署也是一个道理。
ONLYOFFICE目前存在的缺点:汉字输入不是很方便,就是当输入符号的时候,它会重复将前面的汉字又输进去一次:解决办法,在设置里勾选象形文字(5.1.2新版已经解决这个问题);Excel表格里的文字格式没有删除线、上下标之类,文本框中的文字有这些格式,Word中也有;QQ拼音输入法按空格不能输出汉字,(5.1.2新版已经解决这个问题)搜狗输入法可以;字体/样式选择里显示的是英文,不是汉字(用ps修改一下图片即可);打开文档默认文字检查都是打开的,新版5.1.2版支持word目录,但没有文档结构。但瑕不掩瑜,它的功能还是很强大的,而且随着版本的更替,会解决这些问题的。
如果是局域网,部署的电脑拥有固定ip(下文叫宿主机,切记)。电脑能打开cup的虚拟功能。如果部署到云主机,道理是一样的。
环境是win7以上,win10以下。Win10区别就是安装的docker软件不同而已。
第一步:确定电脑打开了cpu虚拟打开。https://jingyan.baidu.com/article/22fe7ced3b4c003002617f17.html
第二步:下载和安装docker toolbox,默认安装即可。下载地址http://get.daocloud.io/,下载支持旧版windows的docker toolbox,win10就直接下载docker了。
第三步:启动docker后在里面拉取Onlyoffice Document Server 的Docker镜像
3、拉取ONLYOFFICE Document Server 的Docker镜像
拉取镜像:启动docker,在里面输入命令docker pull onlyoffice/documentserver
可以用我做好的镜像导入,已经设置好了字体,修正了几个翻译错误,可以省略第5步,直接到第6步。
用docker load < feionlyoffice.tar命令。
建议用离线的,
(Administrator@604TFALNDKDKJWCMINGW64 ~
dockerexport−oonlyoffice−‘date+ d o c k e r e x p o r t − o o n l y o f f i c e − ‘ d a t e + docker import onlyoffice-20180220-import.tar onlyoffice/documentserver
离线的包在我的网盘中:https://pan.baidu.com/s/1gf0ucuR,离线包有4个:
第一个是onlyoffice_load.tar,替换好了字体,修正了几个翻译错误,是用commit命令生成新的包后save导出的。
第二个是onlyoffice-20180220-import.tar,这个包虽然里面已经替换好了字体,但导入后暂时不知道怎样运行起来。
第三个是onlyofficedocumentserver-load.tar这个包就是原生态的pull下来的镜像打的包,用save命令打的包,用loader命令导入,然后运行,需要替换字体。
第四个是feionlyoffice.tar,这个包是用5.1.2版做成的,添加了字体,修改了几处界面翻译错误,修改了连接数限制。就是它太大了,上传花了一个晚上。
应该下载第四个文件,放到docker命令行对应的目录下,方便运行命令导入这个镜像。一般在c盘-users-administrator或者其他用户名下(在docker命令行里输入dir,看看当前目录下有哪些文件,一般就能找到这个目录了。)4、启动——映射至9000端口
docker run -i -t -d -p 9000:80 onlyoffice/documentserver
如果是导入的镜像,上面的命令中onlyoffice/documentserver用镜像id代替,查阅镜像用docker images命令。
5、替换 添加容器onlyofficedocument server的字体
在网盘中下载字体winfont压缩包。字体来源于https://github.com/neroxps/Docker-Only-Office-Chinese-font和win10系统,win10系统提取中文字体的方法:控制面板——搜字体——查看安装的字体——再在搜索栏输入中文 2个字,这些就是需要的中文字体了。有些体积大的字体就不要放了,免得OO启动太慢。
新版5.1.2已经支持中文字体,所以不用删除它自带的字体了。但只有文泉驿的3种字体,可以根据下文再增加一些字体。
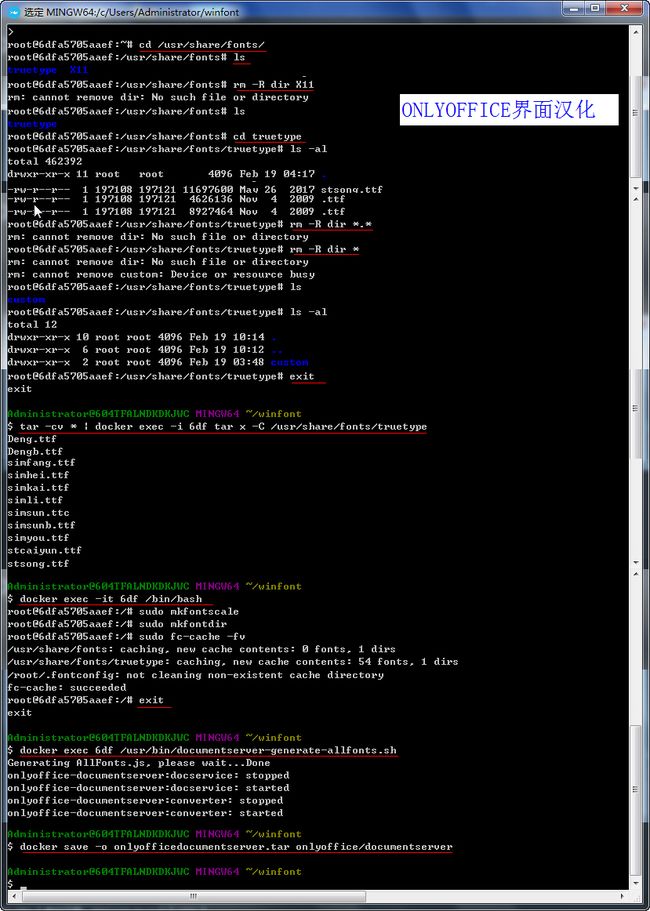
//进入容器(运行的镜像)内,删除/usr/share/fonts下除truetype外其他文件和文件夹
docker exec -it 38e27 /bin/bash
root@38e27823ae92:/#dir或者ls –al
root@6dfa5705aaef:~#cd /usr/share/fonts/
root@6dfa5705aaef:/usr/share/fonts#ls
truetype X11
//删除文件夹X11
root@6dfa5705aaef:/usr/share/fonts#
rm:cannot remove dir: No such file or directory
root@6dfa5705aaef:/usr/share/fonts#ls
truetype
root@6dfa5705aaef:/usr/share/fonts#cd truetype
root@6dfa5705aaef:/usr/share/fonts/truetype#ls -al
total462392
drwxr-xr-x11 root root 4096 Feb 19 04:17 .
………………
//删除trutype文件夹下所有文件,除了custome文件夹外
root@6dfa5705aaef:/usr/share/fonts/truetype#
rm:cannot remove dir: No such file or directory
root@6dfa5705aaef:/usr/share/fonts/truetype#
rm:cannot remove dir: No such file or directory
rm:cannot remove custom: Device or resource busy
root@6dfa5705aaef:/usr/share/fonts/truetype#ls
custom
root@6dfa5705aaef:/usr/share/fonts/truetype#ls -al
total 12
drwxr-xr-x10 root root 4096 Feb 19 10:14 .
drwxr-xr-x 6 root root 4096 Feb 19 10:12 ..
drwxr-xr-x 2 root root 4096 Feb 19 03:48 custom
……
root@6dfa5705aaef:/usr/share/fonts/truetype#
exit
Administrator@604TFALNDKDKJWCMINGW64 ~/winfont
kaiu.ttf
msjh.ttc
msjhbd.ttc
msjhl.ttc
msyh.ttc
msyh.ttf
msyhbd.ttc
msyhl.ttc
simfang.ttf
simhei.ttf
simkai.ttf
simli.ttf
simsun.ttc
simsunb.ttf
simyou.ttf
……
Administrator@604TFALNDKDKJWCMINGW64 ~/winfont
//进入容器内
root@6dfa5705aaef:/#
root@6dfa5705aaef:/#
root@6dfa5705aaef:/#
/usr/share/fonts:caching, new cache contents: 0 fonts, 1 dirs
…………
fc-cache:succeeded
root@6dfa5705aaef:/#
exit
//退出容器
Administrator@604TFALNDKDKJWCMINGW64 ~/winfont
root@6dfa5705aaef:/#
root@6dfa5705aaef:/#
root@6dfa5705aaef:/#
/usr/share/fonts:caching, new cache contents: 0 fonts, 1 dirs
…………
fc-cache:succeeded
root@6dfa5705aaef:/#
exit
//退出容器
Administrator@604TFALNDKDKJWCMINGW64 ~/winfont
GeneratingAllFonts.js, please wait…Done
onlyoffice-documentserver:docservice:stopped
onlyoffice-documentserver:docservice:started
onlyoffice-documentserver:converter:stopped
onlyoffice-documentserver:converter:started
如果机器重启后,不要用docker run命令,要用docker start 容器id
完成后记得清理chrome浏览器缓存,否则还是乱码。设置—高级—隐私设置和安全性—清除浏览数据—时间范围选择时间不限……
具体替换字体的命令见下图,很详细具体了。
修正excel、word、ppt翻译错误:
Administrator@604TFALNDKDKJWC MINGW64 ~/zh
docker exec -it 6df /bin/bash
root@6dfa5705aaef:/var/www/onlyoffice/documentserver/web-apps/apps/spreadsheeteditor/main/locale#ls
cs.json en.json fr.json ja.json nl.json pt.json sk.json tr.json vi.json
de.json es.json it.json lv.json pl.json ru.json sl.json uk.json zh.json
root@6dfa5705aaef:/var/www/onlyoffice/documentserver/web-apps/apps/spreadsheeteditor/main/locale#exit
exit
Administrator@604TFALNDKDKJWC MINGW64 ~/zh
zh.json
word的翻译文件/var/www/onlyoffice/documentserver/web-apps/apps/documenteditor/main/locale/
$ tar-cv zh.json | docker exec -i 6df tar x -C /var/www/onlyoffice/documentserver/web-apps/apps/documenteditor/main/locale/
6、还可以替换帮助文件为中文……
/var/www/onlyoffice/documentserver/apps/presentationeditor/main/resources/help/zh/Contents.json
/var/www/onlyoffice/documentserver/apps/spreadsheeteditor/main/resources/help/zh/Contents.json
/var/www/onlyoffice/documentserver/apps/documenteditor/main/resources/help/zh/Contents.json
7、连接数20个的限制
做完以上工作,你可以将修改后的容器保存为新的镜像,然后save导出后给其他机器用。
docker commit将修改后镜像保存到本地,参数是容器ID,新名字:版本标志
#docker ps -all
CONTAINER ID IMAGE COMMAND CREATED STATUS PORTS NAMES
b3426410ff43 centos:7 ”/bin/bash” 4 minutes ago Exited (0) 4 seconds ago centos7ssh
#docker commit b59myimage/centos7-ssh
下次可以输入刚保存的名字启动修改了字体的镜像了。
导出镜像——一定要导出保存,否则docker经常自己升级,容器啊,镜像啊,都会丢失,追悔莫及。
所以,启动docker的时候要关闭网络,否则它自动升级。等docker完全启动后,再打开网络。
docker save -o onlyoffice.tar onlyoffice/documentserver
6、运行和修改文档管理平台EngineerCMS
直接去https://github.com/3xxx/EngineerCMS查看源码
直接去https://github.com/3xxx/EngineerCMS/releases下载编译好的二进制文件
或者直接去https://pan.baidu.com/s/1gf0ucuR下载软件包,直接运行engineercms即可用浏览器chrome访问127.0.0.1了,不用配置环境,因为它是golang语言编写的跨平台的可执行文件。如果运行出现闪退,则更改一下端口号。
(1)运行前要替换EngineerCMS\views\onlyoffice\onlyoffice.tpl中的3处IP,如果engineercms和docker安装在同一个电脑上,那么三个IP相同,见6.1节。
(2)docker toolbox访问前要按照第7节中的方法设置宿主机(安装docker的电脑)virtualbox的端口转发。win10的windows docker不用设置端口转发了。
有问题联系我QQ504284,微信hotqin999
http://blog.csdn.net/hotqin888
6.1协作编辑页面要根据你的情况进行修改(ip地址、汉化界面)
一定要用ip,不要用localhost、127.0.0.1之类的代替本机ip,本机调试要用192.168.99.100
-
EngineerCMS\views\onlyoffice\onlyoffice.tpl:
-
-
<html style="height: 100%;">
-
<head>
-
<title>fei-OnlyOffice
title>
-
head>
-
<body style="height: 100%; margin: 0;">
-
<divid="placeholder" style="height: 100%">
div>
-
<script type="text/javascript"src="http://
安装docker电脑的ip
:9000/web-apps/apps/api/documents/api.js">
script>
-
<scripttype="text/javascript">
-
//alert({{.Doc.FileName}});
-
window.docEditor = new DocsAPI.DocEditor("placeholder",
-
{
-
"document": {
-
"fileType": "{{.fileType}}",
-
"key": "{{.Key}}",//"Khirz6zTPdfd7"
-
"title": "{{.Doc.FileName}}",
-
"url": "http://
运行engineercms电脑的ip/attachment/onlyoffice/{{.Doc.FileName}}"
-
},
-
"documentType": "{{.documentType}}",
-
"editorConfig": {
-
"callbackUrl": "http://
运行engineercms电脑的ip/url-to-callback?id={{.Doc.Id}}",
-
-
"user": {
-
"id": "{{.Uid}}",
-
"name": "{{.Uname}}"
-
},
-
"lang": "zh-CN",//"en-US",汉化
-
-
},
-
-
"height": "100%",
-
"width": "100%"
-
});
-
script>
-
body>
-
html>
7、端口转发
http://blog.csdn.net/maodou95838/article/details/78194830?locationNum=1&fps=1#0-qzone-1-51693-d020d2d2a4e8d1a374a433f596ad1440
前文第4节运行ONLYOFFICE DOCUMENT SERVER:
docker run -i -t -d -p 9000:80 onlyoffice/documentserver
-d:后台运行
-p 9000:80 :端口映射,前一个9000代表虚拟机的端口,后一个80代表docker容器的端口
命令执行完成后,可以通过http://192.168.99.100:9000访问OO服务的欢迎界面。
这时只能在你自己的机器上访问,同一个局域网中的其他机器是不能访问的,原因是:Windows上的docker是运行在一个虚拟机里面的,看官方给的图:
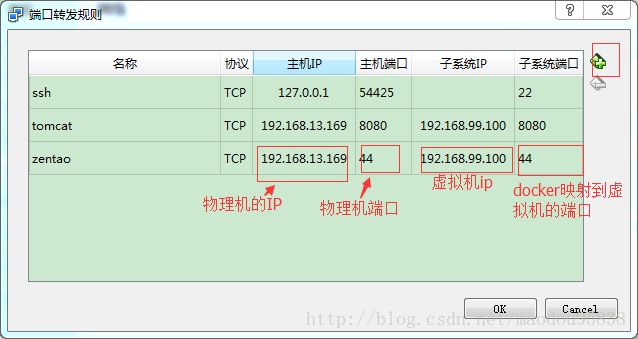
要让别的机器也访问到,需要配置一下虚拟机。设置如下:
双击运行安装docker toolbox生成的Oracle VMVirtualBox。
点击端口转发:下图中主机IP为安装docker的电脑IP,主机端口为9000,子系统IP为192.168.99.100,子系统端口为9000。
这样配置完成后,别的机器也可以访问docker 容器了。
下文的开发仅供兴趣参考。
8、二次开发EngineerCMS
8.1 协作编辑页面
-
-
<html style="height: 100%;">
-
<head>
-
<title>fei-OnlyOffice
title>
-
head>
-
<body style="height: 100%; margin: 0;">
-
<divid="placeholder" style="height: 100%">
div>
-
<script type="text/javascript"src="http://安装docker电脑的ip:9000/web-apps/apps/api/documents/api.js">
script>
-
<scripttype="text/javascript">
-
//alert({{.Doc.FileName}});
-
window.docEditor = newDocsAPI.DocEditor("placeholder",
-
{
-
"document": {
-
"fileType": "{{.fileType}}",
-
"key": "{{.Key}}",//"Khirz6zTPdfd7"
-
"title": "{{.Doc.FileName}}",
-
"url": "http://运行engineercms电脑的ip/attachment/onlyoffice/{{.Doc.FileName}}"
-
},
-
"documentType":"{{.documentType}}",
-
"editorConfig": {
-
"callbackUrl": "http:// 运行engineercms电脑的ip /url-to-callback?id={{.Doc.Id}}",
-
-
"user": {
-
"id": "{{.Uid}}",
-
"name": "{{.Uname}}"
-
},
-
"lang": "zh-CN",//"en-US",
-
},
-
"height": "100%",
-
"width": "100%"
-
});
-
script>
-
body>
-
html>
8.2 协作页面的保存和回调
-
type Callback
struct {
-
Key
string
`json:"key"`
-
Status
int
`json:"status"`
-
Url
string
`json:"url"`
-
Changesurl
string
`json:"changesurl"`
-
History history
`json:"history"`
-
Users []
string
`json:"users"`
-
Actions []action
`json:"actions"`
-
Lastsave
string
`json:"lastsave"`
-
Notmodifiedbool
`json:"notmodified"`
-
}
-
type action
struct {
-
Type
int
-
userid
string
-
}
-
type history
struct {
-
changes []change
-
serverVersionstring
-
}
-
type change
struct {
-
created
string
-
User User1
-
}
-
-
type User1
struct {
-
id
string
-
name
string
-
}
-
-
//关闭浏览器标签后获取最新文档保存到文件夹
-
func (c *OnlyController) UrltoCallback() {
-
// pk1 :=c.Ctx.Input.RequestBody
-
id :=c.Input().Get(
"id")
-
//pid转成64为
-
idNum, err :=strconv.ParseInt(id,
10,
64)
-
if err !=
nil {
-
beego.Error(err)
-
}
-
//根据附件id取得附件的prodid,路径
-
onlyattachment,err := models.GetOnlyAttachbyId(idNum)
-
if err !=
nil {
-
beego.Error(err)
-
}
-
-
var callbackCallback
-
json.Unmarshal(c.Ctx.Input.RequestBody,&callback)
-
ifcallback.Status ==
1 || callback.Status ==
4 {
-
c.Data[
"json"]=
map[
string]
interface{}{
"error":
0}
-
c.ServeJSON()
-
}
else ifcallback.Status ==
2 {
-
resp, err :=http.Get(callback.Url)
-
if err !=
nil{
-
beego.Error(err)
-
}
-
body, err :=ioutil.ReadAll(resp.Body)
-
if err !=
nil{
-
beego.Error(err)
-
}
-
deferresp.Body.Close()
-
if err !=
nil{
-
beego.Error(err)
-
}
-
f, err :=os.create(
".\\attachment\\onlyoffice\\"+onlyattachment.FileName)
-
if err !=
nil{
-
beego.Error(err)
-
}
-
deferf.Close()
-
_, err =f.Write(body)
-
if err !=
nil{
-
beego.Error(err)
-
}
else {
-
err =models.UpdateOnlyAttachment(idNum)
-
if err !=
nil {
-
beego.Error(err)
-
}
-
}
-
c.Data[
"json"]=
map[
string]
interface{}{
"error":
0}
-
c.ServeJSON()
-
}
-
}
![]()
![]()
![]()
![]()

