Create an app that runs an AR session and uses plane detection to place 3D content using SceneKit.
创建一个运行AR会话并使用平面检测来使用SceneKit放置3D内容的应用程序。
Overview
This sample app runs an ARKit world tracking session with content displayed in a SceneKit view. To demonstrate plane detection, the app simply places an SCNPlane object to visualize each detected ARPlaneAnchor object.
概述
此示例应用运行一个ARKit世界跟踪 Session,其内容显示在SceneKit视图中。 为了演示平面检测,应用程序简单地放置一个SCNPlane对象来可视化每个检测到的ARPlaneAnchor对象。
Configure and Run the AR Session
The ARSCNView class is a SceneKit view that includes an ARSession object that manages the motion tracking and image processing required to create an augmented reality (AR) experience. However, to run a session you must provide a session configuration.
配置并运行ARSession
ARSCNView类是一个SceneKit视图,其中包含一个ARSession对象,该对象管理创建增强现实(AR)体验所需的运动跟踪和图像处理。 但是,要运行Session,您必须提供Session配置。
The ARWorldTrackingConfiguration class provides high-precision motion tracking and enables features to help you place virtual content in relation to real-world surfaces. To start an AR session, create a session configuration object with the options you want (such as plane detection), then call the runWithConfiguration:options: method on the sessionobject of your ARSCNView instance:
ARWorldTrackingConfiguration类提供高精度的运动跟踪,并使用功能来帮助您将虚拟内容与真实世界的表面相关联。 要启动ARSession,请使用所需的选项(例如平面检测)创建会话配置对象,然后在ARSCNView实例的会话对象上调用runWithConfiguration:options:方法:
Run your session only when the view that will display it is onscreen.
Important: If your app requires ARKit for its core functionality, use the arkit key in the UIRequiredDeviceCapabilities section of your app’s Info.plist file to make your app available only on devices that support ARKit. If AR is a secondary feature of your app, use the isSupported property to determine whether to offer AR-based features.
只有在显示它的视图在屏幕上时才运行Session。
重要提示:如果您的应用需要ARKit的核心功能,请在应用的Info.plist文件的UIRequiredDeviceCapabilities部分中使用arkit密钥,以使您的应用仅在支持ARKit的设备上可用。 如果AR是应用程序的辅助功能,请使用isSupported属性来确定是否提供基于AR的功能。
Place 3D Content for Detected Planes
After you’ve set up your AR session, you can use SceneKit to place virtual content in the view.
When plane detection is enabled, ARKit adds and updates anchors for each detected plane. By default, the ARSCNView class adds an SCNNode object to the SceneKit scene for each anchor. Your view’s delegate can implement the renderer:didAddNode:forAnchor: method to add content to the scene.
为检测到的平面放置3D内容
设置完AR Session后,您可以使用SceneKit将虚拟内容放入视图中。
当启用平面检测时,ARKit会为每个检测到的平面添加并更新锚点。 默认情况下,ARSCNView类为每个锚点添加一个SCNNode对象到SceneKit场景。 您的视图委托可以实现渲染器:didAddNode:forAnchor:方法将内容添加到场景中。
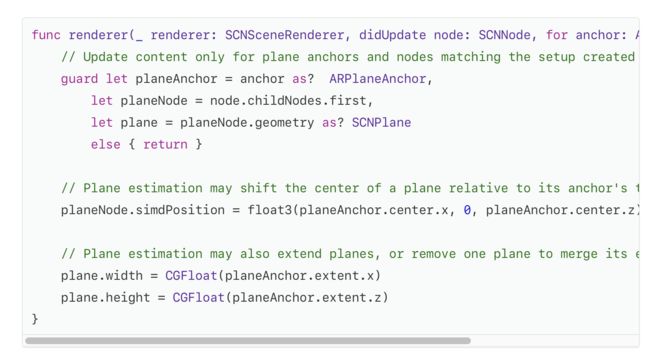
If you add content as a child of the node corresponding to the anchor, the ARSCNView class automatically moves that content as ARKit refines its estimate of the plane’s position and extent. To show the full extent of the estimated plane, this sample app also implements the renderer:didUpdateNode:forAnchor: method, updating the SCNPlane object’s size to reflect the esitmate provided by ARKit.
如果将内容添加为与锚点相对应的节点的子节点,ARSCNView类会自动移动该内容,因为ARKit会优化其对平面位置和范围的估计。 为了显示估计平面的全部范围,此示例应用程序还实现了renderer:didUpdateNode:forAnchor:方法,更新SCNPlane对象的大小以反映ARKit提供的预估平面。


