Linux基础篇学习——CentOS7.6下Git的使用
Git 分布式版本控制系统
Git是一个开源的分布式版本控制系统,可以有效、高速地处理从很小到非常大的项目版本管理。
Git是 Linus为了帮助管理 Linux 内核开发而用C语言开发的一个开放源码的版本控制软件。
GitHub是一个网站,它为开源项目免费提供Git存储,帮助程序员之间互相交流和学习。
参考教程 Git教程-廖雪峰的官方网站
1.安装git
[root@localhost ~]# mount /dev/sr0 /media
mount: /dev/sr0 is write-protected, mounting read-only
[root@localhost ~]# yum install git -y
2.配置git
[root@localhost ~]# git config --global user.name "Your Name"
[root@localhost ~]# git config --global user.email "[email protected]"
查看配置是否生效
[root@localhost ~]# git config --list
user.name=Your Name
user.email=[email protected]
3.创建版本库
版本库即Git管理文件的仓库,英文名repository,可以简单理解成一个目录,这个目录里所有的文件都被Git管理,每个文件的修改、删除,Git都能找到对应的操作记录,予以“追踪”或者“还原”。对于新增的文件,要先添加到版本库中才能被Git管理起来。
[root@localhost ~]# mkdir gitspace
[root@localhost ~]# cd gitspace/
[root@localhost gitspace]# git init
Initialized empty Git repository in /root/gitspace/.git/
git init命令把这个目录变成Git可以管理的仓库
查看版本库内容ls -a
[root@localhost gitspace]# ls -A
.git
[root@localhost gitspace]# ls -Al .git
total 12
drwxr-xr-x. 2 root root   6 Oct  8 15:05 branches
-rw-r--r--. 1 root root  92 Oct  8 15:05 config
-rw-r--r--. 1 root root  73 Oct  8 15:05 description
-rw-r--r--. 1 root root  23 Oct  8 15:05 HEAD
drwxr-xr-x. 2 root root 242 Oct  8 15:05 hooks
drwxr-xr-x. 2 root root  21 Oct  8 15:05 info
drwxr-xr-x. 4 root root  30 Oct  8 15:05 objects
drwxr-xr-x. 4 root root  31 Oct  8 15:05 refs
.git就是Git的版本库,里面里存了很多东西,最重要的是暂存区stage,Git自动创建的第一个分支master,以及指向master的一个指针HEAD。

HEAD 文件内容包含了一个索引信息,这个索引将总是指向项目中的当前开发分支
cat.git/HEAD查看HEAD文件的内容为ref:refs/heads/master。master 是默认的分支,这也是.git/HEAD创建的时候就指向master的原因,尽管目前它其实并不存在。git 将假设你会在 master 上开始并展开你以后的工作,除非你自己创建你自己的分支。
objects 包含了项目中的所有对象
refs 用来保存指向对象的索引
具体地说,refs 包含两个子目录heads 和 tags,它们存放了不同的开发分支的头的索引,或者是用来标定版本的标签的索引。
把文件添加到版本库
准备工作:创建文件
一定要放到版本库gitspace目录下
[root@localhost gitspace]# echo "hello git" >file1
正式步骤
step1 用命令git add告诉Git,把文件添加到仓库
如果不用git add到暂存区,就不会加入到commit中
[root@localhost gitspace]# git add file1
step2 用命令git commit告诉Git,把文件提交到仓库
[root@localhost gitspace]# git commit -m "add file1"
[master 19e84fb] add file1
 1 files changed, 1 insertion(+)
-m 本次提交说明 便于从历史记录里方便地找到改动记录
1 file changed 1个文件被改动
1 insertions 插入了一行内容 file1有一行内容
注意事项:
使用命令git add 将需要提交的文件修改放到stage暂存区,可反复多次使用;
使用命令git commit向master分支上提交更改,一次性提交暂存区的所有修改。
git status 命令可以列出当前目录所有还没有被git管理的文件和被git管理且被修改但还未提交(git commit)的文件。
[root@localhost gitspace]# vim file1
[root@localhost gitspace]# vim file2
[root@localhost gitspace]# cat file1
hello git
happy
no
apple
[root@localhost gitspace]# cat file2
banana
[root@localhost gitspace]# git status
# On branch master
# Changes not staged for commit:
#   (use "git add ..." to update what will be committed)
#   (use "git checkout -- ..." to discard changes in working directory)
#
#       modified:   file1
#
# Untracked files:
#   (use "git add ..." to include in what will be committed)
#
#       file2
no changes added to commit (use "git add" and/or "git commit -a")
modified 修改过的文件
Untracked files 没有被添加过的文件
[root@localhost gitspace]# git add file1 file2
[root@localhost gitspace]# git status
# On branch master
# Changes to be committed:
#   (use "git reset HEAD ..." to unstage)
#
#       modified:   file1
#       new file:   file2
git commit 一次性把暂存区的所有修改提交到分支master

[root@localhost gitspace]# git commit -m "file1 changed and file2 newadd"
[master 7f5ab15] file1 changed and file2 newadd
 2 files changed, 2 insertions(+)
 create mode 100644 file2
4.版本回退
修改file1并提交(重复2次)
[root@localhost gitspace]# vim file1
[root@localhost gitspace]# cat file1
hello git
happy
[root@localhost gitspace]# git add file1
[root@localhost gitspace]# git commit -m "add happy"
[master cd3528c] add happy
 1 file changed, 1 insertion(+)
[root@localhost gitspace]# vim file1
[root@localhost gitspace]# cat file1
hello git
happy
no
[root@localhost gitspace]# git add file1
[root@localhost gitspace]# git commit -m "add no"
[master 16205dd] add no
 1 file changed, 1 insertion(+)
git log 显示从最近到最远的提交日志
[root@localhost gitspace]# git log
commit a46df4368a8eff11b970c36a81558b97aa331201
Author: zhao <[email protected]>
Date:   Thu Oct 10 17:35:50 2019 +0800

    add no

commit 82010f6640b04c7c4b55f6488a50954bc85bb5a9
Author: zhao <[email protected]>
Date:   Thu Oct 10 17:33:14 2019 +0800

    add happy

commit c8b38f0615f9ca751e97343470076bfe50a766e6
Author: zhao <[email protected]>
Date:   Thu Oct 10 17:32:39 2019 +0800

    add file1

commit 37c86f0cc958b96262a94786ccaefed76a4c5fa6
Author: zhao <[email protected]>
Date:   Thu Oct 10 17:28:56 2019 +0800
查看简要提交记录git log --pretty=oneline
[root@localhost gitspace]# git log --pretty=oneline
a46df4368a8eff11b970c36a81558b97aa331201 add no
82010f6640b04c7c4b55f6488a50954bc85bb5a9 add happy
c8b38f0615f9ca751e97343470076bfe50a766e6 add file1
| commit id | commit messege |
|---|---|
| a46df4368a8eff11b970c36a81558b97aa331201 | add no |
| 82010f6640b04c7c4b55f6488a50954bc85bb5a9 | add happy |
| c8b38f0615f9ca751e97343470076bfe50a766e6 | add file1 |
git reset 版本回退
type1 把当前版本add no回退到上一个版本add happy
[root@localhost gitspace]# git reset --hard HEAD^
HEAD is now at 82010f6 add happy
[root@localhost gitspace]# cat file1
hello git
happy
此时版本库提交日志如下:
最新的版本add no不存在了
[root@localhost gitspace]# git log
commit 82010f6640b04c7c4b55f6488a50954bc85bb5a9
Author: zhao <[email protected]>
Date:   Thu Oct 10 17:33:14 2019 +0800

    add happy

commit c8b38f0615f9ca751e97343470076bfe50a766e6
Author: zhao <[email protected]>
Date:   Thu Oct 10 17:32:39 2019 +0800

    add file1

commit 37c86f0cc958b96262a94786ccaefed76a4c5fa6
Author: zhao <[email protected]>
Date:   Thu Oct 10 17:28:56 2019 +0800
type2 通过commit id指定回到某个版本
版本号可以不写全,Git会自动查寻
[root@localhost gitspace]# git reset --hard a46df
HEAD is now at a46df43 add no
commit id找回方法 git reflog
git reflog用来记录每一次命令
[root@localhost gitspace]# git reflog
a46df43 HEAD@{0}: reset: moving to a46df
82010f6 HEAD@{1}: reset: moving to HEAD^
a46df43 HEAD@{2}: commit: add no
82010f6 HEAD@{3}: commit: add happy
c8b38f0 HEAD@{4}: commit: add file1
git版本回退原理
Git的版本回退速度非常快,因为Git在内部有个指向当前版本的HEAD指针,当你回退版本的时候,Git仅仅是把HEAD从指向add no

改为指向add happy
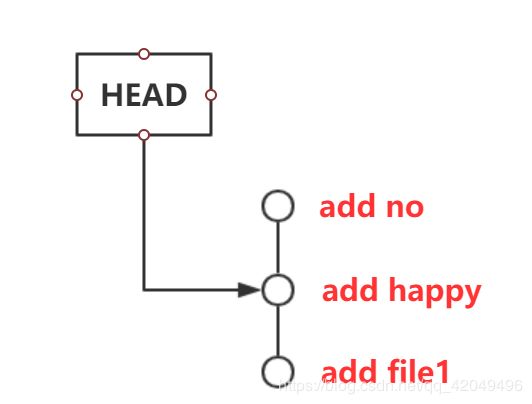
并更新工作区的文件。即HEAD指向哪个版本号,当前版本就定位在哪儿。
5.撤销修改
[root@localhost gitspace]# cat file1
hello git
happy
no
apple
error
[root@localhost gitspace]# git status
# On branch master
# Changes not staged for commit:
#   (use "git add ..." to update what will be committed)
#   (use "git checkout -- ..." to discard changes in working directory)
#
#       modified:   file1
#
no changes added to commit (use "git add" and/or "git commit -a")
git checkout -- file 丢弃工作区的修改
情况1 file1自修改后还没有被放到暂存区,撤销修改就回到和版本库一模一样的状态
[root@localhost gitspace]# git checkout -- file1
[root@localhost gitspace]# cat file1
hello git
happy
no
apple
情况2 file1已经添加到暂存区后,又作了修改,则撤销修改就回到添加到暂存区后的状态
[root@localhost gitspace]# vim file1
[root@localhost gitspace]# cat file1
hello git
happy
no
apple
orange
[root@localhost gitspace]# git add file1
[root@localhost gitspace]# vim file1
[root@localhost gitspace]# cat file1
hello git
happy
no
apple
orange
error
[root@localhost gitspace]# git checkout -- file1
[root@localhost gitspace]# cat file1
hello git
happy
no
apple
orange
即让这个文件回到最近一次git commit或git add时的状态
git reset HEAD 撤销暂存区的修改(unstage),重新放回工作区
[root@localhost gitspace]# vim file1
[root@localhost gitspace]# cat file1
hello git
happy
no
apple
orange
error 2
[root@localhost gitspace]# git add file1
[root@localhost gitspace]# git status
# On branch master
# Changes to be committed:
#   (use "git reset HEAD ..." to unstage)
#
#       modified:   file1
[root@localhost gitspace]# git reset HEAD file1
Unstaged changes after reset:
M       file1
小结
场景1:当你改乱了工作区某个文件的内容,想直接丢弃工作区的修改时,用命令git checkout – file。
场景2:当你不但改乱了工作区某个文件的内容,还添加到了暂存区时,想丢弃修改,分两步,第一步用命令git reset HEAD,就回到了场景1,第二步按场景1操作。
场景3:已经提交了不合适的修改到版本库时,想要撤销本次提交,参考版本回退,前提是没有推送到远程库。
6.删除文件
若在工作区用rm删除文件,会导致工作区和版本库不一致,用git status命令可以查看到被删除的文件
[root@localhost gitspace]# rm -rf file2
[root@localhost gitspace]# git status
# On branch master
# Changes not staged for commit:
#   (use "git add/rm ..." to update what will be committed)
#   (use "git checkout -- ..." to discard changes in working directory)
#
#       modified:   file1
#       deleted:    file2
#
no changes added to commit (use "git add" and/or "git commit -a")
情况1 确实要从版本库中删除该文件 git rm 且 git commit
[root@localhost gitspace]# git rm file2
rm 'file2'
[root@localhost gitspace]# git commit -m "delete file2"
[master bedd40b] delete file2
 1 file changed, 1 deletion(-)
 delete mode 100644 file2
先手动删除文件,然后使用git rm 与 git add 效果是一样的
情况2 删错了,但版本库里还有,可以把误删的文件恢复到最新版本
[root@localhost gitspace]# rm -rf file2
[root@localhost gitspace]# git status
# On branch master
# Changes not staged for commit:
#   (use "git add/rm ..." to update what will be committed)
#   (use "git checkout -- ..." to discard changes in working directory)
#
#       deleted:    file2
#
no changes added to commit (use "git add" and/or "git commit -a")
[root@localhost gitspace]# git checkout -- file2
git checkout实际上是用版本库里的版本替换工作区的版本,无论工作区是修改还是删除,都可以“一键还原”
只能恢复文件到最新版本,会丢失最近一次提交后你修改的内容。
添加远程仓库
注册一个GitHub账号,免费获得Git远程仓库
本地Git仓库和GitHub仓库之间的传输是通过SSH加密的
创建SSH Key
[root@localhost ~]# ssh-keygen -t rsa -C "[email protected]"
Generating public/private rsa key pair.
Enter file in which to save the key (/root/.ssh/id_rsa):
Created directory '/root/.ssh'.
Enter passphrase (empty for no passphrase):
Enter same passphrase again:
Your identification has been saved in /root/.ssh/id_rsa.
Your public key has been saved in /root/.ssh/id_rsa.pub.
The key fingerprint is:
SHA256:FRHDPGOjvkdh9WnKX401fWacvPwGHX+Hh0DuX4azHKY [email protected]
The key's randomart image is:
+---[RSA 2048]----+
|         o=o     |
|          Boo    |
|         o.B ..oo|
|        ..o o +=B|
|       .S. + +.XB|
|        . . + Xo@|
|         o   * X+|
|        . . E = o|
|         .     . |
+----[SHA256]-----+
[root@localhost .ssh]# ls -l /root/.ssh
total 8
-rw-------. 1 root root 1679 Oct 19 15:21 id_rsa
-rw-r--r--. 1 root root  399 Oct 19 15:21 id_rsa.pub
ssh密钥对默认地址: /root/.ssh
id_rsa是私钥,不能泄露
id_rsa.pub是公钥,可以告诉任何人
将SSH Key添加到GitHub
登陆GitHub——Settings——Personal settings:SSH and GPG keys——new SSH key——填上任意Title,在Key文本框里粘贴id_rsa.pub文件的内容——Add SSH key
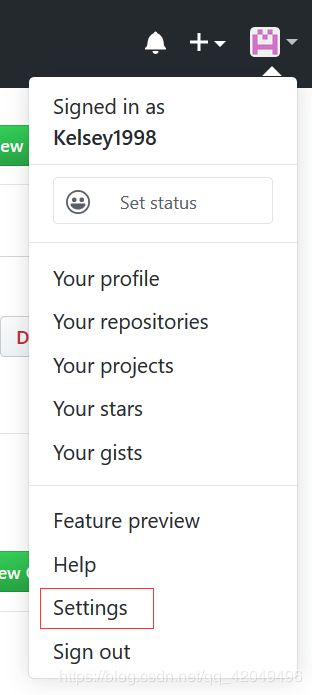
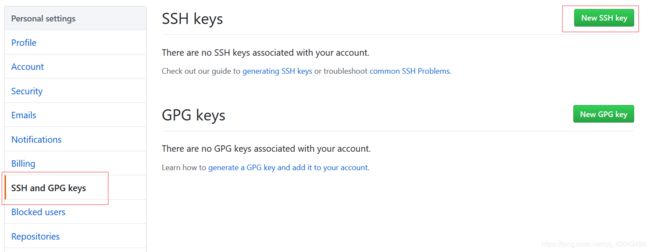
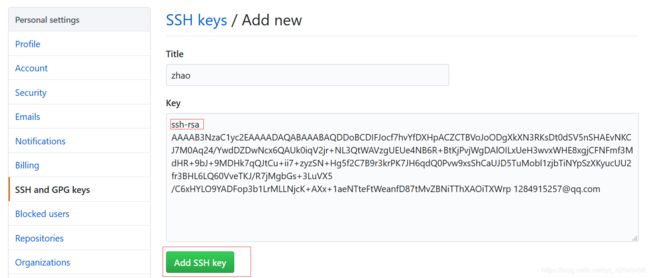
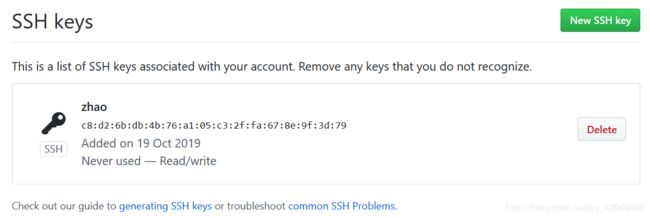 在GitHub上免费托管的Git仓库,任何人都可以看到
2019.01.07,GitHub 官网宣布,GitHub 两大更新
1.个人可以免费创建私有仓库,数量无限制,但是免费的私有仓库同时最多只能有三个协作者。
2.GitHub 企业升级,统一了原 GitHub 业务云 和 GitHub企业。方便开发人员可以无缝地在两种环境中工作。
添加远程库
New repository——添加Repository name——选择远程库类型(Public或Private)——create Repository
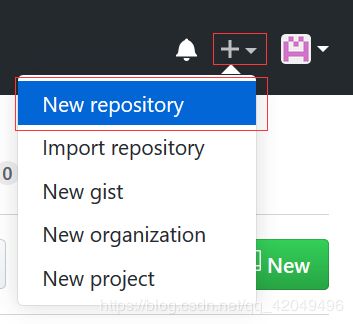
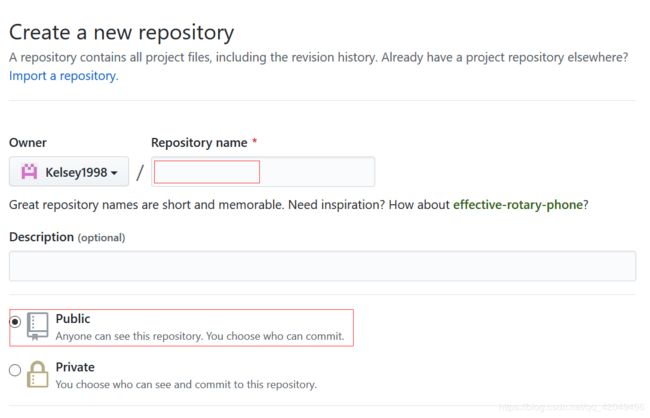
把本地仓库的内容推送到GitHub仓库
在本地的gitspace仓库下运行命令,添加后,远程库的名字就是origin
git remote add origin [email protected]:kelsey1998/gitspace.git
把本地库的所有内容推送到远程库上
git push -u origin master
-u Git会把本地的master分支内容推送到远程新的master分支,并把本地的master分支和远程的master分支关联起来
[root@localhost gitspace]# git remote add origin [email protected]:Kelsey1998/gitpsace.git
[root@localhost gitspace]# git push -u origin master
Warning: Permanently added the RSA host key for IP address '13.229.188.59' to the list of known hosts.
Counting objects: 55, done.
Compressing objects: 100% (31/31), done.
Writing objects: 100% (55/55), 4.29 KiB | 0 bytes/s, done.
Total 55 (delta 1), reused 0 (delta 0)
remote: Resolving deltas: 100% (1/1), done.
To [email protected]:Kelsey1998/gitpsace.git
 * [new branch]      master -> master
Branch master set up to track remote branch master from origin.
SSH警告
当第一次使用Git的clone或者push命令连接GitHub时,会得到一个警告
[root@localhost gitspace]# git push -u origin master
The authenticity of host 'github.com (13.250.177.223)' can't be established.
RSA key fingerprint is SHA256:nThbg6kXUpJWGl7E1IGOCspRomTxdCARLviKw6E5SY8.
RSA key fingerprint is MD5:16:27:ac:a5:76:28:2d:36:63:1b:56:4d:eb:df:a6:48.
Are you sure you want to continue connecting (yes/no)? yes
因为Git使用SSH连接,而SSH连接在第一次验证GitHub服务器的Key时,需要确认GitHub的Key的指纹信息是否真的来自GitHub的服务器,输入yes回车即可;
Git会告诉你已经把GitHub的Key添加到本机的一个信任列表里了
Warning: Permanently added 'github.com,13.250.177.223' (RSA) to the list of known hosts.
从远程库克隆
创建远程库
创建远程库learngit,勾选Initialize this repository with a README,GitHub会自动创建一个README.md文件
git clone 克隆一个本地库
[root@localhost ~]# git clone [email protected]:Kelsey1998/learngit.git
Cloning into 'learngit'...
remote: Enumerating objects: 3, done.
remote: Counting objects: 100% (3/3), done.
Receiving objects: 100% (3/3), done.
remote: Total 3 (delta 0), reused 0 (delta 0), pack-reused 0
[root@localhost ~]# ls -al learngit/
total 4
drwxr-xr-x. 3 root root  35 Oct 19 16:19 .
dr-xr-x---. 5 root root 213 Oct 19 16:20 ..
drwxr-xr-x. 8 root root 163 Oct 19 16:19 .git
-rw-r--r--. 1 root root  10 Oct 19 16:19 README.md
Git支持多种协议,包括https,但通过ssh支持的原生git协议速度最快
