好,静态的页面已经可以完成了,下面就开始加上后台的处理部分。
查看easyui的API可以看到,如果需要后台支持的话,需要设置url属性,下面用java来做后台处理数据。
传输的格式用的是JSON,如果你还不知道JSON那么就去baidu一下好了。
后台现在只添加了struts和spring的支持,如果需要连接数据库那么添加上hibernate或者用jdbc等数据处理层的框架好了
好新建jsp页面,添加默认的编码格式为UTF-8
 代码
代码

     <%


     @ page language


     =


     "


     java


     "


      contentType


     =


     "


     text/html; charset=UTF-8


     "


      pageEncoding


     =


     "


     UTF-8


     "


     %>


     <%


     @ taglib uri


     =


     "


     http://struts.apache.org/tags-bean


     "


      prefix


     =


     "


     bean


     "


     %>


     <%


     @ taglib uri


     =


     "


     http://struts.apache.org/tags-html


     "


      prefix


     =


     "


     html


     "


     %>


     <%


     @ taglib uri


     =


     "


     http://struts.apache.org/tags-logic


     "


      prefix


     =


     "


     logic


     "


     %>
设置默认路径
    <%


String path


    =


     request.getContextPath();
String basePath


    =


     request.getScheme()


    +


    "


    ://


    "


    +


    request.getServerName()


    +


    "


    :


    "


    +


    request.getServerPort()


    +


    path


    +


    "


    /


    "


    ;
request.setAttribute(


    "


    basepath


    "


    ,basePath);


    %>
添加默认的css和必须的js包
代码
     <


     link rel


     =


     "


     stylesheet


     "


      type


     =


     "


     text/css


     "


      href


     =


     "


     ${basepath}resources/default.css


     "


     />


     <


     link rel


     =


     "


     stylesheet


     "


      type


     =


     "


     text/css


     "


      href


     =


     "


     ${basepath}resources/themes/default/easyui.css


     "


     />


     <


     link rel


     =


     "


     stylesheet


     "


      type


     =


     "


     text/css


     "


      href


     =


     "


     ${basepath}resources/themes/icon.css


     "


     >


     <


     script type


     =


     "


     text/javascript


     "


      src


     =


     "


     ${basepath}resources/jquery-1.4.2.min.js


     "


     >


     script


     >


     <


     script type


     =


     "


     text/javascript


     "


      src


     =


     "


     ${basepath}resources/jquery.easyui.min.js


     "


     >


     script


     >


     <


     script type


     =


     "


     text/javascript


     "


      src


     =


     "


     ${basepath}resources/jquery[1].json-1.3.min.js


     "


     >


     script


     >
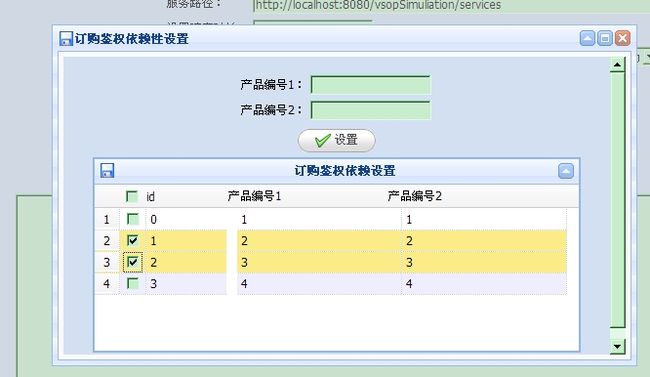
OK,现在可以开始写生成表格的程序了。
在$(function(){}中添加调用表格的程序
代码
     $(


     '


     #tt


     '


     ).datagrid({
                title:


     '


     订购鉴权依赖设置


     '


     ,
                iconCls:


     '


     icon-save


     '


     ,
                width:


     500


     ,
                height:


     200


     ,
                nowrap:


     false


     ,
                striped:


     true


     ,
                collapsible:


     true


     ,
                url:


     '


     ${basepath}simulation/simulation.do?method=yilai


     '


     ,
                remoteSort:


     false


     ,
                idField:


     '


     id


     '


     ,
                frozenColumns:[[
                    {field:


     '


     ck


     '


     ,checkbox:


     true


     },
                    {title:


     '


     id


     '


     ,field:


     '


     id


     '


     ,width:


     80


     }
                ]],
                columns:[
                    [
                        {title:


     '


     产品编号1


     '


     ,field:


     '


     key


     '


     ,width:


     160


     },
                        {title:


     '


     产品编号2


     '


     ,field:


     '


     value


     '


     ,width:


     160


     }
                    ]
                ],
                rownumbers:


     true


     //


                     toolbar:[{


     //


                         id:'btncut',


     //


                         text:'删除',


     //


                         iconCls:'icon-cut',


     //


                         handler:function(){


     //


                             alert('del')


     //


                         }


     //


                     }]


                 });
        });
要注意生成的数据的格式,是标准的JSON的格式。
将struts所使用的action配置到struts-config.xml中
在Action中调用的方法的内容如下:
代码
     /**


     * 依赖性设置
     *
     *


     @param


      map
     *


     @param


      form
     *


     @param


      req
     *


     @param


      res
     *


     @return


     *


     @throws


      Exception


     */


     public


      ActionForward huchi(ActionMapping map, ActionForm form,
            HttpServletRequest req, HttpServletResponse res)


     throws


      Exception {

        List


     <


     PropertyBean


     >


      l


     =


      simulationBO.propForGrid(


     "


     huchi


     "


     );
        JSONArray jsonArray


     =


      JSONArray.fromObject(l);

        String baseStr


     =


     "


     {\


     "


     total\


     "


     :1,\


     "


     rows\


     "


     :


     "


     +


      jsonArray.toString()


     +


     "


     }


     "


     ;

        outJsonUTFString(res, baseStr);


     return


     null


     ;
    }
注意返回的值的内容,编码格式为UTF-8,看一下outJsonUTFString方法
代码
     /**


     * dengwei add JSON数据输出
     *
     *


     @param


      response
     *


     @param


      json


     */


     private


     void


      outJsonUTFString(HttpServletResponse response, String json) {


     //


      response.setContentType("text/javascript;charset=UTF-8");


             response.setContentType(


     "


     text/html;charset=UTF-8


     "


     );


     try


      {
            outString(response, json);
        }


     catch


      (Exception e) {


     //


      TODO Auto-generated catch block


                 e.printStackTrace();
        }
    }
使用response的输出返回给调用的页面
代码
     //


      输出json格式数据


     private


     void


      outString(HttpServletResponse response, String str) {


     try


      {
            PrintWriter out


     =


      response.getWriter();


     //


      out.write(str);


                 out.println(str);
            out.flush();
            out.close();
        }


     catch


      (IOException e) {
            e.printStackTrace();
        }
    }
其中使用net.sf.json.JSONArray来处理生成的json对象,将list中的内容格式化成页面上需要返回的json格式,当然也可以使用其它的工具类来完成。
下面把完整的jsp页面和要使用的几个类文件的源码贴上来吧
<%@ page language="java" contentType="text/html; charset=UTF-8" pageEncoding="UTF-8"%>
<%@ taglib uri="http://struts.apache.org/tags-bean" prefix="bean" %>
<%@ taglib uri="http://struts.apache.org/tags-html" prefix="html" %>
<%@ taglib uri="http://struts.apache.org/tags-logic" prefix="logic" %>
<%
String path = request.getContextPath();
String basePath = request.getScheme()+"://"+request.getServerName()+":"+request.getServerPort()+path+"/";
request.setAttribute("basepath",basePath);
%>
依赖设置
产品编号1:
产品编号2:
要使用的struts文件就自己配置一下吧
接下来是Action中的代码可以在上边找一下
然后是逻辑类中的代码文件
public ListpropForGrid(String type){ List l = new ArrayList (); String value = ""; if("yilai".equals(type)){ value = ConfigParser.get("yilai_list"); }else{ value = ConfigParser.get("huchi_list"); } if(value.length()>0){ String[] str = value.split(";"); for (int i = 0; i < str.length; i++) { String[] kvStr = str[i].split(","); PropertyBean prob = new PropertyBean(); prob.setId(i); prob.setKey(kvStr[0]); prob.setValue(kvStr[1]); l.add(prob); } } return l; }
好了,看一下运行的效果吧,这个工程中没有加上分页,因为数据量不大。
如果有需要源码的我可以把源码分享出来,下一步会完成在产品编号1和产品编号2中添加值后在列表中动态显示。