Jetson Nano 【14】Pytorch的YOLOv3 spp 模型中关于tensorRT+ 矩形推理问题的解决过程
文章目录
- 背景说明
- 最终效果
- 实现过程
- 矩形推理在整体流程中的位置
- 图形数据输入处理
- 推理输出接收
- 总结
- git地址
背景说明
- 模型是YOLOv3 spp
- 框架是Pytorch
- 由于我的Nano上GPU计算资源不够,所以我们急需减少模型计算量,在剪枝与量化+转tensorRT后从500ms达到了85ms每张,但依然达不到要求,于是想到了矩形推理。
最终效果
- 在256x416的视频中实现50-55ms 处理一张图片的成绩,换算成FPS 在 20左右(YOLOv3 Spp)。
实现过程
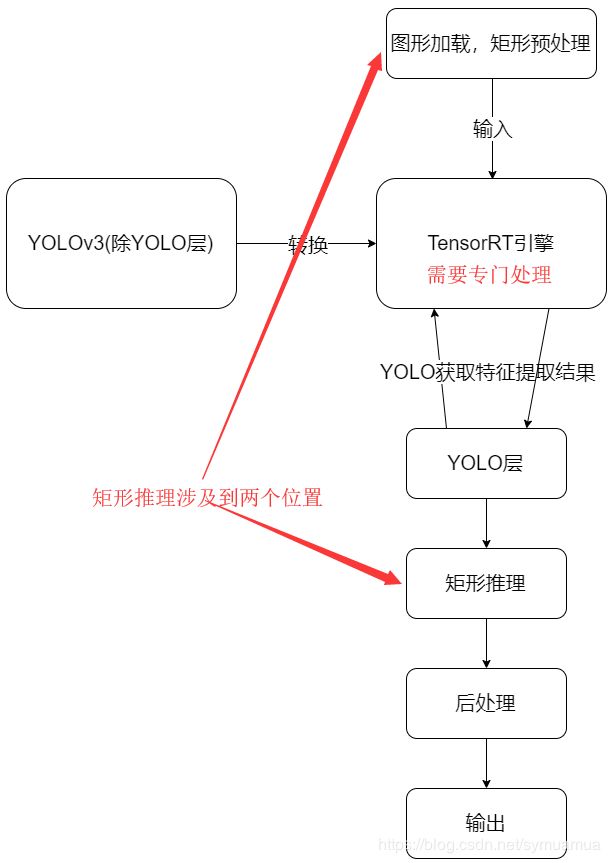
矩形推理在整体流程中的位置
- 如图
图形数据输入处理
- 可以参考https://github.com/ultralytics/yolov3/issues/232,中的讨论内容
- 基本原理就是,图形等比缩放,短边朝着最近的32倍数补充(YOLOv3特征图有个较大的是32x32的)于是,关键代码是:
dw, dh = np.mod(dw, 32), np.mod(dh, 32)。
# 图片变形
def letterbox(img, new_shape=(416, 416), color=(0, 0, 0),
              auto=True, scaleFill=False, scaleup=True, interp=cv2.INTER_AREA):
    # Resize image to a 32-pixel-multiple rectangle https://github.com/ultralytics/yolov3/issues/232
    shape = img.shape[:2]  # current shape [height, width]      (1920,1080,3)
    if isinstance(new_shape, int):
        new_shape = (new_shape, new_shape)

    # Scale ratio (new / old)
    r = max(new_shape) / max(shape)# 计算缩放比例
    if not scaleup:  # only scale down, do not scale up (for better test mAP)
        r = min(r, 1.0)

    # Compute padding
    ratio = r, r  # width, height ratios  等比缩小
    new_unpad = int(round(shape[1] * r)), int(round(shape[0] * r))
    dw, dh = new_shape[1] - new_unpad[0], new_shape[0] - new_unpad[1]  # wh padding
    if auto:  # minimum rectangle
        dw, dh = np.mod(dw, 32), np.mod(dh, 32)  # wh padding  模计算
        pass# 造成长宽不同的原因在于此
    elif scaleFill:  # stretch
        dw, dh = 0.0, 0.0
        new_unpad = new_shape
        ratio = new_shape[0] / shape[1], new_shape[1] / shape[0]  # width, height ratios

    dw /= 2  # divide padding into 2 sides # 填充分两边
    dh /= 2

    if shape[::-1] != new_unpad:  # resize
        img = cv2.resize(img, new_unpad, interpolation=interp)  # INTER_AREA is better, INTER_LINEAR is faster
    top, bottom = int(round(dh - 0.1)), int(round(dh + 0.1))
    left, right = int(round(dw - 0.1)), int(round(dw + 0.1))
    img = cv2.copyMakeBorder(img, top, bottom, left, right, cv2.BORDER_CONSTANT, value=color)  # add border   添加边框
    return img, ratio, (dw, dh)
推理输出接收
-
由于输入是矩形的,则输出应当也是矩形(这里考虑TensorRT没问题的情况,不匹配请重新转化一遍),则需要在原来的基础上添加判断形状的代码
-
我在init中吧grid_分成x和y,用以代表矩形的两边
 # self.grid_size = 0  # grid size  分成 grid_size_x grid_size_y,用于矩形推理的实现
        self.grid_size_x = 0
        self.grid_size_y = 0
- 在进行前推forward的时候,我们需要对接收的数据进行形状判断:
- 这里就第一层为例,下采样32x32,则当输入为256x416时,,那么h = 256/32 = 8 ; w = 416/32 = 13,即当batchsize=1的时候,x的形状是:[1,3,8,13],如此依赖我们就获取了高和宽数据(实际上是网格数量)
 # 检测框具体顺序为 Center x,Center y,Width,Height
 # x的说明:若图片输入非正方形 如:256x416
 # x[2],x[3] =  256/32 = 8 , 416/32 = 13 下一层以此类推
grid_size_y = x.size(2)
grid_size_x = x.size(3)
- 在后续构造tensor形状的时候起作用,如:
# 注释说明
# prediction 的维度为 batch_size, num_anchors=3, grid_size, grid_size, num_classes + 5(coco:85)
prediction = (
    x.view(num_samples, self.num_anchors, self.num_classes + 5, grid_size_y, grid_size_x)
     .permute(0, 1, 3, 4, 2)  # permute: 将维度换位
     .contiguous()
   )
- 还有个比较重要的点是:
compute_grid_offsets方法,它是计算网格偏移的,用于抵消图像变化所带来的框体偏移
def compute_grid_offsets(self, grid_size_y,grid_size_x, img_dim, cuda=True, Half=False):
        # self.grid_size = grid_size
        # [x,y] 由于x y 可能不同,则所有有关x、y都需要分开
        self.grid_size_x = grid_size_x
        self.grid_size_y = grid_size_y
        gx = self.grid_size_x
        gy = self.grid_size_y
        FloatTensor = torch.cuda.FloatTensor if cuda else torch.FloatTensor
        FloatTensor = torch.cuda.HalfTensor if Half else torch.cuda.FloatTensor
        self.img_dim = img_dim
        # 步长一定要是正方形
        self.stride = self.img_dim / max(gx, gy)


        # Calculate offsets for each grid
        # self.grid_x = torch.arange(gx).repeat(gy, 1).view([1, 1, gy, gx]).type(FloatTensor)
        self.grid_x = torch.arange(gx).repeat(gy, 1).view([1, 1, gy, gx]).type(FloatTensor)
        # self.grid_y = torch.arange(gx).repeat(gy, 1).view([1, 1, gy, gx]).type(FloatTensor)
        # self.grid_y = torch.arange(gx).repeat(gy, 1).t().contiguous().view([1, 1, gy, gx]).type(FloatTensor)
        # 这里的grid y 需要与gridx 的顺序不同
        self.grid_y = torch.arange(gy).repeat(gx, 1).t().contiguous().view([1, 1, gy, gx]).type(FloatTensor)
        self.scaled_anchors = FloatTensor([(a_w / self.stride, a_h / self.stride) for a_w, a_h in self.anchors])
        # self.scaled_anchors = FloatTensor([(a_w / self.stride, a_h / self.stride) for a_w, a_h in self.anchors])
        self.anchor_w = self.scaled_anchors[:, 0].view((1, self.num_anchors, 1, 1))
        self.anchor_h = self.scaled_anchors[:, 1].view((1, self.num_anchors, 1, 1))
- 它需要计算grid_x和grid_y,此时需要将形状准确地填入,如在计算grid_y的时候,涉及到矩阵转置,如果非方阵,则涉及到长宽问题就比较重要,需要与grid_x的计算方法,相反:
self.grid_y = torch.arange(gy).repeat(gx, 1).t().contiguous().view([1, 1, gy, gx]).type(FloatTensor)
总结
- 总体原理比较简单,但是加速效果简单粗暴,真的明显,比如原来416x416编程256x416那个加速比,简单算算应该至少有三分之一吧,实际上接近40%,更加明显一点。
git地址
- 更新更新:觉得不错的话,给小弟一个Star吧