利用creator的widget + layout组件搭建一个能适应各种分辨率的UI
1)先看效果
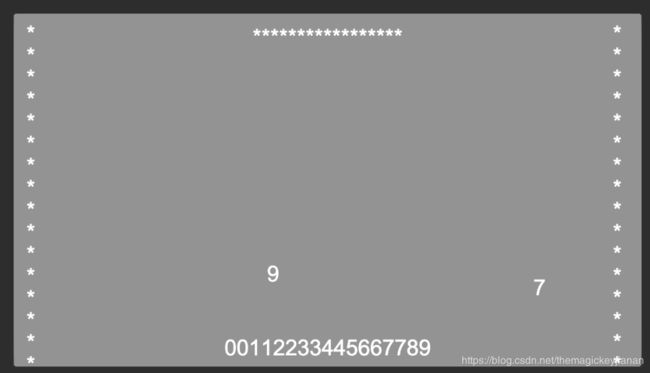
正常的设计分辨率的
奇葩分辨率ipad下

华为p9这种比较长的
比较窄的,甚至我都不转屏
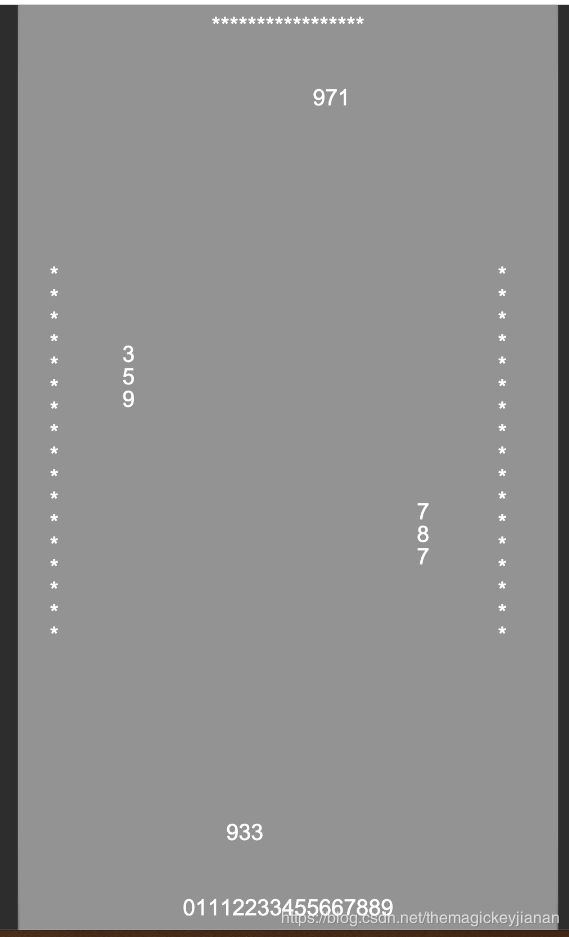
总结:可见,在任何分辨率下,显示效果都还不错:1.没有黑边 2.背景铺满 3.元素在不同分辨率下大小始终,做到都显示差不多
2)实现原理
1.先说背景:不考虑拉伸的话,就直接使用widget组件给铺满

2.显示UI的父节点地方
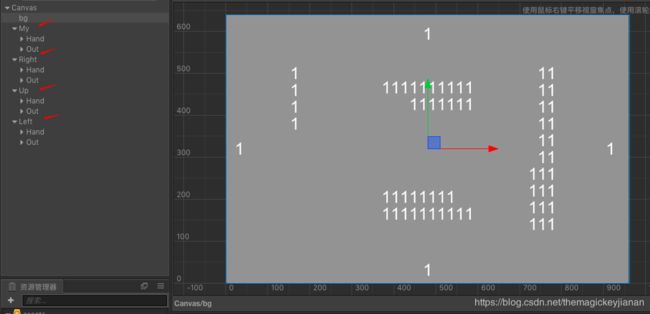
先搞4个父节点My、Right、Up、Left,锚点不用改,因为仅仅是一个节点,使用widget设置他们4个方向的停靠点
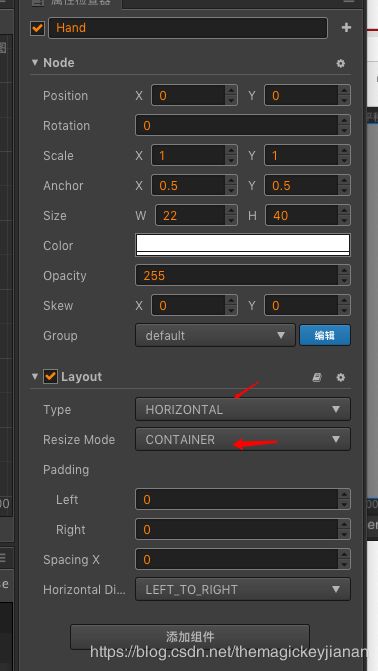
3.根据手牌和出的牌的位置,有2个子节点Hand和Out,设置好Layout组件,
手牌是设置下横竖就行
其中打出来的牌是Grid类型,因为要打到指定位置就要换行

由于4个停靠点,要么x是0,要么y是0,那么这样就会保证在不同分辨率下,这个位置始终都是0,在用widget组件保证停靠,那么就OK了
4.然后4个父节点要设置好放缩,保证即使不旋转,也能在即使很窄的宽度方向显示比例也良好 initScale
/**
 * 实现发牌后,每个人自动打牌: 摸到什么打什么
 */
cc.Class({
    extends: cc.Component,

    properties: {
        nodeMy: cc.Node,
        nodeRight: cc.Node,
        nodeUp: cc.Node,
        nodeLeft: cc.Node,

        cardNormal: cc.Prefab,
        cardBack: cc.Prefab,
    },

    onLoad() {
        // 当前轮到谁出牌了
        this.curTurnIndex = -1;

        // 服务器发的玩家的牌
        this.cardMap = {
            0: {
                cardList: [0, 1, 2, 3, 4, 5, 6, 7, 8, 9, 0, 1, 2, 3, 4, 5, 6],
            },
            1: {
                cardList: [-1, -1, -1, -1, -1, -1, -1, -1, -1, -1, -1, -1, -1, -1, -1, -1, -1],
            },
            2: {
                cardList: [-1, -1, -1, -1, -1, -1, -1, -1, -1, -1, -1, -1, -1, -1, -1, -1, -1],
            },
            3: {
                cardList: [-1, -1, -1, -1, -1, -1, -1, -1, -1, -1, -1, -1, -1, -1, -1, -1, -1],
            },
        };

        this.nodePosList = [this.nodeMy, this.nodeRight, this.nodeUp, this.nodeLeft];

        // 手牌节点
        this.nodeHandList = [this.nodeMy.getChildByName("Hand"), this.nodeRight.getChildByName("Hand"), this.nodeUp.getChildByName("Hand"), this.nodeLeft.getChildByName("Hand")];

        // 打出的牌节点
        this.nodeOutList = [this.nodeMy.getChildByName("Out"), this.nodeRight.getChildByName("Out"), this.nodeUp.getChildByName("Out"), this.nodeLeft.getChildByName("Out")];
    },

    start() {
        this.initScale();

        this.initCard();

        this.testOutCard();
    },

    initScale: function () {
        let canvasNode = cc.find("Canvas");
        let widthScale = canvasNode.width / 960;
        let scale = Math.min(widthScale, 1);

        for (let i = 0; i < this.nodePosList.length; i++) {
            this.nodePosList[i].scale = scale;
        }
    },

    initCard: function () {
        for (let i = 0; i < this.nodeHandList.length; i++) {
            let node = this.nodeHandList[i];
            node.removeAllChildren();
        }

        for (let i = 0; i < this.nodeOutList.length; i++) {
            let node = this.nodeOutList[i];
            node.removeAllChildren();
        }

        for (let key in this.cardMap) {
            let info = this.cardMap[key];

            let prefab = null;
            if (key == "0") {
                prefab = this.cardNormal;
            } else {
                prefab = this.cardBack;
            }

            let cardList = info.cardList;

            for (let i = 0; i < cardList.length; i++) {
                let val = cardList[i];

                let comp = cc.instantiate(prefab).getComponent("Card");
                comp.setVal(val);

                let node = this.nodeHandList[key];
                node.addChild(comp.node);
            }
        }
    },

    getNextTurnIndex: function () {
        this.curTurnIndex++;

        if (this.curTurnIndex > 3) {
            this.curTurnIndex = 0;
        }

        return this.curTurnIndex;
    },

    getOutNode: function (curTurnIndex) {
        return this.nodeOutList[curTurnIndex];
    },

    getHandNode: function (curTurnIndex) {
        return this.nodeHandList[curTurnIndex];
    },

    testOutCard: function () {
        let self = this;

        this.schedule(function () {
            let curTurnIndex = self.getNextTurnIndex();

            // 添加手牌
            let handNode = self.getHandNode(curTurnIndex);

            let comp = null;
            let prefab = null;
            let num = -1;
            if (curTurnIndex == 0) {
                prefab = self.cardNormal;
                num = Math.floor(Math.random() * 10);
            } else {
                prefab = self.cardBack;
            }

            comp = cc.instantiate(prefab).getComponent("Card");
            comp.setVal(num);

            handNode.addChild(comp.node);

            // 0.1s后出牌
            self.scheduleOnce(function () {
                // 移除一张手牌
                let children = handNode.getChildren();
                let removeChild = children[Math.floor(Math.random() * children.length)];
                removeChild.removeFromParent();

                // 界面上添加一张出的牌
                let outNode = self.getOutNode(curTurnIndex);
                comp = cc.instantiate(self.cardNormal).getComponent("Card");
                let num = Math.floor(Math.random() * 10);
                comp.setVal(num);
                comp.resetZIndex();
                outNode.addChild(comp.node);
            }, 0.5);
        }, 1);

    }
});
5.总体适配策略为:采用高度填充满,这样结合widget组件的停靠点,就能保证各种分辨率下都能完美显示,而且没有黑边
思考: 不同分辨率到底意味着什么?
回答:在没有用widget组件时,比如一个A(200, 300) 其实在任意分辨率下位置依然是200, 300,
问题在于:有不同的分辨率下,他显示在屏幕上的位置比例是不同的,造成失真。
因此,我们需要使用widget组件,让在不同的分辨率下,坐标也动态的变化,处于显示良好的屏幕位置。
注意: Canvas节点的坐标始终在屏幕中间,比如有的是480,320 有的是640 360,但是分辨率再变化,确实其中在屏幕 中间,只不过,由于分辨率变化,有了黑边,要消除黑边,那么就要设置停靠,改变下节点位置!