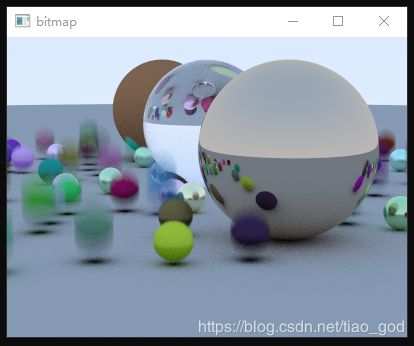
《再学一周光线追踪》 学习 一 引子和运动模糊
蒙特卡洛光线追踪技术系列 见 蒙特卡洛光线追踪技术
在《一周学完光线跟踪》书本中,您构建了一个简单且蛮力的光线跟踪器。在本期中,我们将添加纹理、体(如雾)、矩形、实例、灯光,并支持使用BVH的许多对象。完成后,你会有一个“真正的”光线跟踪器。
许多人(包括我)相信,光线跟踪中的一个启发是,大多数优化会使代码复杂化,而不会带来很大的加速。我将在这本迷你书中做的是在每一个设计决策中采用最简单的方法。去 光线追踪学习网站 (该网站在国内貌似访问不了,鉴于是违法行为您可以等着哪天去日本旅游的时候再登录这个网站学习)可以阅读和参考更复杂的方法。但是,我强烈建议您不要过早地进行优化;如果它的执行时间在配置文件中显示得不高,则在支持所有功能之前,它最好先不进行优化!
这本书最难的两部分是BVH和Perlin纹理。这就是为什么标题建议你花一个星期而不是一个周末来完成这项工作。但如果你想周末做项目的话,你可以把这些留到最后。顺序不是在这本书中提出的很重要的概念,没有BVH和柏林纹理你仍然可以得到Cornell 盒!
运动模糊:
当您决定使用光线跟踪时,您认为视觉质量更值得运行时使用。在模糊反射和散焦模糊中,每个像素需要多个采样。一旦你在这条道路上迈出了一步,好消息是几乎所有的效果都可以用暴力来实现。运动模糊当然是其中之一。在真正的相机中,快门打开并保持打开一段时间间隔,相机和对象可能在这段时间内移动。它实际上是相机在我们想要的时间间隔内所看到的平均值。当快门打开时,我们可以通过在某个随机时间发送每条光线来获得随机估计。只要物体在那个时候应该在的地方,我们就可以用一条正好在同一时间的射线得到正确的平均答案。这就是为什么随机光线跟踪往往很简单的根本原因。
基本思想是在快门打开时随机生成光线,并在该时间与模型相交。通常的方法是让摄影机和对象移动,但让每条光线恰好同时存在。这样,光线跟踪器的“引擎”就可以确保对象位于光线所需的位置,并且交集部分不会有太大变化。
为此,我们首先需要在光线存储存在的时间:
#ifndef RAY_H
#define RAY_H
#include "vec3.h"

class ray  {
public:

    ray() {}
    ray(const vec3& a, const vec3& b,float ti = 0.0)
    {
		A = a;B = b;_time = ti;
    }

    ray(const ray& r) {*this = r;}
    vec3 origin() const {return A;}
    vec3 direction() const {return B;}
	float time()const { return _time; }
    vec3 pointAtParameter(float t) const { return A + t*B; }
	vec3 A;
	vec3 B;
	float _time;
};

#endif
现在我们需要修改相机以在时间1和时间2之间的随机时间生成光线。相机应该跟踪时间1和时间2,还是应该在创建光线时由相机的用户决定?当有疑问的时候,我喜欢让构造器变得复杂,如果它使调用变得简单,那么我会让相机保持跟踪,但这是个人的偏好。相机不需要太多的改动,因为现在不允许移动;它只是在一段时间内发出光线。
#ifndef __CAMERA_H__
#define __CAMERA_H__
#include "ray.h"
#define M_PI 3.14159265
double myRandom();
vec3 random_in_unit_disk() {
	vec3 p;
	do {
		p = 2.0*vec3(rand() / (RAND_MAX + 1.0), rand() / (RAND_MAX + 1.0),0.0)-vec3(1,1,0);
	} while (dot(p, p) >= 1.0);
	return p;
}
class camera {
public:
	camera(vec3 lookfrom,vec3 lookat,vec3 vup,float vfov,float aspect,float aperture,float focus_dist,float t0,float t1) {
		lens_radius = aperture / 2;
		float theta = vfov*M_PI / 180.0;
		float half_height = tan(theta / 2);
		float half_width = aspect * half_height;
		origin = lookfrom;
		w = unitVector(lookfrom - lookat);
		u = unitVector(cross(vup, w));
		v = cross(w, u);
		//lower_left_corner = vec3(-half_width, -half_height, -1.0);
		lower_left_corner = origin - half_width*focus_dist*u -half_height*focus_dist*v - focus_dist*w;
		horizontal = 2*half_width*focus_dist*u;
		vertical = 2*half_height*focus_dist*v;
	}
	ray get_ray(float s, float t) {
		vec3 rd = lens_radius*random_in_unit_disk();
		vec3 offset = u*rd.x() + v*rd.y();
		float time = time0 + myRandom()*(time1-time0);
		return ray(origin+offset,lower_left_corner+s*horizontal+t*vertical-origin-offset,time);
	}
	vec3 origin;
	vec3 lower_left_corner;
	vec3 horizontal;
	vec3 vertical;
	vec3 u, v, w;
	float time0, time1;
	float lens_radius;
};
#endif
我们还需要一个移动的物体。我将创建一个sphere类,它的中心在时间0从中心0线性移动到时间1的中心1。在这个时间间隔之外,它继续运行,所以这些时间不需要与相机光圈的开闭相匹配。
class moving_sphere :public hitable {
public:
	moving_sphere(){}
	moving_sphere(vec3 cen0, vec3 cen1, float t0, float t1, float r, material*m) :
		center0(cen0), center1(cen1), time0(t0), time1(t1), radius(r), mat_ptr(m) {};
	virtual bool hit(const ray&r, float tmin, float tmax, hit_record& rec)const;
	vec3 center(float time)const;
	vec3 center0, center1;
	float time0, time1;
	vec3 center0,center1;
	float radius;
	material* mat_ptr;
};

vec3 moving_sphere::center(float time)const {
	return center0 + ((time - time0) / (time1 - time0))*(center1 - center0);
}
创建一个新的移动球体类的另一种方法是使它们都移动,并且使静止的球体具有相同的起点和终点。我对在更少的类和更高效的固定球体之间的权衡持谨慎态度,所以让你的设计品味来指导你。
交叉口代码几乎不需要更改:中心只需要成为功能中心(时间):
bool moving_sphere::hit(const ray&r, float t_min, float t_max, hit_record&rec)const {
	vec3 oc = r.origin() - center(r.time());
	float a = dot(r.direction(), r.direction());
	float b = 2.0*dot(oc, r.direction());
	float c = dot(oc, oc) - radius*radius;
	float discriminant = b*b - 4 * a*c;
	if (discriminant > 0) {
		float temp = (-b - sqrt(discriminant)) / (2.0*a);
		if (temp < t_max && temp > t_min) {
			rec.t = temp;
			rec.p = r.pointAtParameter(rec.t);
			rec.normal = (rec.p - center(r.time())) / radius;
			rec.mat_ptr = mat_ptr;
			return true;
		}
		temp = (-b + sqrt(discriminant)) / (2.0*a);
		if (temp < t_max && temp > t_min) {
			rec.t = temp;
			rec.p = r.pointAtParameter(rec.t);
			rec.normal = (rec.p - center(r.time())) / radius;
			rec.mat_ptr = mat_ptr;
			return true;
		}
	}
	return false;
}
如果我们以上一本书结尾的场景中的漫射球体为例,使它们在time=0时的center移动到time=1时的 center + vec3 (0,0.5*drand48(),0), 同时在该帧上打开相机光圈。
hitable *random_scene() {
	int n = 500;
	hitable **list = new hitable*[n + 1];
	list[0] = new sphere(vec3(0, -1000, 0), 1000, new lambertian(vec3(0.5, 0.5, 0.5)));
	int i = 1;
	for (int a = -5;a < 5;a++) {
		for (int b = -5;b < 5;b++) {
			float choose_mat = myRandom();
			vec3 center(a + 0.9*(myRandom()), 0.2, b + 0.9*(myRandom()));
			if ((center - vec3(4, 0.2, 0)).length() > 0.9) {
				if (choose_mat < 0.8) {//diffuse
					list[i++] = new moving_sphere(center, center+vec3(0,0.5*myRandom(),0),0.0,1.0,0.2,//
						new lambertian(vec3(myRandom()*myRandom(), myRandom()*myRandom(), myRandom()*myRandom())));
				}
				else if (choose_mat < 0.95) {//metal
					list[i++] = new sphere(center, 0.2,
						new metal(vec3(0.5*(1+ myRandom()),0.5*(1 + myRandom()),
							0.5*(1 + myRandom())),0.5*myRandom()));
				}
				else {//glass
					list[i++] = new sphere(center, 0.2, new dielectric(1.5));
				}
			}

		}
	}/**/
	list[i++] = new sphere(vec3(4, 1, 0), 1.0, new metal(vec3(0.7,0.6,0.5),0.0));
	list[i++] = new sphere(vec3(0, 1, 0), 1.0, new dielectric(1.5));

	list[i++] = new sphere(vec3(-4, 1, 0), 1.0, new lambertian(vec3(0.4,0.2,0.1)));
	return new hitable_list(list, i);
}
通过这些观察参数可以得到:
	vec3 lookfrom(13, 2, 3);
	vec3 lookat(0, 0, 0);
	float disk_to_focus = 10.0;//(lookfrom - lookat).length();
	float aperture = 0.00;
	camera cam(lookfrom,lookat,vec3(0,1,0),20,float(WIDTH)/float(HEIGHT),aperture,disk_to_focus,0.0,1.0);