Yolov3(pytorch)训练自己的数据集(一)
折腾了两天YOLOV3,填了几个坑,记录一下。
使用的代码:https://github.com/ultralytics/yolov3
一、数据准备
1.1 训练集和验证集
为了节省数据集的制作时间,直接利用DataFountain“四维图新”自动驾驶感知算法竞赛的数据,如图所示为其中的一个训练集。
下图为官方给出的数据标注,前四个数字为边框的坐标,第五个数字为目标类别,最后一个为置信度

1.2 数据集转化
对于此代码,需要将数据集转化为如下格式

images文件夹下的两个文件夹分别存放训练和验证的图片,labels文件夹下的两个文件夹分别存放训练集和验证集的目标txt文件,其中每一张图片对应一个txt文件。
首先将官方给的train.txt文件分成每张图片对应一个txt文件,代码如下
# 把train.txt中的每张图片的信息提取出来
train_txt_dir = '../train.txt'
train_save_txt = './train_txt/'
f = open(train_txt_dir, 'r')
lines = f.readlines()
for line in lines:
    name = line[0:6] + '.txt'
    print(name)
    txtname = train_save_txt + name
    line = line[22:]
    if len(line) == 0:     # 去掉没有目标的图片
       continue
    else:
        file = open(txtname, 'w')
        for content in line.split():
            file.write(content[:-2])
            file.write('\n')
        file.close()
接着将生成的txt文件转化为VOC数据集中的xml格式,代码如下:
import os, sys
import glob
from PIL import Image
img_dir = '/media/tim_mary/study/PycharmProjects/kaggle/PyTorch-YOLOv3/data/adas/images/train'
txt_dir = '/media/tim_mary/study/PycharmProjects/kaggle/PyTorch-YOLOv3/data/adas/data_pro/train_txt'
xml_dir = '/media/tim_mary/study/PycharmProjects/kaggle/PyTorch-YOLOv3/data/adas/data_pro/train_xml'
class_name = ['red', 'green', 'yellow', 'red_left', 'red_right', 'yellow_left',
'yellow_right', 'green_left', 'green_right', 'red_forward', 'green_forward',
'yellow_forward', 'horizon_red', 'horizon_green', 'horizon_yellow', 'off',
'traffic_sign', 'car', 'motor', 'bike', 'bus', 'truck', 'suv', 'express', 'person']
txt_lists = glob.glob(txt_dir + '/*.txt')
img_basenames1 = []
for item in txt_lists:
img_basenames1.append(os.path.basename(item))
img_names1 = []
for item in img_basenames1:
temp1, temp2 = os.path.splitext(item)
img_names1.append(temp1)
img_lists = glob.glob(img_dir + '/*.jpg')
img_basenames2 = []
for item in img_lists:
img_basenames2.append(os.path.basename(item))
img_names2 = []
for item in img_basenames2:
temp1, temp2 = os.path.splitext(item)
img_names2.append(temp1)
img_names = [x for x in img_names1 if x in img_names2] # 求1和2两个列表的交集
for img in img_names:
im = Image.open((img_dir + '/' + img + '.jpg'))
width, height = im.size
#打开txt文件
gt = open(txt_dir + '/' + img + '.txt').read().splitlines()
#写入到xml
xml_file = open((xml_dir + '/' + img + '.xml'), 'w')
xml_file.write('\n' )
xml_file.write(' VOC2007 \n')
xml_file.write(' ' + str(img) + '.jpg' + '\n')
xml_file.write(' \n' )
xml_file.write(' ' + str(width) + '\n')
xml_file.write(' ' + str(height) + '\n')
xml_file.write(' 3 \n')
xml_file.write(' \n')
# write the region of image on xml file
for img_each_label in gt:
spt = img_each_label.split(',')
xml_file.write(' )
xml_file.write(' ' + class_name[int((spt[4]))-1] + '\n')
xml_file.write(' Unspecified \n')
xml_file.write(' 0 \n')
xml_file.write(' 0 \n')
xml_file.write(' \n' )
xml_file.write(' ' + str(spt[0]) + '\n')
xml_file.write(' ' + str(spt[1]) + '\n')
xml_file.write(' ' + str(spt[2]) + '\n')
xml_file.write(' ' + str(spt[3]) + '\n')
xml_file.write(' \n')
xml_file.write(' \n')
xml_file.write('')
接着将生成的xml文件,转化为yolo3训练的txt文件,代码如下:
import xml.etree.ElementTree as ET
import pickle
import os
from os import listdir, getcwd
from os.path import join

# 20190227@new-only 2007 data
# sets=[('2007', 'train'), ('2007', 'val'), ('2007_test', 'test')]
sets = ['train']
# classes = ['1', '2', '3','4','5','6','7','8','9','10','11', '12', '13','14','15','16','17','18','19','20']

# COCO数据集的类别
# classes = ['person', 'bicycle', 'car', 'motorcycle', 'airplane', 'bus', 'train', 'truck', 'boat', 'traffic light',
#            'fire hydrant', 'stop sign', 'parking meter', 'bench', 'bird', 'cat', 'dog', 'horse', 'sheep', 'cow',
#            'elephant', 'bear', 'zebra', 'giraffe', 'backpack', 'umbrella', 'handbag', 'tie', 'suitcase', 'frisbee',
#            'skis', 'snowboard', 'sports ball', 'kite', 'baseball bat', 'baseball glove', 'skateboard', 'surfboard',
#            'tennis racket', 'bottle', 'wine glass', 'cup', 'fork', 'knife', 'spoon', 'bowl', 'banana', 'apple',
#            'sandwich', 'orange', 'broccoli', 'carrot', 'hot dog', 'pizza', 'donut', 'cake', 'chair', 'couch',
#            'potted plant', 'bed', 'dining table', 'toilet', 'tv', 'laptop', 'mouse', 'remote', 'keyboard', 'cell phone',
#            'microwave', 'oven', 'toaster', 'sink', 'refrigerator', 'book', 'clock', 'vase', 'scissors', 'teddy bear',
#            'hair drier', 'toothbrush']

# 自定义数据集的类别
classes = ['red', 'green', 'yellow', 'red_left', 'red_right', 'yellow_left',
              'yellow_right', 'green_left', 'green_right', 'red_forward', 'green_forward',
              'yellow_forward', 'horizon_red', 'horizon_green', 'horizon_yellow', 'off',
              'traffic_sign', 'car', 'motor', 'bike', 'bus', 'truck', 'suv', 'express', 'person']


def convert(size, box):
    dw = 1. / (size[0])
    dh = 1. / (size[1])
    x = (box[0] + box[1]) / 2.0 - 1
    y = (box[2] + box[3]) / 2.0 - 1
    w = box[1] - box[0]
    h = box[3] - box[2]
    x = x * dw
    w = w * dw
    y = y * dh
    h = h * dh
    return (x, y, w, h)


def convert_annotation(image_id):
    # print("2-open annotations")
    # print('image_id:%s'%image_id)
    # image_id_1 = image_id.split('/')[-1]
    # print('image_id:%s'%image_id)
    # imade_id = image_id_1.replace("jpg","xml")
    # print('image_id:%s'%image_id)
    # in_file = open('/home/test/darknet/VOC2020/annotations_val_xml/%s.xml'%(image_id))
    # print('infile:','/home/test/darknet/VOC2020/annotations_val_xml/%s'%(image_id))

    # COCO2017数据集
    # in_file = open('./coco2017_xml/train_xml/%s.xml' % (image_id))
    # out_file = open('./coco2017_xml/labels/train2017/%s.txt' % (image_id), 'w')

    # 自己的数据集
    in_file = open('../adas/data_pro/train_xml/%s.xml' % (image_id))
    out_file = open('../adas/labels/train/%s.txt' % (image_id), 'w')
    tree = ET.parse(in_file)
    root = tree.getroot()
    size = root.find('size')
    w = int(size.find('width').text)
    h = int(size.find('height').text)

    for obj in root.iter('object'):
        difficult = obj.find('difficult').text
        cls = obj.find('name').text
        if cls not in classes or int(difficult) == 1:
            continue
        cls_id = classes.index(cls)
        xmlbox = obj.find('bndbox')
        b = (float(xmlbox.find('xmin').text), float(xmlbox.find('xmax').text), float(xmlbox.find('ymin').text),
             float(xmlbox.find('ymax').text))
        bb = convert((w, h), b)
        out_file.write(str(cls_id) + " " + " ".join([str(a) for a in bb]) + '\n')
        # print("write ok")
# wd = getcwd()
wd = " "
for image_set in sets:
    image_ids = open('../adas/train_all.txt').read().strip().split()  ######
    # image_ids = open('%s.txt'%(image_set)).read().strip().split()
    print("start ")
    # list_file = open('%s.txt'%(image_set), 'w')
    for image_id in image_ids:
        # print("again write")
        # print('image_id:%s'%image_id)
        # list_file.write('%s/%s.jpg\n'%(wd, image_id))
        id = image_id.split('/')[-1].replace('jpg', 'xml')
        id = id.split('.')[0]
        print('id:%s' % id)
        convert_annotation(i
生成后的txt文件内容如下,将其放到labels文件夹中train和val文件夹。
 最后一步生成要生成所有图片的路径,并分别存放在train_all.txt和val_all.txt中。
1.3配置文件
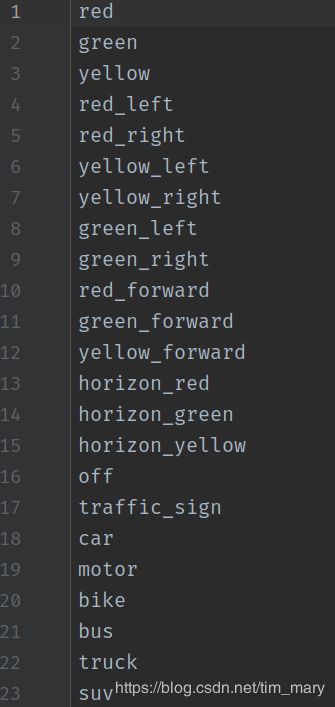
首先更改原来代码中的coco.names文件或者新建一个names文件,我新建了一个classes.names文件,将所有目标名称按照格式放进去

然后更改coco.data 文件,同样的新建custom.data文件,将相关的路径配置好,如下图所示。
