elastic APM 深入测试 一 (无嵌套调用的分布式微服务监控)
前几篇文章,我在一个比较浅的层面给大家介绍了elastic的APM功能,对于我而言,在没有具体到真正的在生产环境上去应用,对各种场景进行适配之前,也只是对APM建立了一个基础的认知。在接下去的几篇文章中,我会尽可能的模拟各种我们在现实生产环境上可能遇到的场景来进行测试,看看elastic APM能够满足我们哪些方面的需求。
无嵌套调用的微服务监控
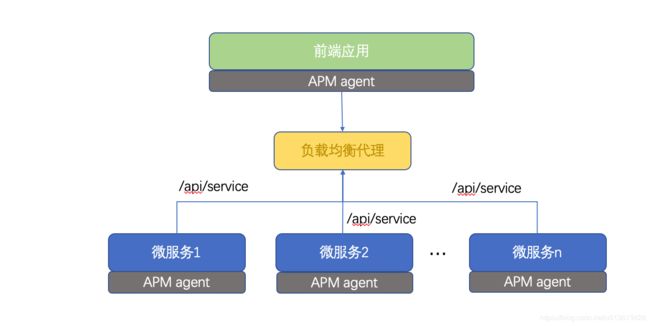
首先,我们先来看一个比较简单的场景,即部署多个进程提供相同的服务,根据简单的负载均衡,来支撑流量。

测试用到以下工具:
- postman, 模拟前端对接口对调用,并发,压测
- nginx,反向代理和负载均衡
后端微服务
之前的文章都是以nodejs和python的服务作为测试样例,这次使用python。
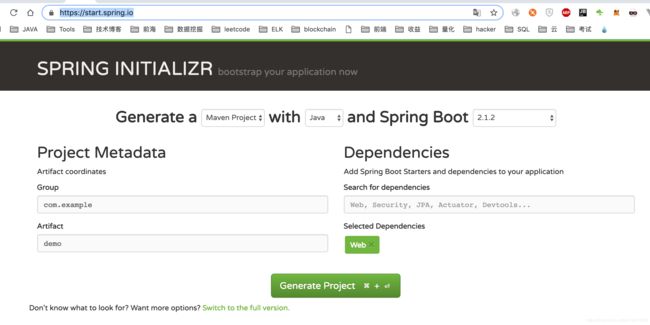
为了快速搭建测试环境,https://start.spring.io/ 上快速创建一个springboot 微服务工程,包含基本的web功能(我们测试restful接口),下载到本地,解压缩,然后maven install一下,下载相关的依赖

编写一个超简单的接口:(这里请自动忽视我使用类静态属性和方法这样的操作。。。)
package com.example.demo;

import org.springframework.web.bind.annotation.RequestMapping;
import org.springframework.web.bind.annotation.RequestMethod;
import org.springframework.web.bind.annotation.ResponseBody;
import org.springframework.web.bind.annotation.RestController;

import java.util.Random;

@RestController("MyServiceController")
@RequestMapping("/api")
public class MyService
{
    public static String serviceName = "service";

    @RequestMapping(path = "/service", method = RequestMethod.GET)
    @ResponseBody
    public String service1()
    {
        try
        {
            Random random = new Random(  );
            Thread.sleep( 1000 * random.nextInt(5) );
            System.out.println( "This is " + serviceName );
            return "Hello world";

        }
        catch( InterruptedException e )
        {
            e.printStackTrace();
        }
        return "";
    }

    public static void setServiceName( String serviceName)
    {
        MyService.serviceName = serviceName;
    }
}
该代码在web上通过path: /api/service 提供restful接口的调用,每次调用,我们会在标准输出上显示是哪个接口发生了调用。
注意,这里的Thread.sleep( 1000 * random.nextInt(5) ); 是为了让接口有一个不确定的响应时间。
main文件:
package com.example.demo;

import org.springframework.boot.SpringApplication;
import org.springframework.boot.autoconfigure.SpringBootApplication;

@SpringBootApplication
public class DemoApplication
{

    public static void main( String[] args )
    {

        if( args.length > 0 )
        {
            MyService.setServiceName( args[0] );
        }
        SpringApplication.run( DemoApplication.class, args );
    }

}
maven package之后,在本地启动多个微服务。注意以下的启动项中,我是动态提供了serice name和server port:
nohup java -jar demo-0.0.2-SNAPSHOT.jar service1 --server.port=8081 &
nohup java -jar demo-0.0.2-SNAPSHOT.jar service2 --server.port=8082 &
nohup java -jar demo-0.0.2-SNAPSHOT.jar service3 --server.port=8083 &
tailf nohup.out
简单访问一下localhost:8081/api/service,localhost:8082/api/service,localhost:8083/api/service,确认都能提供服务
2019-02-01 09:22:40.085  INFO 15246 --- [nio-8082-exec-2] o.a.c.c.C.[Tomcat].[localhost].[/]       : Initializing Spring DispatcherServlet 'dispatcherServlet'
2019-02-01 09:22:40.085  INFO 15246 --- [nio-8082-exec-2] o.s.web.servlet.DispatcherServlet        : Initializing Servlet 'dispatcherServlet'
2019-02-01 09:22:40.092  INFO 15246 --- [nio-8082-exec-2] o.s.web.servlet.DispatcherServlet        : Completed initialization in 7 ms
This is service2
2019-02-01 09:22:49.257  INFO 15245 --- [nio-8081-exec-1] o.a.c.c.C.[Tomcat].[localhost].[/]       : Initializing Spring DispatcherServlet 'dispatcherServlet'
2019-02-01 09:22:49.258  INFO 15245 --- [nio-8081-exec-1] o.s.web.servlet.DispatcherServlet        : Initializing Servlet 'dispatcherServlet'
2019-02-01 09:22:49.263  INFO 15245 --- [nio-8081-exec-1] o.s.web.servlet.DispatcherServlet        : Completed initialization in 5 ms
This is service1
2019-02-01 09:22:58.574  INFO 15247 --- [nio-8083-exec-2] o.a.c.c.C.[Tomcat].[localhost].[/]       : Initializing Spring DispatcherServlet 'dispatcherServlet'
2019-02-01 09:22:58.574  INFO 15247 --- [nio-8083-exec-2] o.s.web.servlet.DispatcherServlet        : Initializing Servlet 'dispatcherServlet'
2019-02-01 09:22:58.582  INFO 15247 --- [nio-8083-exec-2] o.s.web.servlet.DispatcherServlet        : Completed initialization in 8 ms
This is service3
nginx的反向代理和负载均衡
先自己搜索一下,如何在本地主机上安装nginx,这里就不在列举细节。
修改nginx的配置文件,我这里是/usr/local/etc/nginx/nginx.conf
先列举关于nginx负载均衡的一些重要配置项:
#定义负载均衡设备的 Ip及设备状态
upstream myServer {

    server 127.0.0.1:9090 down;
    server 127.0.0.1:8080 weight=2;
    server 127.0.0.1:6060;
    server 127.0.0.1:7070 backup;
}

在需要使用负载均衡的Server节点下,让其通过负载均衡器进行代理

proxy_pass http://myServer;

upstream 每个设备的状态:

down 表示单前的server暂时不参与负载
weight  默认为1.weight越大,负载的权重就越大。
max_fails :允许请求失败的次数默认为1.当超过最大次数时,返回proxy_next_upstream 模块定义的错误
fail_timeout:max_fails 次失败后,暂停的时间。
这里,我们的配置是:
    upstream local {
        server localhost:8081;
        server localhost:8082;
        server localhost:8083;
    }

    server {
        listen 8001;
        server_name localhost;

        location / {
            proxy_pass http://local;
        }
    }
即我们通过反向代理服务器http://localhost:8001,去代理和负载均衡之前的三个web微服务:localhost:8081/api/service,localhost:8082/api/service,localhost:8083/api/service
运行nginx, 确认无误:
MacBook-Pro:target lex$ sudo nginx -s quit
MacBook-Pro:target lex$ sudo nginx
配置postman用于测试
先创建一个测试集: (不知道怎么用postman的同学请查看我之前的postman最强教程系列博客)

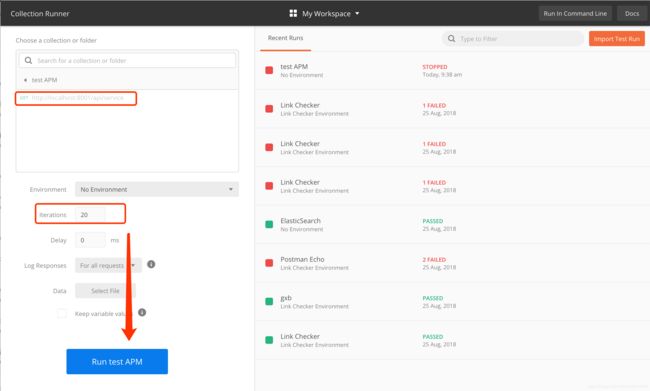
将访问反向代理的request保存到测试集中

在runner里面选择合适的项(接口,运行次数等),然后测试:

可以看到这20次的运行结果,每次调用的时间都不一样:
看看后端,确实是被路由到了不同的进程上:
This is service1
This is service1
This is service2
This is service2
This is service3
This is service3
This is service1
This is service1
This is service2
This is service2
This is service3
This is service3
This is service1
This is service1
This is service2
This is service2
This is service3
This is service3
This is service1
This is service1
This is service2
This is service2
This is service3
This is service3
This is service1
This is service1
This is service2
web服务器端
这里,我们需要拉通了测试,因此先弄一个简单的界面,去访问该接口,因为kibana是用hapi写的,这里我们也用hapi:
'use strict';

const axios = require('axios')

const Hapi = require('hapi');
const Hoek = require('hoek');
const Path = require('path');


const server = new Hapi.Server({
  port: 3088,
  host: 'localhost',
});

const init = async() => {
  await server.register(require('inert'));

  server.route({
    method: 'GET',
    path: '/{param*}',
    handler: {
      directory: {
        path: 'public',
        index: ['index.html', 'default.html'],
        listing: true
      }
    }
  });

  server.route({
    method: 'GET',
    path: '/api/service',
    handler: async function (request, h) {
      await Hoek.wait(1500);   // Simulate some slow I/O
      let resp = await axios.get("http://localhost:8001/api/service")
      return resp.data

    }
  });

  await server.start();
  console.log(`Server running at: ${server.info.uri}`);
};

process.on('unhandledRejection', (err) => {

  console.log(err);
  process.exit(1);
});

init();
注意,这里在3088上提供服务,并且路由/api/service到我们代理上,并且强制增加了一些延时:await Hoek.wait(1500); // Simulate some slow I/O
UI端
vue脚手架创建一个项目:
vue init webpack-simple apm-js-test
修改一下App.vue:
<template>
  <div id="app">
    <img src="./assets/logo.png">
    <h1>{{ msg }}</h1>
  </div>
</template>

<script>
import axios from 'axios'
export default {
  name: 'app',
  data () {
    return {
      msg: 'Welcome to Your Vue.js App'
    }
  },
  mounted() {
    this.getServiceData()
  },
  methods: {

    getServiceData(){
      axios.get('/api/service').then( (resp) => {
        this.msg = resp.data
      })
    }
  }
}
</script>

<style>
#app {
  font-family: 'Avenir', Helvetica, Arial, sans-serif;
  -webkit-font-smoothing: antialiased;
  -moz-osx-font-smoothing: grayscale;
  text-align: center;
  color: #2c3e50;
  margin-top: 60px;
}

h1, h2 {
  font-weight: normal;
}

ul {
  list-style-type: none;
  padding: 0;
}

li {
  display: inline-block;
  margin: 0 10px;
}

a {
  color: #42b983;
}
</style>
编译打包后,放到hapi的public目录,运行一下,
启动APM server
下载安装包之后,进入目录:
sudo ./apm-server -e
默认在localhost的8200端口
安装agent
基本的微服务框架搭好了,各种服务基本分离,我们开始安装agent,看看RUM和distributed tracing如何工作。
RUM agent
这部分代码是安装在前端的,也就是安装在vue的部分。修改一下vue的main.js文件,在启动其他组件之前,先启动apm。
var apm = initApm({
  serviceName: 'front-end RUM',
  //distributedTracingOrigins: ['http://localhost:8001'],
  pageLoadSampled: true
})
注意,因为我们是通过nodejs web服务器中转之后,去访问的nginx,所以不需要设置 distributedTracingOrigins:,如果是在UI上直接往代理上调用接口,则需要配置
distributedTracingOrigins。因为根据RUM的工作原理,为了标识RUM agent是整个管道的起始点,我们需要在HTTP request Header中标注elastic-apm-traceparent,即代表整个trace的parent是从UI发起的。在发起真正的HTTP GET/POST 请求之前,APM RUM agent会先发送一个OPTIONS请求,确认后端的服务器也支持APM,并且知晓RUM作为traceparent的存在:
Access-Control-Request-Headers: elastic-apm-traceparent
Access-Control-Request-Method: [request-method]
Origin: [request-origin]
当这个OPTIONS的response也包含对应的HEADER时:
Access-Control-Allow-Headers: elastic-apm-traceparent
Access-Control-Allow-Methods: [allowed-methods]
Access-Control-Allow-Origin: [request-origin]
RUM agent才会发起真正的HTTP GET/POST 请求。
而包含该header的前提是,要么对方是该页面的origins,要么是包含在distributedTracingOrigins属性中的地址。
nodejs agent
hapi的server代码加上这段:
var apm = require('elastic-apm-node').start({
  // Override service name from package.json
  // Allowed characters: a-z, A-Z, 0-9, -, _, and space
  serviceName: 'hapi_server',
  // logLevel: 'debug'
})
java agent
java agent是通过-javaagent的选项,在java字节码上增加的代理功能,对代码无侵入。因此,只需在启动时加入:
java -javaagent:/Users/caishichao/Downloads/elastic-apm-agent-1.3.0.jar -Delastic.apm.service_name=my-cool-service1 -Delastic.apm.application_packages=org.example,org.another.example -Delastic.apm.server_urls=https://localhost:8200 -Delastic.apm.secret_token=nhkGtRqvIGmRVZEjCs -jar demo-0.0.2-SNAPSHOT.jar service1 --server.port=8081
java -javaagent:/Users/caishichao/Downloads/elastic-apm-agent-1.3.0.jar -Delastic.apm.service_name=my-cool-service2 -Delastic.apm.application_packages=org.example,org.another.example -Delastic.apm.server_urls=https://localhost:8200 -Delastic.apm.secret_token=nhkGtRqvIGmRVZEjCs -jar demo-0.0.2-SNAPSHOT.jar service2 --server.port=8082
java -javaagent:/Users/caishichao/Downloads/elastic-apm-agent-1.3.0.jar -Delastic.apm.service_name=my-cool-service3 -Delastic.apm.application_packages=org.example,org.another.example -Delastic.apm.server_urls=https://localhost:8200 -Delastic.apm.secret_token=nhkGtRqvIGmRVZEjCs -jar demo-0.0.2-SNAPSHOT.jar service3 --server.port=8083
注意,这里的三个apm agent(-Delastic.apm.service_name=my-cool-service1,-Delastic.apm.service_name=my-cool-service2,-Delastic.apm.service_name=my-cool-service3)名字必须不一样,否则无法区分到底进了哪个服务
测试结果
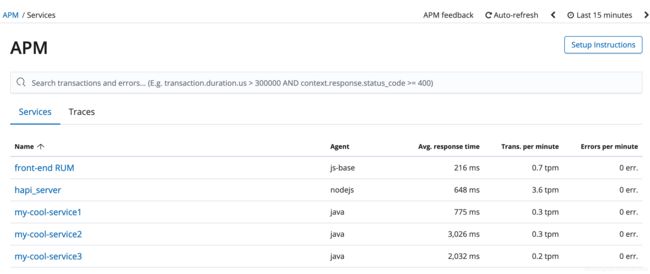
因为现在改为通过web前端去访问后端的微服务,中间有Vue,所以不能再使用postman,需手动页面(也可以用无头浏览器来做自动化测试),我刷新了10次页面。这时,在APM的UI上可以看到所有的5个agent:
- 前端RUM
- 后端web server
- 三个后端微服务

从RUM的transaction,我们可以看到整个request的服务过程,是经历了后端两个节点的服务的,同时也可以看到前端在下载资源,parse页面花费了多少时间:
从hapi的agent上看,我们能看到hapi到java的性能分析,同时,还能看到每个transaction点,主机的cpu和memory的指标:
测试结果可见,elastic APM对于这种负载均衡的web restful服务,能够完成端到端的全链路的软件性能监控。
同时,在APM的dashboard上,我们还可以看到更高维度的数据:

比如,因为我使用了随机数,所以,每个微服务的平均响应时间并不一样。但三个微服务的负载是均衡的(4,3,4),hapi_server的事务多,是因为需要响应资源文件,图片等的下载。
同时,如果代码里面有抛出异常,APM还能捕获异常,在界面上进行分析
总结
在只使用nginx等反向代理的情况下,elastic APM很好的完成了应用性能监控所必须的任务。
总的来说优点如下:
- 多种开发语言的agent,支持面广
- agent使用方法简单,文档也比较完善,且通俗易懂
- 界面操作不复杂,易上手
- 支持EQL的搜索
- 和Monitoring功能结合,可以观察agent是否对宿主机的性能有影响
- 支持错误的堆栈分析
缺点:
- RUM的duration数据不准确,可能是因为异步调用的原因,不包含后端返回数据的用时,所以duration的排序仅仅统计读取资源和parse页面的时间
