Flume 入门与简单运用
一、Flume 简述
- Flume是什么:通俗地说 Flume 就是一个日志采集工具。官网解释:Flume is a distributed, reliable, and available service for efficiently collecting, aggregating, and moving large amounts of log data.
- 特性:高可用、高可靠、具有分布式处理模式,可对数据进行简单处理。
- 版本进化过程:分为 Flume-og(0.9x 已停止更新了)、Flume-ng(1.x) 两个版本,Flume-ng最明显的改动就是取消了集中管理配置的 Master 和 Zookeeper,变为一个纯粹的传输工具。Flume-ng另一个主要的不同点是读入数据和写出数据现在由不同的工作线程处理(称为 Runner)。在 Flume-og 中,读入线程同样做写出工作(除了故障重试)。如果写出慢的话(不是完全失败),它将阻塞 Flume 接收数据的能力。
- 数据处理方面: Flume提供对数据进行简单处理,并写到各种数据接受方(可定制)的能力 。提供了从console(控制台)、RPC(Thrift-RPC)、text(文件)、tail(UNIX tail)、syslog(syslog日志系统),支持TCP和UDP等2种模式),exec(命令执行)等数据源上收集数据的能力。
二、Flume 架构
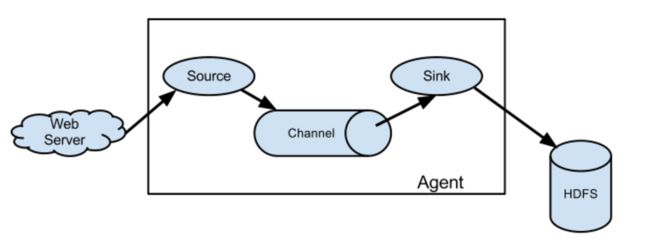
各组件职责
-
Source : 负责日志流入,比如从文件、网络、Kafka等数据源流入数据,数据流入的方式有两种:轮巡拉取和事件驱动。
-
Channel :负责数据聚合或暂存,比如暂存到内存、本地文件、数据库、Kafka 等,日志数据不会在管道停留很长时间,很快会被 Sink 消费掉。
-
Sink :也叫接收器,负责数据转移存储,比如从Channel拿到日志后直接存储到HDFS、Hbase、ElasticSearch、Kafka 等。
-
细分 Flume 数据流应该是由5个组件组成:Events、Sources、Channels、Sink、Agent。基中三个如上所述,Events与Agent 如下:
Events :是使用Flume移动的数据的基本单位。它类似于JMS中的消息,通常很小。它由头和字节数组体组成。
三、 第一个Flume Demo
-
原理方面的这里暂时不深入,先运行一个简单的Demo再说…
其实flume的用法很简单—-书写一个配置文件,在配置文件当中描述source、channel与sink的具体实现,而后运行一个agent实例,在运行agent实例的过程中会读取配置文件的内容,这样flume就会采集到数据。 -
笔者是在HDP平台上安装的Flume, 因此无需进行任何配置便可以运用Flume。
部署与安装步骤只是通过 Ambari 的web 界面,点击 Actions , 选择 add services ,根据提示直接Next便安装完成。 -
查看flume 是否安装好 及其版本号
[root@hdp06 conf]# flume-ng version
Flume 1.5.2.2.5.3.0-37 -
这个案例主要的功能是监听一个指定的网络端口,即只要应用程序向这个端口里面写数据,这个source组件就可以获取到信息并打印到日志中,当然如果想将监控的日志写入到Hdfs也是很简单的,只需修改对应的配置便可,这里以快速入门为由所以只把其记录下。
详细操作步骤如下所示:
1、编写配置文件
注:这里的配置文件指的是一个Flume任务相关的配置文件,例如这里监听一个指定网络端口的配置,并非安装相关的配置文件。
创建一个配置文件(文件可以随便找个目录放置):
touch testNetcat.conf
2、编写配置文件:
vi  testNetcat.conf
# Name the components on this agent
a1.sources = r1
a1.sinks = k1
a1.channels = c1

# Describe/configure the source
a1.sources.r1.type = netcat
a1.sources.r1.bind = 10.135.21.3
a1.sources.r1.port = 55555

# Describe the sink
a1.sinks.k1.type = logger

# Use a channel which buffers events in memory
a1.channels.c1.type = memory
a1.channels.c1.capacity = 1000
a1.channels.c1.transactionCapacity = 100

# Bind the source and sink to the channel
a1.sources.r1.channels = c1
a1.sinks.k1.channel = c1
3、启动 flume agent a1 服务端
[root@hdp03 conf]# flume-ng agent -n a1 -c ../conf -f testNetcat.conf -Dflume.root.logger=DEBUG,console
如果要想flume 命令在后台执行,可在上面命令最后添加一个“&”符号,便可在后台运行了,实际开发过程,一般通过编写启停脚本来运行。
启动程序的部分日志如下:
17/08/25 15:07:24 INFO instrumentation.MonitoredCounterGroup: Monitored counter group for type: CHANNEL, name: c1: Successfully registered new MBean.
17/08/25 15:07:24 INFO instrumentation.MonitoredCounterGroup: Component type: CHANNEL, name: c1 started
17/08/25 15:07:24 INFO node.Application: Starting Sink k1
17/08/25 15:07:24 INFO node.Application: Starting Source r1
17/08/25 15:07:24 INFO source.NetcatSource: Source starting
17/08/25 15:07:24 INFO source.NetcatSource: Created serverSocket:sun.nio.ch.ServerSocketChannelImpl[/10.135.21.3:55555]
从上面日志可看出其在监听 10.135.21.3:55555
4、通过另一台Linux 服务器向10.135.21.3:55555 端口发送信息
[root@hdp04 root]# telnet hdp03 55555
Trying 192.194.67.6...
Connected to hdp06.
Escape character is '^]'.
I am bad boy...
OK
战狼2很好看哦
OK
可在 10.135.21.3 监听服务的日志中看到如下信息
17/08/25 15:07:24 INFO source.NetcatSource: Created serverSocket:sun.nio.ch.ServerSocketChannelImpl[/10.194.67.6:55555]
17/08/25 15:16:43 INFO sink.LoggerSink: Event: { headers:{} body: 48 65 6C 6C 6F 20 46 6C 75 6D 65 21 21 21 21 21 Hello Flume!!!!! }
17/08/25 15:20:02 INFO sink.LoggerSink: Event: { headers:{} body: 49 20 61 6D 20 62 61 64 20 62 6F 79 2E 2E 2E 0D I am bad boy.... }
17/08/25 15:20:40 INFO sink.LoggerSink: Event: { headers:{} body: E6 88 98 E7 8B BC 32 E5 BE 88 E5 A5 BD E7 9C 8B ......2......... }
上述就是这个简单案例的全部过程。
5、配置文件简单解说
a1.sources = r1
a1.sinks = k1
a1.channels = c1
用编程思路来解释上面三行代码就相当与定义了 sources、sinks、channels 对应的变量,方便下面对它们的引用。其中 a1为agent 名,可随意命令,但要注意在启动时要与之对应,eg: flume-ng agent -n a1 …
# Describe/configure the source
a1.sources.r1.type = netcat
a1.sources.r1.bind = 10.135.21.3
a1.sources.r1.port = 55555
设置了r1(即sources) 接收的资源的类型为netcat, 监听地址为10.135.21.3 ,端口为55555
# Describe the sink
a1.sinks.k1.type = logger
指定了k1(sinks) 输出日志的形式
# Use a channel which buffers events in memory
a1.channels.c1.type = memory
a1.channels.c1.capacity = 1000
a1.channels.c1.transactionCapacity = 100
设置了c1 (channel) 的缓存机制,memory 将日志缓存在内存,
capacity:默认该通道中最大的可以存储的event数量是1000,
trasactionCapacity:每次最大可以source中拿到或者送到sink中的event数量也是100
# Bind the source and sink to the channel
a1.sources.r1.channels = c1
a1.sinks.k1.channel = c1
上面代码就很明了,将sources 与 sinks 绑定 channel
官方文档如下:
https://docs.hortonworks.com/HDPDocuments/HDP2/HDP-2.5.0/bk_flume-component-guide/content/understanding_flume.html
flume 写的不错的入门文档
Flume架构以及应用介绍
