在开发实际应用项目当中,肯定存在用户登录和授权的过程,之前我们使用自己开发的权限框架或者 Shiro 来做这块内容的扩展和延伸,今天使用 Spring 框架自身的权限框架来集成下,也就是 Spring Security。
Spring Security 核心功能包括以下三个部分:
1)认证,解决你是谁的问题,也即用户登录;
2)授权,解决你可以干什么的问题,并不是你登录就可以为所欲为;
3)攻击防护,解决防止别人伪造身份问题,
1、基于表单的认证
1.1第一印象
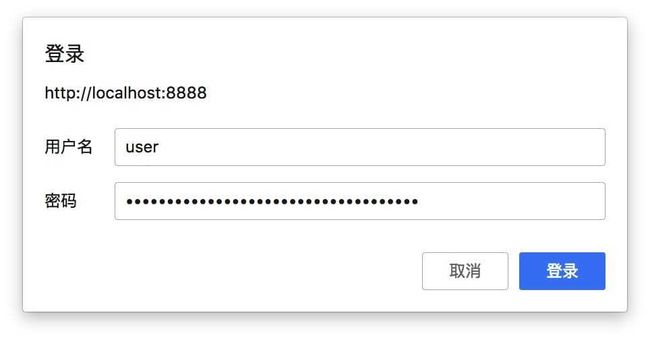
导入 springsecurity 的依赖包之后,我们的项目启动会自动开启基本安全认证,认证的用户名是 user,密码可以在控制台找到,形如
打开一个 URL,就可以看到需要登录验证
输入账号密码就可以正常使用。
当然这种情况是无法满足实际应用的,我们需要自己的用户名和密码来进行登录认证。
记下来首先配置一些 开启使用Springsecurity 的基本配置,在配置包里面新建一个类WebSecurityConfig,继承WebSecurityConfigurerAdapter,然后复写configure(HttpSecurity http)方法,具体代码如下
@Configuration
public class WebSecurityConfig extends WebSecurityConfigurerAdapter{

    @Override
    protected void configure(HttpSecurity http) throws Exception {
        http.formLogin()//表单登录,身份认证
            .and()
            .authorizeRequests()//对请求授权
            .anyRequest()//任何请求
            .authenticated();//需要身份认证
    }
}
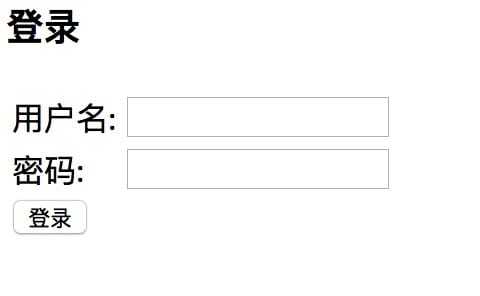
然后重启,进行访问,此时将会出现一个默认登录框,如下
账号密码和之前相同,可以测试,注意 URL 的跳转。
其实这个和之前没什么区别,也的确没什么区别,主要是原来默认的是http.httpBasic()改为了http.formLogin().
1.2基本原理
其实 Springsecurity 就是一组过滤器,形成过滤器练,所有的访问请求都会经过这些过滤器,这些过滤器在系统启动的时候自行配置到链中,无需开发者关心。
过滤器链上有很多过滤器,其中比较主要的几个
1、UserPasswordAuthenticationFilter、BaseicAuthenticationFilter 是认证用户身份的,每个过滤器就是一种验证方式。和上面对应的就是
http.httpBasic()---->BaseicAuthenticationFilter
http.formLogin()---->UserPasswordAuthenticationFilter
这两个过滤器都是检查请求里面是否包含过滤器需要的信息。比如先经过UserPasswordAuthenticationFilter这个过滤器,那么就需要先查看是否是一个登陆请求,是否包含用户名和密码,如果没有这些信息,那么就到BaseicAuthenticationFilter过滤器,会检查请求头里面是否包含需要的信息。
2、一旦通过认证,会有相应的标记进行记录,然后继续想后面的过滤器传递。最后到达链的终端是FilterSecurityInterceptor,他是整个过滤器链最终守门人,他决定该请求能否顺利的访问 Controller 里面的服务。也就是说前面的链不管结论如何都会走到最后整个过滤器,有他来决定是往后继续执行业务,还是抛出某个异常。
3、一旦有异常出现,会在倒数第二层的过滤器来处理这些异常,这个过滤器是ExceptionTranslationFilter。他会根据具体的异常会导向不同的页面。
上图中,除了第一类(绿色)的我们可以控制,第二第三(橙色和蓝色)是不可控制的,他们一定在过滤器链的末端。
深入源码
分别在绿色的 UserPasswordAuthenticationFilter,蓝色的异常处理过滤器,橙色的过滤器,以及自己的 Rest 服务 上打上断点。
首先在 Controller 的方法上打个断点
其次在FilterSecurityInterceptor的124行地方打断点
[图片上传失败...(image-c0c504-1527080640040)]
再次在ExceptionTranslationFilter 的123行的地方打上断点
最后在UsernamePasswordAuthenticationFilter的获取用户名和面膜的地方打上断点
然后我们开始运行一个请求,比如
http://localhost:8888/users?username=123。
首先断点停在FilterSecurityInterceptor这个类,运维前面的过滤器对这个 URL 都不care,由于我们配置了所有请求都需要身份验证,那么这关肯定过不去的。在执行beforeInvocation的时候跑出一个异常,这个异常跑出来之后,被ExceptionTranslationFilter过滤器捕获到了。然后对异常的处理,处理结果是一个重定向到一个登陆页面。
接下来进行登录,这次停在UsernamePasswordAuthenticationFilter这个过滤器上,说明登录请求被诸葛过滤器抓住了,并且开始进行验证登录结果。
再继续就又到橙色的FilterSecurityInterceptor类上,其实这之间由个跳转的,登录 URL 处理完毕,正常登录后又回到http://localhost:8888/users?username=123这个请求,其实是这个请求走到了橙色过滤器上。一旦InterceptorStatusToken token = super.beforeInvocation(fi);执行完毕,就到实际业务代码里面了。
1.2自定义用户认证逻辑
1.2.1用户信息获取
这部分功能被封装在UserDetailsService这个接口里面。这个接口只有一个方法
UserDetails loadUserByUsername(String username) throws UsernameNotFoundException;
接受用户名,返回UserDetails对象。创建一个类,实现UserDetailsService,并且实现方法,代码实现如下,为了简便处理,忽略了数据层
@Component
public class CustomerUserDetailService implements UserDetailsService{

    @Override
    public UserDetails loadUserByUsername(String username) throws UsernameNotFoundException {
        //根据用户名去数据库查询用户信息
        //可以注入 jdbc,mybatis 等 DAO
        //这里方便演示,直接在代码里面做了

        //User 对象已经实现了UserDetails
        //AuthorityUtils.commaSeparatedStringToAuthorityList 方法是以逗号分割产生一个授权集合
        User user=new User(username, "123456", AuthorityUtils.commaSeparatedStringToAuthorityList("admin"));
        return user;
    }
}
这下可以使用自己的用户登录逻辑了。
1.2.2校验逻辑
主要是密码是否匹配,比如取出123456密码之后交给 Springsecurity 就可以了。
其次其他的一些校验,密码过期,用户冻结等。
主要看 UserDetails这个接口,里面包含了所有信息
后面4个布尔返回方法可以执行自己的校验逻辑
isAccountNonExpired----账号是否过期
isAccountNonLocked----账号是否冻结,可恢复
isCredentialsNonExpired----密码是否过期
isEnabled----账号是否删除,不可恢复
我们在构造 User 的时候使用有7参数的构造,改写
User user=new User(username, "123456",
                true,//账号可用
                true,//账号不过期
                true,//密码不过期
                true,//账号没有锁定
                AuthorityUtils.commaSeparatedStringToAuthorityList("admin"));
        return user;
1.2.3加密解密
实际应用密码取出应该是一个加密的密码,而不是明文。Springsecurity 的密码加密在接口PasswordEncoder中处理。该接口有2个方法,分别是
String encode(CharSequence rawPassword);负责加密,用户注册的时候对明文加密,存到 DB。
boolean matches(CharSequence rawPassword, String encodedPassword);负责匹配
为了使用加密功能,这里使用一个美人的实现BCryptPasswordEncoder,把这个 bean 添加到配置中。
为了演示,这里直接使用
1.3个性化登录
1、自定义用户登录页
之前 SpringSecurity 自带的登录页当然不能正常使用,我们需要自行定制一个,首先在配置里面增加一行登录页的名称
然后开始构建这个页面
需要注意的是:这个 login.html 需要排除请求认证之外。
这样我们就能使用自己的登录页面了。
登录的请求地址是
/userlogin,form是
UsernamePasswordAuthenticationFilter过滤器验证的是
这样的请求,而我们现在改了,也需要修改配置
进行访问出现跨站防护的问题,如下图
这里暂时关闭这个功能
@Override
    protected void configure(HttpSecurity http) throws Exception {
        http.formLogin()//表单登录,身份认证
            .loginPage("/login.html")//设置登录页
            .loginProcessingUrl("/userlogin")//设置表单提交请求的 URL
            .and()
            .authorizeRequests()//对请求授权
            .antMatchers("/login.html").permitAll()//表示对这个 url 永远的通过
            .anyRequest()//任何请求
            .authenticated()//需要身份认证
            .and()
            .csrf().disable();//把 csdf 跨站防护关闭
    }
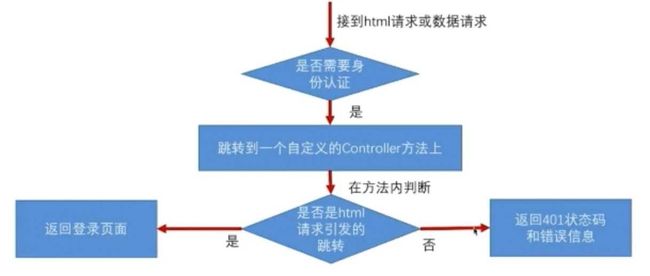
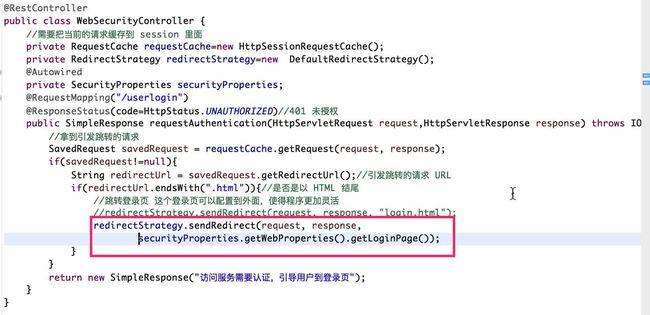
接下来针对不同类型的请求,应该返回不同的内容,如下图所示,一个请求是否需要认证(由 Springsecurity 决定),一旦需要认证,那么久转入一个 Controller 里面,进行判断,如果来源是 HTML,那么久跳转到登录页面,如果是 ajax 请求什么的,那么返回 JSON 内容什么的。
接下来实现他,首先编写 Controller
@RestController
public class WebSecurityController {
    //需要把当前的请求缓存到 session 里面
    private RequestCache requestCache=new HttpSessionRequestCache();
    private RedirectStrategy redirectStrategy=new  DefaultRedirectStrategy();
    @RequestMapping("/authlogin")
    @ResponseStatus(code=HttpStatus.UNAUTHORIZED)//401 未授权
    public SimpleResponse requestAuthentication(HttpServletRequest request,HttpServletResponse response) throws IOException{
        //拿到引发跳转的请求
        SavedRequest savedRequest = requestCache.getRequest(request, response);
        if(savedRequest!=null){
            String redirectUrl = savedRequest.getRedirectUrl();//引发跳转的请求 URL
            if(redirectUrl.endsWith(".html")){//是否是以 HTML 结尾
                //跳转登录页 这个登录页可以配置到外面,使得程序更加灵活
                redirectStrategy.sendRedirect(request, response, "login.html");
            }
        }
        return new SimpleResponse("访问服务需要认证,引导用户到登录页");
    }
}
代码重构
由于上面的登录页是写死在代码里面,需要移植到可配置层面,现在为了全局考虑,进行总体进行一个设计
1、构建 类 SecurityProperties
@ConfigurationProperties(prefix="cn.ts")
public class SecurityProperties {

    //以 cn.ts.web配置的读到这个对象里面
    private WebProperties web=new WebProperties();

    public WebProperties getWeb() {
        return web;
    }

    public void setWeb(WebProperties webProperties) {
        this.web = webProperties;
    }

}
2、构建 WebProperties
public class WebProperties {

    //登录页 cn.ts.web.loginPage
    //如果用户配置这个值,就使用配置了的,否则使用默认的
    private String loginPage="/login.html";

    public String getLoginPage() {
        return loginPage;
    }

    public void setLoginPage(String loginPage) {
        this.loginPage = loginPage;
    }

}
3、构建配置类,装载SecurityProperties
@Configuration
@EnableConfigurationProperties(SecurityProperties.class)
public class CoreConfiguration {

}
4、修改 Controller 代码
5、修改SS 配置代码
@Configuration
public class WebSecurityConfig extends WebSecurityConfigurerAdapter{

    @Autowired private SecurityProperties securityProperties;

    @Bean
    public PasswordEncoder passwordEncoder(){
        return new BCryptPasswordEncoder();
    }

    @Override
    protected void configure(HttpSecurity http) throws Exception {
        http.formLogin()//表单登录,身份认证
            .loginPage("/authlogin")//设置登录页
            .loginProcessingUrl("/userlogin")//设置表单提交请求的 URL
            .and()
            .authorizeRequests()//对请求授权
            .antMatchers("/authlogin",
                    "/login.html",//默认的登录页
                    securityProperties.getWeb().getLoginPage())
            .permitAll()//表示对这个 url 永远的通过
            .anyRequest()//任何请求
            .authenticated()//需要身份认证
            .and()
            .csrf().disable();//把 csdf 跨站防护关闭
    }
}
1.4登录成功和失败页面处理
在 SS 中处理登录成功之后的处理比较简单,只需要实现AuthenticationSuccessHandler即可。
我们来实现这个接口
@Component
public class MyAuthenticationSuccessHandler implements AuthenticationSuccessHandler{

    @Autowired
    private ObjectMapper objectMapper;
    /**
     *
     * Authentication封装了我们的登录信息,包括登录之前信息和 UserDetail
     * @see org.springframework.security.web.authentication.AuthenticationSuccessHandler#onAuthenticationSuccess(javax.servlet.http.HttpServletRequest, javax.servlet.http.HttpServletResponse, org.springframework.security.core.Authentication)
     */
    @Override
    public void onAuthenticationSuccess(HttpServletRequest request, HttpServletResponse response,
            Authentication authentication) throws IOException, ServletException {

        System.out.println("登录成功");
        response.setContentType("application/json;charset=UTF-8");
        response.getWriter().write(objectMapper.writeValueAsString(authentication));

    }

}
这里就是把authentication包装成 JSON 格式返回到前端。
接下来配置这个成功处理器,注入这个处理器到 SS 配置类,设置如下图
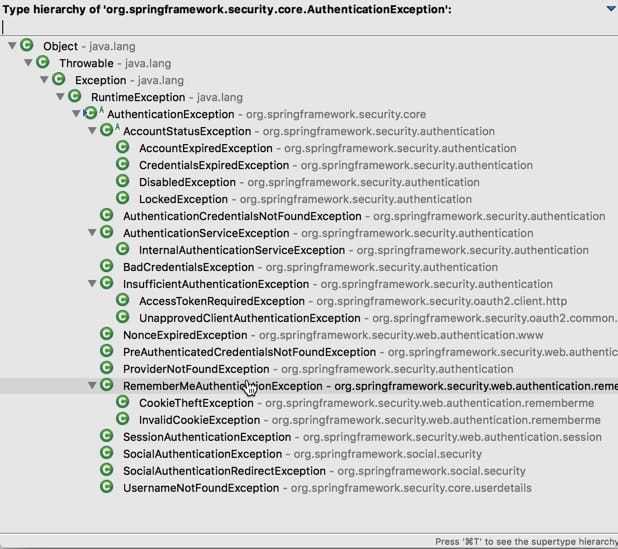
有了成功处理,现在开始定制失败处理的类,与上面类似,不过实现的是AuthenticationFailureHandler,该接口里面需要实现的方法是onAuthenticationFailure,其里面参数AuthenticationException可以看下图,是他的子类实现。
而我们自定义的失败处理类和上面成功类相似,唯一不同的是返回状态需要修改为500
@Component
public class MyAuthenticationFailureHandler implements AuthenticationFailureHandler{

    @Autowired
    private ObjectMapper objectMapper;
    @Override
    public void onAuthenticationFailure(HttpServletRequest request, HttpServletResponse response,
            AuthenticationException exception) throws IOException, ServletException {
        System.out.println("登录失败");
        response.setStatus(HttpStatus.INTERNAL_SERVER_ERROR.value());//500错误
        response.setContentType("application/json;charset=UTF-8");
        response.getWriter().write(objectMapper.writeValueAsString(exception));
    }
}
同时也需要在 SS 配置类上配置,如下图所示
然后启动服务器,故意输入错误密码,可以看到打出一大片错误信息,同时返回状态码是500,控制台也打出登录错误。
成功登录一次,可以看到控制台打出成功登录信息。
为了让成功和失败能够同时处理页面跳转和返回 JSON两种方案,需要重构下上面两个实现。
于是我们先构建一个枚举
public enum LoginType {
    REDIRECT,
    JSON
}
在 WebProperties 里面引入这个属性
public class WebProperties {

    //登录页 cn.ts.web.loginPage
    //如果用户配置这个值,就使用配置了的,否则使用默认的
    private String loginPage="/login.html";

    private LoginType loginType=LoginType.JSON;

    public String getLoginPage() {
        return loginPage;
    }

    public void setLoginPage(String loginPage) {
        this.loginPage = loginPage;
    }

    public LoginType getLoginType() {
        return loginType;
    }

    public void setLoginType(LoginType loginType) {
        this.loginType = loginType;
    }


}
接下来,需要变动成功处理器,改成继承一个默认的处理器SavedRequestAwareAuthenticationSuccessHandler
具体代码如下
@Component
public class MyAuthenticationSuccessHandler extends SavedRequestAwareAuthenticationSuccessHandler{

    @Autowired
    private ObjectMapper objectMapper;
    @Autowired
    private SecurityProperties securityProperties;
    /**
     *
     * Authentication封装了我们的登录信息,包括登录之前信息和 UserDetail
     */
    @Override
    public void onAuthenticationSuccess(HttpServletRequest request, HttpServletResponse response,
            Authentication authentication) throws IOException, ServletException {

        System.out.println("登录成功");
        if(LoginType.JSON.equals(securityProperties.getWeb().getLoginType())){
            response.setContentType("application/json;charset=UTF-8");
            response.getWriter().write(objectMapper.writeValueAsString(authentication));
        }else{
            //父类的方法就是跳转
            super.onAuthenticationSuccess(request, response, authentication);
        }
    }
}
同样的做法,修改失败处理
@Component
public class MyAuthenticationFailureHandler extends SimpleUrlAuthenticationFailureHandler{

    @Autowired
    private ObjectMapper objectMapper;
    @Autowired
    private SecurityProperties securityProperties;
    @Override
    public void onAuthenticationFailure(HttpServletRequest request, HttpServletResponse response,
            AuthenticationException exception) throws IOException, ServletException {
        System.out.println("登录失败");
        if(LoginType.JSON.equals(securityProperties.getWeb().getLoginType())){
            response.setStatus(HttpStatus.INTERNAL_SERVER_ERROR.value());//500错误
            response.setContentType("application/json;charset=UTF-8");
            response.getWriter().write(objectMapper.writeValueAsString(exception));
        }else{
            //跳到父类的错误页面上
            super.onAuthenticationFailure(request, response, exception);
        }

    }
}
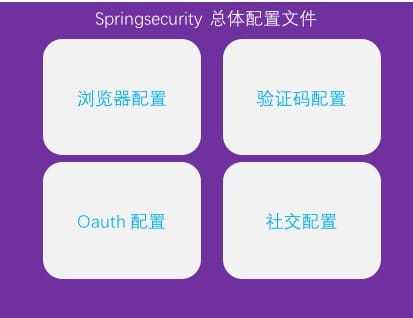
配置文件
上面分析了若干接口,以及如何使用,接下来仔细分析下源码是怎么把这些东西串起来的。
源码分析
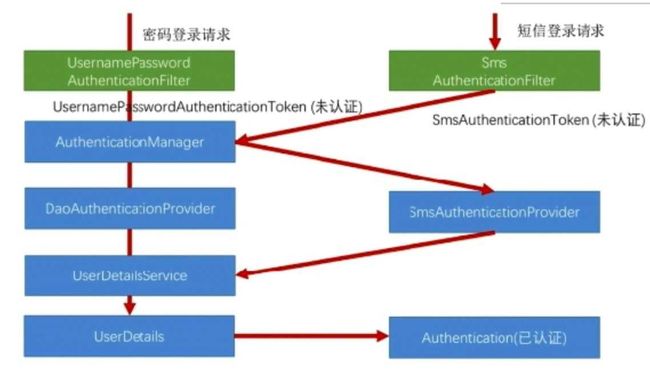
1、认证处理流程说明
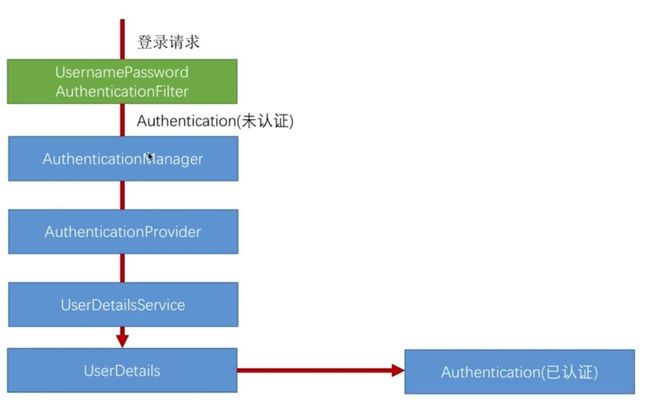
首先来看看这个流程涉及哪些类,是如何进行的。
这张图涉及到了核心一些类,接下来我们就就着这样的流程看源码。
我们开始登录,首先进入的是绿色的
UsernamePasswordAuthenticationFilter,是 SS 过滤器链上的一个过滤器,处理用户表单登录,他根据用户名和密码构造了一个
UsernamePasswordAuthenticationToken类。
UsernamePasswordAuthenticationToken authRequest = new UsernamePasswordAuthenticationToken(
                username, password);
这个对象向上寻找,可以追溯到他是Authentication的一个实现。再看他的构造函数
public UsernamePasswordAuthenticationToken(Object principal, Object credentials) {
        super(null);//调用父类的空构造,权限设置为空
        this.principal = principal;
        this.credentials = credentials;
        setAuthenticated(false);//还没有进行验证
    }
然后来到this.getAuthenticationManager().authenticate(authRequest)最后一行,也就来到上图的第二个类的位置``AuthenticationManager。这个类本身不包含验证逻辑,负责管理下面的 Provider 类。真正工作的类是ProviderManager,他的authenticate方法是拿到 Provider,真正校验的逻辑是在 Provider 里面。for (AuthenticationProvider provider : getProviders()) {`在这个地方,需要循环多个 Provider,哪个支持当前的登录就使用哪个,比如用户名密码登录,或者微信登录是使用不同的Provider 的。
具体的 Provider 是 DAOAUthenticationProvider。该类进行具体实现,该类的父类又调用了我们自己编写的 UserDetailService,这就和我们自定义代码集合起来了。
仔细跟进代码,成功后会调用我们自定义的成功代码,失败代码是在每个异常地方都会调用。
2、认证结果如何再多个请求之间共享
主要是 SecurityContent 和 SecurityContentHolder ,SecurityContentHolder是一个本地线程变量;最后一个过滤器是过滤器链的最前端,请求进入时候,检查 session 信息到线程,出去的时候把线程信息保存到 session。
3、获取用户认证信息
可以通过 SecurityContentHolder.getContext().getAuthentication()获得。
也可以在方法参数上直接使用
还可以使用部分信息
1.5 图像验证码
需要三个步骤:
1、根据随机数生成图片
2、随机数存入 session
3、图片写到接口响应
开始建立一个包,专门负责验证码,首先图像验证码的基本类。
public class ImageCode {

    private BufferedImage image;//图片
    private String code;//验证码
    private LocalDateTime expireTime;//过期时间
    public BufferedImage getImage() {
        return image;
    }
    public void setImage(BufferedImage image) {
        this.image = image;
    }
    public String getCode() {
        return code;
    }
    public void setCode(String code) {
        this.code = code;
    }
    public LocalDateTime getExpireTime() {
        return expireTime;
    }
    public void setExpireTime(LocalDateTime expireTime) {
        this.expireTime = expireTime;
    }
    public ImageCode(BufferedImage image, String code, LocalDateTime expireTime) {
        super();
        this.image = image;
        this.code = code;
        this.expireTime = expireTime;
    }
    public ImageCode(BufferedImage image, String code, int expireInt) {
        super();
        this.image = image;
        this.code = code;
        this.expireTime = LocalDateTime.now().plusSeconds(expireInt);
    }

}
下面开始编写图像验证码的控制器
@RestController
public class ValidateCodeController {

    private static final String SESSION_KEY="SESSION_KEY_IMAGE_CODE";

    //工具类
    private SessionStrategy sessionStrategy=new HttpSessionSessionStrategy();

    @GetMapping("/image/code")
    public void createCode(HttpServletRequest request,HttpServletResponse response) throws IOException{
        //1创建 ImageCode 对象
        ImageCode imageCode=createImageCode(request);
        //2从 request 拿到 session,把imageCode存入到 SESSION_KEY 当中
        sessionStrategy.setAttribute(new ServletWebRequest(request), SESSION_KEY, imageCode);
        //3输出到响应
        ImageIO.write(imageCode.getImage(), "JPEG", response.getOutputStream());
    }

    private ImageCode createImageCode(HttpServletRequest request) {
        ...省略
        return ...;
    }
}
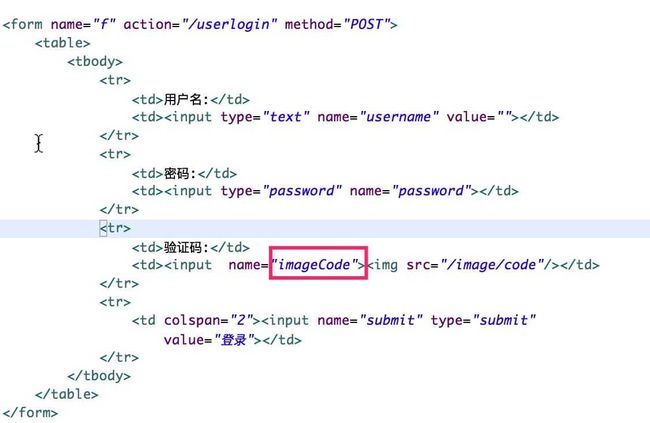
如何使得验证码在何时使用以及在哪里处理验证码过程。首先我们修改下登录页,添加图形验证码
展现的样子
然后,我们需要一个过滤器,构建
ValidateCodeFilter
详细代码如下
//OncePerRequestFilter 保证过滤器每次只被调用一次
public class ValidateCodeFilter extends OncePerRequestFilter{

    private AuthenticationFailureHandler authenticationFailureHandler;

    private SessionStrategy sessionStrategy=new HttpSessionSessionStrategy();

    @Override
    protected void doFilterInternal(HttpServletRequest request, HttpServletResponse response, FilterChain filterChain)
            throws ServletException, IOException {
        //判断拦截的请求 URL,只是登录的 URL
        //并且是 POST 请求
        if(StringUtils.equals("/userlogin", request.getRequestURI())
                && StringUtils.equalsIgnoreCase("post", request.getMethod())){
            try {
                validate(new ServletWebRequest(request));
            } catch (ImageCodeException e) {//自定义异常进行捕获
                //一旦出现异常,使用authenticationFailureHandler来处理
                authenticationFailureHandler.onAuthenticationFailure(request, response, e);
                return;
            }
        }else{
            filterChain.doFilter(request, response);
        }

    }

    private void validate(ServletWebRequest request) throws ImageCodeException, ServletRequestBindingException {
        //分别拿到 session 和请求里面的验证码信息
        ImageCode codeInSession=(ImageCode)sessionStrategy.getAttribute(request, ValidateCodeController.SESSION_KEY);
        String codeInRequest = ServletRequestUtils.getStringParameter(request.getRequest(), "imageCode");

        if(StringUtils.isEmpty(codeInRequest)){
            throw new ImageCodeException("验证码不能为空");
        }

        if(codeInSession==null){
            throw new ImageCodeException("验证码不存在");
        }

        if(codeInSession.isExpire()){
            sessionStrategy.removeAttribute(request, ValidateCodeController.SESSION_KEY);
            throw new ImageCodeException("验证码过期");
        }
        if(!StringUtils.equals(codeInSession.getCode(), codeInRequest)){
            throw new ImageCodeException("验证码不匹配");
        }
        //清除 session 里面的 ImageCode
        sessionStrategy.removeAttribute(request, ValidateCodeController.SESSION_KEY);

    }
    public AuthenticationFailureHandler getAuthenticationFailureHandler() {
        return authenticationFailureHandler;
    }

    public void setAuthenticationFailureHandler(AuthenticationFailureHandler authenticationFailureHandler) {
        this.authenticationFailureHandler = authenticationFailureHandler;
    }

    public SessionStrategy getSessionStrategy() {
        return sessionStrategy;
    }

    public void setSessionStrategy(SessionStrategy sessionStrategy) {
        this.sessionStrategy = sessionStrategy;
    }

}
之后需要把这个过滤器添加到过滤器链上
添加到
UsernamePasswordAuthenticationFilter过滤器之前。
1.6 图像验证码拦截URL 可配置
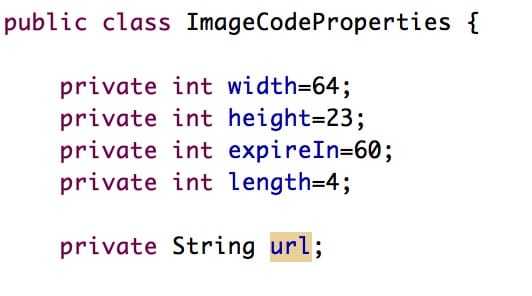
我们在ImageCodeProperties 里面添加一个 url 属性
这个是一个 url 集合,以逗号分隔的,形如
1.7 记住我功能实现
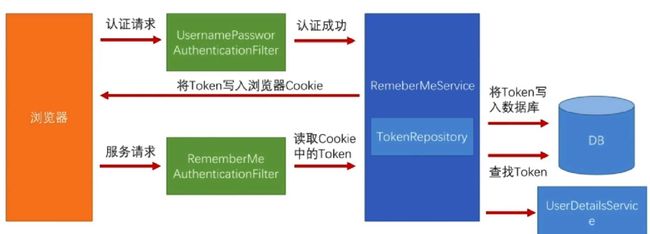
1、原理
(1)、用户超过登录之后,会调用一个叫记住我的服务,该服务调用 TokenRepository 生成 token,然后将 token 写入浏览器 Cookie 和保存到数据库;
(2)、第二天发起请求的时候,会结果一个叫记住我验证过滤器,他会从记住我服务里面读取token 信息,然后再调用 UserDetailService,完成登录;
其中记住我的过滤器在基本认证过滤器之后,如下图的位置。
2、实现
2.1 首先在登录页面增加记住我的 checkbox。
注意红色框的内容必须是这样。
然后配置 TokenRepository,在之前的 SS 配置类中进行,这里需要数据源注入
@Autowired
    private DataSource dataSource;
    @Bean
    public PersistentTokenRepository persistentTokenRepository(){
        JdbcTokenRepositoryImpl jdbcTokenRepositoryImpl=new JdbcTokenRepositoryImpl();
        jdbcTokenRepositoryImpl.setDataSource(dataSource);
        return jdbcTokenRepositoryImpl;
    }
    //为了后面获取用户信息使用
    @Autowired
    private CustomerUserDetailService customerUserDetailService;
需要预先创建一个表
create table persistent_logins (
username varchar(64) not null,
series varchar(64) primary key,
token varchar(64) not null,
last_used timestamp not null)
2.2 配置记住我的过期时间
也是在WebProperties 里面增加一个属性
private int rememberMeSecond=3600;
//set/get方法
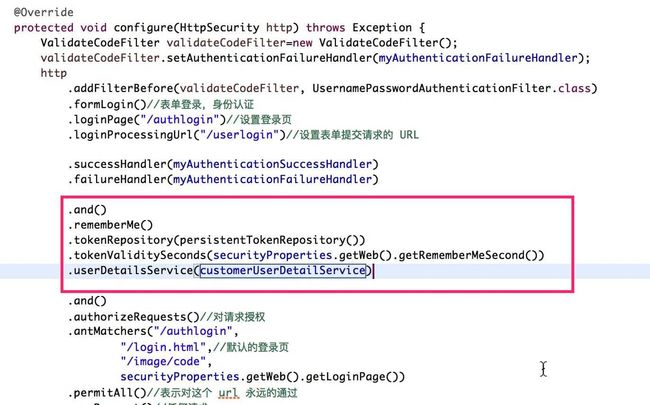
2.3 配置记住我到 SS 配置
到此为止,配置记住我就完成了。
可以测试,成功登录后,数据库添加一条信息。
2、基于短信验证码的认证
2.1 开发短信验证码接口
基于图像验证码的接口改造一个发送短信验证码,在ValidateCodeController里面增加一个短信验证码的方法
@Autowired
    private SMSSender smsSender;
@GetMapping("/sms/code")
    public void createSMS(HttpServletRequest request,HttpServletResponse response) throws IOException, ServletRequestBindingException{
        //1创建 ImageCode 对象
        SMSCode  smsCode=createSMSCode(new ServletWebRequest(request, response));
        //2从 request 拿到 session,把imageCode存入到 SESSION_KEY 当中
        sessionStrategy.setAttribute(new ServletWebRequest(request), SESSION_KEY, smsCode);
        //3短信供应商发送
        String mobile=ServletRequestUtils.getRequiredStringParameter(request, "mobile");
        //这里模拟
        smsSender.sendSMS(mobile, "");
    }

    private SMSCode createSMSCode(ServletWebRequest servletWebRequest) {
        SMSCode code=new SMSCode("1234", 60000);
        return code;
    }
其中短信供应商也应该封装起来,这里粗略的封装下
public interface SMSSender {
    public void sendSMS(String phone,String code);
}
实现
@Component("smsSender")
public class DianxinSMSSender implements SMSSender{
    @Override
    public void sendSMS(String phone, String code) {
        System.out.println("想手机"+phone+"发送验证码"+code);
    }
}
便捷前端页面
2.2 校验短信验证码和登录
和用户密码登录类似构造自己的过滤器,但是短信验证码校验是放在过滤器之前,方便通用。
接下来开始逐个实现
SMSCodeAuthenticationToken模仿
UsernamePasswordAuthenticationToken代码,稍作修改
//封装登录信息
public class SMSCodeAuthenticationToken extends AbstractAuthenticationToken {

    private static final long serialVersionUID = SpringSecurityCoreVersion.SERIAL_VERSION_UID;

    // ~ Instance fields
    // ================================================================================================

    private final Object principal;//未验证之前是手机号,验证之后是用户信息
    //private Object credentials;//密码,由于在这之前已经验证过了,所以不需要这个属性

    // ~ Constructors
    // ===================================================================================================

    /**
     * This constructor can be safely used by any code that wishes to create a
     * UsernamePasswordAuthenticationToken, as the {@link #isAuthenticated()}
     * will return false.
     *
     */
    public SMSCodeAuthenticationToken(String mobile) {
        super(null);
        this.principal = mobile;
        setAuthenticated(false);
    }

    /**
     * This constructor should only be used by AuthenticationManager or
     * AuthenticationProvider implementations that are satisfied with
     * producing a trusted (i.e. {@link #isAuthenticated()} = true)
     * authentication token.
     *
     * @param principal
     * @param credentials
     * @param authorities
     */
    public SMSCodeAuthenticationToken(Object principal, Object credentials,
            Collection authorities) {
        super(authorities);
        this.principal = principal;
        super.setAuthenticated(true); // must use super, as we override
    }

    // ~ Methods
    // ========================================================================================================


    public Object getPrincipal() {
        return this.principal;
    }

    public void setAuthenticated(boolean isAuthenticated) throws IllegalArgumentException {
        if (isAuthenticated) {
            throw new IllegalArgumentException(
                    "Cannot set this token to trusted - use constructor which takes a GrantedAuthority list instead");
        }

        super.setAuthenticated(false);
    }

    @Override
    public void eraseCredentials() {
        super.eraseCredentials();
    }

    @Override
    public Object getCredentials() {
        return null;
    }
}
SMSCodeAuthenticationFilter同样模仿UsernamePasswordAuthenticationFilter
public class SMSCodeAuthenticationFilter extends AbstractAuthenticationProcessingFilter {

    public static final String MOBILE = "mobile";

    private String mobileParameter = MOBILE;
    private boolean postOnly = true;

    public SMSCodeAuthenticationFilter() {
        super(new AntPathRequestMatcher("/mobilelogin", "POST"));
    }

    public Authentication attemptAuthentication(HttpServletRequest request, HttpServletResponse response)
            throws AuthenticationException {
        if (postOnly && !request.getMethod().equals("POST")) {
            throw new AuthenticationServiceException("Authentication method not supported: " + request.getMethod());
        }

        String mobile = obtainMobile(request);

        if (mobile == null) {
            mobile = "";
        }

        mobile = mobile.trim();

        SMSCodeAuthenticationToken authRequest = new SMSCodeAuthenticationToken(mobile);

        // Allow subclasses to set the "details" property
        setDetails(request, authRequest);

        return this.getAuthenticationManager().authenticate(authRequest);
    }

    protected String obtainMobile(HttpServletRequest request) {
        return request.getParameter(mobileParameter);
    }

    protected void setDetails(HttpServletRequest request, SMSCodeAuthenticationToken authRequest) {
        authRequest.setDetails(authenticationDetailsSource.buildDetails(request));
    }

    public void setMobileParameter(String mobileParameter) {
        Assert.hasText(mobileParameter, "mobileParameter parameter must not be empty or null");
        this.mobileParameter = mobileParameter;
    }

    public void setPostOnly(boolean postOnly) {
        this.postOnly = postOnly;
    }

}
SMSCodeAuthenticationProvider类的代码如下
public class SMSCodeAuthenticationProvider implements AuthenticationProvider{

    private UserDetailsService userDetailsService;

    //使用 UserDetailService 获取用户信息重新组装 Authentication
    @Override
    public Authentication authenticate(Authentication authentication) throws AuthenticationException {
        SMSCodeAuthenticationToken token=(SMSCodeAuthenticationToken)authentication;
        UserDetails user=userDetailsService.loadUserByUsername((String)token.getPrincipal());
        if(user==null){
            throw new InternalAuthenticationServiceException("无法获取用户信息");
        }
        SMSCodeAuthenticationToken result=new SMSCodeAuthenticationToken(user,user.getAuthorities());
        result.setDetails(token.getDetails());//需要把之前的 Detail 设置到新的 Token 里面
        return result;
    }

    //检查参数是不是我们定义的 SMSCodeAuthenticationToken
    @Override
    public boolean supports(Class authentication) {
        return SMSCodeAuthenticationToken.class.isAssignableFrom(authentication);
    }
    public UserDetailsService getUserDetailsService() {
        return userDetailsService;
    }

    public void setUserDetailsService(UserDetailsService userDetailsService) {
        this.userDetailsService = userDetailsService;
    }

}
最后SMSCodeFilter雷同之前的图形验证码的过滤器,需要修改部分代码即可
//OncePerRequestFilter 保证过滤器每次只被调用一次
public class SMSCodeFilter extends OncePerRequestFilter{

    private AuthenticationFailureHandler authenticationFailureHandler;

    private SessionStrategy sessionStrategy=new HttpSessionSessionStrategy();

    @Override
    protected void doFilterInternal(HttpServletRequest request, HttpServletResponse response, FilterChain filterChain)
            throws ServletException, IOException {
        //判断拦截的请求 URL,只是登录的 URL
        //并且是 POST 请求
        if(StringUtils.equals("/mobilelogin", request.getRequestURI())
                && StringUtils.equalsIgnoreCase("post", request.getMethod())){
            try {
                validate(new ServletWebRequest(request));
            } catch (ImageCodeException e) {//自定义异常进行捕获
                //一旦出现异常,使用authenticationFailureHandler来处理
                authenticationFailureHandler.onAuthenticationFailure(request, response, e);
                return;
            }
        }
        filterChain.doFilter(request, response);


    }

    private void validate(ServletWebRequest request) throws ServletRequestBindingException {
        //分别拿到 session 和请求里面的验证码信息
        SMSCode codeInSession=(SMSCode)sessionStrategy.getAttribute(request, ValidateCodeController.SESSION_KEY_SMS);
        String codeInRequest = ServletRequestUtils.getStringParameter(request.getRequest(), "smsCode");

        if(StringUtils.isEmpty(codeInRequest)){
            throw new ImageCodeException("验证码不能为空");
        }

        if(codeInSession==null){
            throw new ImageCodeException("验证码不存在");
        }

        if(codeInSession.isExpire()){
            sessionStrategy.removeAttribute(request, ValidateCodeController.SESSION_KEY_SMS);
            throw new ImageCodeException("验证码过期");
        }
        if(!StringUtils.equals(codeInSession.getCode(), codeInRequest)){
            throw new ImageCodeException("验证码不匹配");
        }
        //清除 session 里面的 ImageCode
        sessionStrategy.removeAttribute(request, ValidateCodeController.SESSION_KEY_SMS);

    }

    public AuthenticationFailureHandler getAuthenticationFailureHandler() {
        return authenticationFailureHandler;
    }

    public void setAuthenticationFailureHandler(AuthenticationFailureHandler authenticationFailureHandler) {
        this.authenticationFailureHandler = authenticationFailureHandler;
    }

    public SessionStrategy getSessionStrategy() {
        return sessionStrategy;
    }

    public void setSessionStrategy(SessionStrategy sessionStrategy) {
        this.sessionStrategy = sessionStrategy;
    }


}
最终配置以上代码,使其可以正常工作
分连部分,首先配置前三个,配到核心包里面
@Component
public class SMSCodeAuthenticationConfig extends SecurityConfigurerAdapter{

    @Autowired private AuthenticationFailureHandler myAuthenticationFailureHandler;
    @Autowired private AuthenticationSuccessHandler myAuthenticationSuccessHandler;
    @Autowired private UserDetailsService userDetailsService;

    @Override
    public void configure(HttpSecurity http) throws Exception {
        SMSCodeAuthenticationFilter sMSCodeAuthenticationFilter=new SMSCodeAuthenticationFilter();
        sMSCodeAuthenticationFilter.setAuthenticationManager(http.getSharedObject(AuthenticationManager.class));
        sMSCodeAuthenticationFilter.setAuthenticationFailureHandler(myAuthenticationFailureHandler);
        sMSCodeAuthenticationFilter.setAuthenticationSuccessHandler(myAuthenticationSuccessHandler);

        SMSCodeAuthenticationProvider sMSCodeAuthenticationProvider=new SMSCodeAuthenticationProvider();
        sMSCodeAuthenticationProvider.setUserDetailsService(userDetailsService);

        http.authenticationProvider(sMSCodeAuthenticationProvider)
        .addFilterAfter(sMSCodeAuthenticationFilter, UsernamePasswordAuthenticationFilter.class);
    }
}
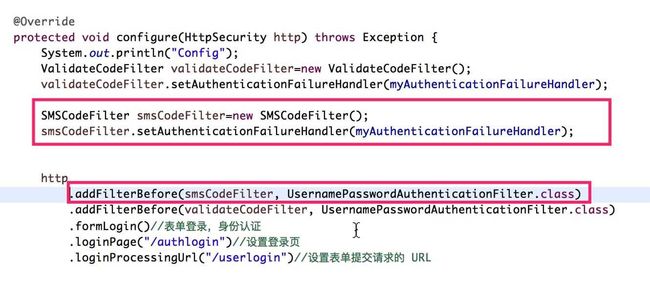
再把SMSCodeFilter类似ValidateCodeFilter在 SS 配置中进行
最后把
SMSCodeAuthenticationConfig也添加到 SS 配智中。
先引入,最后 apply(sMSCodeAuthenticationConfig);
最后贴出完整代码
@Configuration
public class WebSecurityConfig extends WebSecurityConfigurerAdapter{

    @Autowired
    private SecurityProperties securityProperties;

    @Bean
    public PasswordEncoder passwordEncoder(){
        return new BCryptPasswordEncoder();
    }

    @Autowired
    private MyAuthenticationSuccessHandler myAuthenticationSuccessHandler;
    @Autowired
    private MyAuthenticationFailureHandler myAuthenticationFailureHandler;

    @Autowired
    private DataSource dataSource;
    @Bean
    public PersistentTokenRepository persistentTokenRepository(){
        JdbcTokenRepositoryImpl jdbcTokenRepositoryImpl=new JdbcTokenRepositoryImpl();
        jdbcTokenRepositoryImpl.setDataSource(dataSource);
        //jdbcTokenRepositoryImpl.setCreateTableOnStartup(true);//执行一次,创建表,也可以自行创建表
        return jdbcTokenRepositoryImpl;
    }
    @Autowired
    private UserDetailsService userDetailsService;

    @Autowired
    private SMSCodeAuthenticationConfig sMSCodeAuthenticationConfig;


    @Override
    protected void configure(HttpSecurity http) throws Exception {
        System.out.println("Config");
        ValidateCodeFilter validateCodeFilter=new ValidateCodeFilter();
        validateCodeFilter.setAuthenticationFailureHandler(myAuthenticationFailureHandler);

        SMSCodeFilter smsCodeFilter=new SMSCodeFilter();
        smsCodeFilter.setAuthenticationFailureHandler(myAuthenticationFailureHandler);


        http
            .addFilterBefore(smsCodeFilter, UsernamePasswordAuthenticationFilter.class)
            .addFilterBefore(validateCodeFilter, UsernamePasswordAuthenticationFilter.class)
            .formLogin()//表单登录,身份认证
            .loginPage("/authlogin")//设置登录页
            .loginProcessingUrl("/userlogin")//设置表单提交请求的 URL

            .successHandler(myAuthenticationSuccessHandler)
            .failureHandler(myAuthenticationFailureHandler)

            .and()
            .rememberMe()
            .tokenRepository(persistentTokenRepository())
            .tokenValiditySeconds(securityProperties.getWeb().getRememberMeSecond())
            .userDetailsService(userDetailsService)

            .and()
            .authorizeRequests()//对请求授权
            .antMatchers("/authlogin","/mobilelogin",
                    "/login.html",//默认的登录页
                    "/image/code",
                    "/sms/code",
                    securityProperties.getWeb().getLoginPage())
            .permitAll()//表示对这个 url 永远的通过
            .anyRequest()//任何请求
            .authenticated()//需要身份认证
            .and()
            .csrf().disable()//把 csdf 跨站防护关闭
            .apply(sMSCodeAuthenticationConfig);
    }
}
