为什么80%的码农都做不了架构师?>>> ![]()
================================
后续更新
储存空间大小,受限于fat32的原因,即使拓展data.img最大也只有4G的存储空间
丢在一边不搭理后进入假死状态,无法进行任何操作,只能重启,然后恶性循环
结论:
进行单独软件调试下,获取数据那么一会功夫的工作可以,长期工作。。。die。。
该方案pass,还是操起那部破手机继续折腾,并且看官方貌似没在这方面下什么精力了
================================
相信和我一样日常折腾的同学来说Win10 Hyper-V 基本上属于必装环境
毕竟为了Docker嘛,还是要用的。可有这时候安装安卓模拟器嘛,各种崩
好,我退一步求其次,安装虚拟机vm,vxbox各种蓝屏。
记得印象中找了N款产品都无解,网上翻了一圈都太麻烦了索性一直没去弄了都真机
然后今天在抓包小程序的时候真机 炸弹星n8 note没root权限,备用机卡的一笔受不了
想起模拟器来吧,MD想起来模拟器无解,搜了圈搜到个文章,按照上面的中文试了下没成功
好在看到了底部英文原文,勉强啃了下成功了
安装了两次,第一次按照中文的做的,没成功
第二次按照英文的走,成功了(论英文对程序猿的重要性)
===========以上是背景=============
工具与环境:
win10 企业或专业版
Hyper-V
RemixOS 游戏版:http://youxi.jide.com/
-
Hyper-V 新建一个
一代虚拟机
内存 2048 MB
网络 默认开关 (你懂网络的自己配置)
硬盘10G(看你需求)
以后安装系统
千万别立即开机 还有事要做
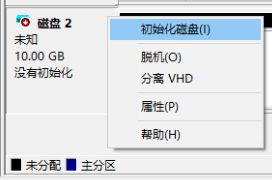
2.在我的计算机中找到 磁盘管理 (在 此电脑 右键 管理 )
这个是我的虚拟机磁盘保存路径
E:\vm\RemixOS\Virtual Hard Disks\RemixOs.vhdx初始化磁盘
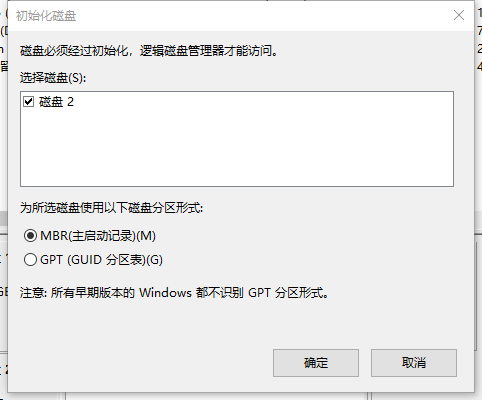
MBR分区
初始化磁盘
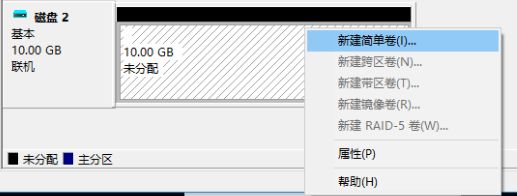
不分配驱动器号或路径
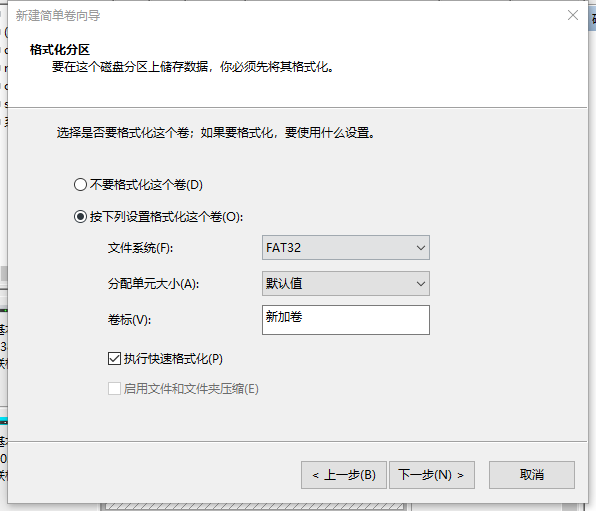
FAT32分区格式
分离VHD磁盘
装载ISO镜像到光盘,然后启动系统
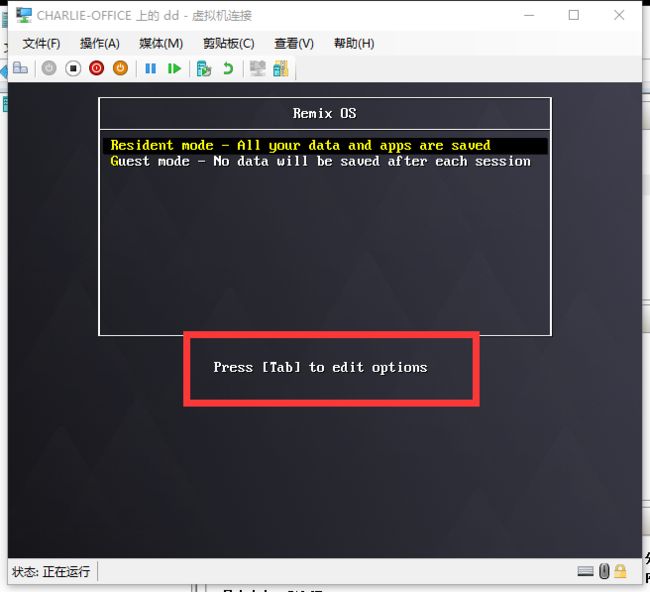
到选择界面不要选择任何一项,按【Tab】键
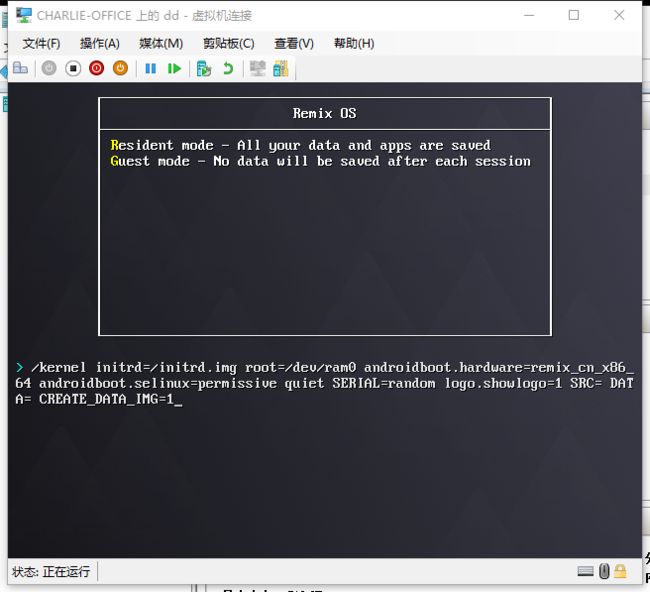
将原来的
/kernel initrd=initrd.img root=/dev/ram0 androidboot.hardware=remixx8664 androidboot.selinux=permissive quiet SERIAL=random logo.showlogo=1 SRC= DATA= CREATEDATAIMG=1
改成为如下
/kernel initrd=initrd.img root=/dev/ram0 androidboot.hardware=remixx8664 androidboot.selinux=permissive quiet INSTALL=1 nomodeset vga=791
关于后面的VGA参数表如下解释
http://pierre.baudu.in/other/grub.vga.modes.html
| Colour | depth | 640x480 | 800x600 | 1024x768 | 1280x1024 | 1400x1050 | 1600x1200 |
|---|---|---|---|---|---|---|---|
| 8 | (256) | 769 | 771 | 773 | 775 | ||
| 15 | (32K) | 784 | 787 | 790 | 793 | ||
| 16 | (65K) | 785 | 788 | 791 | 794 | 834 | 884 |
| 24 | (16M) | 786 | 789 | 792 | 795 |
回车,然后按照如下顺序选择
【ok】 选择第一项 sda1 vfat Virtual Dis
【ok】 选择第一项 Do not format
【Yes】 Do you want to install boot loader GRUB?
【Skip】Do you want to install EFI GRUB2?
【Yes】 Do you want to install /system directory as read-write?
然后等待个30多秒
【Yes】 Are you sure to create the image?
【2047】 将512 改成 2047 因为这里最大值就只有2047 然后回车
等待一会后,你可以选择【Run Android-x86】进入系统,也可以Reboot重启系统(这里会进不去)
但是,这里我们直接关闭电源(对,就是这么暴力)
然后我们回到 磁盘管理 这从新附加刚才的磁盘文件,并分配磁盘盘符
打卡磁盘找到并编辑
H:\grub\menu.lst这里我们主要做的工作就是找到 kernel791 改成 kernel vga=791
原来的是这样的
default=0
timeout=6
splashimage=/grub/android-x86.xpm.gz
root (hd0,0)

title Remix OS 2016-10-24
    kernel /android-2016-10-24/kernel791 quiet root=/dev/ram0 androidboot.hardware=remix_cn_x86_64 androidboot.selinux=permissive nomodeset SRC=/android-2016-10-24
    initrd /android-2016-10-24/initrd.img

title Remix OS 2016-10-24 (Debug mode)
    kernel /android-2016-10-24/kernel791 root=/dev/ram0 androidboot.hardware=remix_cn_x86_64 androidboot.selinux=permissive nomodeset DEBUG=2 SRC=/android-2016-10-24
    initrd /android-2016-10-24/initrd.img

title Remix OS 2016-10-24 (Debug nomodeset)
    kernel /android-2016-10-24/kernel791 nomodeset root=/dev/ram0 androidboot.hardware=remix_cn_x86_64 androidboot.selinux=permissive nomodeset DEBUG=2 SRC=/android-2016-10-24
    initrd /android-2016-10-24/initrd.img

title Remix OS 2016-10-24 (Debug video=LVDS-1:d)
    kernel /android-2016-10-24/kernel791 video=LVDS-1:d root=/dev/ram0 androidboot.hardware=remix_cn_x86_64 androidboot.selinux=permissive nomodeset DEBUG=2 SRC=/android-2016-10-24
    initrd /android-2016-10-24/initrd.img
我们更改为如下这样
default=0
timeout=6
splashimage=/grub/android-x86.xpm.gz
root (hd0,0)

title Remix OS 2016-10-24
    kernel /android-2016-10-24/kernel vga=791 quiet root=/dev/ram0 androidboot.hardware=remix_cn_x86_64 androidboot.selinux=permissive nomodeset SRC=/android-2016-10-24
    initrd /android-2016-10-24/initrd.img

title Remix OS 2016-10-24 (Debug mode)
    kernel /android-2016-10-24/kernel vga=791 root=/dev/ram0 androidboot.hardware=remix_cn_x86_64 androidboot.selinux=permissive nomodeset DEBUG=2 SRC=/android-2016-10-24
    initrd /android-2016-10-24/initrd.img

title Remix OS 2016-10-24 (Debug nomodeset)
    kernel /android-2016-10-24/kernel vga=791 nomodeset root=/dev/ram0 androidboot.hardware=remix_cn_x86_64 androidboot.selinux=permissive nomodeset DEBUG=2 SRC=/android-2016-10-24
    initrd /android-2016-10-24/initrd.img

title Remix OS 2016-10-24 (Debug video=LVDS-1:d)
    kernel /android-2016-10-24/kernel vga=791 video=LVDS-1:d root=/dev/ram0 androidboot.hardware=remix_cn_x86_64 androidboot.selinux=permissive nomodeset DEBUG=2 SRC=/android-2016-10-24
    initrd /android-2016-10-24/initrd.img
PS:这里有点我很好奇,我前面测试的时候 nomodeset这个词是 nomodesetp 但是这里在写这个教程的时候却是正确的了,如果你发现nomodesetp这个词请改为nomodeset才正常,保险起见还是这么改比较妥当
然后保存退出,分离VHD磁盘,到虚拟机设置里面将ISO镜像卸载出来
启动系统
默认选择,这里第一次启动会相当的漫长,有点耐心,大概也就5~10分种就好了,当然如果你是SSD可能速度会很快
进入系统后我们要做一件事,你有没有发现鼠标贼特么难用?找不到鼠标?
不,那个煞笔鼠标要按住左键才能移动
解决办法就是 按住左键 移动到左下角菜单 找到 命令终端 或者叫做 终端命令
输入
$ su
$ rmmod hid_hyperv
su后要点击允许才能获取权限,否则没权限执行
至此折腾完毕
参考文档:
https://www.cnblogs.com/atwind/p/7048283.html
http://trukhanov.com/2016/01/install-remixos-on-hyper-v-virtual-machine/

