DeepLink用法及源码解析
终于建了一个自己个人小站:https://huangtianyu.gitee.io,以后优先更新小站博客,欢迎进站,O(∩_∩)O~~
1. 简介
DeepLink官网上有这样的解释:
When a clicked link or programmatic request invokes a web URI intent, the Android system tries each of the following actions, in sequential order, until the request succeeds:
1.  Open the user's preferred app that can handle the URI, if one is designated.
2.  Open the only available app that can handle the URI.
3.  Allow the user to select an app from a dialog.

Follow the steps below to create and test links to your content. You can also use the [App Links Assistant](https://developer.android.com/studio/write/app-link-indexing.html) in Android Studio to add Android App Links
翻译后的意思就是:
当单击链接或编程请求调用Web URI意图时,Android系统按顺序依次尝试以下每一个操作,直到请求成功为止:
1. 打开用户首选的应用程序,它可以处理URI,如果指定的话。
2. 打开可以处理URI的惟一可用应用程序。
3. 允许用户从对话框中选择应用程序。
意思也就是用户可以自己写一串字符串,系统会对该字符串进行解析,然后调起注册过相应scheme的应用,如果有多个注册了,那么就会弹出对话框让用户选择。
2. 用法
Google官方给了一个样例:search-samples
以下根据Android官方的deep-linking的样例来说明如何使用。
<activity
    android:name="com.example.android.GizmosActivity"
    android:label="@string/title_gizmos" >
    <intent-filter android:label="@string/filter_view_http_gizmos">
        <action android:name="android.intent.action.VIEW" />
        <category android:name="android.intent.category.DEFAULT" />
        <category android:name="android.intent.category.BROWSABLE" />

        <data android:scheme="http"
              android:host="www.example.com"
              android:pathPrefix="/gizmos" />

    intent-filter>
    <intent-filter android:label="@string/filter_view_example_gizmos">
        <action android:name="android.intent.action.VIEW" />
        <category android:name="android.intent.category.DEFAULT" />
        <category android:name="android.intent.category.BROWSABLE" />

        <data android:scheme="example"
              android:host="gizmos" />
    intent-filter>
activity>
在上面有两个
<intent-filter>
  ...
  <data android:scheme="https" android:host="www.example.com" />
  <data android:scheme="app" android:host="open.my.app" />
intent-filter>
上面在同一个
@Override
public void onCreate(Bundle savedInstanceState) {
    super.onCreate(savedInstanceState);
    setContentView(R.layout.main);

    Intent intent = getIntent();
    String action = intent.getAction();
    Uri data = intent.getData();
}
getIntent可以在Activity的生命周期的任何时段进行获取,不过一般别人应用要调你应用,肯定都是希望进入你的应用某个界面,或实现某个功能。其他应用会把该传的信息都传给你,最好的解析地方肯定是onCreate(或onStart但onStart还是会晚一些)。对于这个官方给了以下建议:
*   The deep link should take users directly to the content, without any prompts, interstitial pages, or logins. Make sure that users can see the app content even if they never previously opened the application. It is okay to prompt users on subsequent interactions or when they open the app from the Launcher. This is the same principle as the [first click free](https://support.google.com/webmasters/answer/74536?hl=en) experience for web sites.
*   Follow the design guidance described in [Navigation with Back and Up](https://developer.android.com/design/patterns/navigation.html) so that your app matches users' expectations for backward navigation after they enter your app through a deep link
意思就是:
1. 打开应用后应该直接到内容,不要有任何提示,间接的页面,或登录。确保用户可以看到应用程序的内容,即使他们以前从未打开过应用程序。可以在随后的交互中提示用户,或者在启动程序中打开应用程序。这与网站第一次点击免费体验的原理是相同的。
2. 遵循导航与后退和向上描述的设计指南,使您的应用程序与用户通过向后链接进入您的应用程序的深度导航的期望相符。
实现上面代码后就可以进行测试了。在测试时可以使用adb的shell命令进行测试,语法格式如下:
$ adb shell am start
        -W -a android.intent.action.VIEW
        -d <URI> <PACKAGE>
例如我们上面的例子就可以采用如下方式进行打开:
$ adb shell am start
        -W -a android.intent.action.VIEW
        -d "example://gizmos" com.example.android
上面的intent也可以通过浏览器里面的网页进行设置,现在浏览器都会解析这个intent然后调起对应的应用,即可以直接在网页中调起应用。
DeepLink使得开发网站和自己的App能很好的相互交互。而且一个intent字符串也好发送,比如你想推广你的App,你就可以把这个intent发给广告商,然后点击的时候就把这个intent给手机浏览器,通过浏览器调起你自己的应用。这个最好的应用还在搜索上,在搜索的时候,当用户搜到对应内容的时候,现在一般都是跳网站。但是如果有DeepLink,那么就可以直接通过DeepLink的intent直接跳转到你自己的App,这既方便了用户,也方便了开发者。
3. DeepLink原理分析
3.1 DeepLinkDispatch框架
DeepLink采用的是Airbnb推出的DeepLinkDispatch框架,该DeepLinkDispatch是一个以注解形式来实现dispatch跳转的框架。这个是它的简单介绍README.md。
3.2 Dispatch框架使用例子
@DeepLink("foo://example.com/deepLink/{id}")
public class MainActivity extends Activity {
  @Override protected void onCreate(Bundle savedInstanceState) {
    super.onCreate(savedInstanceState);
    Intent intent = getIntent();
    if (intent.getBooleanExtra(DeepLink.IS_DEEP_LINK, false)) {
      Bundle parameters = intent.getExtras();
      String idString = parameters.getString("id");
      // Do something with idString
    }
  }
}
多个
//多filter的注解
@DeepLink({"foo://example.com/deepLink/{id}", "foo://example.com/anotherDeepLink"})
public class MainActivity extends Activity {
  @Override protected void onCreate(Bundle savedInstanceState) {
    super.onCreate(savedInstanceState);
    Intent intent = getIntent();
    if (intent.getBooleanExtra(DeepLink.IS_DEEP_LINK, false)) {
      Bundle parameters = intent.getExtras();
      String idString = parameters.getString("id");
      // Do something with idString
    }
  }
}
某个方法的注解:
@DeepLink("foo://example.com/methodDeepLink/{param1}")
public static Intent intentForDeepLinkMethod(Context context, Bundle extras) {
  Uri.Builder uri = Uri.parse(extras.getString(DeepLink.URI)).buildUpon();
  return new Intent(context, MainActivity.class)
      .setData(uri.appendQueryParameter("bar", "baz").build())
      .setAction(ACTION_DEEP_LINK_METHOD);
}
上面的注解相当于DeepLink中在manifest中的Activity标签下注册的
public class DeepLinkReceiver extends BroadcastReceiver {
  private static final String TAG = "DeepLinkReceiver";

  @Override public void onReceive(Context context, Intent intent) {
    String deepLinkUri = intent.getStringExtra(DeepLinkHandler.EXTRA_URI);
    if (intent.getBooleanExtra(DeepLinkHandler.EXTRA_SUCCESSFUL, false)) {
      Log.i(TAG, "Success deep linking: " + deepLinkUri);
    } else {
      String errorMessage = intent.getStringExtra(DeepLinkHandler.EXTRA_ERROR_MESSAGE);
      Log.e(TAG, "Error deep linking: " + deepLinkUri + " with error message +" + errorMessage);
    }
  }
}

public class YourApplication extends Application {
  @Override public void onCreate() {
    super.onCreate();
    IntentFilter intentFilter = new IntentFilter(DeepLinkHandler.ACTION);

//使用应用内广播注册的,不用担心其他应用收到
LocalBroadcastManager.getInstance(this).registerReceiver(new DeepLinkReceiver(), intentFilter);
  }
}
下面就来分析下它的原理。
3.3 源码剖析
3.3.1 根据注解生成对应class文件
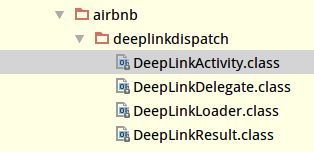
在AS点击build后即可生成对应的class文件,主要的文件有以下几个: 
在DeepLinkDispatch框架中主要是通过DeepLinkDelegate代理来处理传来的Uri,在DeepLinkDelegate中主要是dispatchFrom这个方法来处理Uri。代码如下: 
1. 收下根据getIntent.getData()即可获取到对应的uri。
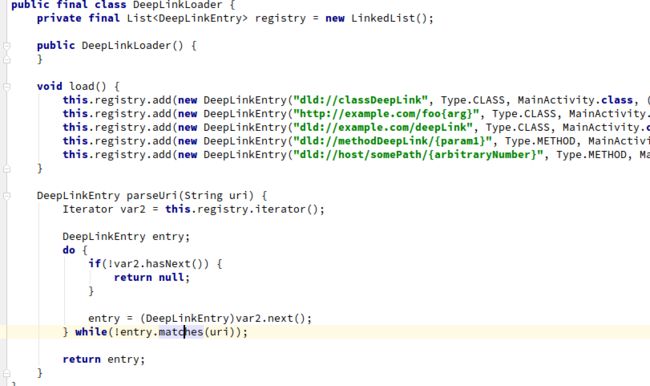
2. 然后通过DeepLinkLoader.load()来加载注册的uri。代码如下 
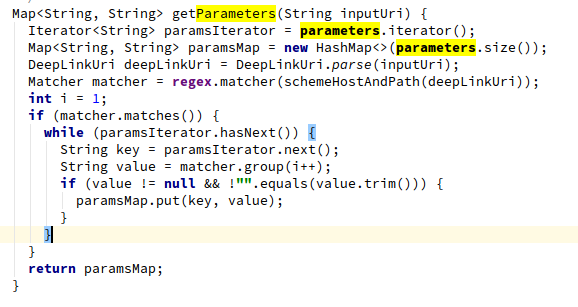
其中DeepLinkUri.getParameters代码如下: 
然后调用了该类的parseParameters获取patterns集合。 
从DeepLink的intent中获取的就是key,具体跳转的内容就是value。
5. DeepLinkUri.queryParameterNames
通过queryParameterNames就把真实的Uri解析成对应的注解了,之后就会进行分发逻辑了。
6. 具体分发逻辑 

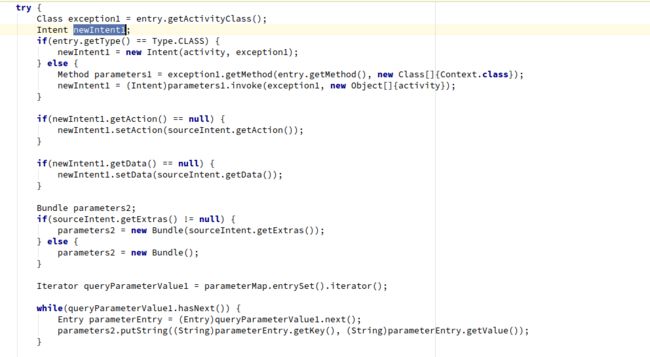
6.1 首先生成Intent对象
6.2 setAction和data,通过以上将action和data放入Intent中。
6.3 处理Bundle。
6.4 调用callingActivity。
6.5 startActivity
6.6 createResultAndNotify
页面路由的框架大多类似,主要逻辑是:先注册下需要路由的地址页及对应的uri,然后通过uri调起时有控制中枢拦截后进行匹配,当匹配成功后就执行跳转,在匹配的时候uri后面可以跟上所需要传输的数据,然后在接收端进行解析即可完成数据的交互。通过以上步骤就完成了DeepLink调起应用页面的操作了,具体代码稍后再贴。
4. 总结
- DeepLink实现了网页直接和App直接跳转。之前手机上的每个App都相当于一个个孤岛,没有办法和广泛的网站实现直接的跳转。现在比如你在浏览微博的时候看到某个App上面有精彩的内容,你就可以直接点击链接跳转到App里面(甚至可以判断如果按照了App就进入App里面,如果不安装那么就进入应用市场的该App下载界面),这样的交互很方便,很好的将App连接到了整个网络世界,以后有个浏览器就能随意的跳转。
- DeepLink完全可以在搜索中使用,目前的搜索都是搜到了内容还是调网页。以后如果开发者把自己的DeepLink链接提交给搜索公司,那么在搜索到对应的结果的时候就可以直接点击搜到的结果跳转到自己的App了。这个还能应用到广告上去。推广自己的App就更容易了。
- DeepLink使得大企业的众多App之间相互拉活,相互跳转。假如某公司有个超级App,那么想推广自己的其他App就可以使用DeepLink在开启自己某个子页面的时候,把这个子页面交给其他App进行处理。这样就拉活了自己的其他App了。
- 在DeepLink的基础上,Google又新出了一个AppLinks,AppLinks就是你自己的网站和你自己的App相互关联了。比如用户在短信中点击了你的网站,那么就可以直接跳转到你的App,而不会出现选择对话框。Google官方是这样说的:
Android App Links are a special type of deep link that allow your website URLs to immediately open the
corresponding content in your Android app (without requiring the user to select the app).

To add Android App Links to your app, define intent filters that open your app content using HTTP URLs (as
 described in [Create Deep Links to App Content]), and verify that you own both your app and the website URLs (as described in this guide). If the
system successfully verifies that you own the URLs, the system automatically routes those URL intents to your app.
创建你自己的AppLinks,可以参考如下Create Deep Links to App Content。后续我会专门写篇文章介绍下AppLinks及其用法。
