基于java(maven)搭建nginx+ffmpeg搭建流媒体直播大华or海康摄像头
上周公司要我用java获取客户那边大华摄像头进行页面上直播的效果,下面谈谈我的做法:
简单说一下nginx和ffmpeg
1.nginx服务器负责rtmp协议访问:rtsp->rtmp
2.ffmpeg 负责推拉视频流,对视频流进行处理。
正文
1.首先确认一下是否能正常看到摄像头录像。
确认提供流是否能够播放:打开vlc播放器【媒体--》打开网络串流,输入流地址】。这里大华提供的rtsp流地址,【rtsp://账号:密码@IP地址:544/cam/realmonitor?channel=1&subtype=0\】【端口号默认544,通道号channel默认1,主码流为 0(即subtype=0),辅码流为1(即subtype=1)】。如果能正常播放继续以下操作,不能请确认rtsp协议是否正确。
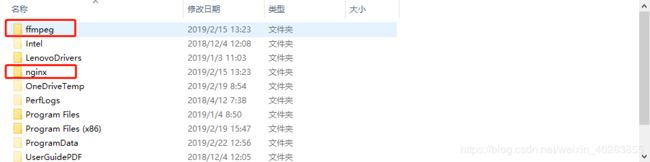
2.将nginx、ffmpeg 解压后放置c盘根目录。配置环境变量path:C:\ffmpeg\bin
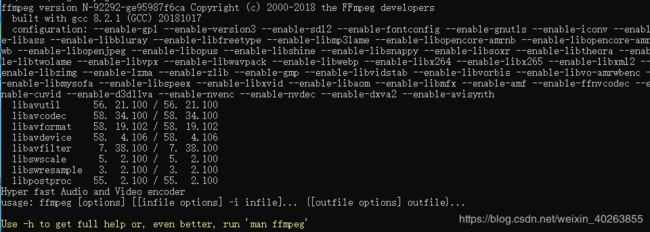
2.1 cmd输入:ffmpeg
2.2 启动nginx【运行文件中的exe文件,运行一闪之后任务管理器查看nginx.exe进程存在即可】
2.3 在cmd中输入 ffmpeg -i "rtsp://账号:密码@IP地址:544/cam/realmonitor?channel=1&subtype=0" -vcodec h264 -f flv -an "rtmp://localhost/live"
回车后控制台持续打印转流信息

这样证明ffmpeg转流成功。
3 现在开始进行java整合
3.1 Java 整合的代码(controller)
package com.java.controller;

import java.io.BufferedReader;
import java.io.IOException;
import java.io.InputStream;
import java.io.InputStreamReader;
import java.util.ArrayList;
import java.util.HashMap;
import java.util.List;
import java.util.Map;
import java.util.Properties;

import javax.servlet.http.HttpServletRequest;
import javax.servlet.http.HttpServletResponse;

import org.springframework.stereotype.Controller;
import org.springframework.web.bind.annotation.RequestMapping;
import org.springframework.web.bind.annotation.RequestParam;

import cc.eguid.FFmpegCommandManager.FFmpegManager;
import cc.eguid.FFmpegCommandManager.FFmpegManagerImpl;

@Controller
public class ControllerCamera {
	public static Map maps = new HashMap<>();
	public static FFmpegManager manager = new FFmpegManagerImpl();

	// 开转流
	@RequestMapping(value = "/ffmpegs")
	public void ffmpegs(HttpServletResponse response, HttpServletRequest request) {
		InputStream inputStream = this.getClass().getClassLoader().getResourceAsStream("ffmpeg.properties");
		Properties p = new Properties();
		try {
			p.load(inputStream);
		} catch (IOException e1) {
			e1.printStackTrace();
		}

		String number = p.getProperty("number");
		int num = Integer.valueOf(number);
		// System.out.println("ip:" + p.getProperty("ip") + ",port:" +
		// p.getProperty("port"));
		for (int i = 1; i <= num; i++) {
			// maps.remove("a");

			Map map = new HashMap<>();
			map.put("appName", p.getProperty("code" + i));// code为客户端编码
			// map.put("input", "\"rtsp://admin:dsgbridge@" + ip +
			// "/cam/realmonitor?channel=1&subtype=0\"");
			map.put("output", p.getProperty("output" + i));
			map.put("codec", p.getProperty("codec" + i));
			map.put("fmt", p.getProperty("fmt" + i));
			map.put("fps", p.getProperty("fps" + i));
			map.put("rs", p.getProperty("rs" + i));
			map.put("kb", p.getProperty("kb" + i));
			map.put("twoPart", p.getProperty("twoPart" + i));// twoPart:0-推一个元码流;1-推一个自定义推流;2-推两个流(一个是自定义,一个是元码)

			map.put("input", p.getProperty("input" + i));

			if(maps.containsKey(p.getProperty("code" + i))==false){
				// 执行任务,id就是appName,如果执行失败返回为null
				String id = manager.start(map);
				// 将转流放入静态map中用于关转流
				maps.put(p.getProperty("code" + i), id);
				System.out.println("appName: " + p.getProperty("code" + i));
				System.out.println("input: " + p.getProperty("input" + i));
				System.out.println("output: " + p.getProperty("output" + i));
				System.out.println("codec: " + p.getProperty("codec" + i));
				System.out.println("fmt: " + p.getProperty("fmt" + i));
				System.out.println("fps: " + p.getProperty("fps" + i));
				System.out.println("rs: " + p.getProperty("rs" + i));
				System.out.println("kb" + p.getProperty("kb" + i));
				System.out.println("twoPart:" + p.getProperty("twoPart" + i));
				System.out.println();
				System.out.println(p.getProperty("code" + i) + ":  流已开启");
			}
		}
	}

	// 关闭转流
	@RequestMapping(value = "/offall")
	public void offall(HttpServletResponse response, HttpServletRequest request) {
		InputStream inputStream = this.getClass().getClassLoader().getResourceAsStream("ffmpeg.properties");
		Properties p = new Properties();
		try {
			p.load(inputStream);
		} catch (IOException e1) {
			e1.printStackTrace();
		}
		String number = p.getProperty("number");
		int num = Integer.valueOf(number);
		for (int i = 1; i <= num; i++) {
			try {
				manager.stop(maps.get(p.getProperty("code" + i)));
				maps.remove(p.getProperty("code" + i));
				System.out.println(p.getProperty("code" + i) + "流已关闭");
			} catch (Exception e) {
				e.getStackTrace();
			}
		}
	}

	@RequestMapping(value = "/index")
	public String index(HttpServletResponse response, HttpServletRequest request) {
		return "index";
	}

	@RequestMapping(value = "/getNginxUrls")
	public List getNginxUrls(HttpServletResponse response, HttpServletRequest request) {
		List list =new ArrayList();
		InputStream inputStream = this.getClass().getClassLoader().getResourceAsStream("ffmpeg.properties");
		Properties p = new Properties();
		try {
			p.load(inputStream);
		} catch (IOException e1) {
			e1.printStackTrace();
		}
		String number = p.getProperty("number");
		int num = Integer.valueOf(number);
		for (int i = 1; i <= num; i++) {
			try {
				String output = p.getProperty("output"+i);
				output=output.replace("\"","");
				String url = output+p.getProperty("code"+i);
				System.out.println(url);
				list.add(url);
			} catch (Exception e) {
				e.getStackTrace();
			}
		}
		for (String string : list) {
			System.out.println(string+"    1");
		}
		return list;
	}

    //这是执行linux上的命令测试
	@RequestMapping(value = "/aa")
	public String index1(HttpServletResponse response, HttpServletRequest request) throws IOException, InterruptedException {
				String[] cmds = {"/bin/sh","-c","ps -ef|grep java"};
				Process pro = Runtime.getRuntime().exec(cmds);
				pro.waitFor();
				InputStream in = pro.getInputStream();
				BufferedReader read = new BufferedReader(new InputStreamReader(in));
				String line = null;
				while((line = read.readLine())!=null){
					System.out.println(line);
				}
		return null;
	}
}
3.2 前端页面播放采用video.js,相关连接:http://www.jq22.com/jquery-info404
3.3 ffmpeg 配置如下:(ffmpeg.properties)
number=5

code1=camera1
input1="rtsp\://admin\:[email protected]\:554//cam/realmonitor?channel\=1&subtype\=0"
output1="rtmp\://192.168.1.109/live/"
codec1=copy
fmt1=flv
fps1=25
kb1=2048k
rs1=640x360
twoPart1=1

code2=camera2
input2="rtsp\://admin\:[email protected]\:554//cam/realmonitor?channel\=1&subtype\=0"
output2="rtmp\://192.168.1.109/live/"
codec2=copy
fmt2=flv
fps2=25
kb2=2048k
rs2=640x360
twoPart2=1

code3=camera3
input3="rtsp\://admin\:[email protected]\:554//cam/realmonitor?channel\=1&subtype\=0"
output3="rtmp\://192.168.1.109/live/"
codec3=copy
fmt3=flv
fps3=25
kb3=2048k
rs3=640x360
twoPart3=1

code4=camera4
input4="rtsp\://admin\:[email protected]\:554//cam/realmonitor?channel\=1&subtype\=0"
output4="rtmp\://192.168.1.109/live/"
codec4=copy
fmt4=flv
fps4=25
kb4=2048k
rs4=640x360
twoPart4=1

code5=camera5
input5="rtsp\://admin\:[email protected]\:554//cam/realmonitor?channel\=1&subtype\=0"
output5="rtmp\://192.168.1.109/live/"
codec5=copy
fmt5=flv
fps5=25
kb5=2048k
rs5=640x360
twoPart5=1

code6=camera6
input6="rtsp\://admin\:[email protected]\:554//cam/realmonitor?channel\=1&subtype\=0"
output6="rtmp\://192.168.1.109/live/"
codec6=copy
fmt6=flv
fps6=25
rs6=640x360
twoPart6=1
3.4 ffmpeg 常用命令说明:
1.分离视频音频流
ffmpeg -i input_file -vcodec copy -an output_file_video  //分离视频流
ffmpeg -i input_file -acodec copy -vn output_file_audio  //分离音频流
2.视频解复用
ffmpeg –i test.mp4 –vcodec copy –an –f m4v test.264
ffmpeg –i test.avi –vcodec copy –an –f m4v test.264
3.视频转码
ffmpeg –i test.mp4 –vcodec h264 –s 352*278 –an –f m4v test.264              //转码为码流原始文件
ffmpeg –i test.mp4 –vcodec h264 –bf 0 –g 25 –s 352*278 –an –f m4v test.264  //转码为码流原始文件
ffmpeg –i test.avi -vcodec mpeg4 –vtag xvid –qsame test_xvid.avi            //转码为封装文件
//-bf B帧数目控制,-g 关键帧间隔控制,-s 分辨率控制
4.视频封装
ffmpeg –i video_file –i audio_file –vcodec copy –acodec copy output_file5.视频剪切
ffmpeg –i test.avi –r 1 –f image2 image-%3d.jpeg        //提取图片
ffmpeg -ss 0:1:30 -t 0:0:20 -i input.avi -vcodec copy -acodec copy output.avi    //剪切视频
//-r 提取图像的频率,-ss 开始时间,-t 持续时间
6.视频录制
ffmpeg –i rtsp://192.168.3.205:5555/test –vcodec copy out.avi7.YUV序列播放
ffplay -f rawvideo -video_size 1920x1080 input.yuv8.YUV序列转AVI
ffmpeg –s w*h –pix_fmt yuv420p –i input.yuv –vcodec mpeg4 output.avi常用参数说明:
主要参数:
-i 设定输入流
-f 设定输出格式
-ss 开始时间
视频参数:
-b 设定视频流量,默认为200Kbit/s ( 音频比特率(请使用-b:a) 视频比特率(请使用-b:v) )
-r 设定帧速率,默认为25
-s 设定画面的宽与高
-aspect 设定画面的比例
-vn 不处理视频
-vcodec 设定视频编解码器,未设定时则使用与输入流相同的编解码器
音频参数:
-ar 设定采样率
-ac 设定声音的Channel数
-acodec 设定声音编解码器,未设定时则使用与输入流相同的编解码器
-an 不处理音频
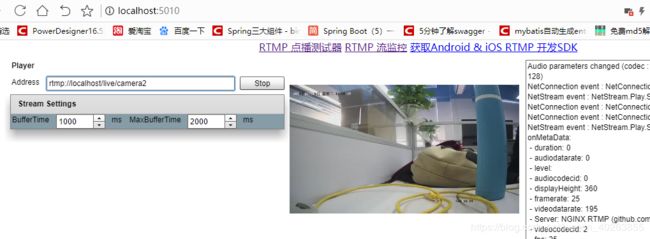
项目运行后的效果如下:
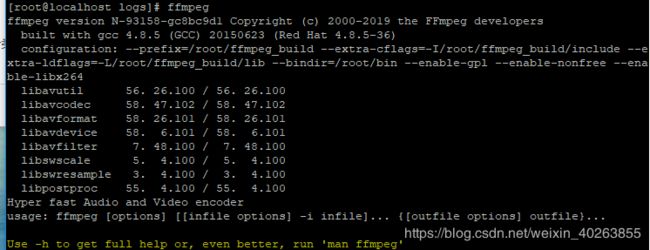
备注:linux 下同样可以运行,前提下要安装nginx还有ffmpeg。
安装方法我是采用这些连接教程的:
https://www.cnblogs.com/sz-jack/p/5200283.html
https://www.cnblogs.com/jimisun/p/8057156.html
https://blog.csdn.net/u010782875/article/details/80679510
ffmpeg下我安装的模块有:
值得注意的是:TaskHandlerImpl.java文件下
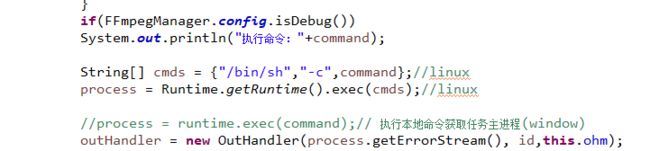
window下直接传command,而linux下需要/bin/sh -c +参数,至于为什么要这样,个人认为可能是command命令有特殊字符,linux下执行不了吧,反正添加了就可以执行了。
以下是你们最想要的:
项目相关资料以及地址如下:
链接:https://pan.baidu.com/s/1EUMiDx16DwCw_iXNA_S61w
提取码:12ro
链接: https://pan.baidu.com/s/1VsKob4j3pHPSvcSWDLQgEw
提取码: 64k9
参考来源:https://blog.csdn.net/u011877155/article/details/83750651
https://www.cnblogs.com/dwdxdy/p/3240167.html