使用tensorflow理解GBDT的可解释性
前一篇《boosted trees》完整训练了一个Boosted分类树,这篇文章主要是在上篇的基础上讲解以下三个内容:
- 理解各个特征对单个样本预测结果的贡献
- 各个特征对模型的重要性
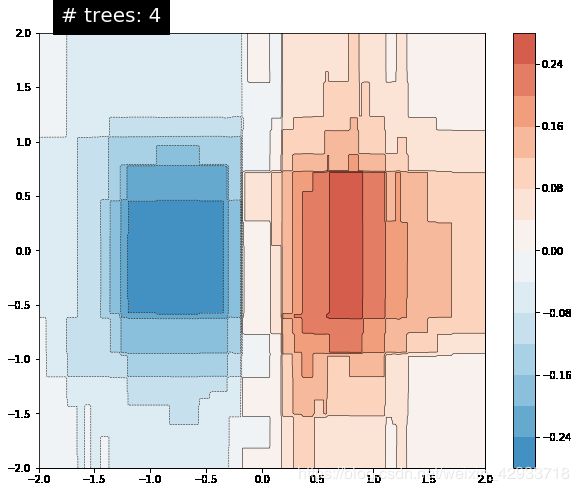
- 从直觉上了解Boosted Tree 是怎么fit数据的
文章目录
- 模型的可解释性
- 构建模型
- 加载数据
- 创建特征
- 输入
- 模型训练
- local interpretability
- 可视化单个样本的DFCs
- 优化可视化
- 单个样本的DFCs VS. 各个特征的DFCs分布
- Global feature importances
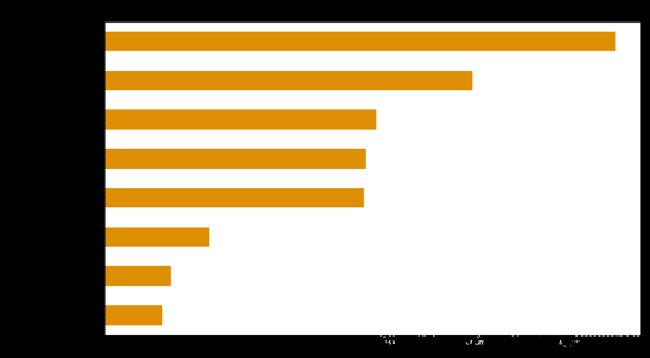
- 基于增益的特征重要性
- 基于DFCs绝对值的平均值的特征重要性
- Permutation feature importance(序列特征)
- 可视化模型的训练过程
- 训练数据可视化
- 线性模型baseline
- GBDT
模型的可解释性
模型的可解释性分为两个方面:
- 局部可解释性(Local interpretability)是指单个样本的预测结果的可解释性,
- 全局可解释性( Global interpretability)指模型的决策方式是可解释的。
对于局部可解释性,学习创建和可视化每个样本的贡献(contributions),这和特征的重要性不同,样本的重要性值称作定向特征贡献(directional feature contributions,DFCs)
全局的可解释性可以学习和可视化gain-based feature importances、permutation feature importances 和aggregated DFCs。
PS:教程在最开始的时候有一句 pip install -q tf-nightly # Requires tf 1.13,因为对tf-nightly不是很了解,我自己的机子上安装了tensorflow-1.13.1,所以没有管它,但是最后没有跑出想要的结果:对类别型特征进行了one-hot之后,该特征应当仍然被当做一个特征去分析其重要性的,但是tensorflow-1.13.1是将one-hot之后的特征看做了多个独立特征去分析了,这偏离了我原来使用tf去训练BD Tree的宗旨,最终检查多遍代码之后,我将可能的原因归结为tf-nightly,但是网上tf-nightly的资料并不是很多,我现在的理解是tf-nightly是tensorflow的开发版本,里面有一些tensorflow没有的功能,但是还不是很稳定。在安装的时候,也走了一些弯路,需要把tensorflow 先卸载干净之后在安装tf-nightly。正好昨天(3.6),tf-nightly发布了新的版本1.14.1-dev20190306,我也算尝鲜了,哈哈。
构建模型
加载数据
from __future__ import absolute_import, division, print_function

import numpy as np
import pandas as pd
import tensorflow as tf

tf.logging.set_verbosity(tf.logging.ERROR)
tf.set_random_seed(123)

# Load dataset.
dftrain = pd.read_csv('https://storage.googleapis.com/tfbt/titanic_train.csv')
dfeval = pd.read_csv('https://storage.googleapis.com/tfbt/titanic_eval.csv')
y_train = dftrain.pop('survived')
y_eval = dfeval.pop('survived')
创建特征
fc = tf.feature_column
CATEGORICAL_COLUMNS = ['sex', 'n_siblings_spouses', 'parch', 'class', 'deck',
                       'embark_town', 'alone']
NUMERIC_COLUMNS = ['age', 'fare']

def one_hot_cat_column(feature_name, vocab):
  return fc.indicator_column(
      fc.categorical_column_with_vocabulary_list(feature_name,
                                                 vocab))
feature_columns = []
for feature_name in CATEGORICAL_COLUMNS:
  # Need to one-hot encode categorical features.
  vocabulary = dftrain[feature_name].unique()
  feature_columns.append(one_hot_cat_column(feature_name, vocabulary))

for feature_name in NUMERIC_COLUMNS:
  feature_columns.append(fc.numeric_column(feature_name,dtype=tf.float32))
输入
# Use entire batch since this is such a small dataset.
NUM_EXAMPLES = len(y_train)

def make_input_fn(X, y, n_epochs=None, shuffle=True):
  def input_fn():
    dataset = tf.data.Dataset.from_tensor_slices((X.to_dict(orient='list'), y))
    if shuffle:
      # batchsize = NUM_EXAMPLES 时,batchsize过大会报kernal restarting 错误
      dataset = dataset.shuffle(64)
    # For training, cycle thru dataset as many times as need (n_epochs=None).
    dataset = (dataset
      .repeat(n_epochs)
      .batch(64))
    return dataset
  return input_fn

# Training and evaluation input functions.
train_input_fn = make_input_fn(dftrain, y_train)
eval_input_fn = make_input_fn(dfeval, y_eval, shuffle=False, n_epochs=1)
len(dftrain)
627
模型训练
params = {
  'n_trees': 100,
  'max_depth': 3,
  'n_batches_per_layer': 1,
  # You must enable center_bias = True to get DFCs. This will force the model to
  # make an initial prediction before using any features (e.g. use the mean of
  # the training labels for regression or log odds for classification when
  # using cross entropy loss).
  'center_bias': True
}

est = tf.estimator.BoostedTreesClassifier(feature_columns, **params)
est.train(train_input_fn, max_steps=100)
results = est.evaluate(eval_input_fn)
pd.Series(results).to_frame()
| 0 | |
|---|---|
| accuracy | 0.810606 |
| accuracy_baseline | 0.625000 |
| auc | 0.842975 |
| auc_precision_recall | 0.824142 |
| average_loss | 0.455730 |
| label/mean | 0.375000 |
| loss | 0.432008 |
| precision | 0.788235 |
| prediction/mean | 0.387055 |
| recall | 0.676768 |
| global_step | 100.000000 |
local interpretability
接下来将输出directional feature contributions来解释单个预测值,该方法可以参考文章Interpreting random forests和论文Interpreting random forest classification models
using a feature contribution method。
scikit-learn中的Random Forest模型中也存在该该方法,在treeinterpreter中。
import matplotlib.pyplot as plt
import seaborn as sns
sns_colors = sns.color_palette('colorblind')
pred_dicts = list(est.experimental_predict_with_explanations(eval_input_fn))
pred_dicts[0]
{'logits': array([-2.1667228], dtype=float32),
 'logistic': array([0.10277882], dtype=float32),
 'probabilities': array([0.8972212 , 0.10277886], dtype=float32),
 'class_ids': array([0], dtype=int64),
 'classes': array([b'0'], dtype=object),
 'bias': 0.3437500217477164,
 'dfc': OrderedDict([('age', -0.07895472816824273),
              ('sex', -0.06325637071238067),
              ('embark_town', -0.04549111733967605),
              ('fare', -0.022285333116146),
              ('deck', -0.015886283774878704),
              ('class', -0.009440178458887838),
              ('parch', -0.003368982923539765),
              ('n_siblings_spouses', -0.002288176456518673),
              ('alone', 0.0)])}
# Create DFC Pandas dataframe.
labels = y_eval.values
probs = pd.Series([pred['probabilities'][1] for pred in pred_dicts])
df_dfc = pd.DataFrame([pred['dfc'] for pred in pred_dicts])
df_dfc.describe().T
| count | mean | std | min | 25% | 50% | 75% | max | |
|---|---|---|---|---|---|---|---|---|
| age | 264.0 | 0.009450 | 0.081673 | -0.105591 | -0.040991 | -0.008687 | 0.029089 | 0.331626 |
| sex | 264.0 | -0.002487 | 0.115896 | -0.157026 | -0.091049 | -0.066526 | 0.135913 | 0.196724 |
| embark_town | 264.0 | -0.015108 | 0.065171 | -0.105188 | -0.055726 | -0.045491 | 0.015000 | 0.199845 |
| fare | 264.0 | 0.048854 | 0.097702 | -0.105521 | -0.031787 | 0.026067 | 0.099456 | 0.300124 |
| deck | 264.0 | -0.008877 | 0.027764 | -0.042782 | -0.022066 | -0.014940 | -0.006706 | 0.136220 |
| class | 264.0 | 0.018992 | 0.070895 | -0.229208 | -0.028784 | -0.009440 | 0.072323 | 0.193327 |
| parch | 264.0 | -0.003682 | 0.018285 | -0.062094 | -0.004519 | -0.002029 | 0.008646 | 0.060175 |
| n_siblings_spouses | 264.0 | -0.003176 | 0.024600 | -0.131421 | -0.010299 | -0.002582 | 0.005173 | 0.061435 |
| alone | 264.0 | -0.000661 | 0.006292 | -0.027930 | 0.000000 | 0.000000 | 0.000000 | 0.070025 |
DFCs有一个很好的特性,贡献之和+bias= 预测值
# Sum of DFCs + bias == probabality.
bias = pred_dicts[0]['bias']
dfc_prob = df_dfc.sum(axis=1) + bias
np.testing.assert_almost_equal(dfc_prob.values,
                               probs.values)
可视化单个样本的DFCs
# Plot results.
ID = 1
example = df_dfc.iloc[ID]  # Choose ith example from evaluation set.
TOP_N = 8  # View top 8 features.
sorted_ix = example.abs().sort_values()[-TOP_N:].index
ax = example[sorted_ix].plot(kind='barh', color=sns_colors[3])
ax.grid(False, axis='y')

ax.set_title('Feature contributions for example {}\n pred: {:1.2f}; label: {}'.format(ID, probs[ID], labels[ID]))
ax.set_xlabel('Contribution to predicted probability');

量级更大的贡献值对应的特征越能影响模型的预测结果。负贡献表明该样本的这个特征值降低的模型的预测值,正贡献则增加了模型的预测值。
优化可视化
# Boilerplate code for plotting :)
def _get_color(value):
    """To make positive DFCs plot green, negative DFCs plot red."""
    green, red = sns.color_palette()[2:4]
    if value >= 0: return green
    return red

def _add_feature_values(feature_values, ax):
    """Display feature's values on left of plot."""
    x_coord = ax.get_xlim()[0]
    OFFSET = 0.15
    for y_coord, (feat_name, feat_val) in enumerate(feature_values.items()):
        t = plt.text(x_coord, y_coord - OFFSET, '{}'.format(feat_val), size=12)
        t.set_bbox(dict(facecolor='white', alpha=0.5))
    from matplotlib.font_manager import FontProperties
    font = FontProperties()
    font.set_weight('bold')
    t = plt.text(x_coord, y_coord + 1 - OFFSET, 'feature\nvalue',
    fontproperties=font, size=12)

def plot_example(example):
  TOP_N = 8 # View top 8 features.
  sorted_ix = example.abs().sort_values()[-TOP_N:].index  # Sort by magnitude.
  example = example[sorted_ix]
  colors = example.map(_get_color).tolist()
  ax = example.to_frame().plot(kind='barh',
                          color=[colors],
                          legend=None,
                          alpha=0.75,
                          figsize=(10,6))
  ax.grid(False, axis='y')
  ax.set_yticklabels(ax.get_yticklabels(), size=14)

  # Add feature values.
  _add_feature_values(dfeval.iloc[ID][sorted_ix], ax)
  return ax
example = df_dfc.iloc[ID]  # Choose IDth example from evaluation set.
ax = plot_example(example)
ax.set_title('Feature contributions for example {}\n pred: {:1.2f}; label: {}'.format(ID, probs[ID], labels[ID]))
ax.set_xlabel('Contribution to predicted probability', size=14);
单个样本的DFCs VS. 各个特征的DFCs分布
# Boilerplate plotting code.
def dist_violin_plot(df_dfc, ID):
  # Initialize plot.
  fig, ax = plt.subplots(1, 1, figsize=(10, 6))

  # Create example dataframe.
  TOP_N = 8  # View top 8 features.
  example = df_dfc.iloc[ID]
  ix = example.abs().sort_values()[-TOP_N:].index
  example = example[ix]
  example_df = example.to_frame(name='dfc')

  # Add contributions of entire distribution.
  parts=ax.violinplot([df_dfc[w] for w in ix],
                 vert=False,
                 showextrema=False,
                 widths=0.7,
                 positions=np.arange(len(ix)))
  face_color = sns_colors[0]
  alpha = 0.15
  for pc in parts['bodies']:
      pc.set_facecolor(face_color)
      pc.set_alpha(alpha)

  # Add feature values.
  _add_feature_values(dfeval.iloc[ID][sorted_ix], ax)

  # Add local contributions.
  ax.scatter(example,
              np.arange(example.shape[0]),
              color=sns.color_palette()[2],
              s=100,
              marker="s",
              label='contributions for example')

  # Legend
  # Proxy plot, to show violinplot dist on legend.
  ax.plot([0,0], [1,1], label='eval set contributions\ndistributions',
          color=face_color, alpha=alpha, linewidth=10)
  legend = ax.legend(loc='lower right', shadow=True, fontsize='x-large',
                     frameon=True)
  legend.get_frame().set_facecolor('white')

  # Format plot.
  ax.set_yticks(np.arange(example.shape[0]))
  ax.set_yticklabels(example.index)
  ax.grid(False, axis='y')
  ax.set_xlabel('Contribution to predicted probability', size=14)
dist_violin_plot(df_dfc, ID)
plt.title('Feature contributions for example {}\n pred: {:1.2f}; label: {}'.format(ID, probs[ID], labels[ID]));
Global feature importances
Gain-based feature importances是通过计算分裂一个特征而获得的增益来,
permutation feature importances是在验证集上单独shuffle一个特征并衡量该特征shuffle后对模型性能的影响。
总的来说,permutation feature importances要优于Gain-based feature importances,虽然这两个方法在某些情况下可能都不可信。
基于增益的特征重要性
importances = est.experimental_feature_importances(normalize=True)
df_imp = pd.Series(importances)

# Visualize importances.
N = 8
ax = (df_imp.iloc[0:N][::-1]
    .plot(kind='barh',
          color=sns_colors[0],
          title='Gain feature importances',
          figsize=(10, 6)))
ax.grid(False, axis='y')
基于DFCs绝对值的平均值的特征重要性
# Plot.
dfc_mean = df_dfc.abs().mean()
N = 8
sorted_ix = dfc_mean.abs().sort_values()[-N:].index  # Average and sort by absolute.
ax = dfc_mean[sorted_ix].plot(kind='barh',
                       color=sns_colors[1],
                       title='Mean |directional feature contributions|',
                       figsize=(10, 6))
ax.grid(False, axis='y')
## 比较适合连续型特征,离散型特征是沿着y轴的竖线,不太容易看密度,类别型(字符串)不行
FEATURE = 'age'
feature = pd.Series(df_dfc[FEATURE].values, index=dfeval[FEATURE].values).sort_index()
ax = sns.regplot(feature.index.values, feature.values, lowess=True);
ax.set_ylabel('contribution')
ax.set_xlabel(FEATURE);
ax.set_xlim(0, 100);
Permutation feature importance(序列特征)
def permutation_importances(est, X_eval, y_eval, metric, features):
    """Column by column, shuffle values and observe effect on eval set.

    source: http://explained.ai/rf-importance/index.html
    A similar approach can be done during training. See "Drop-column importance"
    in the above article."""
    baseline = metric(est, X_eval, y_eval)
    imp = []
    for col in features:
        save = X_eval[col].copy()
        X_eval[col] = np.random.permutation(X_eval[col])
        m = metric(est, X_eval, y_eval)
        X_eval[col] = save
        imp.append(baseline - m)
    return np.array(imp)

def accuracy_metric(est, X, y):
    """TensorFlow estimator accuracy."""
    eval_input_fn = make_input_fn(X,
                                  y=y,
                                  shuffle=False,
                                  n_epochs=1)
    return est.evaluate(input_fn=eval_input_fn)['accuracy']
features = CATEGORICAL_COLUMNS + NUMERIC_COLUMNS
importances = permutation_importances(est, dfeval, y_eval, accuracy_metric,
                                      features)
df_imp = pd.Series(importances, index=features)

sorted_ix = df_imp.abs().sort_values().index
ax = df_imp[sorted_ix][-5:].plot(kind='barh', color=sns_colors[2], figsize=(10, 6))
ax.grid(False, axis='y')
ax.set_title('Permutation feature importance');
可视化模型的训练过程
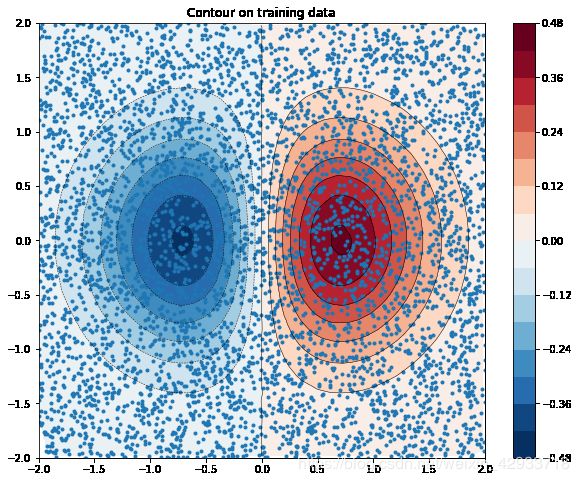
首先通过下列函数来伪造训练数据:
z = x ∗ e − x 2 − y 2 z=x*e^{-x^2-y^2} z=x∗e−x2−y2
z z z为因变量(dependent variable),是我们的预测值, x x x, y y y为特征。
伪造5000个点(x,y),x,y服从[-2,2]之间的均匀分布
from numpy.random import uniform, seed
from matplotlib.mlab import griddata

# Create fake data
seed(0)
npts = 5000
x = uniform(-2, 2, npts)
y = uniform(-2, 2, npts)
z = x*np.exp(-x**2 - y**2)
训练数据可视化
# Prep data for training.
df = pd.DataFrame({'x': x, 'y': y, 'z': z})

xi = np.linspace(-2.0, 2.0, 200),
yi = np.linspace(-2.1, 2.1, 210),
xi,yi = np.meshgrid(xi, yi);

df_predict = pd.DataFrame({
    'x' : xi.flatten(),
    'y' : yi.flatten(),
})
predict_shape = xi.shape
绘制 z z z的等高线图
def plot_contour(x, y, z, **kwargs):
  # Grid the data.
  plt.figure(figsize=(10, 8))
  # Contour the gridded data, plotting dots at the nonuniform data points.
  CS = plt.contour(x, y, z, 15, linewidths=0.5, colors='k')
  CS = plt.contourf(x, y, z, 15,
                    vmax=abs(zi).max(), vmin=-abs(zi).max(), cmap='RdBu_r')
  plt.colorbar()  # Draw colorbar.
  # Plot data points.
  plt.xlim(-2, 2)
  plt.ylim(-2, 2)
zi = griddata(x, y, z, xi, yi, interp='linear')
plot_contour(xi, yi, zi)
plt.scatter(df.x, df.y, marker='.')
plt.title('Contour on training data');
d:\python\lib\site-packages\ipykernel_launcher.py:1: MatplotlibDeprecationWarning: The griddata function was deprecated in version 2.2.
  """Entry point for launching an IPython kernel.
线性模型baseline
特征处理:
fc = [tf.feature_column.numeric_column('x'),
      tf.feature_column.numeric_column('y')]
给定模型est的预测函数:
def predict(est):
  """Predictions from a given estimator."""
  predict_input_fn = lambda: tf.data.Dataset.from_tensors(dict(df_predict))
  preds = np.array([p['predictions'][0] for p in est.predict(predict_input_fn)])
  return preds.reshape(predict_shape)
train_input_fn = make_input_fn(df, df.z)
est = tf.estimator.LinearRegressor(fc)
est.train(train_input_fn, max_steps=500);
plot_contour(xi, yi, predict(est))
GBDT
def create_bt_est(n_trees):
  return tf.estimator.BoostedTreesRegressor(fc,
                                            n_batches_per_layer=1,
                                            n_trees=n_trees)
N_TREES = [1,2,3,4,10,20,50,100]
for n in N_TREES:
  est = create_bt_est(n)
  est.train(train_input_fn, max_steps=500)
  plot_contour(xi, yi, predict(est))
  plt.text(-1.8, 2.1, '# trees: {}'.format(n), color='w', backgroundcolor='black', size=20);


