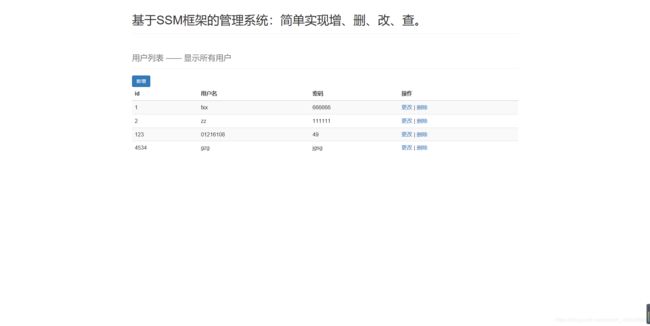
基于SSM框架的管理系统:简单实现增、删、改、查。源代码
准备工作
在建项目之前需要配置好maven环境,没配置的同学可以参考我上一篇博客进行配置https://blog.csdn.net/weixin_43843824/article/details/93903018
程序源文件在底部。
项目框架
bean 实体类
dao 持久层 数据库增删改查
service 业务层
controller 控制层 跳转哪里
resources
mapper dao实现类
applicationContext.xml spring+mybatis
db.properties 数据库连接信息
log4j.properties 日志
springmvc.xml 配置springmvc

具体步骤
新建Maven项目:
点击File -> New -> Project -> Maven -> 勾选 Create from archetype -> 选择 maven-archetype-webapp,在弹出的new project 选项卡中填写GroupId和Artifactid。
在新建的项目中添加所需要的文件/文件夹。首先在项目的根目录下新建target文件夹。
2.1在src/main目录下新建Directory:“java”,并将其设置为“Source Root“。
2.2在刚才新建的java文件下新建“com”包,再在com包下新建四个包,分别命名为:bean,service,dao,controller。在resource包下新建Directory:“mapper”(用于存放xxxMapper.xml文件)和“spring”(用于存放spring-xxx.xml配置文件),新建文件:“jdbc.properties”(mysql数据库配置文件),”log4j.properties”(日志输出配置文件),”mybatis-config.xml”(mybatis框架配置文件)。
2.3 在web-inf目录下新建“jsp”包。存放jsp文件。
配置好pom.xml文件以下载架构。
pom.xml文件代码:(直接复制粘贴即可)
pom.xml
  4.0.0

  com
  test
  1.0-SNAPSHOT
  war

  test Maven Webapp

  http://www.example.com


    UTF-8
    1.8
    1.8

    5.0.2.RELEASE

    3.2.6

    1.7.7
    1.2.17
    0.9.5.2
    1.1.2


      org.springframework
      spring-core
      ${spring.version}


      org.springframework
      spring-web
      ${spring.version}


      org.springframework
      spring-oxm
      ${spring.version}


      org.springframework
      spring-tx
      ${spring.version}


      org.springframework
      spring-jdbc
      ${spring.version}


      org.springframework
      spring-webmvc
      ${spring.version}


      org.springframework
      spring-aop
      ${spring.version}


      org.springframework
      spring-context-support
      ${spring.version}


      org.springframework
      spring-test
      ${spring.version}


      org.mybatis
      mybatis
      ${mybatis.version}


      org.mybatis
      mybatis-spring
      1.2.2


      javax
      javaee-api
      7.0


      mysql
      mysql-connector-java
      5.1.30


      commons-dbcp
      commons-dbcp
      1.2.2


      jstl
      jstl
      1.2


      log4j
      log4j
      ${log4j.version}


      com.mchange
      c3p0
      ${c3p0.version}


      taglibs
      standard
      ${taglibs.version}


      org.slf4j
      slf4j-api
      ${slf4j.version}


      org.slf4j
      slf4j-log4j12
      ${slf4j.version}


      javax.servlet
      javax.servlet-api
      3.1.0
      provided


      javax.servlet.jsp
      javax.servlet.jsp-api
      2.3.1
      provided


    test


          maven-clean-plugin
          3.1.0


          maven-resources-plugin
          3.0.2


          maven-compiler-plugin
          3.8.0


          maven-surefire-plugin
          2.22.1


          maven-war-plugin
          3.2.2


          maven-install-plugin
          2.5.2


          maven-deploy-plugin
          2.8.2
复制上面文件点击import changes会导入架构,配置一下阿里云镜像会加快下载速度,下给出方法。
配置阿里云镜像源方法:
1、进入maven安装目录下的conf文件夹,比如我是:C:\Development Environment\apache-maven-3.6.1\conf
2、将此目录下的setting.xml复制到文件夹C:\Users\你的用户名\.m2文件夹下面(如果没有.m2的话就新建一个)。我复制完成后该文件的地址是:
C:\Users\TusuZer\.m2\settings.xml
3、在.m2下打开setting.xml找到其中的
alimaven
central
aliyun maven
http://maven.aliyun.com/nexus/content/repositories/central/
userinfo
package com.bean;

public class userinfo {
    private  int id;
    private  String username;
    private  String password;

    public int getId() {
        return id;
    }

    public void setId(int id) {
        this.id = id;
    }

    public String getUsername() {
        return username;
    }

    public void setUsername(String username) {
        this.username = username;
    }

    public String getPassword() {
        return password;
    }

    public void setPassword(String password) {
        this.password = password;
    }

    @Override
    public String toString() {
        return "userinfo{" +
                "id=" + id +
                ", username='" + username + '\'' +
                ", password='" + password + '\'' +
                '}';
    }

    public userinfo(int id, String username, String password) {
        this.id = id;
        this.username = username;
        this.password = password;
    }

    public userinfo() { }
}
UserController
package com.controller;
import com.bean.userinfo;
import com.service.IUserService;
import org.springframework.beans.factory.annotation.Autowired;
import org.springframework.stereotype.Controller;
import org.springframework.ui.Model;
import org.springframework.web.bind.annotation.RequestMapping;
import org.springframework.web.servlet.ModelAndView;
import javax.xml.registry.infomodel.User;
import java.util.List;
@Controller
@RequestMapping(“user”)
public class UserController {
@Autowired
private IUserService userService;
@RequestMapping("/findAll.do")
public ModelAndView findAll(){
    Listuserinfos=userService.findAll();
    ModelAndView mv =new ModelAndView();
    mv.addObject("ui",userinfos);
    mv.setViewName("allUser");
    return  mv;
}
@RequestMapping("/toAddUser.do")
public String toaddUser(){
  return  "addUser";
}
@RequestMapping("/save.do")
public String addUser(userinfo a)
{
    userService.addUser(a);
    return "redirect:/user/findAll.do";
}
@RequestMapping("/delete.do")
public String delete(long id)
{
    userService.delete(id);
    return "redirect:/user/findAll.do";
}
 @RequestMapping("/toUpdate.do")
 public ModelAndView toUpdate(int id)
    {
        userinfo user=userService.userB(id);
        ModelAndView a=new ModelAndView();
        a.addObject("userInfo",user);
        a.setViewName("updateUser");
        return  a;
 }
 @RequestMapping("/update.do")
public String update(userinfo a)
 {
     userService.updateuser(a);
     return "redirect:/user/findAll.do";
 }
}
IUserDao
package com.dao;

import com.bean.userinfo;

import java.util.List;

public interface IUserDao {
   public List findAll();

   public int addUser(userinfo user);

   public  int updateUser(userinfo user);

   userinfo userB (long id);

   int delete (long id);

}
IUserservice
package com.service;

import com.bean.userinfo;

import java.util.List;

public interface IUserService {
    ListfindAll();
    int addUser(userinfo a);
    int delete (long id);
    int updateuser(userinfo a);
    userinfo userB(long id);
}
IUserservice
package com.service.impl;

import com.bean.userinfo;
import com.dao.IUserDao;
import com.service.IUserService;
import org.springframework.beans.factory.annotation.Autowired;
import org.springframework.stereotype.Service;

import java.util.List;

@Service
public class UserServiceImpl implements IUserService {
    @Autowired
    IUserDao userdao;
    @Override
    public List findAll() {
        return userdao.findAll();
    }

    @Override
    public int addUser(userinfo a)
    {
        return userdao.addUser(a);
    }

    @Override
    public int delete(long id) {
        return userdao.delete(id);
    }

    @Override
    public int updateuser(userinfo a)
    {
        return userdao.updateUser(a);
    }
    public userinfo userB(long id)
    {
        return userdao.userB(id);
    }

}
usermapper.xml(IUserDao实现)
insert into userinfo (id,username,password) value (#{id},#{username},#{password})
delete from userinfo where id= #{id};
update userinfo set username=#{username},password=#{password} where id=#{id};
applicationContext.xml
这里时进行数据库配置的注意其中的2.配置数据源要把中间的
改成自己的信息。比如password直接property name=“password” value="你的数据库密码"即可。
db.properties
jdbc.driver=com.mysql.jdbc.Driver
jdbc.url=jdbc:mysql://localhost:3306/idea?useSSL=true&characterEncoding=utf-8
jdbc.username=root
jdbc.password=666666
这里同样要改成自己的信息,和上面一样![]()
红色下划线处改成自己数据库名。
log4j.properties
# Global logging configuration
log4j.rootLogger=DEBUG, stdout
# Console output...
log4j.appender.stdout=org.apache.log4j.ConsoleAppender
log4j.appender.stdout.layout=org.apache.log4j.PatternLayout
log4j.appender.stdout.layout.ConversionPattern=%5p [%t] - %m%n
spring-mvc.xml
addUser.jsp
<%@ page language="java" contentType="text/html; charset=UTF-8"
pageEncoding="UTF-8" isELIgnored="false"%>
<%@ taglib prefix="c" uri="http://java.sun.com/jsp/jstl/core" %>
新增用户
<%
String path = request.getContextPath();
String basePath = request.getScheme() + "://"
+ request.getServerName() + ":" + request.getServerPort()
+ path + "/";
%>
基于SSM框架的管理系统:简单实现增、删、改、查。
新增用户
allUser.jsp
<%@ page language="java" contentType="text/html; charset=UTF-8"
pageEncoding="UTF-8" isELIgnored="false"%>
<%@ taglib prefix="c" uri="http://java.sun.com/jsp/jstl/core" %>
user列表
updateUser
<%@ page language="java" contentType="text/html; charset=UTF-8"
pageEncoding="UTF-8" isELIgnored="false"%>
<%@ taglib prefix="c" uri="http://java.sun.com/jsp/jstl/core" %>
修改论文
基于SSM框架的管理系统:简单实现增、删、改、查。
修改用户
web.xml
    contextConfigLocation
    classpath*:applicationContext.xml


    org.springframework.web.context.ContextLoaderListener


    org.springframework.web.context.request.RequestContextListener


    characterEncodingFilter
    org.springframework.web.filter.CharacterEncodingFilter

      encoding
      UTF-8


    characterEncodingFilter
    /*


    dispatcherServlet
    org.springframework.web.servlet.DispatcherServlet


      contextConfigLocation
      classpath:spring-mvc.xml


    1


    dispatcherServlet
    *.do
index.jsp
<%@ page language="java" contentType="text/html; charset=UTF-8"
         pageEncoding="UTF-8" isELIgnored="false"%>


Hello World!
查询所有用户
数据库内容
运行结果

对了运行前没需要装好Tomcat。较为简单我这里就不教了,没装的同学可以自行百度。
这里附上本程序源文件:
链接:https://pan.baidu.com/s/1wwcvf5yvh4-i0c65b4LNew
提取码:t3wf
