cobbler+pxe自动化装机,ansible自动部署nginx+keepalived+lnmp
1、实现cobbler+pxe自动化装机
2、ansible实现主/备模式高可用
1、实现cobbler+pxe自动化装机
1、httpd服务提供yum repository仓库而kickstart文件提供安装配置
2、syslinux是一个的引导加载程序,负责提供pxelinux.0文件。
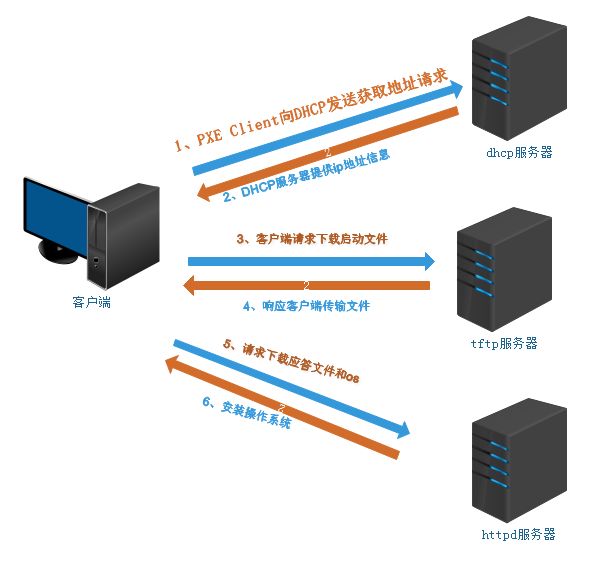
3、PXE安装
- PXE: preboot excution environment
- 首先 由dhcp分配给主机ip,netmask,gw,dns,通过tfrp server加载(bootloader,kernel,initrd),然后到yum repository可以通过 (ftp,http,nfs),由kickstart自动应答文件提供安装配置,完成自动化安装。
相对于Pxe而言Cobbler是一个自动化和简化系统安装的工具,通过使用网络引导来实现系统自动化安装。
它集成了:
PXE服务支持
DHCP服务管理
DNS服务管理(可选bind,dnsmasq)
电源管理
Kickstart服务支持
YUM仓库管理
TFTP(PXE启动时需要)
Apache(提供kickstart的安装源,并提供定制化的kickstart配置)
构成的组件有:
Distros(发行版):表示一个操作系统,它承载了内核和initrd的信息,以及内核参数等其他数据
Profile(配置文件):包含一个发行版、一个kickstart文件以及可能的存储库,还包含更多特定的内核参数等其他数据
Systems(系统):表示要配给的额机器。它包含一个配置文件或一个景象,还包含IP和MAC地址、电源管理(地址、凭据、类型)、(网卡绑定、设置valn等)
Repository(镜像):保存一个yum或rsync存储库的镜像信息
Image(存储库):可替换一个包含不属于此类比的额文件的发行版对象(例如,无法分为内核和initrd的对象)。
接下来我们进行实验
安装需要的安装包
yum install -y tftp tftp-server dhcp httpd syslinux

配置dhcp服务
option domain-name "lvqing.com";
option domain-name-servers 223.5.5.5;
default-lease-time 600;
max-lease-time 7200;
log-facility local7;
subnet 192.168.31.0 netmask 255.255.255.0 {
        range 192.168.31.210 192.168.31.220;
        option routers 192.168.31.201;
        filename "pxelinux.0";
        next-server 192.168.31.201;
}

启动服务
systemctl start dhcpd
systemctl start tftp
systemctl start httpd
查看租约情况
cat /var/lib/dhcpd/dhcpd.leases
接着我们配置cobbler
安装服务
yum install -y cobbler
systemctl start cobblerd

然后执行cobbler check
报的错误
The following are potential configuration items that you may want to fix:

1 : The 'server' field in /etc/cobbler/settings must be set to something other than localhost, or kickstarting features will not work.  This should be a resolvable hostname or IP for the boot server as reachable by all machines that will use it.
2 : For PXE to be functional, the 'next_server' field in /etc/cobbler/settings must be set to something other than 127.0.0.1, and should match the IP of the boot server on the PXE network.
3 : change 'disable' to 'no' in /etc/xinetd.d/tftp
4 : Some network boot-loaders are missing from /var/lib/cobbler/loaders, you may run 'cobbler get-loaders' to download them, or, if you only want to handle x86/x86_64 netbooting, you may ensure that you have installed a *recent* version of the syslinux package installed and can ignore this message entirely.  Files in this directory, should you want to support all architectures, should include pxelinux.0, menu.c32, elilo.efi, and yaboot. The 'cobbler get-loaders' command is the easiest way to resolve these requirements.
5 : enable and start rsyncd.service with systemctl
6 : debmirror package is not installed, it will be required to manage debian deployments and repositories
7 : The default password used by the sample templates for newly installed machines (default_password_crypted in /etc/cobbler/settings) is still set to 'cobbler' and should be changed, try: "openssl passwd -1 -salt 'random-phrase-here' 'your-password-here'" to generate new one
8 : fencing tools were not found, and are required to use the (optional) power management features. install cman or fence-agents to use them
1,2,7都是和配置文件相关的,我们先修改配置文件
[root@node2 ~]# openssl passwd -1 -salt '123456' 'lvqing'
$1$123456$DNZ8F1JeU.5HhsLhVKTPU/
[root@node2 ~]# vim /etc/cobbler/settings
server: 192.168.31.201
next_server: 192.168.31.201
default_password_crypted: "$1$123456$DNZ8F1JeU.5HhsLhVKTPU/"
第三条是修改tftp的启动状态
service tftp
{
        socket_type             = dgram
        protocol                = udp
        wait                    = yes
        user                    = root
        server                  = /usr/sbin/in.tftpd
        server_args             = -s /var/lib/tftpboot
        disable                 = no
        per_source              = 11
        cps                     = 100 2
        flags                   = IPv4
}
第四条根据提示执行“cobblerget-loader”命令下载pxelinux.0,menu.c32,elilo.efi, 或yaboot文件,否则,需要安装syslinux程序包,而后复制/usr/share/syslinux/中的pxelinux.0,menu.c32等文件至/var/lib/cobbler/loaders目录中,此处我们先直接复制/usr/share/syslinux目录中的文件到指定目录,看看是否能解决:cp -ar /usr/share/syslinux/* /var/lib/cobbler/loaders/
第五条启动rsync服务
systemctl start rsyncd
systemctl enable rsyncd
6,8都是安装缺少的软件包安装即可yum install -y debmirror fence-agents
然后我们再检查一次
[root@node2 ~]# systemctl restart cobblerd
[root@node2 ~]# cobbler check
The following are potential configuration items that you may want to fix:

1 : Some network boot-loaders are missing from /var/lib/cobbler/loaders, you may run 'cobbler get-loaders' to download them, or, if you only want to handle x86/x86_64 netbooting, you may ensure that you have installed a *recent* version of the syslinux package installed and can ignore this message entirely.  Files in this directory, should you want to support all architectures, should include pxelinux.0, menu.c32, elilo.efi, and yaboot. The 'cobbler get-loaders' command is the easiest way to resolve these requirements.
2 : comment out 'dists' on /etc/debmirror.conf for proper debian support
3 : comment out 'arches' on /etc/debmirror.conf for proper debian support
第一条看来需要下载我们根据提示执行cobbler get-loaders
2,3在指定文件中注释掉相应的配置段即可
vim /etc/debmirror.conf
#@arches="i386";
#@dists="sid";
最后重启cobbler
[root@node2 ~]# systemctl restart cobblerd
[root@node2 ~]# cobbler check
No configuration problems found.  All systems go.
[root@node2 ~]# cobbler sync
挂载镜像文件,然后使用cobbler命令导入
[root@node2 ~]# mount /dev/cdrom /mnt
mount: /dev/sr0 写保护,将以只读方式挂载
cobbler import --name=centos-7.1-x86_64 --path=/mnt
[root@node2 ~]# cobbler distro list
   centos-7.1-x86_64
镜像会被自动导入到/var/www/cobbler/ks_mirror,方便后续通过http获取安装源。
另外默认情况下,cobbler会生成一个最小化安装的kickstart文件,如果想要自定义其对应的kickstart profile,可通过下面操作进行:
[root@cobbler ~]# cp centos7.cfg /var/lib/cobbler/kickstarts/    #复制自定义的kickstart文件到指定的目录下
[root@cobbler ~]# cobbler profile add --name=centos-7.2-x86_64-custom --distro=centos-7.2-x86_64 --kickstart=/var/lib/cobbler/kickstarts/centos7.cfg    #创建自定义的kickstart profile
[root@cobbler ~]# cobbler profile list
   centos-7.1-x86_64
这里因为没有编写kickstart文件,就直接使用最小化的安装了。
测试结果
cobbler会在/var/lib/tftpboot/pxelinux.cfg/default文件中自动添加相应的系统menu,另外如果需要修改默认启动的menu,需要在此文件中修改,但需注意的是此文件每次cobbler sync都会恢复默认local启动
cobbler的web管理
cobbler还支持web管理,需要安装相应的安装包
yum install -y cobbler-web
接着需要更改cobbler的认证模块为auth.pam:
[authentication]
module = authn_pam

然后创建cobbler账号:
echo "lvqing" | passwd --stdin cbadmin
更改用户 cbadmin 的密码 。
passwd:所有的身份验证令牌已经成功更新。

在/etc/cobbler/users.conf文件中指定cbadmin账号为cobbler-web的管理账号:
vim /etc/cobbler/users.conf
[admins]
admin = "cbadmin"

重启服务
systemctl restart cobblerd
systemctl restart httpd
出现错误
查看httpd日志
[root@node2 conf.d]# tail /var/log/httpd/ssl_error_log
[Tue Feb 12 23:44:41.951936 2019] [:error] [pid 8430] [remote 192.168.31.242:59848]     self._setup(name)
[Tue Feb 12 23:44:41.951943 2019] [:error] [pid 8430] [remote 192.168.31.242:59848]   File "/usr/lib/python2.7/site-packages/django/conf/__init__.py", line 41, in _setup
[Tue Feb 12 23:44:41.951955 2019] [:error] [pid 8430] [remote 192.168.31.242:59848]     self._wrapped = Settings(settings_module)
[Tue Feb 12 23:44:41.951962 2019] [:error] [pid 8430] [remote 192.168.31.242:59848]   File "/usr/lib/python2.7/site-packages/django/conf/__init__.py", line 110, in __init__
[Tue Feb 12 23:44:41.951991 2019] [:error] [pid 8430] [remote 192.168.31.242:59848]     mod = importlib.import_module(self.SETTINGS_MODULE)
[Tue Feb 12 23:44:41.952014 2019] [:error] [pid 8430] [remote 192.168.31.242:59848]   File "/usr/lib64/python2.7/importlib/__init__.py", line 37, in import_module
[Tue Feb 12 23:44:41.952028 2019] [:error] [pid 8430] [remote 192.168.31.242:59848]     __import__(name)
网上查找好像是python版本的问题
#下载pip.py
wget https://bootstrap.pypa.io/get-pip.py

#调用本地python运行pip.py脚本
python get-pip.py

#安装pip
pip install Django==1.8.9

#查看pip版本号
python -c "import django; print(django.get_version())"

#重启httpd
systemctl restart httpd
2、ansible实现主/备模式高可用
轻量级的运维工具:Ansible
Ansible的特性
模块化:调用特定的模块,完成特定任务
基于Python语言实现,有Paramiko,PyYAML,Jinja2(模板语言)三个关键模块;
部署简单:agentless
支持自定义模块
支持playbook编排任务
有幂等性:一个任务执行一遍和执行n遍效果一样,不因为重复执行带来意外情况
安全,基于OpenSSH
无需代理不依赖PKI(无需ssl)
YAML格式编排任务,支持丰富的数据结构
较强大的多层解决方案
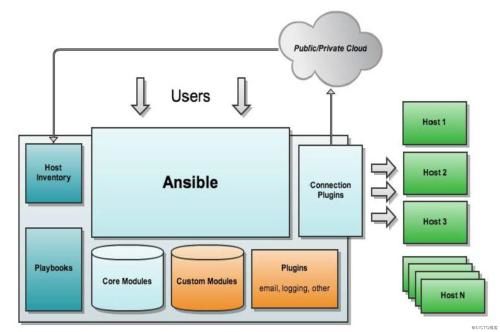
Ansible的架构
Core Modules:核心模块
Custom Modules:自定义模块
Connection Plugins:连接插件
Host Inventory:ansible管理主机的清单/etc/ansibe/hosts
Plugins:模块功能的补充,如记录日志发送通知等
Playbooks 核心组件;任务剧本,编排定义ansible任务集的配置文件,ansible顺序依次执行,通常时json格式的yaml文件
常用的模块
常用模块:
            command
                -a 'COMMAND'
            user
                -a 'name= state={present|absent} system= uid='

            group
                -a 'name= gid= state= system='

            cron
                -a 'name= minute= hour= day= month= weekday= job= user= state='

            copy
                -a 'dest= src= mode= owner= group='
                注意:src是目录时最后带/复制目录内容,不带/递归复制文件本身
            file
                -a 'path= mode= owner= group= state={directory|link|present|absent} src='

            ping
                没有参数

            yum
                -a 'name= state={present|latest|absent}'

            service
                -a 'name= state={started|stopped|restarted} enabled='

            shell
                -a 'COMMAND'

            script
                -a '/path/to/script'

            setup
playbook的核心元素:
- Hosts:主机
- tasks: 任务
- variables: 变量
- templates: 模板包含了模板语法的文本文件
- handlers: 处理器
- roles: 角色
- Hosts:运行指定任务的目标主机;
- remoute——user:在远程主机上执行任务的用户
sudo_user;
ansible的简单使用格式:ansible HOST-PATTERN -m MOD_NAME -a MOD_ARGS -f FORKS -C -u USERNAME -c CONNECTION
实验用ansible自动部署nginx+keepalived+lamp
两台nginx作为web代理服务器用keepalived做高可用;后端两个apache服务器,一个部署apache+php,另一个部署apache+mysql。通过ansible管理配置以上服务器,配置完成后,能通过VIP访问到后端主机主页。
配置免密登陆待管理主机
ssh-keygen -t rsa -P ""
ssh-copy-id -i ~/.ssh/id_rsa.pub [email protected]
ssh-copy-id -i ~/.ssh/id_rsa.pub [email protected]
ssh-copy-id -i ~/.ssh/id_rsa.pub [email protected]
ssh-copy-id -i ~/.ssh/id_rsa.pub [email protected]

vim /etc/ansible/hosts   #编辑主机清单文件添加主机
[nginx]
192.168.31.201
192.168.31.203
[apache]
192.168.31.204
192.168.31.205
[php]
192.168.31.204
[mysql]
192.168.31.205
测试是否能通
ansible all -m ping
192.168.31.205 | SUCCESS => {
    "changed": false,
    "ping": "pong"
}
192.168.31.204 | SUCCESS => {
    "changed": false,
    "ping": "pong"
}
192.168.31.203 | SUCCESS => {
    "changed": false,
    "ping": "pong"
}
192.168.31.201 | SUCCESS => {
    "changed": false,
    "ping": "pong"
}
配置时间同步ansible all -m shell -a 'echo "TZ='Asia/Shanghai'; export TZ" > /etc/profile '
配置定期同步时间ansible all -m cron -a "minute=*/3 job='/usr/sbin/ntpdate ntp1.aliyun.com &> /dev/null' name=dateupdate"
关闭firewalld和selinuxansible all -m shell -a 'systemctl stop firewalld; systemctl disable firewalld; setenforce 0'
配置各个服务
接着我们就可以在ansible主机上配置需要下发到各远程主机上的playbook了,这里我以roles角色定义各服务器上需要配置的服务,最后用playbook调用相应的roles进行下发配置。
1、 配置apache服务role
创建好各个目录
mkdir -pv  /etc/ansible/roles/apache/{files,templates,tasks,handlers,vars,meta,default}

配置apache的配置模板
vim /etc/ansible/roles/apache/templates/vhost1.conf.j2

        servername lvqing.com
        DirectoryIndex index.html index.php
        Documentroot /var/www/html
        ProxyRequest off
        ProxyPassMatch ^/(.*\.php)$ fcgi://192.168.31.204:9000/var/www/html/$1
        ProxyPassMatch ^/(ping|status)$ fcgi://192.168.31.204:9000/$1

                options FollowSymlinks
                Allowoverride none
                Require all granted


配置apache的主页文件
vim /etc/ansible/roles/apache/templates/
index.html
This is {{ ansible_hostname }}
vim /etc/ansible/roles/apache/templates/
index.php


配置apache的task任务
vim /etc/ansible/roles/apache/tasks/main.yml
- name: install apache
  yum: name=httpd state=latest
- name: install vhost file
  template: src=/etc/ansible/roles/apache/templates/vhost1.conf.j2 dest=/etc/httpd/conf.d/vhost.conf
- name: install index.html
  template: src=/etc/ansible/roles/apache/templates/index.html dest=/var/www/html/index.html
- name: install index.php
  template: src=/etc/ansible/roles/apache/templates/index.php dest=/var/www/html/index.php
- name: start httpd
  service: name=httpd state=started
配置php-fpm服务的role
mkdir -pv  /etc/ansible/roles/php-fpm/{files,templates,tasks,handlers,vars,meta,default}

cp /etc/php-fpm.d/www.conf /etc/ansible/roles/php-fpm/templates/www.conf
vim /etc/ansible/roles/php-fpm/templates/www.conf
#修改以下配置
listen = 0.0.0.0:9000
listen.allowed_clients = 127.0.0.1
pm.status_path = /status
ping.path = /ping
ping.response = pong

配置task文件
- name: install epel repo
  yum: name=epel-release state=latest
- name: install php package
  yum: name={{ item }} state=latest
  with_items:
  - php-fpm
  - php-mysql
  - php-mbstring
  - php-mcrypt
- name: install config file
  template: src=/etc/ansible/roles/php-fpm/templates/www.conf dest=/etc/php-fpm.d/www.conf
- name: install session directory
  file: path=/var/lib/php/session group=apache owner=apache state=directory
- name: start php-fpm
  service: name=php-fpm state=started
配置mysql的role服务
mkdir -pv  /etc/ansible/roles/mysql/{files,templates,tasks,handlers,vars,meta,default}

cp /etc/my.cnf /etc/ansible/roles/mysql/templates/
vim /etc/ansible/roles/mysql/templates/my.cnf
#添加下面两行配置
skip-name-resolve=ON
innodb-file-per-table=ON

配置mysql的task任务
vim /etc/ansible/roles/mysql/tasks/main.yml
- name: install mysql
  yum: name=mariadb state=latest
- name: install config file
  template: src=/etc/ansible/roles/mysql/templates/my.cnf dest=/etc/my.cnf
- name: start mysql
  service: name=mariadb.service state=started
配置nginx服务的role
mkdir -pv  /etc/ansible/roles/nginx/{files,templates,tasks,handlers,vars,meta,default}

 cp /etc/nginx/nginx.conf /etc/ansible/roles/nginx/templates/
vim /etc/ansible/roles/nginx/templates/nginx.conf
http {
        ......
        upstream apservers {
                server 192.168.31.204:80;
                server 192.168.31.205:80;
        }

      ......
    server {
        ......
        location / {
                proxy_pass http://apservers;
                proxy_set_header host $http_host;
                proxy_set_header X-Forward-For $remote_addr;
        }
        ......
    }

配置nignx服务role的task任务
vim /etc/ansible/roles/nginx/tasks/main.yml
- name: install epel
  yum: name=epel-release state=latest
- name: install nginx
  yum: name=nginx state=latest
- name: install config file
  template: src=/etc/ansible/roles/nginx/templates/nginx.conf dest=/etc/nginx/nginx.conf
- name: start nginx
  service: name=nginx state=started
配置keepalived服务role
mkdir -pv  /etc/ansible/roles/keepalived/{files,templates,tasks,handlers,vars,meta,default}

cp /etc/keepalived/keepalived.conf /etc/ansible/roles/keepalived/templates/
vim /etc/ansible/roles/keepalived/templates/keepalived.conf
vrrp_instance VI_1 {
    state {{ keepalived_role }}
    interface ens33
    virtual_router_id 51
    priority {{ keepalived_pri }}
    advert_int 1
    authentication {
        auth_type PASS
        auth_pass 12345678
    }
    virtual_ipaddress {
        192.168.31.240/24 dev ens33 label ens33:0
    }
}

编辑/etc/ansible/hosts文件,给nginx主机添加指定的对应变量:
192.168.31.201 keepalived_role=MASTER keepalived_pri=100
192.168.31.203 keepalived_role=BACKUP keepalived_pri=98

配置nginx服务的task服务:
vim /etc/ansible/roles/keepalived/tasks/main.yml
- name: install keepalived
  yum: name=keepalived state=latest
- name: install config file
  template: src=/etc/ansible/roles/keepalived/templates/keepalived.conf dest=/etc/keepalived/keepalived.conf
- name: start keepalived
  service: name=keepalived state=started
至此所有的playbook roles都已经写好了。
配置playbook下发配置
1、定义ap1并下发
mkdir /etc/ansible/playbooks

vim /etc/ansible/playbooks/ap1.yaml
#因为ap1又是apache服务器,也php-fpm服务器,所以调用apache和php-fpm两个role
- hosts: php
  remote_user: root
  roles:
  - apache
  - php-fpm

#语法检查
ansible-playbook --syntax-check /etc/ansible/playbooks/ap1.yaml

下发执行playbook
ansible-playbook /etc/ansible/playbooks/ap1.yaml
2、定义ap2的playbook并下发
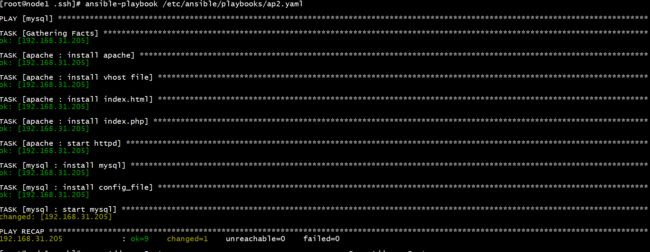
vim /etc/ansible/playbooks/ap2.yaml
- hosts: mysql
  remote_user: root
  roles:
  - apache
  - mysql

#下发安装
ansible-playbook /etc/ansible/playbooks/ap2.yaml
3、定义两台nginx服务器的playbook并下发
 vim /etc/ansible/playbooks/loadbalance.yaml
- hosts: nginx
  remote_user: root
  roles:
  - nginx
  - keepalived
[root@node1 ~]# ansible-playbook /etc/ansible/playbooks/loadbalance.yaml
然后我们就可以测试
参考:https://www.jianshu.com/p/d56a687961de


