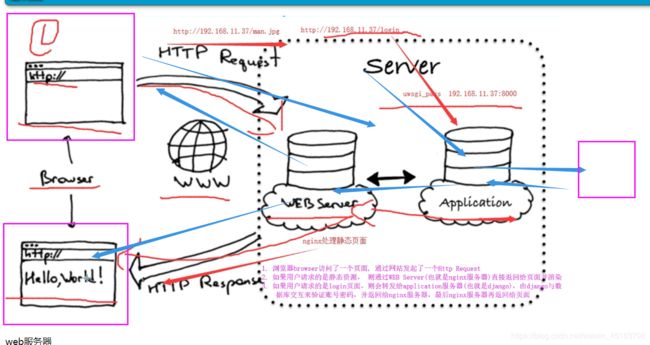
linux之django+vue网站项目部署(uwsgi+nginx+supervisor)
1. 熟悉linux操作
2. 配置阿里云的源
2.1 备份所有repo
cd /etc/yum.repos.d
mkdir repobak
mv * repobak/
2.2 下载阿里云源和epel扩展源
wget -O /etc/yum.repos.d/CentOS-Base.repo http://mirrors.aliyun.com/repo/Centos-7.repo

wget -O /etc/yum.repos.d/epel.repo http://mirrors.aliyun.com/repo/epel-7.repo
3.上传****项目
4.安装python3解释器
#####   注意1: 必须先安装库环境
yum install -y gcc patch libffi-devel python-devel  zlib-devel bzip2-devel openssl-devel ncurses-devel sqlite-devel readline-devel tk-devel gdbm-devel db4-devel libpcap-devel xz-devel

##### 	注意2: 配置环境变量/etc/profile,python3的变量一定要放在第一位
5.安装虚拟环境virtualenv
5.1 安装虚拟环境
pip3 install -i https://pypi.douban.com/simple virtualenv
6.安装virtualenvwrapper工具
6.1 下载并安装virtualenvwrapper
pip3 install -i https://pypi.douban.com/simple virtualenvwrapper
6.2 配置用户环境变量配置文件
vim ~/.bashrc
在最后添加以下内容:
export WORKON_HOME=~/Envs
export VIRTUALENVWRAPPER_VIRTUALENV_ARGS='--no-site-packages'
export VIRTUALENVWRAPPER_PYTHON=/opt/python36/bin/python3
source /opt/python36/bin/virtualenvwrapper.sh
6.3 重载用户环境变量配置文件
source ~/.bashrc
6.4 创建****项目虚拟环境
mkvirtualenv web_pj_env
6.5 安装项目软件包
# 安装xadmin
pip install https://codeload.github.com/sshwsfc/xadmin/zip/django2 -i https://pypi.douban.com/simple/
# 安装依赖包:
pip3 install -i https://pypi.douban.com/simple -r requirements.txt
7.打包vue项目
此处是用xshell进行文件上传的;下面教程仅供参考;
linux下需要安装node.js环境(windows打包也可,linux打包也可以)
7.1 修改src目录下的settings.js配置文件
# 注意,在打包之前,最好是将src目录下面的setting.js配置文件里面的配置修改一下
# 将IP与端口改为我们部署服务器的IP和端口

export default {
    Host: "http://192.168.12.249:8000"
}
7.2 打包vue项目并上传到服务器/opt/web/web_pc/目录下
npm run build
8.安装数据库并导入数据
完成centos7下安装配置mariadb数据库,且创建数据库数据,迁移导入knight数据
在centos7下,mariadb就是mysql数据库,只是包名的不同
8.1 下载mariadb
yum install -y mariadb-server mariadb
8.2 初始化mysql
# 先启动mariadb
systemctl start mariadb

# 再进行初始化
mysql_secure_installation
8.3 配置中文支持
修改/etc/my.cnf配置文件,添加以下配置
[mysqld]
character-set-server=utf8
collation-server=utf8_general_ci
log-error=/var/log/mysqld.log
[client]
default-character-set=utf8
[mysql]
default-character-set=utf8
8.4 配置完成后需要重启mariadb服务
systemctl restart mariadb
8.5 在linux上登录mariadb
mysql -uroot -p
8.6 使用root用户连接后端django程序
# 如果使用的是web_user用户连接后端django程序, 则需要重新创建用户并授权

# 1. 创建用户
create user 'web_user'@'%' identified by 'web';
# 2. 授权用户
grant all privileges on *.* to web_user@'%' identified by 'web';
8.7 刷新授权表
8.7.1 导出****项目的数据库
mysqldump -u root -p --all-databases > /opt/web.sql
8.7.2 上传这个数据文件到linux数据库中
8.7.3 在linux的mysql,导入这个数据文件
source /opt/web.sql
注意1,linux的数据库,需要对root用户设置远程链接的权限, 密码是redhat
注意,SELinux和linux的防火墙要给关闭,否则windows去链接linux的3306端口可能被拒绝!!!
注意,SELinux和linux的防火墙要给关闭,否则windows去链接linux的3306端口可能被拒绝!!!
注意,SELinux和linux的防火墙要给关闭,否则windows去链接linux的3306端口可能被拒绝!!!
9. 安装配置redis数据库
9.1 下载并安装redis
wget http://download.redis.io/releases/redis-5.0.2.tar.gz
tar -zxvf redis-5.0.2.tar.gz
cd redis-5.0.2
make && make install
9.2 准备redis配置文件
mkdir -p /opt/redis_conf
touch /opt/redis_conf/redis-6379.conf
vim /opt/redis_conf/redis-6379.conf
9.3 在redis配置文件中添加以下配置
port 6379
daemonize yes
pidfile /data/6379/redis.pid
loglevel notice
logfile "/data/6379/redis.log"
dir /data/6379
protected-mode yes
9.4 创建data文件
mkdir -p /data/6379
9.5 启动redis
redis-server /opt/redis_conf/redis-6379.conf
10. 解决项目启动的几个问题
python manage.py runserver 0.0.0.0:8000
测试使用linux的python解释器去运行项目 切换到 项目中运行(注意要解决解释器的模块问题,才能正常运转项目), 在启动django时会遇到以下几个问题:
10.1 报错导入配置错误
File "/opt/Envs/luffy_env/lib/python3.6/site-packages/django/db/backends/mysql/base.py", line 36, in
    raise ImproperlyConfigured('mysqlclient 1.3.13 or newer is required; you have %s.' % Database.__version__)
解决办法:
# 修改文件36行的if判断语句,直接注释即可
-
10.2 报错编码错误
File "/opt/Envs/luffy_env/lib/python3.6/site-packages/django/db/backends/mysql/operations.py", line 146, in last_executed_query
    query = query.decode(errors='replace')
解决办法:
将文件中146行原decode改为encode即可
10.3 配置settings下的dev.py文件,如ALLOW_HOSTS配置
ALLOW_HOSTS = ["*"]
10.4 修改settings下的dev.py文件,修改跨域配置
CORS_ORIGIN_WHITELIST = (
    'http://192.168.12.249',
)
11. 完成uWSGI命令学习与使用
11.1 使用uWSGI启动****项目,支持多进程
uwsgi的hello world测试
参照博客https://www.cnblogs.com/tiger666/articles/10313069.html里面的安装uwsgi版块
11.2 进入虚拟环境venv,安装uwsgi
pip3 install uwsgi
11.3 配置uwsgi.ini文件
[uwsgi]
#使用nginx连接时使用,Django程序所在服务器地址
# socket=127.0.0.1:8080
#直接做web服务器使用,Django程序所在服务器地址
http=0.0.0.0:8000
#项目目录
chdir=/opt/luffy/luffyapi
#项目中wsgi.py文件的目录,相对于项目目录
wsgi-file=luffyapi/wsgi.py
# 进程数
processes=2
# 线程数
threads=2
# uwsgi服务器的角色
master=True
# 存放进程编号的文件
pidfile=uwsgi.pid
# 日志文件,因为uwsgi可以脱离终端在后台运行,日志看不见。我们以前的runserver是依赖终端的
daemonize=uwsgi.log
# 指定依赖的虚拟环境
virtualenv=/root/Envs/luffy_env
注意: 目前暂时先用http,如果使用nginx的话,就需要注释掉http,启用socket
11.4 使用uwsgi命令启动django程序
uwsgi --ini /opt/web/webapi/uwsgi.ini
11.5 uwsgi启动后无法访问的问题解决
修改项目里面的wsgi.py文件,将settings的配置指向dev.py
vim /opt/web/webapi/webapi/wsgi.py
修改配置文件
os.environ.setdefault('DJANGO_SETTINGS_MODULE', 'webapi.settings.dev')
11.6 uwsgi不能处理静态文件
uwsgi本身是支持高并发,多进程的功能,这是它的优点
缺点: 不能处理静态文件
12.完成nginx的安装
https://blog.csdn.net/weixin_45163798/article/details/103781390?utm_source=app&from=singlemessage
13 收集django的静态文件
由于uwsgi对静态文件的处理很差,然而nginx处理静态文件是一把手,所以我们的项目部署还需要结合nginx来使用
13.1 设置django的静态文件目录并收集, 打开mysite/settings/dev.py, 加入这一项配置:
STATIC_ROOT='/opt/web/webapi/static'  # 在STATIC_URL = '/static/'配置上面加这一行
STATIC_URL = '/static/'
STATICFILES_DIRS=[
    os.path.join(BASE_DIR,"static"),
]
那么,上述的参数STATIC_ROOT用在哪?看下面
13.2 通过python3 manage.py collectstatic 收集所有你使用的静态文件保存到STATIC_ROOT
python3 manage.py collectstatic

# STATIC_ROOT 文件夹 是用来将所有STATICFILES_DIRS中所有文件夹中的文件,以及各app中static中的文件都复制过来
# 把这些文件放到一起是为了用nginx等部署的时候更方便
13.3 查看django的静态文件收集目录
ls /opt/web/webapi/static
14.配置nginx
完成nginx处理路飞学城项目的静态文件, 与后端的接口配置
14.1 nginx.conf配置文件详情
server {
    listen       80;
    server_name  192.168.12.249;
    #access_log  logs/host.access.log  main;
    location / {
        root   /opt/web/web_pc/dist;
        index  index.html index.htm;
        try_files $uri $uri/ /index.html;
    }
    error_page   500 502 503 504  /50x.html;
    location = /50x.html {
        root   html;
    }
}


server {
    listen       8000;
    server_name  192.168.12.249;
    #charset koi8-r;
    #access_log  logs/host.access.log  main;

    location / {
        include uwsgi_params;
        uwsgi_pass 0.0.0.0:9000;
    }
    location /static {
        root   /opt/web/webapi;
    }
    error_page   500 502 503 504  /50x.html;
    location = /50x.html {
        root   html;
    }
}
虚拟主机1: 用于找到vue的静态文件
虚拟主机2: 用于接受vue发起的8000端口的请求,反向代理转发给9000的uwsgi应用, 同时处理后端的静态文件static
14.2 nginx配置并启动好之后,再启用uwsgi.ini配置文件里面的socket并禁用http配置
[uwsgi]
#使用nginx连接时使用,Django程序所在服务器地址
socket=127.0.0.1:8080
#直接做web服务器使用,Django程序所在服务器地址
# http=0.0.0.0:8000
#项目目录
chdir=/opt/luffy/luffyapi
#项目中wsgi.py文件的目录,相对于项目目录
wsgi-file=luffyapi/wsgi.py
# 进程数
processes=2
# 线程数
threads=2
# uwsgi服务器的角色
master=True
# 存放进程编号的文件
pidfile=uwsgi.pid
# 日志文件,因为uwsgi可以脱离终端在后台运行,日志看不见。我们以前的runserver是依赖终端的
daemonize=uwsgi.log
# 指定依赖的虚拟环境
virtualenv=/root/Envs/luffy_env
15. 测试uwsgi与nginx
测试手动启动uwsgi与nginx,能够保证正常访问即可
15.1 启动uwsgi
/root/Envs/web_pj/bin/uwsgi /opt/web/webapi/uwsgi.ini
15.2 平滑重启nginx
/opt/nginx196/sbin/nginx -s reload
16 supervisor工具的安装与使用
使用supervisor来守护uwsgi进程
16.1 supervisor的概念
16.2 安装
easy_install supervisor

如果easy_install命令无法使用的话,就安装一下python-setuptools工具即可
yum install python-setuptools
由于supervisor在python3下无法使用,因此只能用python2去下载!!!!!!
由于supervisor在python3下无法使用,因此只能用python2去下载!!!!!!
由于supervisor在python3下无法使用,因此只能用python2去下载!!!!!!
16.3. 使用命令生成supervisor配置文件
echo_supervisord_conf > /etc/supervisord.conf
16.4. 修改配置文件/etc/supervisord.conf
在文件末尾添加如下配置:
[program:luffy]
command=/root/Envs/web_pj/bin/uwsgi /opt/web/webapi/uwsgi.ini
stopasgroup=true
killasgroup=true
16.5. 启动supervisor工具
supervisord -c /etc/supervisord.conf
16.6 查看supervisor的状态
supervisorctl
supervisor交互模式中基本操作命令
start 进程名   # 启动进程
stop 进程名    # 停止进程
start all     # 启动所有进程
stop all      # 启动所有进程
最终效果: 访问nginx的80端口,即可找到****web应用
