ElasticSearch基础及数据迁移
文章目录
- 基本原理
- 多机器集群搭建
- Node1 192.168.2.5
- Node2 192.168.2.6
- esm数据迁移
- 数据迁移完美方案
https://github.com/medcl/esm-abandoned/releases/download/v0.4.1/linux64-esm--2019.4.20.tar.gz
基本原理
写:发送一个请求到协调节点,对document进行hash路由到对应由primary shard的节点上,处理请求并同步到replica shard,协调节点检测同步后返回相应给客户端。
读:发送一个请求到协调节点,根据doc id对document进行hash路由到对应node,通过随机轮询算法从primary和replica的shard中随机选择让读请求负载均衡,返回document给协调节点后给客户端。
一个索引拆分为多个shard存储部分数据,每个shard由primary shard和replica shard组成,primary写入将同步到replica,类似kafka的partition副本。保证高可用。
Es多个节点选举一个为master,管理和切换主副shard,若宕机则重新选举,并将宕机节点primary shard身份转移到其他机器的replica shard。重启将修改原primary为replica同步数据。
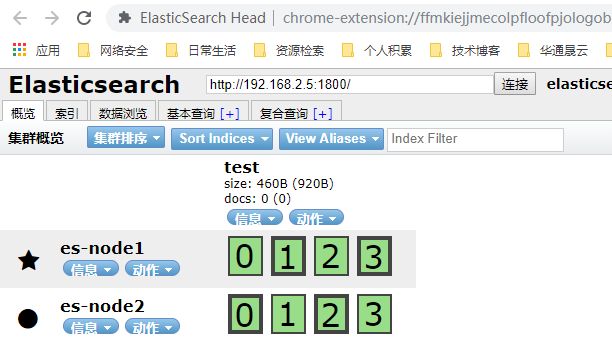
多机器集群搭建
vi /etc/sysctl.conf
vm.max_map_count=262144
sysctl -p
Node1 192.168.2.5
最好挂载到大磁盘上
mkdir /usr/local/docker/ElasticSearch/data -p && chmod 777 /usr/local/docker/ElasticSearch/data
mkdir /usr/local/docker/ElasticSearch/config/ -p && cd /usr/local/docker/ElasticSearch/config/


vi es.yml
cluster.name: elasticsearch-cluster
node.name: es-node1
network.bind_host: 0.0.0.0
network.publish_host: 192.168.2.5
http.port: 1800
transport.tcp.port: 1801
http.cors.enabled: true
http.cors.allow-origin: "*"
node.master: true
node.data: true
discovery.zen.ping.unicast.hosts: ["192.168.2.5:1801","192.168.2.6:1801"]  # 可配置多个
discovery.zen.minimum_master_nodes: 1


docker run  -d  -v /usr/local/docker/ElasticSearch/config/es.yml:/usr/share/elasticsearch/config/elasticsearch.yml -v /usr/local/docker/ElasticSearch/data:/usr/share/elasticsearch/data -e ES_MIN_MEM=10g -e ES_MAX_MEM=10g --name es-node1 --net host --privileged elasticsearch:6.6.0
docker exec -it es-node1 bash
elasticsearch-plugin install https://github.com/medcl/elasticsearch-analysis-ik/releases/download/v6.6.0/elasticsearch-analysis-ik-6.6.0.zip
docker restart es-node1
Node2 192.168.2.6
mkdir /usr/local/docker/ElasticSearch/data -p && chmod 777 /usr/local/docker/ElasticSearch/data
mkdir /usr/local/docker/ElasticSearch/config/ -p && cd /usr/local/docker/ElasticSearch/config/
vi es.yml
cluster.name: elasticsearch-cluster
node.name: es-node2
network.bind_host: 0.0.0.0
network.publish_host: 192.168.2.6
http.port: 1800
transport.tcp.port: 1801
http.cors.enabled: true
http.cors.allow-origin: "*"
node.master: true
node.data: true
discovery.zen.ping.unicast.hosts: ["192.168.2.5:1801","192.168.2.6:1801"]  # 可配置多个
discovery.zen.minimum_master_nodes: 1

docker run  -d  -v /usr/local/docker/ElasticSearch/config/es.yml:/usr/share/elasticsearch/config/elasticsearch.yml -v /usr/local/docker/ElasticSearch/data:/usr/share/elasticsearch/data --name es-node2 -e ES_MIN_MEM=10g -e ES_MAX_MEM=10g --net host --privileged elasticsearch:6.6.0
docker exec -it es-node2 bash
elasticsearch-plugin install https://github.com/medcl/elasticsearch-analysis-ik/releases/download/v6.6.0/elasticsearch-analysis-ik-6.6.0.zip
docker restart es-node2
http://192.168.2.5:1800/_cat/plugins 查看插件信息
esm数据迁移
./esm -s http://192.168.2.6:9200 -d http://192.168.2.7:1800 -x p_answer_handle_alarm -w=5 -b=10 -c 10000;  同步数据
curl 192.168.2.7:1800/_cat/indices?v	查看所有索引信息
常见参数使用:
./esm -s http://192.168.2.6:9200 -d http://192.168.2.7:1800 -x t_record_analyze -y record_test --copy_settings --copy_mappings --shards=4 -w=5 -b=10 -c 10000;
若数据结果不一致,可能是磁盘不足。
数据迁移完美方案
通过两集群都建立同样索引,保证mappings和settings一致,再同步数据
curl -XGET 192.168.2.7:1800/p_answer_handle_alarm    查看索引信息
curl -XGET 192.168.2.7:1800/p_answer_handle_alarm/_search;
curl -XGET http://192.168.2.5:1800/record_test/_settings?pretty    查看settings信息
PUT http://192.168.2.5:1800/record_set/_settings            修改副本数,片的信息分又重新做了调整,同curl -XPUT '192.168.2.7:1800/record_set/_settings' -d'{"index":{"number_of_replicas":1}}'
{
  "index":{
     "number_of_replicas":1
  }
}
index.blocks.read_only //设置为 true 使索引和索引元数据为只读,false 为允许写入和元数据更改。
index.blocks.read // 设置为 true 可禁用对索引的读取操作
index.blocks.write //设置为 true 可禁用对索引的写入操作。
index.blocks.metadata // 设置为 true 可禁用索引元数据的读取和写入
index.mapping.total_fields.limit  //1000 防止字段过多引起崩溃
curl -XGET http://192.168.2.5:1800/record_set/_mappings?pretty        查看mappings信息
PUT http:///192.168.2.5:1800/record_set/doc/_mapping    新增字段
{
    "properties": {
        "col1": {
            "type": "text",
            "index": false
        }
    }
}

PUT 192.168.2.6:9200/test          新建索引
{
    "mappings":{
        "doc":{
            "properties":{
                "jjbh":{"type": "keyword","index": "true"},
                "bccljg":{"type":"text","index":"true","analyzer": "ik_max_word","search_analyzer": "ik_max_word"},
                "bjnr":{"type": "text","index": "true","analyzer":"ik_max_word","search_analyzer":"ik_max_word"},
                "cjlb":{"type": "keyword","index": "false"}
            }
        }
    }
}


192.168.2.7:1800/test/doc/{_id}  插入数据,_id不加默认随机字符串
{
    "jjbh": "4654132465",
    "bccljg": "我是一名合格的程序员",
    "bjnr": "今天天气真的好啊",
    "cjlb": "天上地下飞禽走兽"
}
192.168.2.7:1800/test/doc/{_id}        更新
{
    "jjbh": "11",
    "bccljg": "我是一名合格的程序员",
    "bjnr": "今天天气真的好啊",
    "cjlb": "天上地下飞禽走兽"
}


PUT 192.168.2.5:1800/test          新建索引
{
    "mappings":{
        "doc":{
            "properties":{
                "jjbh":{"type": "keyword","index": "true"},
                "bccljg":{"type":"text","index":"true","analyzer": "ik_max_word","search_analyzer": "ik_max_word"},
                "bjnr":{"type": "text","index": "true","analyzer":"ik_max_word","search_analyzer":"ik_max_word"},
                "cjlb":{"type": "keyword","index": "false"}
            }
        }
    }
}


./esm -s http://192.168.2.6:9200 -d http://192.168.2.5:1800 -x test -y test   -w=5 -b=10 -c 10000;        同步数据

POST 192.168.2.5:1800/test/doc 全局加ik分词器
{
    "settings":{
        "analysis":{
            "analyzer":{
                "ik":{"tokenizer": "ik_max_keyword"}
            }
        }
    }
}

POST 192.168.2.5:1800/test/doc/_search 查询
POST 192.168.2.5:1800/test/doc/_delete_by_query 删除

精确查询/删除
{
  "query":{
    "term":{
        "bccljg.keyword":"我是一名合格的程序员"
    }
  }
}
模糊查询/删除
{
    "query": {
        "match": {
            "bccljg": "合格"
        }
    }
}
正则模糊查询
{
    "query": {
        "regexp": {
            "bccljg.keyword": ".*我是.*"
        }
    }
}
文本开头查询
{
    "query": {
        "prefix": {
            "bccljg.keyword": "我是"
        }
    }
}
同步后的数据结构

详情见:
https://github.com/OneJane/blog