TensorFlow学习(十三):构造LSTM超长简明教程
参考:
Module: tf.nn.rnn_cell
更新:
2017.12.25
增加了tf.nn.embedding_lookup 来进行embedding的内容

2018.1.14
增加tf.sequence_mask和tf.boolean_mask来对于序列的padding进行去除的内容.

2018.3.13
增加了手动调用`call` 函数实现的LSTM的网络.

2018.11.1
把全部的API从contrib形式改为了正式形式。(因为tensorflow2.0之后会弃用contrib模块)

2019.5.27
全部迁移到了tensorflow 2.0,同时暂时保留着1.0相关的内容
LSTM的理论就不多讲了,对于理论不是很熟悉的童鞋转到:
深度学习笔记七:循环神经网络RNN(基本理论)
深度学习笔记八:长短时记忆网络LSTM(基本理论)
来复习一下基本的理论.这里要知道的是,在深度学习的实践里面,必须先把理论给弄懂了才方便写代码的,LSTM更加是,所以务必把基础打好.不然在代码中很多地方为什么那么写都不知道.理论搞定之后,很重要的一点就是实践上面怎么使用LSTM了,估计很多人在使用tensorflow写LSTM的时候走了弯路.花了很多时间才弄清楚一点.不是因为LSTM有多难(在时序和多层次上考虑,其实也还是有点抽象的),而是不知道常见的结构可以怎么定义怎么写出来.对于初学者是很不友好的.
所以,本文先直接给出API文档里面常用的几个类和函数,然后写一些玩具案例,虽然案例是玩具,但是全部消化的话,不说精通,入门绝对是够了.
tensorflow 1.x
一.重要函数和类
这节主要就是说一下tensorflow里面在LSTM中比较常用的API了,毕竟是砖头,弄清楚肯定是有益处的.
这里先列一下
- tf.nn.rnn_cell.LSTMCell
- tf.nn.rnn_cell.MultiRNNCell
- tf.nn.rnn_cell.LSTMStateTuple
- tf.nn.rnn_cell.ResidualWrapper()
- tf.nn.rnn_cell.DropoutWrapper
- tf.nn.dynamic_rnn()
- tf.nn.bidirectional_dynamic_rnn()
- tf.sequence_mask()
- tf.boolean_mask()
既然说到这里,那这里还说一个与词向量有关的常见函数,后面一并讲解.
- tf.nn.embedding_lookup()
这里只说最基本的够用的. 当然还有几个这里没有列出来的,可以在最开始列出来的文档参考,等到以后升到高阶,也许会用得到.
Ⅰ.tf.nn.rnn_cell.LSTMCell
文档:tf.nn.rnn_cell.LSTMCell
BasicLSTMCell是比较基本的创建LSTM cell的一个类,首先来看一下使用的时候怎么创建一个对象吧,
构造函数为:
__init__(
	num_units,
    use_peepholes=False,
    cell_clip=None,
    initializer=None,
    num_proj=None,
    proj_clip=None,
    num_unit_shards=None,
    num_proj_shards=None,
    forget_bias=1.0,
    state_is_tuple=True,
    activation=None,
    reuse=None,
    name=None,
    dtype=None,
    **kwargs
)
参数:
- num_units:LSTM cell中的units数量
- use_peepholes: 要是为
True的话,表示使用diagonal/peephole连接。 - cell_clip:可选,浮点值, (optional) A float value, if provided the cell state is clipped by this value prior to the cell output activation.
- initializer: 可选,权重和后面投射层(projection)的矩阵权重初始化方式。
- num_proj:可选,可以简单理解为一个全连接,表示投射(projection)操作之后输出的维度,要是为None的话,表示不进行投射操作。
- proj_clip: (optional) A float value. If num_proj > 0 and proj_clip is provided, then the projected values are clipped elementwise to within [-proj_clip, proj_clip].
- num_unit_shards:已弃用
- num_proj_shards: 已弃用
- forget_bias: Biases of the forget gate are initialized by default to 1 in order to reduce the scale of forgetting at the beginning of the training. Must set it manually to 0.0 when restoring from CudnnLSTM trained checkpoints.
- state_is_tuple:state状态作为一个元组,今后都默认为
True - activation: 内部状态的激活函数,默认是
hanh - reuse: (optional) Python boolean describing whether to reuse variables in an existing scope. If not True, and the existing scope already has the given variables, an error is raised.
- name: String, the name of the layer. Layers with the same name will share weights, but to avoid mistakes we require reuse=True in such cases.
- dtype: Default dtype of the layer (default of None means use the type of the first input). Required when build is called before call.
举个例子,比如你想定义一个内部节点数为128的一个Cell,就可以用下面的语句,
import numpy as np
import tensorflow as tf
from tensorflow.contrib.layers.python.layers import initializers

lstm_cell=tf.nn.rnn_cell.LSTMCell(
    num_units=128,
    use_peepholes=True,
    initializer=initializers.xavier_initializer(),
    num_proj=64,
    name="LSTM_CELL"
)

print("output_size:",lstm_cell.output_size)
print("state_size:",lstm_cell.state_size)
print(lstm_cell.state_size.h)
print(lstm_cell.state_size.c)
结果:
output_size: 64
state_size: LSTMStateTuple(c=128, h=64)
64
128
你会发现这个构造函数里面居然没有基本的输入信息! 但是不用担心,关于输入的一些细节底层都做好了,只要在后面的环节里面给进去输入就行了.后面会继续讲到.这里还要了解一点,相对于别人把这128叫做隐藏层的节点,其实我更倾向于理解为在Cell中的128个节点,每个节点接受同样的输入向量,然后得到一个值,128个节点合起来,输出的话就是一个128维的向量.而上面的代码还经过了一次全连接操作,因此最后输出的是64维的输出。
说到这里可能就有点晕了,为什么一下128维,一下64维,因此这里提一下这个类比较重要的两个属性(当然,这个类不止这两个属性).分别是:output_size和state_size.看名字就能够猜到,output_size和state_size 分别表示的LSTM的输出尺寸和状态尺寸的. 有一个博客对这里的解释很好,可以去看一下,我就不啰嗦了。
tf.nn.dynamic_rnn的输出outputs和state含义
128个units决定了state_size 中的c就是128维的,这个很简单.这里的重点是state的格式,这里发现他是一个LSTMStateTuple的类型,别管那么多,简单当做一个tuple看待就行(但是和传统的tuple还是有区别的).之所以是一个tuple,是因为state包含了h和c两方面的内容(这里需要知道一些LSTM的原理)。
然后这个类还有一个很重要的函数,如下
zero_state(batch_size,dtype)
作用:
这个函数主要是用来进行填零的初始化.注意,这里是初始化一个state,不是初始化整个LSTM.
参数:
batch_size: 批大小
dtype: state使用的类型.
返回一个填零的状态state
要是
state_sizeis an int or TensorShape, then the return value is a N-D tensor of shape [batch_size x state_size] filled with zeros.
要是state_size是一个tuple,那么返回的值是同样结构的tuple,其中每个元素都是一个2-D的tensor,他们的形状为[batch_size x s]其中的s是state_size中各自的s .
__call__(inputs,state,scope=None)
作用:在给定的状态(state)和输入上运行RNN cell,这个方法是在一个"时间点"上面运行一次RNN的方法,是比较偏底层的一个函数,对于理解RNN的运行过程非常有帮助。
后面将会讲到的tf.nn.dynamic_rnn() 等接口就是更加高层的接口,直接把所有的运行过程都得到了.
参数:
inputs: 2-D tensor,形状为
[batch_size,input_size].在实际使用的时候,你会先把数据整理成为[batch_size,time_steps_size,input_size]的形状,所以假如当前时刻是i,那么使用的时候,直接使用[:,i,:]作为数据传入就行了.
state: 要是self.state_size是一个整形 ,那么这个参数应该当是一个形状为[batch_size,self.state_size]的tensor,否则,要是self.state_size是一个整数的元组,那么这个应当是一个形状为[batch_size,s]的元组,其中s在self.state_size中.
scope: 这个创建的子图的变量域(VariableScope),默认是类名.
返回值:
A pair containing:
Output: 一个形状为[batch_size,self.output_size] 的2-D tensor
New state:新的state,和之前的state结构一样.
然后还有一些其他的方法和属性,这里不讲了,在真的有需求的时候可以参照官方文档.
Ⅱ.tf.nn.rnn_cell.MultiRNNCell
前面的类可以定义一个一层的LSTM,那么怎么定义多层的LSTM类呢? 这个类主要的作用是把单层LSTM结合为多层的LSTM.
首先来看他的构造函数是怎样的.
__init__( cells,state_is_tuple=True)
参数:
cells:一个列表,里面是你想叠起来的RNNCells,
state_is_tuple:要是是True 的话, 以后都是默认是True了,因此这个参数不用管。接受和返回的state都是n-tuple,其中n = len(cells).
然后还有一些其他的函数和属性都和前面的BasicLSTMCell差不多.但是这里还是要说一下在这里,他的两个属性output_size和state_size 会变成怎么样的形式.下面举一个例子:
import numpy as np
import tensorflow as tf
from tensorflow.contrib.layers.python.layers import initializers

lstm_cell_1=tf.nn.rnn_cell.LSTMCell(
    num_units=128,
    use_peepholes=True,
    initializer=initializers.xavier_initializer(),
    num_proj=64,
    name="LSTM_CELL_1"
)

lstm_cell_2=tf.nn.rnn_cell.LSTMCell(
    num_units=128,
    use_peepholes=True,
    initializer=initializers.xavier_initializer(),
    num_proj=64,
    name="LSTM_CELL_2"
)


lstm_cell_3=tf.nn.rnn_cell.LSTMCell(
    num_units=128,
    use_peepholes=True,
    initializer=initializers.xavier_initializer(),
    num_proj=64,
    name="LSTM_CELL_3"
)

multi_cell=tf.nn.rnn_cell.MultiRNNCell(cells=[lstm_cell_1,lstm_cell_2,lstm_cell_3])


print("output_size:",multi_cell.output_size)
print("state_size:",type(multi_cell.state_size))
print("state_size:",multi_cell.state_size)

#需要先索引到具体的那层cell,然后取出具体的state状态
print(multi_cell.state_size[0].h)
print(multi_cell.state_size[0].c)
结果:
output_size: 64
state_size: <class 'tuple'>
state_size: (LSTMStateTuple(c=128, h=64), LSTMStateTuple(c=128, h=64), LSTMStateTuple(c=128, h=64))
64
128
这里首先建立了3层LSTM,然后使用MultiRNNCell 的构造函数把他们堆叠在一起,所以结果中的属性output_size为64,就是最后那层的projection_num数量了.这个比较简单,重要的是state_size的样式,可以看到是一个tuple里面,然后又有3个LSTMStateTuple对象,其实这里也可以看出来了,就是每层的LSTMStateTuple属性放到了一个大的tuple里面.
这里还是非常重要的.之后各种需要state 的地方可能涉及到state的转换.要是这里不清楚,到时候就不好转换了.
Ⅲ.tf.nn.dynamic_rnn()
这个函数的作用就是通过指定的RNN Cell来展开计算神经网络.
他的构造函数如下:
dynamic_rnn(cell,inputs,sequence_length=None,initial_state=None,dtype=None,parallel_iterations=None,swap_memory=False,time_major=False,scope=None)
对于dynamic_rnn来说每个batch的序列长度都是一样的(不足的话自己要去padding),这个函数会根据 sequence_length 中止计算.同时dynamic_rnn是动态生成graph的
参数:
cell: RNNCell的对象.
inputs: RNN的输入,当time_major == False (default)的时候,必须是形状为[batch_size, max_time, ...]的tensor, 要是time_major == True的话, 必须是形状为[max_time, batch_size, ...]的tensor. 前面两个维度应该在所有的输入里面都应该匹配.
sequence_length: 可选,一个int32/int64类型的vector,他的尺寸是[batch_size]. 对于最后结果的正确性,这个还是非常有用的.因为给他具体每一个序列的长度,能够精确的得到结果,排除了之前为了把所有的序列弄成一样的长度padding造成的不准确.
initial_state: 可选,RNN的初始状态. 要是cell.state_size是一个整形,那么这个参数必须是一个形状为[batch_size, cell.state_size]的tensor. 要是cell.state_size是一个tuple, 那么这个参数必须是一个tuple,其中元素为形状为[batch_size, s]的tensor,s为cell.state_size中的各个相应size.
dtype: 可选,表示输入的数据类型和期望输出的数据类型.当初始状态没有被提供或者RNN的状态由多种形式构成的时候需要显示指定.
parallel_iterations: 默认是32,表示的是并行运行的迭代数量(Default: 32). 有一些没有任何时间依赖的操作能够并行计算,实际上就是空间换时间和时间换空间的折中,当value远大于1的时候,会使用的更多的内存但是能够减少时间,当这个value值很小的时候,会使用小一点的内存,但是会花更多的时间.
swap_memory: Transparently swap the tensors produced in forward inference but needed for back prop from GPU to CPU. This allows training RNNs which would typically not fit on a single GPU, with very minimal (or no) performance penalty.
time_major: 规定了输入和输出tensor的数据组织格式,如果true, tensor的形状需要是[max_time, batch_size, depth]. 若是false, 那么tensor的形状为[batch_size, max_time, depth]. 要是使用time_major = True的话,会更加高效率一点,因为避免了在RNN计算的开始和结束的时候对于矩阵的转置 ,然而,大多数的tensorflow数据格式都是采用的以batch为主的格式,所以这里也默认采用以batch为主的格式.
scope: 子图的scope名称,默认是"rnn"
返回(非常重要):
返回(outputs, state)形式的结果对,其中:
- outputs: 表示RNN的输出隐状态h,就是所有时间步的h,要是
time_major == False (default),那么这个tensor的形状为[batch_size, max_time, cell.output_size],要是time_major == True, 这个Tensor的形状为[max_time, batch_size, cell.output_size]. 这里需要注意一点,要是是双向LSTM,那么outputs就会是一个tuple,其中两个元素分别表示前向的outputs和反向的outputs,后面讲到双向LSTM会详细说这个内容。 - state: 最终时间步的states,要是单向网络,假如有K层,states就是一个元组,里面包含K(层数)个LSTMStateTuple,分别代表这些层最终的状态信息。要是是双向网络,那么还是元组,元组里面又是两个小元组分别表示前向的states和后向的states。相应的小元组里面就是每一层的最终时刻的states信息。
例1:单层lstm
import tensorflow as tf
import numpy as np

inputs = tf.placeholder(np.float32, shape=(32,40,5)) # 32 是 batch_size
lstm_cell_1 = tf.contrib.rnn.BasicLSTMCell(num_units=128)
#lstm_cell_2 = tf.contrib.rnn.BasicLSTMCell(num_units=256)
#lstm_cell_3 = tf.contrib.rnn.BasicLSTMCell(num_units=512)
#多层lstm_cell
#lstm_cell=tf.contrib.rnn.MultiRNNCell(cells=[lstm_cell_1,lstm_cell_2,lstm_cell_3])

print("output_size:",lstm_cell_1.output_size)
print("state_size:",lstm_cell_1.state_size)
#print(lstm_cell.state_size.h)
#print(lstm_cell.state_size.c)
output,state=tf.nn.dynamic_rnn(
    cell=lstm_cell_1,
    inputs=inputs,
    dtype=tf.float32
)

print("output.shape:",output.shape)
print("len of state tuple",len(state))
print("state.h.shape:",state.h.shape)
print("state.c.shape:",state.c.shape)
例二:多层LSTM
import tensorflow as tf
import numpy as np

inputs = tf.placeholder(np.float32, shape=(32,40,5)) # 32 是 batch_size
lstm_cell_1 = tf.contrib.rnn.BasicLSTMCell(num_units=128)
lstm_cell_2 = tf.contrib.rnn.BasicLSTMCell(num_units=256)
lstm_cell_3 = tf.contrib.rnn.BasicLSTMCell(num_units=512)
#多层lstm_cell
lstm_cell=tf.contrib.rnn.MultiRNNCell(cells=[lstm_cell_1,lstm_cell_2,lstm_cell_3])

print("output_size:",lstm_cell.output_size)
print("state_size:",lstm_cell.state_size)
#print(lstm_cell.state_size.h)
#print(lstm_cell.state_size.c)
output,state=tf.nn.dynamic_rnn(
    cell=lstm_cell,
    inputs=inputs,
    dtype=tf.float32
)

print("output.shape:",output.shape)
print("len of state tuple",len(state))
结果:

多层的state就是一个tuple,而tuple的每一个元素都是每一层的state.
Ⅳ tf.nn.bidirectional_dynamic_rnn
bidirectional_dynamic_rnn(cell_fw,cell_bw,inputs,sequence_length=None,initial_state_fw=None,initial_state_bw=None,dtype=None,parallel_iterations=None,swap_memory=False,time_major=False,scope=None)
参数:
cell_fw:RNNCell的一个实例,用于正向。
cell_bw:RNNCell的一个实例,用于反向。
inputs:RNN输入。如果time_major == False(默认),则它必须是形状为[batch_size, max_time, ...]的tensor,或者这些元素的嵌套元组。如果time_major == True,则它必须是形状为[max_time, batch_size, ...]的tensor ,或者是这些元素的嵌套元组。
sequence_length:(可选)一个int32 / int64向量,大小[batch_size],包含批处理中每个序列的实际长度。如果未提供,则所有批次条目均假定为完整序列; 并且时间反转从时间0到max_time每个序列被应用。
initial_state_fw:(可选)前向RNN的初始状态。这必须是适当类型和形状的张量[batch_size, cell_fw.state_size]。如果cell_fw.state_size是一个元组,这应该是一个具有形状的张量的元组[batch_size, s] for s in cell_fw.state_size。
initial_state_bw:(可选)与之相同initial_state_fw,但使用相应的属性cell_bw。
dtype:(可选)初始状态和预期输出的数据类型。如果未提供initial_states或者RNN状态具有异构dtype,则为必需。
parallel_iterations:(默认:32)。并行运行的迭代次数。那些没有任何时间依赖性并且可以并行运行的操作将会是。此参数用于空间换算时间。值>> 1使用更多的内存,但花费更少的时间,而更小的值使用更少的内存,但计算需要更长的时间。
swap_memory:透明地交换前向推理中产生的张量,但是从GPU到后端支持所需的张量。这允许训练通常不适合单个GPU的RNN,而且性能损失非常小(或不)。
time_major:inputs和outputs张量的形状格式。如果为True的话,这些都Tensors的形状为[max_time, batch_size, depth]。如果为False的话,这些Tensors的形状是[batch_size, max_time, depth]。
scope:创建子图的VariableScope; 默认为“bidirectional_rnn”
返回:
元组
(outputs,output_states)其中
outputs:包含正向和反向rnn输出的元组(output_fw,output_bw)。
如果time_major == False(默认值),则output_fw将是一个形状为[batch_size, max_time, cell_fw.output_size]的tensor,output_bw将是一个形状为[batch_size, max_time, cell_bw.output_size]的tensor.
如果time_major == True,则output_fw将为一个形状为[max_time, batch_size, cell_fw.output_size]的tensor, output_bw将是一个形状为[max_time, batch_size, cell_bw.output_size]的tensor.
output_state,也是一个tuple,内容是(output_state_fw, output_state_bw)也就是说,前向的state和后向的state放到了一个元组里面.
这里举一个例子:
import tensorflow as tf
import numpy as np

inputs = tf.placeholder(np.float32, shape=(32,40,5)) # 32 是 batch_size
lstm_cell_fw = tf.contrib.rnn.BasicLSTMCell(num_units=128)
lstm_cell_bw = tf.contrib.rnn.BasicLSTMCell(num_units=128)

#多层lstm_cell
#lstm_cell=tf.contrib.rnn.MultiRNNCell(cells=[lstm_cell_1,lstm_cell_2,lstm_cell_3])

print("output_fw_size:",lstm_cell_fw.output_size)
print("state_fw_size:",lstm_cell_fw.state_size)
print("output_bw_size:",lstm_cell_bw.output_size)
print("state_bw_size:",lstm_cell_bw.state_size)

#print(lstm_cell.state_size.h)
#print(lstm_cell.state_size.c)
output,state=tf.nn.bidirectional_dynamic_rnn(
    cell_fw=lstm_cell_fw,
    cell_bw=lstm_cell_bw,
    inputs=inputs,
    dtype=tf.float32
)
output_fw=output[0]
output_bw=output[1]
state_fw=state[0]
state_bw=state[1]

print("output_fw.shape:",output_fw.shape)
print("output_bw.shape:",output_bw.shape)
print("len of state tuple",len(state_fw))
print("state_fw:",state_fw)
print("state_bw:",state_bw)
#print("state.h.shape:",state.h.shape)
#print("state.c.shape:",state.c.shape)

#state_concat=tf.concat(values=[state_fw,state_fw],axis=1)
#print(state_concat)
state_h_concat=tf.concat(values=[state_fw.h,state_bw.h],axis=1)
print("state_fw_h_concat.shape",state_h_concat.shape)

state_c_concat=tf.concat(values=[state_fw.c,state_bw.c],axis=1)
print("state_fw_h_concat.shape",state_c_concat.shape)

state_concat=tf.contrib.rnn.LSTMStateTuple(c=state_c_concat,h=state_h_concat)
print(state_concat)
结果:
output_fw_size: 128
state_fw_size: LSTMStateTuple(c=128, h=128)
output_bw_size: 128
state_bw_size: LSTMStateTuple(c=128, h=128)
output_fw.shape: (32, 40, 128)
output_bw.shape: (32, 40, 128)
len of state tuple 2
state_fw: LSTMStateTuple(c=<tf.Tensor 'bidirectional_rnn/fw/fw/while/Exit_2:0' shape=(32, 128) dtype=float32>, h=<tf.Tensor 'bidirectional_rnn/fw/fw/while/Exit_3:0' shape=(32, 128) dtype=float32>)
state_bw: LSTMStateTuple(c=<tf.Tensor 'bidirectional_rnn/bw/bw/while/Exit_2:0' shape=(32, 128) dtype=float32>, h=<tf.Tensor 'bidirectional_rnn/bw/bw/while/Exit_3:0' shape=(32, 128) dtype=float32>)
state_fw_h_concat.shape (32, 256)
state_fw_h_concat.shape (32, 256)
LSTMStateTuple(c=<tf.Tensor 'concat_1:0' shape=(32, 256) dtype=float32>, h=<tf.Tensor 'concat:0' shape=(32, 256) dtype=float32>)
在这个例子里面,还用到了一个拼接state的例子,可以作为自己初始化state或者拼接state的模板.
Ⅴ.tf.nn.embedding_lookup()
embedding_lookup(params,ids,partition_strategy=‘mod’,name=None,max_norm=None)
这个函数主要是在任务内进行embeddings的时候使用的一个函数,通过这个函数来把一个字或者词映射到对应维度的词向量上面去. 要是设置为可训练的Variable的话,可以在进行任务的时候同时对于词向量进行训练.
params: 表示完整的嵌入张量,或者除了第一维度之外具有相同形状的P个张量的列表,表示经分割的嵌入张量。
ids: 一个类型为int32或int64的Tensor,包含要在params中查找的id
partition_strategy: 指定分区策略的字符串,如果len(params)> 1,则相关。当前支持“div”和“mod”。 默认为“mod”
name: 操作名称(可选)
max_norm: 如果不是None,嵌入值将被l2归一化为max_norm的值
Ⅵ. tf.sequence_mask()
sequence_mask(lengths,maxlen=None,dtype=tf.bool,name=None)
作用:返回一个mask tensor表示每个序列的前N个位置.
If lengths has shape [d_1, d_2, …, d_n] the resulting tensor mask has dtype dtype and shape [d_1, d_2, …, d_n, maxlen], with
mask[i_1, i_2, …, i_n, j] = (j < lengths[i_1, i_2, …, i_n])
参数:
lengths: 整形的tensor, 他的所有的值都要小于或等于maxlen.
maxlen: scalar integer tensor, size of last dimension of returned tensor. Default is the maximum value in lengths.
dtype: output type of the resulting tensor.
name: op名称
返回:
A mask tensor of shape lengths.shape + (maxlen,), cast to specified dtype.
例子:
tf.sequence_mask([1, 3, 2], 5)  # [[True, False, False, False, False],
                                #  [True, True, True, False, False],
                                #  [True, True, False, False, False]]

tf.sequence_mask([[1, 3],[2,0]])  # [[[True, False, False],
                                  #   [True, True, True]],
                                  #  [[True, True, False],
                                  #   [False, False, False]]]
Ⅶ.tf.boolean_mask()
boolean_mask(tensor,mask,name=‘boolean_mask’)
把boolean类型的mask值应用到tensor上面,可以和numpy里面的tensor[mask] 类比.
参数:
tensor: N-D tensor.
mask: K-D boolean tensor,K <= N同时K必须是已知的
name: 可选,操作名
返回:
一个(N-K+1)维tensor.相应的值对应mask tensor中的True.
上面这些API是对于要使用的东西就基本的了解.接下来就开始讲例子了.
二.实例
如开头所说,接下来讲的几个例子都是一些玩具示例,但是对于新手是绝对友好的,这些简单例子涵盖了进行LSTM编程需要的一些基本思想和手段,通过消化这些简单例子可以快速上手,构建出后面适合自己的更加复杂的网络结构.
接下来从最基本的例子一个一个来讲,每个例子都可以直接作为脚本直接跑起来.
Ⅰ.预测sin函数
代码:
import numpy as np
import tensorflow as tf
import tensorflow.contrib.rnn as rnn
import matplotlib.pyplot as plt


TIME_STEPS=10
BATCH_SIZE=128
HIDDEN_UNITS=1
LEARNING_RATE=0.001
EPOCH=150

TRAIN_EXAMPLES=11000
TEST_EXAMPLES=1100

#------------------------------------Generate Data-----------------------------------------------#
#generate data
def generate(seq):
    X=[]
    y=[]
    for i in range(len(seq)-TIME_STEPS):
        X.append([seq[i:i+TIME_STEPS]])
        y.append([seq[i+TIME_STEPS]])
    return np.array(X,dtype=np.float32),np.array(y,dtype=np.float32)

#s=[i for i in range(30)]
#X,y=generate(s)
#print(X)
#print(y)

seq_train=np.sin(np.linspace(start=0,stop=100,num=TRAIN_EXAMPLES,dtype=np.float32))
seq_test=np.sin(np.linspace(start=100,stop=110,num=TEST_EXAMPLES,dtype=np.float32))

#plt.plot(np.linspace(start=0,stop=100,num=10000,dtype=np.float32),seq_train)

#plt.plot(np.linspace(start=100,stop=110,num=1000,dtype=np.float32),seq_test)
#plt.show()

X_train,y_train=generate(seq_train)
#print(X_train.shape,y_train.shape)
X_test,y_test=generate(seq_test)

#reshape to (batch,time_steps,input_size)
X_train=np.reshape(X_train,newshape=(-1,TIME_STEPS,1))
X_test=np.reshape(X_test,newshape=(-1,TIME_STEPS,1))

#draw y_test
plt.plot(range(1000),y_test[:1000,0],"r*")
#print(X_train.shape)
#print(X_test.shape)


#-----------------------------------------------------------------------------------------------------#


#--------------------------------------Define Graph---------------------------------------------------#
graph=tf.Graph()
with graph.as_default():

    #------------------------------------construct LSTM------------------------------------------#
    #place hoder
    X_p=tf.placeholder(dtype=tf.float32,shape=(None,TIME_STEPS,1),name="input_placeholder")
    y_p=tf.placeholder(dtype=tf.float32,shape=(None,1),name="pred_placeholder")

    #lstm instance
    lstm_cell=rnn.BasicLSTMCell(num_units=HIDDEN_UNITS)

    #initialize to zero
    init_state=lstm_cell.zero_state(batch_size=BATCH_SIZE,dtype=tf.float32)

    #dynamic rnn
    outputs,states=tf.nn.dynamic_rnn(cell=lstm_cell,inputs=X_p,initial_state=init_state,dtype=tf.float32)
    #print(outputs.shape)
    h=outputs[:,-1,:]
    #print(h.shape)
    #--------------------------------------------------------------------------------------------#

    #---------------------------------define loss and optimizer----------------------------------#
    mse=tf.losses.mean_squared_error(labels=y_p,predictions=h)
    #print(loss.shape)
    optimizer=tf.train.AdamOptimizer(LEARNING_RATE).minimize(loss=mse)


    init=tf.global_variables_initializer()


#-------------------------------------------Define Session---------------------------------------#
with tf.Session(graph=graph) as sess:
    sess.run(init)
    for epoch in range(1,EPOCH+1):
        results = np.zeros(shape=(TEST_EXAMPLES, 1))
        train_losses=[]
        test_losses=[]
        print("epoch:",epoch)
        for j in range(TRAIN_EXAMPLES//BATCH_SIZE):
            _,train_loss=sess.run(
                    fetches=(optimizer,mse),
                    feed_dict={
                            X_p:X_train[j*BATCH_SIZE:(j+1)*BATCH_SIZE],
                            y_p:y_train[j*BATCH_SIZE:(j+1)*BATCH_SIZE]
                        }
            )
            train_losses.append(train_loss)
        print("average training loss:", sum(train_losses) / len(train_losses))


        for j in range(TEST_EXAMPLES//BATCH_SIZE):
            result,test_loss=sess.run(
                    fetches=(h,mse),
                    feed_dict={
                            X_p:X_test[j*BATCH_SIZE:(j+1)*BATCH_SIZE],
                            y_p:y_test[j*BATCH_SIZE:(j+1)*BATCH_SIZE]
                        }
            )
            results[j*BATCH_SIZE:(j+1)*BATCH_SIZE]=result
            test_losses.append(test_loss)
        print("average test loss:", sum(test_losses) / len(test_losses))
        plt.plot(range(1000),results[:1000,0])
    plt.show()
结果:
![]()
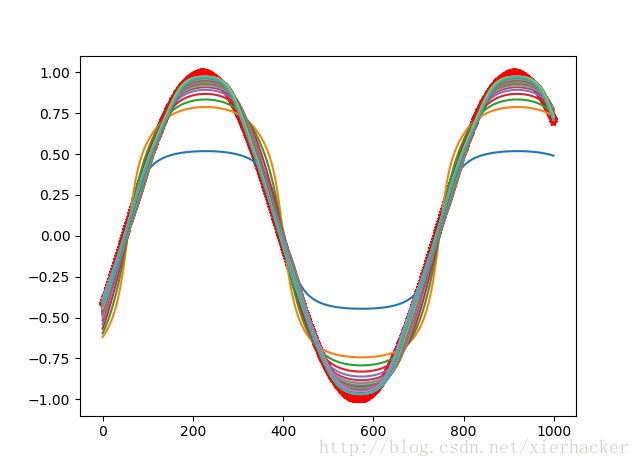
图中红色粗线是真实值,可以看到,在迭代150个epoch之后,我们的结果越来越接近真实值了.
Ⅱ.预测sin函数多层版
代码:
import numpy as np
import tensorflow as tf
import tensorflow.contrib.rnn as rnn
import matplotlib.pyplot as plt
import matplotlib.pyplot as plt


TIME_STEPS=10
BATCH_SIZE=128
HIDDEN_UNITS1=30
HIDDEN_UNITS=1
LEARNING_RATE=0.001
EPOCH=50

TRAIN_EXAMPLES=11000
TEST_EXAMPLES=1100

#------------------------------------Generate Data-----------------------------------------------#
#generate data
def generate(seq):
    X=[]
    y=[]
    for i in range(len(seq)-TIME_STEPS):
        X.append([seq[i:i+TIME_STEPS]])
        y.append([seq[i+TIME_STEPS]])
    return np.array(X,dtype=np.float32),np.array(y,dtype=np.float32)

#s=[i for i in range(30)]
#X,y=generate(s)
#print(X)
#print(y)

seq_train=np.sin(np.linspace(start=0,stop=100,num=TRAIN_EXAMPLES,dtype=np.float32))
seq_test=np.sin(np.linspace(start=100,stop=110,num=TEST_EXAMPLES,dtype=np.float32))

#plt.plot(np.linspace(start=0,stop=100,num=10000,dtype=np.float32),seq_train)

#plt.plot(np.linspace(start=100,stop=110,num=1000,dtype=np.float32),seq_test)
#plt.show()

X_train,y_train=generate(seq_train)
#print(X_train.shape,y_train.shape)
X_test,y_test=generate(seq_test)

#reshape to (batch,time_steps,input_size)
X_train=np.reshape(X_train,newshape=(-1,TIME_STEPS,1))
X_test=np.reshape(X_test,newshape=(-1,TIME_STEPS,1))

#draw y_test
plt.plot(range(1000),y_test[:1000,0],"r*")
#print(X_train.shape)
#print(X_test.shape)


#-----------------------------------------------------------------------------------------------------#


#--------------------------------------Define Graph---------------------------------------------------#
graph=tf.Graph()
with graph.as_default():

    #------------------------------------construct LSTM------------------------------------------#
    #place hoder
    X_p=tf.placeholder(dtype=tf.float32,shape=(None,TIME_STEPS,1),name="input_placeholder")
    y_p=tf.placeholder(dtype=tf.float32,shape=(None,1),name="pred_placeholder")

    #lstm instance
    lstm_cell1=rnn.BasicLSTMCell(num_units=HIDDEN_UNITS1)
    lstm_cell=rnn.BasicLSTMCell(num_units=HIDDEN_UNITS)

    multi_lstm=rnn.MultiRNNCell(cells=[lstm_cell1,lstm_cell])

    #initialize to zero
    init_state=multi_lstm.zero_state(batch_size=BATCH_SIZE,dtype=tf.float32)

    #dynamic rnn
    outputs,states=tf.nn.dynamic_rnn(cell=multi_lstm,inputs=X_p,initial_state=init_state,dtype=tf.float32)
    #print(outputs.shape)
    h=outputs[:,-1,:]
    #print(h.shape)
    #--------------------------------------------------------------------------------------------#

    #---------------------------------define loss and optimizer----------------------------------#
    mse=tf.losses.mean_squared_error(labels=y_p,predictions=h)
    #print(loss.shape)
    optimizer=tf.train.AdamOptimizer(LEARNING_RATE).minimize(loss=mse)


    init=tf.global_variables_initializer()


#-------------------------------------------Define Session---------------------------------------#
with tf.Session(graph=graph) as sess:
    sess.run(init)
    for epoch in range(1,EPOCH+1):
        results = np.zeros(shape=(TEST_EXAMPLES, 1))
        train_losses=[]
        test_losses=[]
        print("epoch:",epoch)
        for j in range(TRAIN_EXAMPLES//BATCH_SIZE):
            _,train_loss=sess.run(
                    fetches=(optimizer,mse),
                    feed_dict={
                            X_p:X_train[j*BATCH_SIZE:(j+1)*BATCH_SIZE],
                            y_p:y_train[j*BATCH_SIZE:(j+1)*BATCH_SIZE]
                        }
            )
            train_losses.append(train_loss)
        print("average training loss:", sum(train_losses) / len(train_losses))


        for j in range(TEST_EXAMPLES//BATCH_SIZE):
            result,test_loss=sess.run(
                    fetches=(h,mse),
                    feed_dict={
                            X_p:X_test[j*BATCH_SIZE:(j+1)*BATCH_SIZE],
                            y_p:y_test[j*BATCH_SIZE:(j+1)*BATCH_SIZE]
                        }
            )
            results[j*BATCH_SIZE:(j+1)*BATCH_SIZE]=result
            test_losses.append(test_loss)
        print("average test loss:", sum(test_losses) / len(test_losses))
        plt.plot(range(1000),results[:1000,0])
    plt.show()
在这里,我们发现仅仅是50个epoch之后,得到的效果就要明显好于前面第一个的结果.
预测sin函数手写版
import numpy as np
import tensorflow as tf
import tensorflow.contrib.rnn as rnn
import matplotlib.pyplot as plt

TIME_STEPS=10
BATCH_SIZE=128
HIDDEN_UNITS1=30
HIDDEN_UNITS=1
LEARNING_RATE=0.001
EPOCH=50

TRAIN_EXAMPLES=11000
TEST_EXAMPLES=1100

#------------------------------------Generate Data-----------------------------------------------#
#generate data
def generate(seq):
    X=[]
    y=[]
    for i in range(len(seq)-TIME_STEPS):
        X.append([seq[i:i+TIME_STEPS]])
        y.append([seq[i+TIME_STEPS]])
    return np.array(X,dtype=np.float32),np.array(y,dtype=np.float32)

#s=[i for i in range(30)]
#X,y=generate(s)
#print(X)
#print(y)

seq_train=np.sin(np.linspace(start=0,stop=100,num=TRAIN_EXAMPLES,dtype=np.float32))
seq_test=np.sin(np.linspace(start=100,stop=110,num=TEST_EXAMPLES,dtype=np.float32))

#plt.plot(np.linspace(start=0,stop=100,num=10000,dtype=np.float32),seq_train)

#plt.plot(np.linspace(start=100,stop=110,num=1000,dtype=np.float32),seq_test)
#plt.show()

X_train,y_train=generate(seq_train)
#print(X_train.shape,y_train.shape)
X_test,y_test=generate(seq_test)

#reshape to (batch,time_steps,input_size)
X_train=np.reshape(X_train,newshape=(-1,TIME_STEPS,1))
X_test=np.reshape(X_test,newshape=(-1,TIME_STEPS,1))

#draw y_test
plt.plot(range(1000),y_test[:1000,0],"r*")
#print(X_train.shape)
#print(X_test.shape)


#-----------------------------------------------------------------------------------------------------#


#--------------------------------------Define Graph---------------------------------------------------#
graph=tf.Graph()
with graph.as_default():

    #------------------------------------construct LSTM------------------------------------------#
    #place hoder
    X_p=tf.placeholder(dtype=tf.float32,shape=(None,TIME_STEPS,1),name="input_placeholder")
    y_p=tf.placeholder(dtype=tf.float32,shape=(None,1),name="pred_placeholder")

    #lstm instance
    lstm_cell1=rnn.BasicLSTMCell(num_units=HIDDEN_UNITS1)
    lstm_cell=rnn.BasicLSTMCell(num_units=HIDDEN_UNITS)

    multi_lstm=rnn.MultiRNNCell(cells=[lstm_cell1,lstm_cell])


    #自己初始化state
    #第一层state
    lstm_layer1_c=tf.zeros(shape=(BATCH_SIZE,HIDDEN_UNITS1))
    lstm_layer1_h=tf.zeros(shape=(BATCH_SIZE,HIDDEN_UNITS1))
    layer1_state=rnn.LSTMStateTuple(c=lstm_layer1_c,h=lstm_layer1_h)

    #第二层state
    lstm_layer2_c = tf.zeros(shape=(BATCH_SIZE, HIDDEN_UNITS))
    lstm_layer2_h = tf.zeros(shape=(BATCH_SIZE, HIDDEN_UNITS))
    layer2_state = rnn.LSTMStateTuple(c=lstm_layer2_c, h=lstm_layer2_h)

    init_state=(layer1_state,layer2_state)
    print(init_state)


    #自己展开RNN计算
    outputs = list()                                    #用来接收存储每步的结果
    state = init_state
    with tf.variable_scope('RNN'):
        for timestep in range(TIME_STEPS):
            if timestep > 0:
                tf.get_variable_scope().reuse_variables()
            # 这里的state保存了每一层 LSTM 的状态
            (cell_output, state) = multi_lstm(X_p[:, timestep, :], state)
            outputs.append(cell_output)
    h = outputs[-1]


    #---------------------------------define loss and optimizer----------------------------------#
    mse=tf.losses.mean_squared_error(labels=y_p,predictions=h)
    #print(loss.shape)
    optimizer=tf.train.AdamOptimizer(LEARNING_RATE).minimize(loss=mse)

    init=tf.global_variables_initializer()


#-------------------------------------------Define Session---------------------------------------#
with tf.Session(graph=graph) as sess:
    sess.run(init)
    for epoch in range(1,EPOCH+1):
        results = np.zeros(shape=(TEST_EXAMPLES, 1))
        train_losses=[]
        test_losses=[]
        print("epoch:",epoch)
        for j in range(TRAIN_EXAMPLES//BATCH_SIZE):
            _,train_loss=sess.run(
                    fetches=(optimizer,mse),
                    feed_dict={
                            X_p:X_train[j*BATCH_SIZE:(j+1)*BATCH_SIZE],
                            y_p:y_train[j*BATCH_SIZE:(j+1)*BATCH_SIZE]
                        }
            )
            train_losses.append(train_loss)
        print("average training loss:", sum(train_losses) / len(train_losses))


        for j in range(TEST_EXAMPLES//BATCH_SIZE):
            result,test_loss=sess.run(
                    fetches=(h,mse),
                    feed_dict={
                            X_p:X_test[j*BATCH_SIZE:(j+1)*BATCH_SIZE],
                            y_p:y_test[j*BATCH_SIZE:(j+1)*BATCH_SIZE]
                        }
            )
            results[j*BATCH_SIZE:(j+1)*BATCH_SIZE]=result
            test_losses.append(test_loss)
        print("average test loss:", sum(test_losses) / len(test_losses))
        plt.plot(range(1000),results[:1000,0])
    plt.show()
这个例子和上面的Ⅱ是一模一样的,唯一的区别就是使用了自定义的初始状态,从这个例子可以看一下怎么自定义一个状态. 然后就是之前自动展开的,
这里变成了手动展开计算,这里的计算过程
#自己展开RNN计算
    outputs = list()                                    #用来接收存储每步的结果
    state = init_state
    with tf.variable_scope('RNN'):
        for timestep in range(TIME_STEPS):
            if timestep > 0:
                tf.get_variable_scope().reuse_variables()
            # 这里的state保存了每一层 LSTM 的状态
            (cell_output, state) = multi_lstm(X_p[:, timestep, :], state)
            outputs.append(cell_output)
    h = outputs[-1]
很有启发意义,有时候需要自己掌控每一步的结果的时候,可以使用这个来展开计算.
Ⅲ.MNIST图像分类
LSTM也可以做图像分类,在这里,思想还是非常简单的,MNIST的图像可以表示为28x28 的形式,
代码:
import numpy as np
import pandas as pd
import tensorflow as tf
import tensorflow.contrib.rnn as rnn
import matplotlib.pyplot as plt


TIME_STEPS=28
BATCH_SIZE=128
HIDDEN_UNITS1=30
HIDDEN_UNITS=10
LEARNING_RATE=0.001
EPOCH=50

TRAIN_EXAMPLES=42000
TEST_EXAMPLES=28000

#------------------------------------Generate Data-----------------------------------------------#
#generate data
train_frame = pd.read_csv("../Mnist/train.csv")
test_frame = pd.read_csv("../Mnist/test.csv")

# pop the labels and one-hot coding
train_labels_frame = train_frame.pop("label")

# get values
# one-hot on labels
X_train = train_frame.astype(np.float32).values
y_train=pd.get_dummies(data=train_labels_frame).values
X_test = test_frame.astype(np.float32).values

#trans the shape to (batch,time_steps,input_size)
X_train=np.reshape(X_train,newshape=(-1,28,28))
X_test=np.reshape(X_test,newshape=(-1,28,28))
#print(X_train.shape)
#print(y_dummy.shape)
#print(X_test.shape)

#-----------------------------------------------------------------------------------------------------#


#--------------------------------------Define Graph---------------------------------------------------#
graph=tf.Graph()
with graph.as_default():

    #------------------------------------construct LSTM------------------------------------------#
    #place hoder
    X_p=tf.placeholder(dtype=tf.float32,shape=(None,TIME_STEPS,28),name="input_placeholder")
    y_p=tf.placeholder(dtype=tf.float32,shape=(None,10),name="pred_placeholder")

    #lstm instance
    lstm_cell1=rnn.BasicLSTMCell(num_units=HIDDEN_UNITS1)
    lstm_cell=rnn.BasicLSTMCell(num_units=HIDDEN_UNITS)

    multi_lstm=rnn.MultiRNNCell(cells=[lstm_cell1,lstm_cell])

    #initialize to zero
    init_state=multi_lstm.zero_state(batch_size=BATCH_SIZE,dtype=tf.float32)

    #dynamic rnn
    outputs,states=tf.nn.dynamic_rnn(cell=multi_lstm,inputs=X_p,initial_state=init_state,dtype=tf.float32)
    #print(outputs.shape)
    h=outputs[:,-1,:]
    #print(h.shape)
    #--------------------------------------------------------------------------------------------#

    #---------------------------------define loss and optimizer----------------------------------#
    cross_loss=tf.losses.softmax_cross_entropy(onehot_labels=y_p,logits=h)
    #print(loss.shape)

    correct_prediction = tf.equal(tf.argmax(h, 1), tf.argmax(y_p, 1))
    accuracy = tf.reduce_mean(tf.cast(correct_prediction, "float"))

    optimizer=tf.train.AdamOptimizer(LEARNING_RATE).minimize(loss=cross_loss)

    init=tf.global_variables_initializer()


#-------------------------------------------Define Session---------------------------------------#
with tf.Session(graph=graph) as sess:
    sess.run(init)
    for epoch in range(1,EPOCH+1):
        #results = np.zeros(shape=(TEST_EXAMPLES, 10))
        train_losses=[]
        accus=[]
        #test_losses=[]
        print("epoch:",epoch)
        for j in range(TRAIN_EXAMPLES//BATCH_SIZE):
            _,train_loss,accu=sess.run(
                    fetches=(optimizer,cross_loss,accuracy),
                    feed_dict={
                            X_p:X_train[j*BATCH_SIZE:(j+1)*BATCH_SIZE],
                            y_p:y_train[j*BATCH_SIZE:(j+1)*BATCH_SIZE]
                        }
            )
            train_losses.append(train_loss)
            accus.append(accu)
        print("average training loss:", sum(train_losses) / len(train_losses))
        print("accuracy:",sum(accus)/len(accus))
Ⅳ.双向LSTM做图像分类
代码:
import numpy as np
import pandas as pd
import tensorflow as tf
import tensorflow.contrib.rnn as rnn
import matplotlib.pyplot as plt


TIME_STEPS=28
BATCH_SIZE=128
HIDDEN_UNITS1=30
HIDDEN_UNITS=10
LEARNING_RATE=0.001
EPOCH=50

TRAIN_EXAMPLES=42000
TEST_EXAMPLES=28000

#------------------------------------Generate Data-----------------------------------------------#
#generate data
train_frame = pd.read_csv("../Mnist/train.csv")
test_frame = pd.read_csv("../Mnist/test.csv")

# pop the labels and one-hot coding
train_labels_frame = train_frame.pop("label")

# get values
# one-hot on labels
X_train = train_frame.astype(np.float32).values
y_train=pd.get_dummies(data=train_labels_frame).values
X_test = test_frame.astype(np.float32).values

#trans the shape to (batch,time_steps,input_size)
X_train=np.reshape(X_train,newshape=(-1,28,28))
X_test=np.reshape(X_test,newshape=(-1,28,28))
#print(X_train.shape)
#print(y_dummy.shape)
#print(X_test.shape)

#-----------------------------------------------------------------------------------------------------#


#--------------------------------------Define Graph---------------------------------------------------#
graph=tf.Graph()
with graph.as_default():

    #------------------------------------construct LSTM------------------------------------------#
    #place hoder
    X_p=tf.placeholder(dtype=tf.float32,shape=(None,TIME_STEPS,28),name="input_placeholder")
    y_p=tf.placeholder(dtype=tf.float32,shape=(None,10),name="pred_placeholder")

    #lstm instance
    lstm_forward=rnn.BasicLSTMCell(num_units=HIDDEN_UNITS)
    lstm_backward=rnn.BasicLSTMCell(num_units=HIDDEN_UNITS)

    outputs,states=tf.nn.bidirectional_dynamic_rnn(
        cell_fw=lstm_forward,
        cell_bw=lstm_backward,
        inputs=X_p,
        dtype=tf.float32
    )

    outputs_fw=outputs[0]
    outputs_bw = outputs[1]
    h=outputs_fw[:,-1,:]+outputs_bw[:,-1,:]
   # print(h.shape)
    #---------------------------------------;-----------------------------------------------------#

    #---------------------------------define loss and optimizer----------------------------------#
    cross_loss=tf.losses.softmax_cross_entropy(onehot_labels=y_p,logits=h)
    #print(loss.shape)

    correct_prediction = tf.equal(tf.argmax(h, 1), tf.argmax(y_p, 1))
    accuracy = tf.reduce_mean(tf.cast(correct_prediction, "float"))

    optimizer=tf.train.AdamOptimizer(LEARNING_RATE).minimize(loss=cross_loss)

    init=tf.global_variables_initializer()


#-------------------------------------------Define Session---------------------------------------#
with tf.Session(graph=graph) as sess:
    sess.run(init)
    for epoch in range(1,EPOCH+1):
        #results = np.zeros(shape=(TEST_EXAMPLES, 10))
        train_losses=[]
        accus=[]
        #test_losses=[]
        print("epoch:",epoch)
        for j in range(TRAIN_EXAMPLES//BATCH_SIZE):
            _,train_loss,accu=sess.run(
                    fetches=(optimizer,cross_loss,accuracy),
                    feed_dict={
                            X_p:X_train[j*BATCH_SIZE:(j+1)*BATCH_SIZE],
                            y_p:y_train[j*BATCH_SIZE:(j+1)*BATCH_SIZE]
                        }
            )
            train_losses.append(train_loss)
            accus.append(accu)
        print("average training loss:", sum(train_losses) / len(train_losses))
        print("accuracy:",sum(accus)/len(accus))
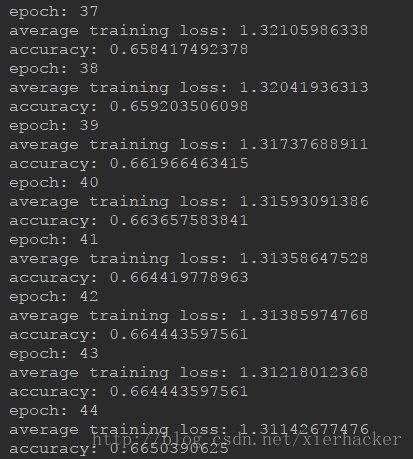
会发现在后面不管怎么学都学不到东西了.这是因为上面我们只使用了一层双向网络.接下来仅仅需要小小的改动,把上面这个网络改为深层的双向LSTM.
Ⅴ.深层双向LSTM做图像分类
import numpy as np
import pandas as pd
import tensorflow as tf
import tensorflow.contrib.rnn as rnn
import matplotlib.pyplot as plt


TIME_STEPS=28
BATCH_SIZE=128
HIDDEN_UNITS1=30
HIDDEN_UNITS=10
LEARNING_RATE=0.001
EPOCH=50

TRAIN_EXAMPLES=42000
TEST_EXAMPLES=28000

#------------------------------------Generate Data-----------------------------------------------#
#generate data
train_frame = pd.read_csv("../Mnist/train.csv")
test_frame = pd.read_csv("../Mnist/test.csv")

# pop the labels and one-hot coding
train_labels_frame = train_frame.pop("label")

# get values
# one-hot on labels
X_train = train_frame.astype(np.float32).values
y_train=pd.get_dummies(data=train_labels_frame).values
X_test = test_frame.astype(np.float32).values

#trans the shape to (batch,time_steps,input_size)
X_train=np.reshape(X_train,newshape=(-1,28,28))
X_test=np.reshape(X_test,newshape=(-1,28,28))
#print(X_train.shape)
#print(y_dummy.shape)
#print(X_test.shape)

#-----------------------------------------------------------------------------------------------------#


#--------------------------------------Define Graph---------------------------------------------------#
graph=tf.Graph()
with graph.as_default():

    #------------------------------------construct LSTM------------------------------------------#
    #place hoder
    X_p=tf.placeholder(dtype=tf.float32,shape=(None,TIME_STEPS,28),name="input_placeholder")
    y_p=tf.placeholder(dtype=tf.float32,shape=(None,10),name="pred_placeholder")

    #lstm instance
    lstm_forward_1=rnn.BasicLSTMCell(num_units=HIDDEN_UNITS1)
    lstm_forward_2=rnn.BasicLSTMCell(num_units=HIDDEN_UNITS)
    lstm_forward=rnn.MultiRNNCell(cells=[lstm_forward_1,lstm_forward_2])

    lstm_backward_1 = rnn.BasicLSTMCell(num_units=HIDDEN_UNITS1)
    lstm_backward_2 = rnn.BasicLSTMCell(num_units=HIDDEN_UNITS)
    lstm_backward=rnn.MultiRNNCell(cells=[lstm_backward_1,lstm_backward_2])

    outputs,states=tf.nn.bidirectional_dynamic_rnn(
        cell_fw=lstm_forward,
        cell_bw=lstm_backward,
        inputs=X_p,
        dtype=tf.float32
    )

    outputs_fw=outputs[0]
    outputs_bw = outputs[1]
    h=outputs_fw[:,-1,:]+outputs_bw[:,-1,:]
   # print(h.shape)
    #---------------------------------------;-----------------------------------------------------#

    #---------------------------------define loss and optimizer----------------------------------#
    cross_loss=tf.losses.softmax_cross_entropy(onehot_labels=y_p,logits=h)
    #print(loss.shape)

    correct_prediction = tf.equal(tf.argmax(h, 1), tf.argmax(y_p, 1))
    accuracy = tf.reduce_mean(tf.cast(correct_prediction, "float"))

    optimizer=tf.train.AdamOptimizer(LEARNING_RATE).minimize(loss=cross_loss)

    init=tf.global_variables_initializer()


#-------------------------------------------Define Session---------------------------------------#
with tf.Session(graph=graph) as sess:
    sess.run(init)
    for epoch in range(1,EPOCH+1):
        #results = np.zeros(shape=(TEST_EXAMPLES, 10))
        train_losses=[]
        accus=[]
        #test_losses=[]
        print("epoch:",epoch)
        for j in range(TRAIN_EXAMPLES//BATCH_SIZE):
            _,train_loss,accu=sess.run(
                    fetches=(optimizer,cross_loss,accuracy),
                    feed_dict={
                            X_p:X_train[j*BATCH_SIZE:(j+1)*BATCH_SIZE],
                            y_p:y_train[j*BATCH_SIZE:(j+1)*BATCH_SIZE]
                        }
            )
            train_losses.append(train_loss)
            accus.append(accu)
        print("average training loss:", sum(train_losses) / len(train_losses))
        print("accuracy:",sum(accus)/len(accus))
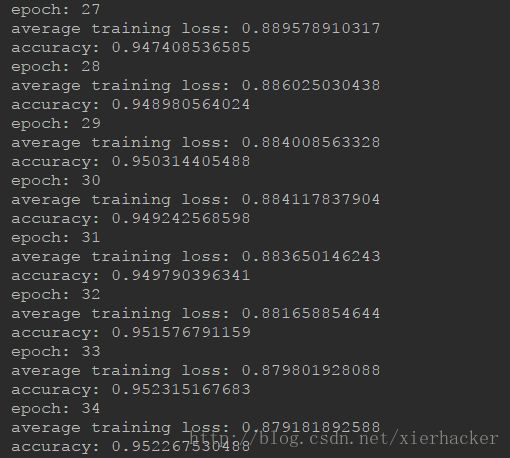
相比起上面单层的bilstm,这里才35轮就已经到了95%了,说明在信息抽象的能力上面,多层的架构要好于单层的架构.
tensorflow2.0
上面都是基于tensorflow1.x时代的使用方式,现在介绍基于tensorflow2.0的方式,介绍的整体流程和上面都是一模一样的。
一.重要函数和类
这节主要就是说一下tensorflow里面在LSTM中比较常用的API了,毕竟是砖头,弄清楚肯定是有益处的.
这里先列一下
- tf.keras.layers.LSTM
- tf.keras.layers.LSTMCell
- tf.keras.layers.Bidirectional
- tf.sequence_mask()
- tf.boolean_mask()
可以看到相较于tensorflow1.x,tensorflow2.0对于LSTM的函数大大简化,
既然说到这里,那这里还说一个与词向量有关的常见函数,后面一并讲解.
- tf.nn.embedding_lookup()
这里只说最基本的够用的. 当然还有几个这里没有列出来的,可以在最开始列出来的文档参考,等到以后升到高阶,也许会用得到.
首先重点介绍tf.keras.layers.LSTM和tf.keras.layers.LSTMCell,他们之间的关系也很简单,都是LSTM的封装,前一个封装的更厉害,更方便,但是失去一些灵活性。后一个更加偏向于底层,没有那么方便,但是非常灵活。


