原文地址
教程开始的project
Getting Started
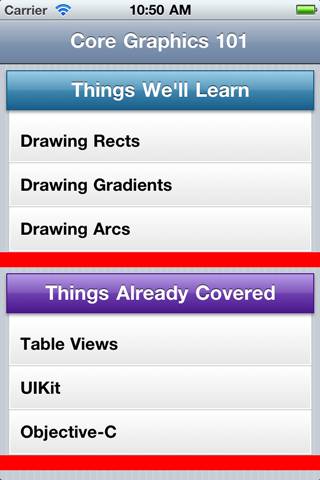
第一步,用15point高的View作为table view的footer,颜色是红色。创建一个新的view,命名为CustomFooter
添加如下code
-(void)drawRect:(CGRect)rect {
    CGContextRef context = UIGraphicsGetCurrentContext();
    CGContextSetFillColorWithColor(context, [UIColor redColor].CGColor);
    CGContextFillRect(context, rect);
}
切换到 CoolTableViewController.m做如下改变
// In import section#
import "CustomFooter.h"
// Add new methods
-(CGFloat) tableView:(UITableView *)tableView heightForFooterInSection:(NSInteger)section {
          return 15;
}
- (UIView *) tableView:(UITableView *)tableView viewForFooterInSection:(NSInteger)section {
          return [[CustomFooter alloc] init];
}
Run
Back to Business
记住下面几点:
- 在底部有一个平滑的圆角
- 有一个从light gray到darker gray的渐变
- 在边缘有一个白色的高亮
- 在圆弧曲线上有一个圆角
Creating Arcs – the Math
圆角是一种简单的曲线,是圆的一部分。上面的圆角是大圆顶部的一小部分。
如何用Core Graphics描述这个圆角呢?我们将适用CGContextAddArc这个API,你需要知道下面三个知识点
- 圆心
- 半径
- 曲线开始和结束的点
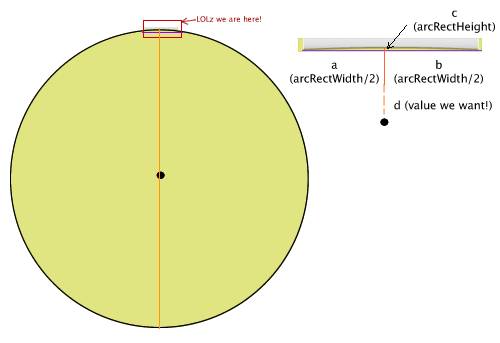
下面是你要画的曲线所在的矩形
公式
再回到我们的圆
计算d
// Just substituting...
CGFloat d = ((arcRectWidth/2) * (arcRectWidth/2)) / (arcRectHeight);
// Or more simply...
CGFloat d = pow(arcRectWidth, 2)/(4*arcRectHeight);
如果知道c和d,可以计算出半径
// Just substituting...
CGFloat radius = (arcRectHeight + (pow(arcRectWidth, 2)/(4*arcRectHeight)))/2;
// Or more simply...
CGFloat radius = (arcRectHeight/2) + (pow(arcRectWidth, 2)/(8*arcRectHeight));
如果你知道半径,很容易得到圆心
CGPoint arcCenter = CGPointMake(arcRectTopMiddleX, arcRectTopMiddleY - radius);
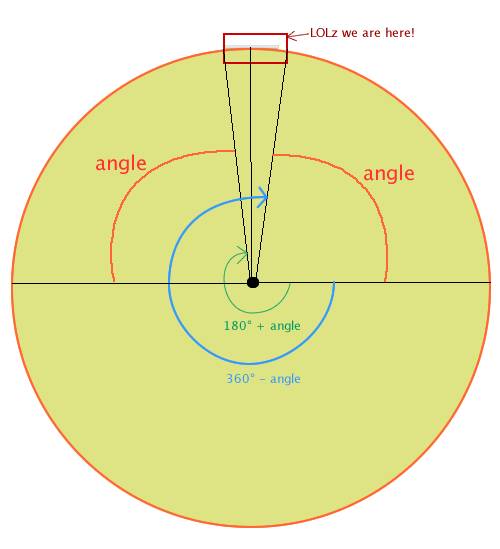
只要我们知道center point, radius, and arcRect,就能计算出开始和结束的角度
求余弦角angle
CGFloat angle = acos(arcRectWidth/(2*radius));
既然知道了余弦很简单能得出开始角和结束角
以上便是原理
Drawing Arcs and Creating Paths
打开Common.h添加如下code
static inline double radians (double degrees) { return degrees * M_PI/180; }
CGMutablePathRef createArcPathFromBottomOfRect(CGRect rect, CGFloat arcHeight);
添加一个方法,把角度转化成弧度
记住在Core Graphics中画图形分两步走,第一步定义path,第二步store或则fill你的path。
到目前为止你已经通过CGContextMoveToPoint,CGContextAddLineToPoint,CGContextAddRect简单的添加了路径。通过CGContextStrokePath,CGContextFillPath来store或者fill path。
你也可以通过CGContextFillRect同时画和填充路径。
但是现在,和直接添加路径不同的是,我们将会保存path在一个特殊的path variable。这将使重用路径更加的简单。就避免了一遍一遍的用相同的方法
这非常简单,用CGPathXXX替代CGContextXXX。
下面介绍用法,将下列code添加到Common.m
CGMutablePathRef createArcPathFromBottomOfRect(CGRect rect, CGFloat arcHeight)
{
    CGRect arcRect = CGRectMake(rect.origin.x, rect.origin.y + rect.size.height - arcHeight, rect.size.width, arcHeight);

    CGFloat arcRadius = (arcRect.size.height/2) + (pow(arcRect.size.width, 2) / (8*arcRect.size.height));
    CGPoint arcCenter = CGPointMake(arcRect.origin.x + arcRect.size.width/2, arcRect.origin.y + arcRadius);

    CGFloat angle = acos(arcRect.size.width / (2*arcRadius));
    CGFloat startAngle = radians(180) + angle;
    CGFloat endAngle = radians(360) - angle;

    CGMutablePathRef path = CGPathCreateMutable();
    CGPathAddArc(path, NULL, arcCenter.x, arcCenter.y, arcRadius, startAngle, endAngle, 0);
    CGPathAddLineToPoint(path, NULL, CGRectGetMaxX(rect), CGRectGetMinY(rect));
    CGPathAddLineToPoint(path, NULL, CGRectGetMinX(rect), CGRectGetMinY(rect));
    CGPathAddLineToPoint(path, NULL, CGRectGetMinX(rect), CGRectGetMaxY(rect));

    return path;
}
该方法通过传入的两个参数计算出arcRect,然后计算出半径,圆心,开始和结束的angle。下一步,创建一个path,path有arc和矩形边缘的line组成。
先创建一个可重用的path,CGPathCreateMutable。然后使用CGPathXXX替代CGContextXXX。
通过CGPathAddArc添加一个Arc,再通过划线来闭合路径。
在CustomFooter.m添加如下code
- (id)initWithFrame:(CGRect)frame
{
    self = [super initWithFrame:frame];
    if (self) {
        self.opaque = YES;
        self.backgroundColor = [UIColor clearColor];
    }
    return self;
}

-(void)drawRect:(CGRect)rect {
    CGContextRef context = UIGraphicsGetCurrentContext();

    UIColor * whiteColor = [UIColor colorWithRed:1.0 green:1.0 blue:1.0 alpha:1.0];
    UIColor * lightGrayColor = [UIColor colorWithRed:230.0/255.0 green:230.0/255.0 blue:230.0/255.0 alpha:1.0];
    UIColor * darkGrayColor = [UIColor colorWithRed:187.0/255.0 green:187.0/255.0 blue:187.0/255.0 alpha:1.0];
    UIColor * shadowColor = [UIColor colorWithRed:0.2 green:0.2 blue:0.2 alpha:0.5];

    CGFloat paperMargin = 9.0;
    CGRect paperRect = CGRectMake(self.bounds.origin.x+paperMargin, self.bounds.origin.y, self.bounds.size.width-paperMargin*2,  self.bounds.size.height);

    CGRect arcRect = paperRect;
    arcRect.size.height = 8;

    CGContextSaveGState(context);
    CGMutablePathRef arcPath = createArcPathFromBottomOfRect(arcRect, 4.0);
    CGContextAddPath(context, arcPath);
    CGContextClip(context);
    drawLinearGradient(context, paperRect, lightGrayColor.CGColor, darkGrayColor.CGColor);
    CGContextRestoreGState(context);

    CFRelease(arcPath);
}
把背景色设置为clear,可以在initWithFrame这个方法里面设置,因为designated method 所以在invokeinit会invokeinitWithFramemethod。


