Android Jetpack之Lifecycles + LiveData探索
目录
- 总览
- 类图关系
- 生命周期事件的分发
- 如何观察生命周期变化
- LiveData使用及原理分析
- 添加观察者
- 发送数据
- 总结
总览
实现一种可感知生命周期的观察者模式。在Activity或者Fragment中的生命周期回调函数中去发起事件,通知观察者。官方给出的最佳实践方案即LiveData。
类图关系
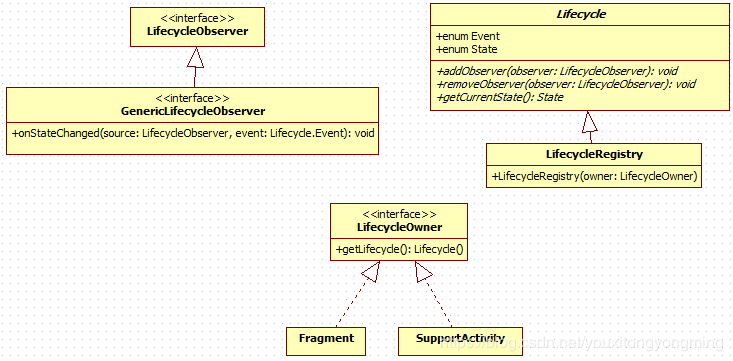
分为3个模块,Lifecycle、LifecycleOwner、LifecycleObserver:

先做一个全局的分析。LifecycleOwner即生命周期的持有者,系统中的实现就是Fragment和SupporActivityComponentActivity ,它们都持有一个LifecycleRegister对象,会在各个生命周期函数中去调用LifecycleRegister的相应Api发起生命周期变化的事件Lifecycle.Event,随即计算出下一步的状态Lifecycle.State。
public enum Event {
/**
* Constant for onCreate event of the {@link LifecycleOwner}.
*/
ON_CREATE,
/**
* Constant for onStart event of the {@link LifecycleOwner}.
*/
ON_START,
/**
* Constant for onResume event of the {@link LifecycleOwner}.
*/
ON_RESUME,
/**
* Constant for onPause event of the {@link LifecycleOwner}.
*/
ON_PAUSE,
/**
* Constant for onStop event of the {@link LifecycleOwner}.
*/
ON_STOP,
/**
* Constant for onDestroy event of the {@link LifecycleOwner}.
*/
ON_DESTROY,
/**
* An {@link Event Event} constant that can be used to match all events.
*/
ON_ANY
}
/**
* Lifecycle states. You can consider the states as the nodes in a graph and
* {@link Event}s as the edges between these nodes.
*/
@SuppressWarnings("WeakerAccess")
public enum State {
/**
* Destroyed state for a LifecycleOwner. After this event, this Lifecycle will not dispatch
* any more events. For instance, for an {@link android.app.Activity}, this state is reached
* right before Activity's {@link android.app.Activity#onDestroy() onDestroy} call.
*/
DESTROYED,
/**
* Initialized state for a LifecycleOwner. For an {@link android.app.Activity}, this is
* the state when it is constructed but has not received
* {@link android.app.Activity#onCreate(android.os.Bundle) onCreate} yet.
*/
INITIALIZED,
/**
* Created state for a LifecycleOwner. For an {@link android.app.Activity}, this state
* is reached in two cases:
*
* - after {@link android.app.Activity#onCreate(android.os.Bundle) onCreate} call;
*
- right before {@link android.app.Activity#onStop() onStop} call.
*
*/
CREATED,
/**
* Started state for a LifecycleOwner. For an {@link android.app.Activity}, this state
* is reached in two cases:
*
* - after {@link android.app.Activity#onStart() onStart} call;
*
- right before {@link android.app.Activity#onPause() onPause} call.
*
*/
STARTED,
/**
* Resumed state for a LifecycleOwner. For an {@link android.app.Activity}, this state
* is reached after {@link android.app.Activity#onResume() onResume} is called.
*/
RESUMED;
/**
* Compares if this State is greater or equal to the given {@code state}.
*
* @param state State to compare with
* @return true if this State is greater or equal to the given {@code state}
*/
public boolean isAtLeast(@NonNull State state) {
return compareTo(state) >= 0;
}
}
下边贴一张Goolge官方的图,把event比作边,state比作点。这样在生命周期发生变化时发出对应的事件,然后再根据当前的状态确定下一个变化的状态。

LifecycleRegistry中持有所有的LifecycleObserver对象,当收到生命周期变化的事件后就会尝试通知所有的LifecycleObserver,最终会回调LifecycleObserver.onStateChanged(LifecycleOwner source, Lifecycle.Event event)函数。
生命周期事件的分发
- ComponentActivity中进行分发
protected void onCreate(@Nullable Bundle savedInstanceState) {
        super.onCreate(savedInstanceState);
        mSavedStateRegistryController.performRestore(savedInstanceState);
        ReportFragment.injectIfNeededIn(this);
        if (mContentLayoutId != 0) {
            setContentView(mContentLayoutId);
        }
    }
在onCreate方法中,调用了ReportFragment.injectIfNeededIn(this), 生命周期事件的分发就是通过这个ReportFragment来进行代理的。injectIfNeededIn方法很简单就是向Activity中添加fragment。
public static void injectIfNeededIn(Activity activity) {
        android.app.FragmentManager manager = activity.getFragmentManager();
        if (manager.findFragmentByTag(REPORT_FRAGMENT_TAG) == null) {
            manager.beginTransaction().add(new ReportFragment(), REPORT_FRAGMENT_TAG).commit();
            manager.executePendingTransactions();
        }
    }
接下来看ReportFragment到底是如何分发生命周期事件的
public class ReportFragment extends Fragment {
@Override
    public void onActivityCreated(Bundle savedInstanceState) {
        super.onActivityCreated(savedInstanceState);
        dispatchCreate(mProcessListener);
        dispatch(Lifecycle.Event.ON_CREATE);
    }

    @Override
    public void onStart() {
        super.onStart();
        dispatchStart(mProcessListener);
        dispatch(Lifecycle.Event.ON_START);
    }

    @Override
    public void onResume() {
        super.onResume();
        dispatchResume(mProcessListener);
        dispatch(Lifecycle.Event.ON_RESUME);
    }

    @Override
    public void onPause() {
        super.onPause();
        dispatch(Lifecycle.Event.ON_PAUSE);
    }

    @Override
    public void onStop() {
        super.onStop();
        dispatch(Lifecycle.Event.ON_STOP);
    }

    @Override
    public void onDestroy() {
        super.onDestroy();
        dispatch(Lifecycle.Event.ON_DESTROY);
        // just want to be sure that we won't leak reference to an activity
        mProcessListener = null;
    }

    private void dispatch(Lifecycle.Event event) {
        Activity activity = getActivity();
        if (activity instanceof LifecycleOwner) {
            Lifecycle lifecycle = ((LifecycleOwner) activity).getLifecycle();
            if (lifecycle instanceof LifecycleRegistry) {
                ((LifecycleRegistry) lifecycle).handleLifecycleEvent(event);
            }
        }
    }
}
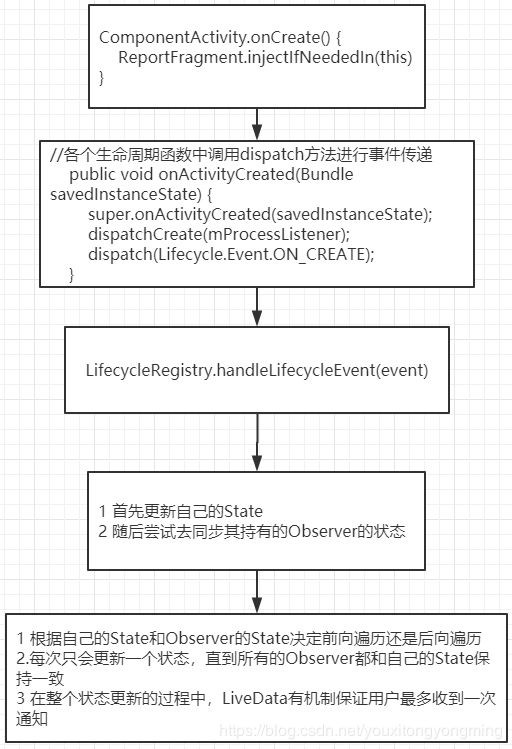
我们可以看到在各个生命周期函数中都调用了dispatch方法发起对应生命周期的事件。而dispatch方法也很简单,最终回调了LifecycleRegistry的handleLifecycleEvent方法。
public void handleLifecycleEvent(@NonNull Lifecycle.Event event) {
        //根据事件去计算下一个状态
        State next = getStateAfter(event);
        moveToState(next);
}
//这个方法对照着上边那张生命周期变化的图就可以很好理解
static State getStateAfter(Event event) {
        switch (event) {
            case ON_CREATE:
            case ON_STOP:
                return CREATED;
            case ON_START:
            case ON_PAUSE:
                return STARTED;
            case ON_RESUME:
                return RESUMED;
            case ON_DESTROY:
                return DESTROYED;
            case ON_ANY:
                break;
        }
        throw new IllegalArgumentException("Unexpected event value " + event);
}


private void moveToState(State next) {
        if (mState == next) {
            return;
        }
        //更新状态
        mState = next;
        mHandlingEvent = true;
        //同步LifeCycleRegistry中的Observer的状态
        sync();
        mHandlingEvent = false;
}
关键代码sync()。
private void sync() {
        LifecycleOwner lifecycleOwner = mLifecycleOwner.get();
        while (!isSynced()) {
            //当前LifeCycleRegistry的状态小于最早添加的observer状态,就进行后向遍历
            //由于状态State是一个枚举变量,所以在前边定义的状态就“小于”后边定义的状态
            if (mState.compareTo(mObserverMap.eldest().getValue().mState) < 0) {
                backwardPass(lifecycleOwner);
            }
            Entry<LifecycleObserver, ObserverWithState> newest = mObserverMap.newest();
            //当前LifeCycleRegistry的状态大于最晚添加的observer状态,就进行前向遍历
            if (newest != null
                    && mState.compareTo(newest.getValue().mState) > 0) {
                forwardPass(lifecycleOwner);
            }
        }

}
前向遍历和后向遍历逻辑差不多,这里只分析一个。forwardPass 每次只能更新一个状态,不能跳跃的进行变化。
比如当前LifecycleRegistry的state为RESUMED,observer的state为INITIALIZED,那么变换的过程只能是INITIALIZED -> CREATED -> STARTED -> RESUMED。
最终经过3次变化才能和LifecycleRegistry状态保持一致。LiveData中对状态变化还做了额外的处理,保证了在上诉过程中最多通知用户一次,这在后边会进行分析。
private void forwardPass(LifecycleOwner lifecycleOwner) {
        //保留核心代码
        Iterator<Entry<LifecycleObserver, ObserverWithState>> ascendingIterator =
                mObserverMap.iteratorWithAdditions();
        while (ascendingIterator.hasNext()) {
            Entry<LifecycleObserver, ObserverWithState> entry = ascendingIterator.next();
            ObserverWithState observer = entry.getValue();
            while ((observer.mState.compareTo(mState) < 0) {
                observer.dispatchEvent(lifecycleOwner, upEvent(observer.mState));
            }
        }
}

void dispatchEvent(LifecycleOwner owner, Event event) {
            State newState = getStateAfter(event);
            mState = min(mState, newState);
            //通知LiveData中管理的observer,最后会回调用户自己添加的observer.onchanged
            mLifecycleObserver.onStateChanged(owner, event);
            mState = newState;
}

//用于计算从当前状态变换到后一个状态需要的事件
private static Event upEvent(State state) {
        switch (state) {
            case INITIALIZED:
            case DESTROYED:
                return ON_CREATE;
            case CREATED:
                return ON_START;
            case STARTED:
                return ON_RESUME;
            case RESUMED:
                throw new IllegalArgumentException();
        }
        throw new IllegalArgumentException("Unexpected state value " + state);
}
用一个流程图来总结生命周期事件的传递流程:

这里补充分析一下LiveData是怎么在生命周期状态变换中保证最多一次通知的。对于LiveData内部的LifecycleBoundObserver来说,它只有两种状态:激活(mActive = true)或者非激活(mActive = false),系统默认的实现是只有LifecycleOwner处于STARTED或者RESUMED两个状态时mActive才为true,了解这个原理后对照下边的源码就很容易理解为什么能保证最多一次通知了:
void activeStateChanged(boolean newActive) {
	if (newActive == mActive) {
		return;
	}
	mActive = newActive;
	boolean wasInactive = LiveData.this.mActiveCount == 0;
	LiveData.this.mActiveCount += mActive ? 1 : -1;
	if (wasInactive && mActive) {
		onActive();
	}
	if (LiveData.this.mActiveCount == 0 && !mActive) {
		onInactive();
	}
	if (mActive) {
		dispatchingValue(this);
	}
}
关键就是第一个if语句的判断,只有激活状态改变才会执行后续的逻辑。举个例子:
LifecycleOwner从CREATED —ON_START—> STARTED —ON_RESUME—> RESUMED,经历了两次状态的改变,但对于LifecycleBoundObserver来说就变化了一次,CREATED —ON_START—> STARTED时,从mActive = false -> mActive = true,后续STARTED —ON_RESUME—> RESUMED对于LifecycleBoundObserver来说都处于激活状态,所以就不会再执行后续逻辑进行通知了。
2. Fragment中的分发
大致流程和上边一样,主要看分发的入口,直接在自己的生命周期函数中进行回调
void performCreate(Bundle savedInstanceState) {
        mLifecycleRegistry.handleLifecycleEvent(Lifecycle.Event.ON_CREATE);
}
void performStart() {
        if (mView != null) {
            mViewLifecycleRegistry.handleLifecycleEvent(Lifecycle.Event.ON_START);
        }
}
如何观察生命周期变化
- 方式1(官方推荐):通过注解进行监听
public class MyActivity extends AppCompatActivity {
    @Override
    protected void onCreate(@Nullable Bundle savedInstanceState) {
        super.onCreate(savedInstanceState);
        getLifecycle().addObserver(new LifecycleObserver() {
            @OnLifecycleEvent(Lifecycle.Event.ON_RESUME)
            public void onResume() {
                Log.d("lifecycle", "event ->" + Lifecycle.Event.ON_RESUME);
            }

            @OnLifecycleEvent(Lifecycle.Event.ON_PAUSE)
            public void onPause() {
                Log.d("lifecycle", "event ->" + Lifecycle.Event.ON_PAUSE);
            }
        });
    }
}
- 方式2(随着androidx库的推进,该类有可能废弃):通过实现LifecycleEventObserver接口来监听
public class Activity2 extends AppCompatActivity {
    @Override
    protected void onCreate(@Nullable Bundle savedInstanceState) {
        super.onCreate(savedInstanceState);
        getLifecycle().addObserver(
            (LifecycleEventObserver) (source, event) -> Log.d("lifecycle" ,"event ->" + event)
        );
    }
}
- 方式3:通过LiveData来间接进行观察,生命周期的变化会被LiveData内部进行观察,不会直接回调给用户。LiveData只会把”可见“状态下的事件变化回调给用户。基于此实现,LiveData才能够只在Activity/Fragment处于可见状态时通知用户去刷新数据。
LiveData使用及原理分析
添加观察者
class NameActivity : AppCompatActivity() {
    override fun onCreate(savedInstanceState: Bundle?) {
        super.onCreate(savedInstanceState)
        val liveData = MutableLiveData<String>()
        // Create the observer which updates the UI.
        val nameObserver = Observer<String> { newName ->
            // Update the UI, in this case, a TextView.
            mNameTextView.text = newName
        }
        // Observe the LiveData, passing in this activity as the LifecycleOwner and the observer.
        liveData.observe(this, nameObserver)
    }
}
关键代码liveData.observe(this, nameObserver),跟进一下源码:
private SafeIterableMap<Observer<T>, ObserverWrapper> mObservers =
            new SafeIterableMap<>();
@MainThread
public void observe(@NonNull LifecycleOwner owner, @NonNull Observer<T> observer) {
    if (owner.getLifecycle().getCurrentState() == DESTROYED) {
        // ignore
        return;
    }
    LifecycleBoundObserver wrapper = new LifecycleBoundObserver(owner, observer);
    ObserverWrapper existing = mObservers.putIfAbsent(observer, wrapper);
    //同一个observer只能绑定一个lifecycleOwner
    if (existing != null && !existing.isAttachedTo(owner)) {
        throw new IllegalArgumentException("Cannot add the same observer"
                + " with different lifecycles");
    }
    if (existing != null) {
        return;
    }
    owner.getLifecycle().addObserver(wrapper);
}
对用户传入的 Observer
public interface Observer<T> {
    void onChanged(@Nullable T t);
}
Observer
- LifecycleOwner mOwner //生命周期的持有者,需要通过它来判断当前的状态,来决定是否通知用户
- Observer mObserver //外部传入的观察者,通过它来对用户进行回调
- boolean mActive //记录当前是否处于激活状态
- int mLastVersion //初始值为-1,通过它和LiveData内部的mLastVersion进行对比,来决定是否要通知用户。该变量使得LiveData默认具有粘性事件的特性。
LifecycleBoundObserver源码如下:
class LifecycleBoundObserver extends ObserverWrapper implements GenericLifecycleObserver {
	  @NonNull final LifecycleOwner mOwner;

	  LifecycleBoundObserver(@NonNull LifecycleOwner owner, Observer<T> observer) {
	      super(observer);
	      mOwner = owner;
	  }
	  //实现GenericLifecycleObserver
	  @Override
	  public void onStateChanged(LifecycleOwner source, Lifecycle.Event event) {
	      if (mOwner.getLifecycle().getCurrentState() == DESTROYED) {
	          removeObserver(mObserver);
	          return;
	      }
	      activeStateChanged(shouldBeActive());
	  }
	  //据此来决定是否通知用户
	  @Override
	  boolean shouldBeActive() {
	      return mOwner.getLifecycle().getCurrentState().isAtLeast(STARTED);
	  }

	  @Override
	  boolean isAttachedTo(LifecycleOwner owner) {
	      return mOwner == owner;
	  }

	  @Override
	  void detachObserver() {
	      mOwner.getLifecycle().removeObserver(this);
	  }
}
上边分析过,生命周期的变化,最终会回调 GenericLifecycleObserver.onStateChanged() 去通知观察者,由代码可知LivaData中事件的处理由 activeStateChanged() 函数来实现。这里先不看它的实现,后边调用到的时候再进行分析。
回到关键代码的调用owner.getLifecycle().addObserver(wrapper)。getLifecycle()就是返回了LifecycleRegistry对象,看一下它的addObserver到底做了什么:
@Override
    public void addObserver(@NonNull LifecycleObserver observer) {
        State initialState = mState == DESTROYED ? DESTROYED : INITIALIZED;
        ObserverWithState statefulObserver = new ObserverWithState(observer, initialState);
        ObserverWithState previous = mObserverMap.putIfAbsent(observer, statefulObserver);
        //省略掉事件分发的逻辑,后边分析
    }
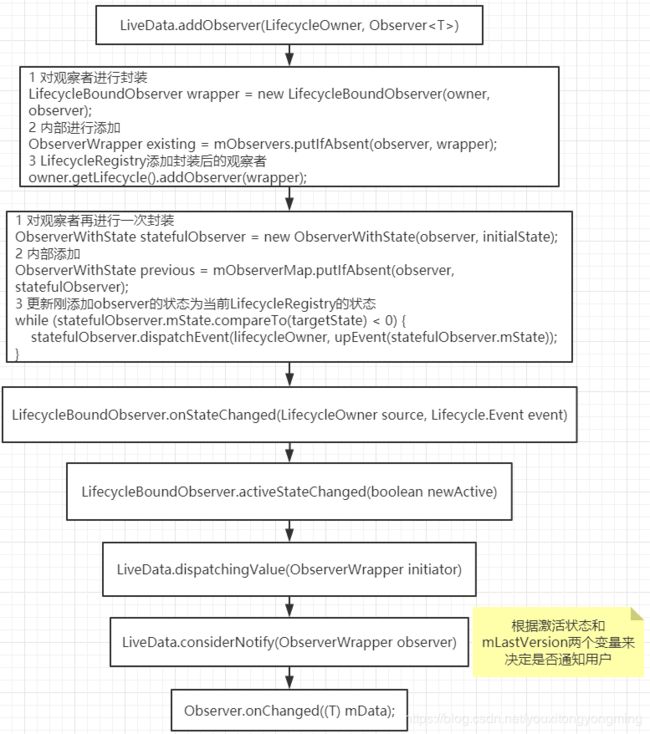
这里又出现了一个 ObserverWithState类 ,又对传入的observe再做了一次封装!下边给出一张图,帮助大家分析:

蓝色区域是暴露给用户的观察者observer1,它只有一个onChanged回调函数。黄色区域是LiveData中的一个类,在调用LiveData.addObserver(observer1)时,对observer1进行了一个封装->observer2:LifecycleBoundObserver,主要是实现了生命周期事件的回调函数onStateChanged()。红色区域是LifecycleRegistry中的一个类,在调用LifecycleRegistry.addObserver(observer2)时,对observer2进行了封装->observer3:ObserverWithState,主要包含了状态变量State,还有事件的分发函数dispatchEvent(),看一下ObserverWithState的源码:
static class ObserverWithState {
     //初始状态为 INITIALIZED
     State mState;
     GenericLifecycleObserver mLifecycleObserver;

     ObserverWithState(LifecycleObserver observer, State initialState) {
         mLifecycleObserver = Lifecycling.getCallback(observer);
         mState = initialState;
     }

     void dispatchEvent(LifecycleOwner owner, Event event) {
         State newState = getStateAfter(event);
         mState = min(mState, newState);
         mLifecycleObserver.onStateChanged(owner, event);
         mState = newState;
     }
}
这个dispatchEvent函数是不是很眼熟,没错,就是生命周期变化后会回调的。
弄明白了这几层Observer的关系之后,回到LifecycleRegistry.addObserver()函数,继续分析其后的逻辑:
@Override
public void addObserver(@NonNull LifecycleObserver observer) {
     //保留核心代码
     State initialState = mState == DESTROYED ? DESTROYED : INITIALIZED;
     ObserverWithState statefulObserver = new ObserverWithState(observer, initialState);
     ObserverWithState previous = mObserverMap.putIfAbsent(observer, statefulObserver);
     //一般情况下,对于刚添加进来的observer,targetState都为当前LifecycleRegistry的State
     State targetState = calculateTargetState(observer);

     while (statefulObserver.mState.compareTo(targetState) < 0) {
         pushParentState(statefulObserver.mState);
         statefulObserver.dispatchEvent(lifecycleOwner, upEvent(statefulObserver.mState));
         popParentState();
         // mState / subling may have been changed recalculate
         targetState = calculateTargetState(observer);
     }
 }
首先对Observer又进行了一层封装,然后添加到内部的一个map中。随后计算一个targetState,一般情况下,对于刚添加进来的observer,targetState都为当前LifecycleRegistry的State。也就是说,对刚添加的observer,如果它的状态”小于“当前LifecycleOwner的状态,那么就会进行状态的更新,以保持状态的一致性。具体的通知,关键的代码就是while循环当中的statefulObserver.dispatchEvent(lifecycleOwner, upEvent(statefulObserver.mState)),上边分析过这个方法,其内部还是调用了GenericLifecycleObserver.onStateChanged(),这是一个接口方法,上边有提到在LiveData中的实现如下:
public void onStateChanged(LifecycleOwner source, Lifecycle.Event event) {
      if (mOwner.getLifecycle().getCurrentState() == DESTROYED) {
           removeObserver(mObserver);
           return;
      }
      activeStateChanged(shouldBeActive());
}

boolean shouldBeActive() {
    return mOwner.getLifecycle().getCurrentState().isAtLeast(STARTED);
}

void activeStateChanged(boolean newActive) {
      if (newActive == mActive) {
          return;
      }
      // owner
      mActive = newActive;
      boolean wasInactive = LiveData.this.mActiveCount == 0;
      LiveData.this.mActiveCount += mActive ? 1 : -1;
      if (wasInactive && mActive) {
          //当active状态的观察者数量从0变为1时(从无到有)
          onActive();
      }
      if (LiveData.this.mActiveCount == 0 && !mActive) {
          //当active状态的观察者数量从1变为0(从有变无,这里的无是指
          //observer is not active)
          onInactive();
      }
      if (mActive) {
          dispatchingValue(this);
      }
  }
onActive()和onInactive()默认实现为空方法,可以通过继承LiveData去重写它们。这里的关键代码是dispatchingValue(this),请记住这个this(注意这里的是指LiveData.LifecycleBoundObserver)。下面贴出dispatchingValue(this):
private void dispatchingValue(@Nullable ObserverWrapper initiator) {
    if (mDispatchingValue) {
        mDispatchInvalidated = true;
        return;
    }
    mDispatchingValue = true;
    do {
        mDispatchInvalidated = false;
        if (initiator != null) {
            considerNotify(initiator);
            initiator = null;
        } else {
            for (Iterator<Map.Entry<Observer<T>, ObserverWrapper>> iterator =
                    mObservers.iteratorWithAdditions(); iterator.hasNext(); ) {
                considerNotify(iterator.next().getValue());
                if (mDispatchInvalidated) {
                    break;
                }
            }
        }
    } while (mDispatchInvalidated);
    mDispatchingValue = false;
}
关键代码就是considerNotify()。initator如果不为空,就只通知当前这一个ObserverWrapper 。如果为空,那么就会遍历所有的ObserverWrapper ,依次进行通知。具体dispatchingValue的调用情况,这里给大家总结了三种情形:
- 用户调用LiveData.observe()时。在添加观察者的时候,一般情况会调用
ObserverWithState.dispatchEvent(LifecycleOwner owner, Event event)最后调用LiveData.dispatchingValue(this)进行通知。 - LifecycleOwner的生命周期发生变化时。此时会发起对应的Event
ObserverWithState.dispatchEvent(LifecycleOwner owner, Event event),然后调用LiveData.dispatchingValue(this),通知当前的Observer。(注意上下文,这里的dispatchingValue是LiveData里的函数,但是当生命周期发生变化时,在LifecycleRegistry内部还是会遍历所有的Observer去通知它们,需要和下边第3中情况区分开) - 用户手动调用LiveData.setValue()/LiveData.postValue(),此时会调用
dispatchingValue(null),通知所有的Observer。
最后来看看considerNotify()函数的源码:
private void considerNotify(ObserverWrapper observer) {
     if (!observer.mActive) {
         return;
     }
     if (observer.mLastVersion >= mVersion) {
         return;
     }
     observer.mLastVersion = mVersion;
     //noinspection unchecked
     observer.mObserver.onChanged((T) mData);
 }
这里有两个关键的判断逻辑
- 判断是否处于激活状态
- observer.mLastVersion = mVersion //mVersion是LiveData内部的变量,初始值为-1,每次调用setValue或者postValue时该变量会加1
只有当处于激活状态且有数据发送过,最后才会调用observer.mObserver.onChanged((T) mData)去通知用户。
下边给出LiveData添加观察者的流程图:

发送数据
LiveData发送数据就相对简单很对,系统提供了两个方法
- 主线程调用:setValue(T value)
@MainThread
    protected void setValue(T value) {
        assertMainThread("setValue");
        mVersion++;
        mData = value;
        dispatchingValue(null);
}
这里dispatchingValue传入的是null,那么就会遍历LiveData中所有的observer进行通知
- 子线程调用:postValue(T value)
protected void postValue(T value) {
        boolean postTask;
        synchronized (mDataLock) {
            postTask = mPendingData == NOT_SET;
            mPendingData = value;
        }
        if (!postTask) {
            return;
        }
        ArchTaskExecutor.getInstance().postToMainThread(mPostValueRunnable);
}
首先把mPendingData设置为待改变了量value,随后ArchTaskExecutor.getInstance().postToMainThread(mPostValueRunnable)通过handler发送一个Message到主线程的MessageQueue中,mPostValueRunnable实现了具体的更新操作:
private final Runnable mPostValueRunnable = new Runnable() {
        @Override
        public void run() {
            Object newValue;
            synchronized (mDataLock) {
                newValue = mPendingData;
                mPendingData = NOT_SET;
            }
            //noinspection unchecked
            setValue((T) newValue);
        }
};
可以看到,最后还是调用了setValue((T) newValue)方法。由于采用了同步操作,如果多次调用postValue,那么mPendingData只会记录最后一次设置的值,而且主线程的MessageQueue中最多只会存在一个刷新数据的消息(持有mPostValueRunnable的Message)
总结
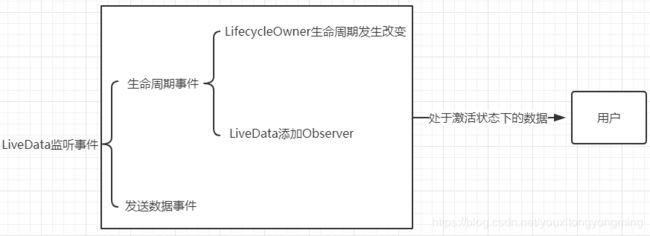
LiveData能够观察两类事件:
- 生命周期事件
- 数据改变事件
而用户真正关心的是数据改变事件,通过LiveData的内部逻辑帮我们简化了复杂的判断逻辑。

到此,Lifecycle和LiveData整个流程就分析完了,如有理解不当的地方,欢迎大家一起交流学习!