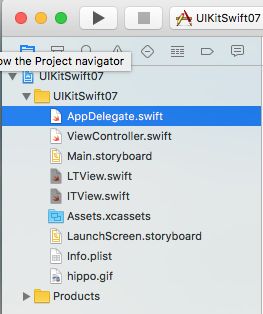
AppDelegate.swift代码如下:
import UIKit
@UIApplicationMain
class AppDelegate: UIResponder, UIApplicationDelegate {
var window: UIWindow?
func application(_ application: UIApplication, didFinishLaunchingWithOptions launchOptions: [UIApplicationLaunchOptionsKey: Any]?) -> Bool {
self.window = UIWindow(frame: UIScreen.main.bounds)
self.window?.backgroundColor = #colorLiteral(red: 1, green: 1, blue: 1, alpha: 1)
self.window?.makeKeyAndVisible()
self.window?.rootViewController = UIViewController()
let aLTView = LTView(frame: CGRect(x: 7, y: 100, width: 400, height: 50))
aLTView.lable.text = "账号"
aLTView.textField.text = "请输入账号"
self.window?.addSubview(aLTView)
let aLTView2 = LTView(frame: CGRect(x: 7, y: 170, width: 400, height: 50))
aLTView2.lable.text = "密码"
aLTView2.textField.placeholder = "请输入密码"
aLTView2.textField.isSecureTextEntry = true
self.window?.addSubview(aLTView2)
let aitView = ITView(frame: CGRect(x: 7, y: 250, width: 400, height: 40))
//根据图片名初始化图片
//使用这种方法图片会读取到内存,占内存空间,如果多次使用同一张图片,这种方式的加载数度快
let image = UIImage(named: "hippo.gif")
//根据文件路径初始化图片
//Bundle.main.path根据资源名称及资源后缀获取资源路径
//使用这种方法不会读到内存中,节省内存空间,每次加载都要按照这个路径去找这张图片
let aimage = UIImage(contentsOfFile: Bundle.main.path(forResource: "hippo", ofType: "gif")!)
aitView.imageView.image = image
aitView.textField.placeholder = "请选择图片"
self.window?.addSubview(aitView)
return true
}
LTView.swift代码如下:
import UIKit
//自定义控件LTView
class LTView: UIView {
//添加lable属性
var lable:UILabel!
//添加textField属性
var textField:UITextField!
override init(frame:CGRect){
//调用父类对这个方法的实现
super.init(frame: frame)
//调用布局子视图的方法
self.setupSubView()
}
//写一个布局子视图
func setupSubView() {
//初始化这两个属性lable和textField
self.lable = UILabel(frame: CGRect(x: 0, y: 0, width: self.frame.size.width * 0.2, height: self.frame.size.height))
self.lable.backgroundColor = #colorLiteral(red: 0.9764705896, green: 0.850980401, blue: 0.5490196347, alpha: 1)
//文字居中显示
self.lable.textAlignment = .center
self.lable.layer.cornerRadius = 5
self.lable.clipsToBounds = true
self.addSubview(self.lable)
self.textField = UITextField(frame: CGRect(x: self.frame.size.width*0.2, y: 0, width: self.frame.size.width*0.8, height: self.frame.size.height))
self.textField.backgroundColor = #colorLiteral(red: 0.721568644, green: 0.8862745166, blue: 0.5921568871, alpha: 1)
self.textField.borderStyle = .roundedRect
self.addSubview(textField)
}
required init?(coder aDecoder: NSCoder) {
fatalError("init(coder:) has not been implemented")
}
}
ITView.swift代码如下:
import UIKit
//自定义控件ITView
class ITView: UIView {
//UIImageView 和 UITextfield
//懒加载:好处1:可以实现代码块的分割,让代码看起来更有条理性 好处2:懒加载创建的属性,没有使用的时候是不会占用内存的,只有使用的时候才去申请内存
// lazy var 属性名: 属性类型 = {
// 属性get方法
// return 返回一个对象
// }()
lazy var imageView: UIImageView = {
let aimageView = UIImageView(frame: CGRect(x: 0, y: 0, width: self.frame.size.width * 0.2, height: self.frame.size.height))
aimageView.backgroundColor = UIColor.red
return aimageView
}()
lazy var textField: UITextField = {
let atextField = UITextField(frame: CGRect(x: self.frame.size.width * 0.2, y: 0, width: self.frame.size.width * 0.8, height: self
.frame.size.height))
atextField.backgroundColor = UIColor.green
atextField.borderStyle = .roundedRect
return atextField
}()
override init(frame:CGRect) {
super.init(frame: frame)
//把这两个控件添加到父视图上
self.addSubview(self.imageView)
self.addSubview(self.textField)
}
required init?(coder aDecoder: NSCoder) {
fatalError("init(coder:) has not been implemented")
}
}
