树莓派安装开源项目——wukong_robot和魔镜结合 个人经验总结
首先安装树莓派镜像
系统:windows10
工具:SD卡、读卡器、树莓派3b+、SD卡格式化工具、win32DiskImager、Raspbian系统镜像、Xshell(ssh工具)
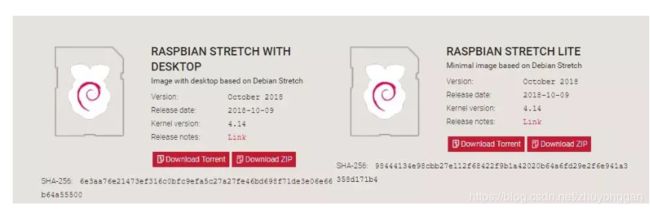
镜像下载可选用官网 https://www.raspberrypi.org/downloads/
后续镜像烧录与初始化修改 ,可参考多数博客基本内容,我个人参考的是
https://www.jianshu.com/p/467335f07e05
这篇文章写的比较详细。
#2 树莓派换国内源
树莓派系统默认使用nano做为编辑器,修改完成后使用ctrl+x退出,退出时会提示是否保存文件, 按Y即可
sudo nano /etc/apt/sources.list

deb http://mirrors.tuna.tsinghua.edu.cn/raspbian/raspbian/ buster main contrib non-free rpi
deb-src http://mirrors.tuna.tsinghua.edu.cn/raspbian/raspbian/ buster main contrib non-free rpi
sudo nano /etc/apt/sources.list.d/raspi.list
用#号注释掉原本内容替换以下国内源
deb http://mirror.tuna.tsinghua.edu.cn/raspberrypi/ buster main ui
deb-src http://mirror.tuna.tsinghua.edu.cn/raspberrypi/ buster main ui
此外,利用"raspi-config"指令可以修改内存容量和音频控制信号等
创建wukong-robot
可以直接参考官网的安装手册,已经介绍的十分详细
https://wukong.hahack.com/#/mic-choices?id=respeaker-2-mics-pi-hat
个人推荐采用手动安装的方式
但是在更新库时候,我遇到了问题pip3 install --upgrade -r requirements.txt 总是报错error

或者如下图
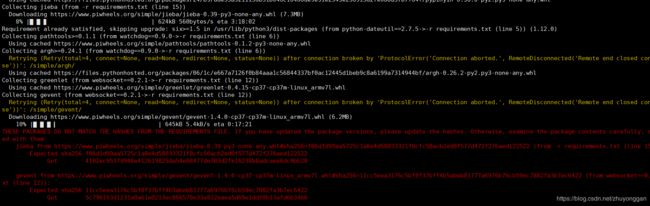
又或者是read time out 。最开始我注意加上必要条件如下,还是不好使
pip3 --default-timeout=500 install --upgrade -r requirements.txt -i https://pypi.tuna.tsinghua.edu.cn/simple
后来发现是jieba和genvent两个库文件 的 pip3库国内源没有,下载过慢,所以,直接去官网下载whl文件,然后手动安装解决问题。
后续安装respeaker 有出现黑屏现象,目前未找到合适方案,后续发现的话,再更新。
此处问题找到了,是因为之前用的镜像不是最新的树莓派镜像,更新到2019年9月份之后的镜像才行,因为安respeaker的驱动会改变linux的kernel,如果不是最新的版本,会被声卡的驱动覆盖,从而干扰使用。
最后补充一个api的key和设置方法
百度FM
baidufm:
channel: 21
天气
使用心知天气的接口
https://www.seniverse.com/
weather:
enable: ture
key: ‘24qbvr1mjsnukavo’
安装 wukong_itrobot插件
地址如下
https://github.com/wzpan/wukong-itchat
git之后 用
pip3 install -r requirements.txt
更新驱动就可以使用微信控制机器人
墨镜
安装和使用主要参考https://blog.seasonseason.top/2019/11/20/MagicMirror1.0/#%E4%BB%80%E4%B9%88%E6%98%AFMagicMirror
内容比较详细,尤其是开机自启和第三方模块的应用比较完善。
感谢大佬的带路。少走很多弯路。
在配置第三方库的天气库时需要使用openweather的api,要去注册,获得apikey。位置id的话要去官网查询http://bulk.openweathermap.org
无法科学上网的小伙伴可以先拿去顶一下 config: {
location: “Zhengzhou”,
locationID: “1784658”, //ID from http://bulk.openweathermap.org/sample/city.list.json.gz; unzip the gz file and find your city
appid: “12b2817fbec86915a6e9b4dbbd3d9036”
}

开机自启动方式
终端下输入并回车新建脚本文件 start.sh
nano start.sh
在里面输入:
#!/bin/sh
cd /home/pi/MagicMirror
npm start &
python3 /home/pi/wukong-robot/wukong.py&
保存退出,终端输入:
⚫ chmod 777 start.sh
终端输入:
⚫ sudo nano /etc/rc.local
在打开的文本中找到 exit 0,在此之前添加的代码在启动时都会被执行,在
exit 0 之前添加一行代码:
su pi -c “exec /home/pi/start.sh”
保存退出,重启,就能够开机自启了,需要退出的话 Ctrl+Q
遇到的问题
问题描述如下,在git clone某个第三方库和npm install 安装之后,npm start 启动,显示屏黑屏,打印输出说,没有node—helper/index.js,据说是安装第三方时路径丢失
if you run npm install in a module folder with no package.json, a side effect is that the MM shipped modules/node_modules/node_helper/index.js is erased, and now nothing (with node helper.js) will run, and MM goes black screen…
without knowledge of git, github, etc, there is no recovery of this required module…
版本是
happens on 2.8.0
去github找到方法:添加路径回去
git checkout modules/node_modules/node_helper/index.js